使用echarts折线图拖拽点及加点功能实现
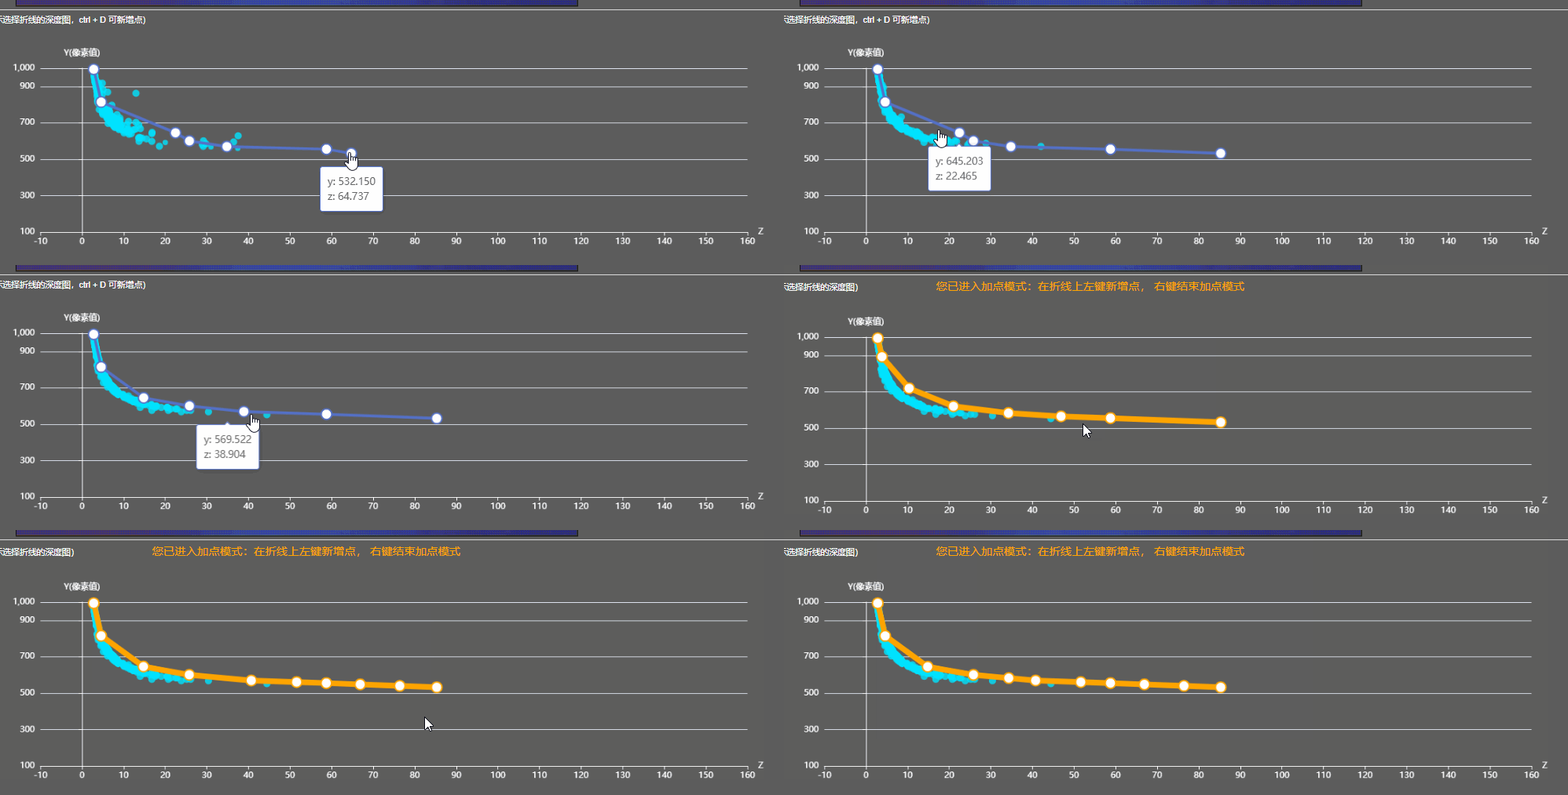
最近在实现一个需求,需要改造echarts的折线图,在其基础上实现点的拖拽及点击操作,效果如下:

实现方案
拖拽点
这个方法网上有说,原理:就是在折线的点位置上新增对应的拖拽点,并把拖拽点覆盖在原点上面,设置其visible为false,做到以假乱真的效果。
      // 初始化echarts
      let sideView = this.$refs.sideView;
      if (!this.chart) {
        this.chart = echarts.init(sideView);
        this.chart.setOption(this.option);

        this.chart.getZr().on('click', (params) => {
          this.lineClickHandler(params)
        })

        this.chart.on('dataZoom', (params) => {
          this.getDragedPointer()
        })
      }
 // 新增图形:透明的可操作的点
            self.chart.setOption({
              graphic: data.map((item, dataIndex) => {
                // 获取对应的物理像素点
                let positionPoint = self.chart.convertToPixel({ seriesIndex: 0 }, item);
                // 记录原始的点信息 相对的点信息
                self.lastCircleInfo[dataIndex] = positionPoint;
                return {
                  type: 'circle',
                  position: positionPoint,
                  shape: {
                    cx: 0,
                    cy: 0,
                    r: self.symbolSize
                  },
                  invisible: true, // 设置隐藏
                  draggable: true,
                  z: 1000,
                  ondrag: function () {
                    let [lastX, lastY] = self.lastCircleInfo[dataIndex];
                    // Y不变 更改
                    data[dataIndex] = self.chart.convertFromPixel({ seriesIndex: 0 }, [this.x, lastY]);
                    self.chart.setOption({
                      series: [{
                        id: 'line',
                        data: data
                      }]
                    });

                    // 修改了Z需要放到数据中 ...业务处理

                    self.lastCircleInfo[dataIndex] = [this.x, lastY];
                  },
                  onmousedown: function () {
                    self.mouseDownFlag = true;
                  },
                  onmouseup: function () {
                    self.chartMouseUp();
                  },
                  onmousemove: function () {
                    self.chart.dispatchAction({
                      type: 'showTip',
                      seriesIndex: 0,
                      dataIndex: dataIndex
                    });
                  },
                  onmouseout: function () {
                    self.chart.dispatchAction({
                      type: 'hideTip'
                    });
                  }
                };
              })
            })
新增点
原理:从点击位置找到它的前后点,根据前后点把新增点放到对应的点index坐标中。由于我的业务场景更复杂,还需要通过获取到的点信息,转换出其他的点信息
 // 点击折线新增点信息
    lineClickHandler (params) {
      let self = this;
      const { target, topTarget } = params;
      // 判断必须是点击在线上
      if (self.addPoint && (target?.type === 'ec-polyline' || topTarget?.type === 'ec-polyline')) {
        // 获取在chart上的像素坐标点
        const pointInPixel = [params.offsetX, params.offsetY];

        // 获取点击的点的前后点
        let { points3d, points } = this.vm.currentDrawData;

        // 获取当前折线上有的点信息 lastCircleInfo 是在绘制点的时候记录的点信息
        let circleInfo = []
        for (let i in this.lastCircleInfo) {
          let circle = this.lastCircleInfo[i];
          let [cicleX, circleY] = circle;
          circleInfo.push([cicleX, circleY, Number(i)]);
        }

        // 获取点击的点到折线点的最短距离,距离最短的可以理解为是点在线上
        let prePoint = null;
        let nextPoint = null;
        circleInfo.find((item, itemIndex) => {
          let flag = false;
          circleInfo.find((unit, unitIndex) => {
            // 相邻的点才有线  距离短才是在线上的
            if (itemIndex !== unitIndex && Math.abs(itemIndex - unitIndex) === 1) {
              let dis = this.getShortestDistance([params.offsetX, params.offsetY], [unit[0], unit[1]], [item[0], item[1]]);
              if (dis === 0) {
                flag = true;
                prePoint = item;
                nextPoint = unit;
                return true;
              }
            }
          })
          if (flag) {
            return true;
          }
        })

        // 获取前后点后 将新增的点放到对应的位置上
        if (prePoint && nextPoint) {
          let prePointIndex = prePoint[2];
          let nextPointIndex = nextPoint[2];

          // 根据像素点获取折线上的的点 注意折线上的点记录的是3D的z 和 2D的y
          prePoint = points3d[prePointIndex];
          nextPoint = points3d[nextPointIndex];
          let [z, yy] = this.chart.convertFromPixel({ seriesIndex: 0 }, pointInPixel);

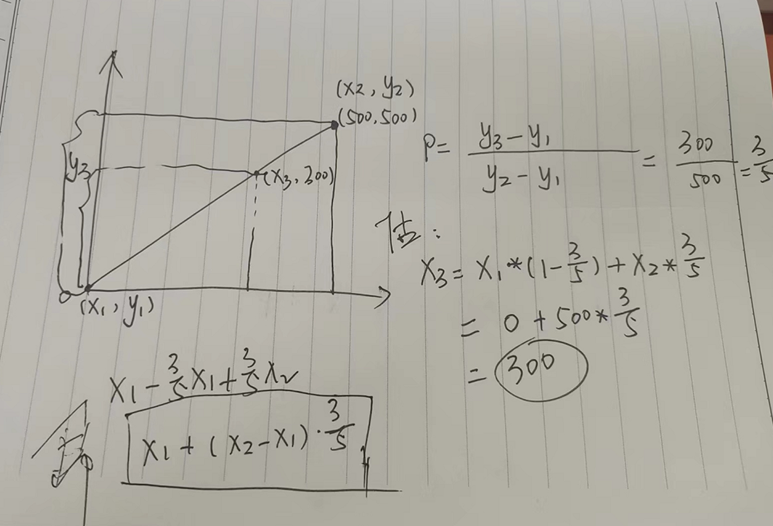
          // 需要获取到3D的xy,这里根据 【插值法】通过z 计算出x 和 y 的值
          const prez1 = Math.abs(prePoint[2]);
          const nextz1 = Math.abs(nextPoint[2]);
          const startPrecent = Math.abs((z - prez1) / (nextz1 - prez1));

          const x = prePoint[0] * (1 - startPrecent) + nextPoint[0] * startPrecent;
          const y = prePoint[1] * (1 - startPrecent) + nextPoint[1] * startPrecent;

          // 插入3D点
          points3d.splice(prePointIndex + 1, 0, [x, y, z]);

          // 获取2D的点
          let prePoint2D = points[prePointIndex];
          let nextPoint2D = points[nextPointIndex];

          const x2d = prePoint2D[0] * (1 - startPrecent) + nextPoint2D[0] * startPrecent;
          const y2d = prePoint2D[1] * (1 - startPrecent) + nextPoint2D[1] * startPrecent;
          // 插入2D
          points.splice(prePointIndex + 1, 0, [x2d, y2d]);

          // 更新视图
          this.updateCurrentDrawData();
        }
      }
    },
关于插值法的说明


【推荐】国内首个AI IDE,深度理解中文开发场景,立即下载体验Trae
【推荐】编程新体验,更懂你的AI,立即体验豆包MarsCode编程助手
【推荐】抖音旗下AI助手豆包,你的智能百科全书,全免费不限次数
【推荐】轻量又高性能的 SSH 工具 IShell:AI 加持,快人一步
· 被坑几百块钱后,我竟然真的恢复了删除的微信聊天记录!
· 没有Manus邀请码?试试免邀请码的MGX或者开源的OpenManus吧
· 【自荐】一款简洁、开源的在线白板工具 Drawnix
· 园子的第一款AI主题卫衣上架——"HELLO! HOW CAN I ASSIST YOU TODAY
· Docker 太简单,K8s 太复杂?w7panel 让容器管理更轻松!