Spring
一、HelloSpring:Spring是一个轻量级的控制反转(IOC)和面向切面编程(AOP)的框架
1、Spring是开源的免费容器
2、Spring是轻量级,非入侵式的
3、核心:IOC、AOP
4、支持事务处理、和框架整合的支持
二 IOC
1、之前程序是主动的创建对象 由程序员控制
使用set注入后,程序不在具有主动性 而是被动的接受对象
通过<bean>标签来创建对象 其中property给对象属性赋值,ref引用其他的bean对象
2、IOC创建对象方式
默认使用无参构造
使用有参构造 可以通过
1)下标赋值
2)类型
3)参数名
注:可以在bean标签中使用name来给bean添加别名
三 DI依赖注入
1)构造器注入
2)set注入
依赖:bean对象的创建依赖于容器
注入:bean对象的所有属性,由容器来注入
通过使用bean标签中的属性和pojo类中的成员变量类型注入,可以有:对象,数组,集合,properties
分别对应标签<ref> <array> <list> <map> <pros>
注:bean的作用域可以通过bean标签的scope值来指定单例模式还说原型模式
四 自动装配:spring会在上下文中寻找,自动给bean装配属性(例如定义的其他对象)
装配方式:
1、通过xml中显示配置
通过autowired属性,属性值可以分为byName和byType
byName:需要保证所有的bean id唯一 并且这个bean需要和自动注入的属性的set方法的值一致
byType:需要保证所有的bean class唯一 并且这个bean需要和自动注入的属性类型一致
2、使用注解自动装配 添加context约束 <context:annotation-config/>
@Autowired 默认通过byType(需要配合@qualifierd指定对象的一个唯一id)
@resource默认通过byName,找不到通过byType
五 注解开发
@Conponent:组件,交由sping来管理 衍生出相同的注解包括@Controller @Service @Repository @Value指定属性的值
六 使用Java方式来配置spring(SpringBoot中)
在类上添加@Configuration @ComponentScan @Bean注解
@Configuration //这个会被Spring容器托管,注册到容器中,本身就是一个Component
//@Configuration代表这是一个配置类,和之前的ApplicationContext.xml一样
@ComponentScan("pojo")
public class myConfig {
    //注册一个bean 方法名相当于id,返回值相当于class属性
    @Bean
    public User getUser(){
        return new User();
    }
}
七 AOP
方式一:使用原生Spring接口
1)通过实现MethodBeforeAdvice和MethodeReturningAdvice接口定义日志类
public class Log implements MethodBeforeAdvice {
    @Override
    //method:要执行的目标对象的方法
    //args:参数
    //target:目标对象
    public void before(Method method, Object[] args, Object target) throws Throwable {
        System.out.println(target.getClass().getName()+"的"+method.getName()+"被执行了");
    }
}
2)配置AOP:
<aop:config>
        <!--切入点:expression:表达式,execution(要执行的位置)-->
        <aop:pointcut id="point" expression="execution(* com.service.UserServiceImp.*(..))"/>
        <!--执行环绕-->
        <aop:advisor advice-ref="log" pointcut-ref="point"/>
        <aop:advisor advice-ref="afterlog" pointcut-ref="point"/>
 </aop:config>
3)测试:
方式二:注解
1)定义切面
@Aspect//标注这个类是切面
public class AnnotationPointCut {
    @Before("execution(* com.service.UserServiceImpl.*(..))")
    public void before(){
        System.out.println("我在方法前");
    }
    @After("execution(* com.service.UserServiceImpl.*(..))")
    public void after()
    {
        System.out.println("我在方法后");
    }
    //在环绕增强中,我们可以给定一个参数,代表我们要获取处理切入的点
    @Around("execution(* com.service.UserServiceImpl.*(..))")
    public void around(ProceedingJoinPoint joinPoint) throws Throwable {
        System.out.println("环绕前");
        //执行方法
        Object proceed = joinPoint.proceed();
        System.out.println("环绕后");
    }
}
八 整合Mybatis
方式一:
1)在spring-dao.xml中定义数据库连接信息
<!--DataSource:使用Spring的数据源替换mybatis的配置 c3p0 dbcp druid
我们使用Spring提供的JDBC
-->
<bean id="datasource" class="org.springframework.jdbc.datasource.DriverManagerDataSource">
<property name="driverClassName" value="com.mysql.cj.jdbc.Driver"/>
<property name="url" value="jdbc:mysql://localhost:3306/mybatis?useUnicode=true&characterEncoding=utf-8&useSSL=false&serverTimezone=UTC"/>
<property name="username" value="root"/>
<property name="password" value="wcc12332100"/>
</bean>
<!--sqlSessionFactory-->
<bean id="sqlSessionFactory" class="org.mybatis.spring.SqlSessionFactoryBean">
<property name="dataSource" ref="datasource"></property>
<!--绑定Mybatis配置文件-->
<property name="configLocation" value="classpath:mybatis-config.xml"></property>
<property name="mapperLocations" value="classpath:mapper/*.xml"></property>
</bean>
<!--sqlSessionTemplate-->
<bean id="sqlSessionTemplate" class="org.mybatis.spring.SqlSessionTemplate">
<!--只能通过构造函数注入 因为没有set方法-->
<constructor-arg name="sqlSessionFactory" ref="sqlSessionFactory"></constructor-arg>
</bean>
2)添加UserMapper接口的实现类UserMapperImpl
public class UserMapperImpl implements UserMapper{
    @Setter//所有操作都使用SqlSession来执行,现在都使用SqlSessionTemplate
    private SqlSessionTemplate sqlSessionTemplate;
    @Override
    public List<User> selectUser() {
        UserMapper mapper = sqlSessionTemplate.getMapper(UserMapper.class);
        return mapper.selectUser();
    }
}
3)ApplicationContext.xml创建SqlSessionTemplate对象
  <import resource="spring-dao.xml"></import>
    <bean id="userMapper" class="mapper.UserMapperImpl">
        <property name="sqlSessionTemplate" ref="sqlSessionTemplate"></property>
    </bean>
4)测试
public static void main(String[] args) throws IOException {
        ClassPathXmlApplicationContext context = new ClassPathXmlApplicationContext("spring-dao.xml");
        UserMapper userMapper = context.getBean("userMapper", UserMapper.class);
        for (User user : userMapper.selectUser()) {
            System.out.println(user);
        }
    }
方式二:UserMapperImpl实现UserMapper接口,并继承SqlSessionDaoSupport类,可以不写SqlSessionTemplate
1)UserMapperImpl类:
public class UserMapperImpl2 extends SqlSessionDaoSupport implements UserMapper{
    @Override
    public List<User> selectUser() {
        return getSqlSession().getMapper(UserMapper.class).selectUser();
    }
}
2)ApplicationContext.xml创建SqlSession对象
<bean id="userMapper2" class="mapper.UserMapperImpl">
     <property name="sqlSessionFactory" ref="sqlSessionFactory"></property>
 </bean>
3)测试
public void Test() throws IOException {
        ApplicationContext context=new ClassPathXmlApplicationContext("applicationContext.xml");
        UserMapper mapper = context.getBean("userMapper2", UserMapper.class);
        List<User> users = mapper.selectUser();
        for (User user : users) {
            System.out.println(user);
        }
    }
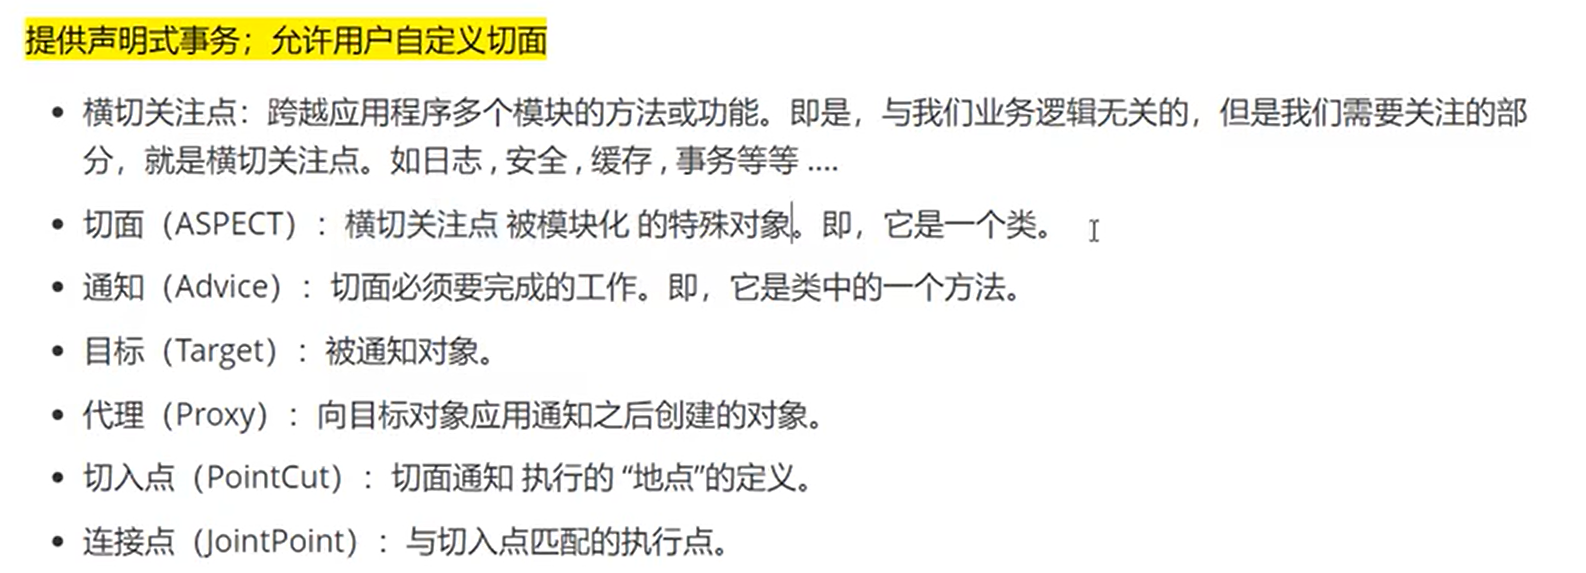
九 声明式事务
在spring-dao.xml中配置声明式事务
<!--配置声明式事务-->
    <bean id="transactionManager" class="org.springframework.jdbc.datasource.DataSourceTransactionManager">
        <constructor-arg ref="datasource"></constructor-arg>
    </bean>
    <!--结合AOP实现事务的织入-->
    <!--配置事务通知-->
    <tx:advice id="txAdvice" transaction-manager="transactionManager">
        <!--给哪些方法配置事务-->
        <!--配置事务的传播特性 默认REQUIRED-->
        <tx:attributes>
            <tx:method name="add" propagation="REQUIRED"/>
            <tx:method name="del"/>
            <tx:method name="update"/>
            <tx:method name="*" propagation="REQUIRED"/>
        </tx:attributes>
    </tx:advice>
    <!--配置事务切入-->
    <aop:config>
        <aop:pointcut id="pointcut" expression="execution(* mapper.*.*(..))"/>
        <aop:advisor advice-ref="txAdvice" pointcut-ref="pointcut"></aop:advisor>
    </aop:config>

 浙公网安备 33010602011771号