SpringBoot + MyBaties 实现其XML方式
由于MyBatis在多表查询时候的优越性。所以再次整理关于如何在SpringBoot中配置MyBatis。
1.新建一个SpringBoot项目。
2.加入依赖:
<!--数据库-->
<dependency>
    <groupId>mysql</groupId>
    <artifactId>mysql-connector-java</artifactId>
    <scope>runtime</scope>
</dependency>
<!-- https://mvnrepository.com/artifact/org.mybatis.spring.boot/mybatis-spring-boot-starter -->
<dependency>
    <groupId>org.mybatis.spring.boot</groupId>
    <artifactId>mybatis-spring-boot-starter</artifactId>
    <version>1.3.1</version>
</dependency>
3.配置数据库和MyBatis
server:
  port: 8080
spring:
  datasource:
    driver-class-name: com.mysql.jdbc.Driver
    password: aa111111
    username: utils_user
    url: jdbc:mysql://localhost:3306/utils_db?useUnicode=true&useSSL=false&characterEncoding=UTF-8


#打印SQL
logging:
  level:
   com.zimo.mybaties.dao: debug
mybatis:
  #配置mapper文件所在地,在 resources 目录下的mapper目录的*xml文件
  mapper-locations: classpath:mybatis/mapper/*.xml
  #配置文件
  config-location: classpath:mybatis/mybatis-config.xml
  #对应实体类的路径
  type-aliases-package: com.zimo.mybaties.model
4.mybatis-config.xml的配置文件
<?xml version="1.0" encoding="UTF-8" ?>
<!DOCTYPE configuration PUBLIC "-//mybatis.org//DTD Config 3.0//EN" "http://mybatis.org/dtd/mybatis-3-config.dtd">
<configuration>
    <settings>
        <setting name="callSettersOnNulls" value="true"/>

        <setting name="cacheEnabled" value="true"/>

        <setting name="lazyLoadingEnabled" value="true"/>

        <setting name="aggressiveLazyLoading" value="true"/>

        <setting name="multipleResultSetsEnabled" value="true"/>

        <setting name="useColumnLabel" value="true"/>

        <setting name="useGeneratedKeys" value="false"/>

        <setting name="autoMappingBehavior" value="PARTIAL"/>

        <setting name="defaultExecutorType" value="SIMPLE"/>

        <setting name="mapUnderscoreToCamelCase" value="true"/>

        <setting name="localCacheScope" value="SESSION"/>

        <setting name="jdbcTypeForNull" value="NULL"/>

    </settings>

    <typeAliases>
        <typeAlias alias="Integer" type="java.lang.Integer" />
        <typeAlias alias="Long" type="java.lang.Long" />
        <typeAlias alias="HashMap" type="java.util.HashMap" />
        <typeAlias alias="LinkedHashMap" type="java.util.LinkedHashMap" />
        <typeAlias alias="ArrayList" type="java.util.ArrayList" />
        <typeAlias alias="LinkedList" type="java.util.LinkedList" />
    </typeAliases>
</configuration>
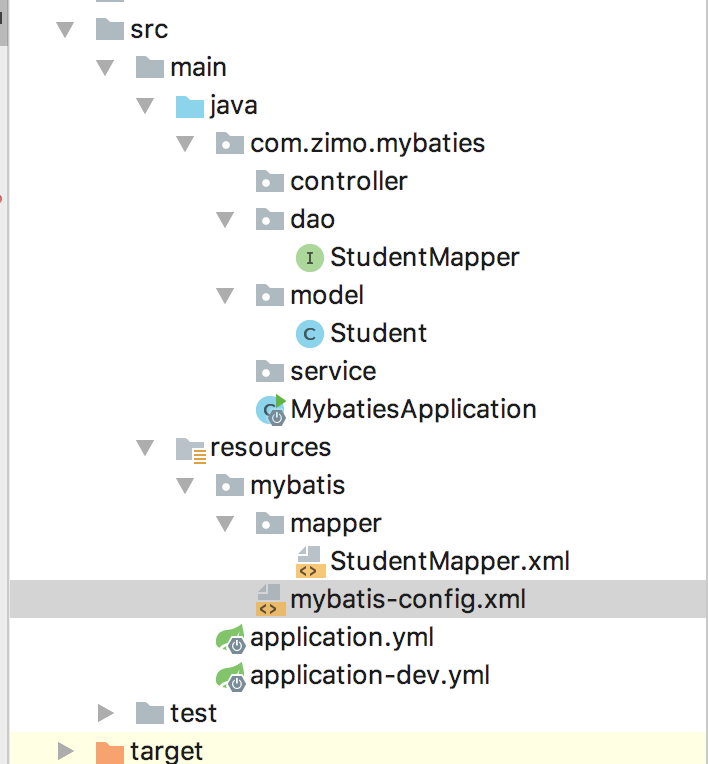
5.创建一个实体student和其mapper接口类,和实现的mapper.xml。项目结构如下

具体内容如下:
StudenMapper.xml
<?xml version="1.0" encoding="UTF-8" ?>
<!DOCTYPE mapper PUBLIC "-//mybatis.org//DTD Mapper 3.0//EN" "http://mybatis.org/dtd/mybatis-3-mapper.dtd" >
<mapper namespace="com.zimo.mybaties.dao.StudentMapper">

    <sql id="allColumns">
        stu_id,stu_num,name,birth_date
    </sql>

    <sql id="table">
        student
    </sql>

    <insert id="add" parameterType="com.zimo.mybaties.model.Student">
        INSERT INTO
        <include refid="table"/>
        (stu_id,stu_num,name,birth_date)
        VALUES
        (#{stuId},#{stuNum},#{name},#{birthDate})
    </insert>
</mapper>
StudentMapper interface
package com.zimo.mybaties.dao;

import com.zimo.mybaties.model.Student;

public interface StudentMapper {
    void add(Student student);
}
6.在MybatiesApplication启动类中加入注解@MapperScan,扫描所有的Mapper接口。
package com.zimo.mybaties;

import org.mybatis.spring.annotation.MapperScan;
import org.springframework.boot.SpringApplication;
import org.springframework.boot.autoconfigure.SpringBootApplication;

@SpringBootApplication
@MapperScan("com.zimo.mybaties.dao")
public class MybatiesApplication {

    public static void main(String[] args) {
        SpringApplication.run(MybatiesApplication.class, args);
    }
}
7.创建数据库,和类
DROP TABLE IF EXISTS `student`;
CREATE TABLE `student`(
  `stu_id` int(11) NOT NULL AUTO_INCREMENT,
  `stu_num` varchar(25) NOT NULL,
  `name` varchar(100) NOT NULL,
  `birth_date` bigint(20) NOT NULL,
  PRIMARY KEY (`stu_id`)
) ENGINE=InnoDB AUTO_INCREMENT = 1 DEFAULT CHARSET = utf8mb4;
8.测试
package com.zimo.mybaties.dao;

import com.zimo.mybaties.model.Student;
import org.junit.Test;
import org.junit.runner.RunWith;
import org.springframework.beans.factory.annotation.Autowired;
import org.springframework.boot.test.context.SpringBootTest;
import org.springframework.test.context.junit4.SpringRunner;

import static org.junit.Assert.*;

@RunWith(SpringRunner.class)
@SpringBootTest
public class StudentMapperTest {
    @SuppressWarnings("all")
    @Autowired
    StudentMapper studentMapper;

    @Test
    public void add() throws Exception {
        for (int i=0;i<10;i++)
        studentMapper.add(new Student("123"+i,"天涯"+i,777524356000l));
    }

}
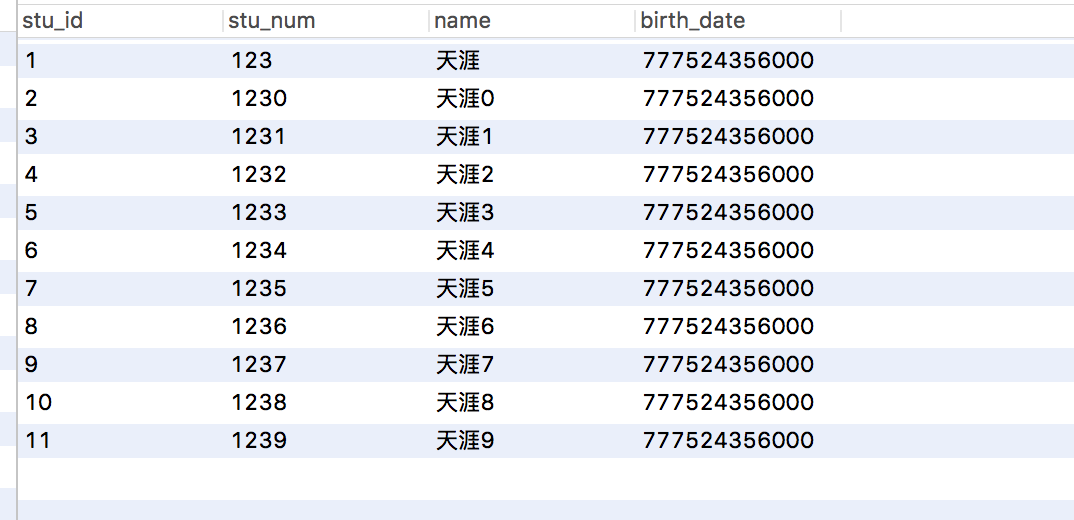
9.测试结果


