关于QT的QPainterPath::arcTo 详解
https://www.cnblogs.com/yuzhould/p/9132493.html
这个函数文档的意思就是画弧,看了文档也不太明白,自己做了demo终于明白了意思
移动到圆心,画180度半圆
void TestArcTo::paintEvent(QPaintEvent *)
{
QPoint startPt(30, 30);
QRect rect(startPt.x(), startPt.y(), 200, 200);
QPainter p(this);
p.setRenderHint(QPainter::Antialiasing); //抗锯齿
p.fillRect(rect, QColor(255, 255, 255));

int arcR = rect.width()/2;
int rectSize = rect.width();
QPainterPath path;

path.moveTo(startPt.x() + arcR, startPt.y() + arcR); //先移动到圆心
path.arcTo(rect, 00.0f, 180.0f);      //以0度起点,逆时针画180度

p.fillPath(path, QBrush(QColor(122, 122, 122)));
}
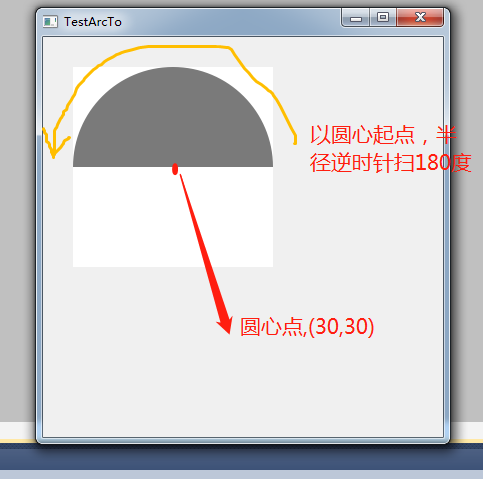
移动到圆心,以90度开始画180度半圆
path.moveTo(startPt.x() + arcR, startPt.y() + arcR); //先移动到圆心
path.arcTo(rect, 90.0f, 180.0f);      //以0度起点,逆时针画180度

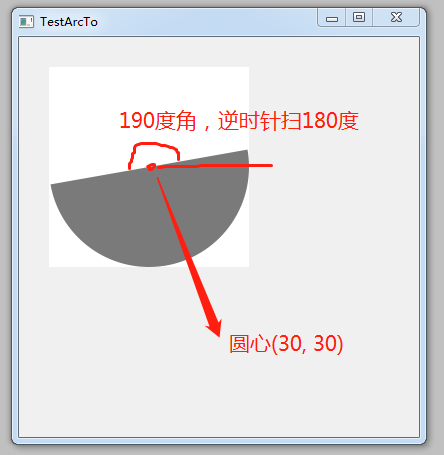
移动到圆心,以190度开始画180度半圆
path.moveTo(startPt.x() + arcR, startPt.y() + arcR); //先移动到圆心
path.arcTo(rect, 90.0f, 180.0f);      //以0度起点,逆时针画180度
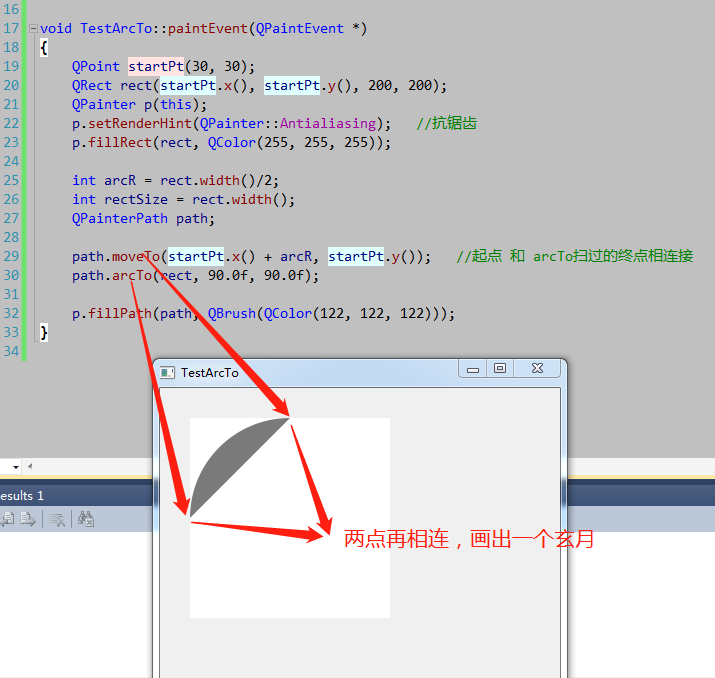
移动到某个点可以画弦月
几个点组合
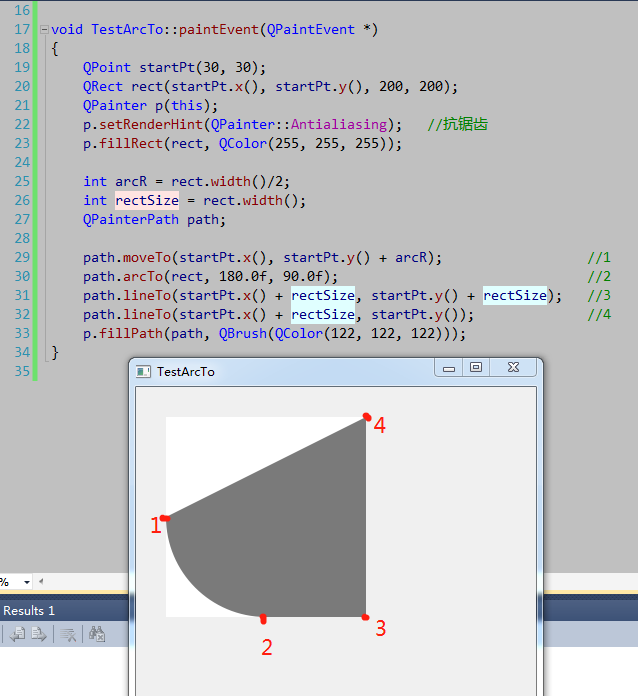
矩形区圆角
void TestArcTo::paintEvent(QPaintEvent *)
{
    QRect rect(30, 30, 200, 200);
    QPainter p(this);
    p.setRenderHint(QPainter::Antialiasing);
    p.fillRect(rect, QColor(255, 255, 0));

    int cornerSize = 50;       //调节圆角的大小
    int arcR = cornerSize/2;
    QPainterPath path;
    path.moveTo(rect.left() + arcR, rect.top());
    path.arcTo(rect.left(), rect.top(), cornerSize, cornerSize, 90.0f, 90.0f);

    path.lineTo(rect.left(), rect.bottom() - arcR);
    path.arcTo(rect.left(), rect.bottom() - cornerSize, cornerSize, cornerSize, 180.0f, 90.0f);

    path.lineTo(rect.right() - arcR, rect.bottom());
    path.arcTo(rect.right() - cornerSize, rect.bottom() - cornerSize, cornerSize, cornerSize, 270.0f, 90.0f);

    path.lineTo(rect.right(), rect.top() + arcR);
    path.arcTo(rect.right() - cornerSize, rect.top(), cornerSize, cornerSize, 0.0f, 90.0f);

    p.fillPath(path, QBrush(QColor(122, 122, 122)));
}
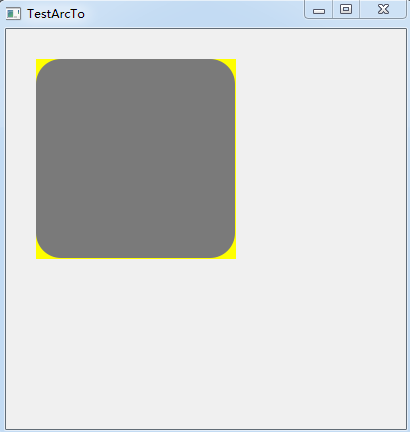
底部和右边有黄色边框需要处理,这就需要+1, -1微调了。理解了arcTo函数,都不难处理。
最方便的圆角方法
void TestArcTo::paintEvent(QPaintEvent *)
{
    QRect rect(30, 30, 200, 200);
    QPainter p(this);
    p.setRenderHint(QPainter::Antialiasing);
    p.fillRect(rect, QColor(255, 255, 0));

    p.setPen(Qt::NoPen);
    p.setBrush(QColor(122, 122, 122));
    p.drawRoundedRect(rect, 20, 20);
}


 浙公网安备 33010602011771号