
Vue2 + SpringBoot 本地前后端联调(简单登录)
前言:
后端:IDEA + SpringBoot
前端:VSCode + Vue2.x
1. 前端
1) vue 创建项目: vue create login-debugging(建议使用管理员身份打开cmd,到指定目录)
![]()

使用 空格 来选中,后续选择不进行演示了,下图蓝色字体就是进行的选择。
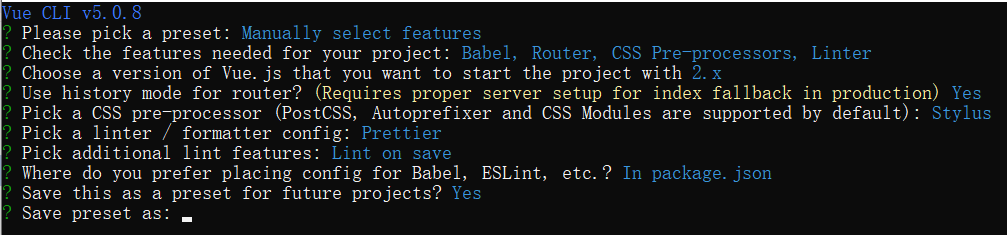
最后一个选项是给自己的项目配置保存命名,可直接回车。
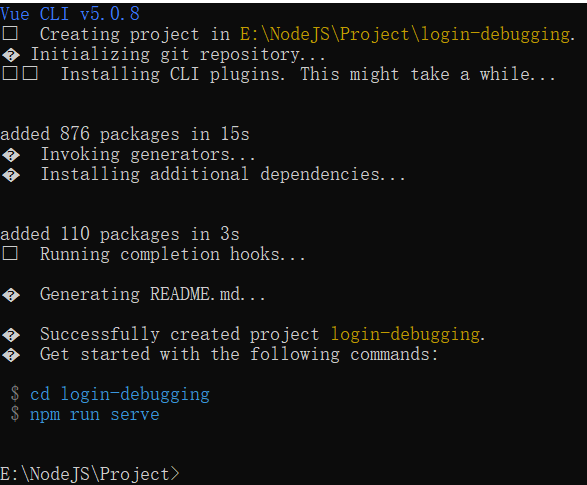
读条完成后如此则成功。
如果中间操作错误,是无法回退的,直接Ctrl + C 结束,重新开始。
继续安装 axios, 命令:npm install axios。此处安装可在下面继续。

2) vue 项目操作
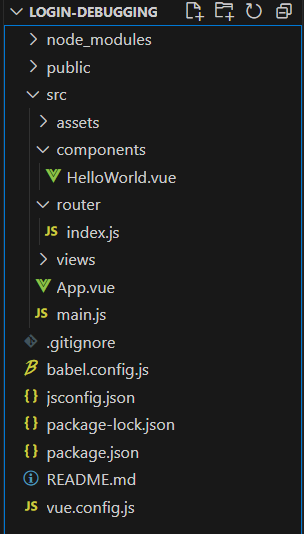
将建好的姓名拖入VSCode或者vscode内打开,如下:
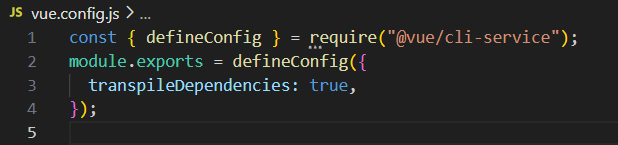
先到 vue.config.js 内把 严格模式关了:lintOnSave: false,
第一步:
登录页面:开发登录页面组件,src/components 新建文件 Login.vue。

<template>
  <div>
    用户名:<input
      type="text"
      v-model="loginForm.username"
      placeholder="请输入用户名"
    />
    <br /><br />
    密码:
    <input
      type="password"
      v-model="loginForm.password"
      placeholder="请输入密码"
    />
    <br /><br />
    <button v-on:click="login">登录</button>
  </div>
</template>

  <script>
export default {
  name: "Login",
  data() {
    return {
      loginForm: {
        username: "",
        password: "",
      },
      responseResult: [],
    };
  },
  methods: {
    login() {
      this.$axios
        .post("/login", {
          username: this.loginForm.username,
          password: this.loginForm.password,
        })
        .then((successResponse) => {
          if (successResponse.data.code === 200) {
            this.$router.replace({ path: "/index" });
          }
        })
        .catch((failResponse) => {});
    },
  },
};
</script>
第二步:src/compoments 下 新建文件夹 Home --> 新建文件 AppIndex.vue,用于登录后跳转。
<template>
  <div>Hello World!</div>
</template>

<script>
export default {
  name: "AppIndex",
};
</script>

<style scoped>
</style>
3) 前端配置
第一步:设置反向代理,src/main.js。
此处用到了 axios,可在项目终端内执行 npm install axios,执行安装。如果报错,管理员身份 cmd 进入终端,到项目目录下,继续执行。(若上面创建项目时执行过则不需要)
import Vue from "vue";
import App from "./App.vue";
import router from "./router";

// 设置反向代理,前端请求默认发送到 http://localhost:8443/api
var axios = require('axios')
axios.defaults.baseURL = 'http://localhost:8443/api'
// 全局注册,之后可在其他组件中通过 this.$axios 发送数据
Vue.prototype.$axios = axios

Vue.config.productionTip = false;

/* eslint-disable no-new */
new Vue({
  el: '#app',
  router,
  components: { App },
  template: '<App/>',
  render: (h) => h(App),
}).$mount("#app");
第二步:配置路由页面,src/router/index.js。
import Vue from "vue";
import VueRouter from "vue-router";
import HomeView from "../views/HomeView.vue";

// 导入编写的Home组件和登录组件
import AppIndex from '@/components/Home/AppIndex'
import Login from '@/components/Login'

Vue.use(VueRouter);

const routes = [
  {
    path: "/",
    name: "home",
    component: HomeView,
  },
  {
    path: "/about",
    name: "about",
    component: () =>
      import("../views/AboutView.vue"),
  },
  // 登录 Login
  {
    path: '/login',
    name: 'Login',
    component: Login
  },
  // Home下的index
  {
    path: '/index',
    name: 'AppIndex',
    component: AppIndex
  }
];

const router = new VueRouter({
  mode: "history",
  base: process.env.BASE_URL,
  routes,
});

export default router;
第三步:配置跨域支持:用于让后端访问。vue.config.js
  devServer: {
    host: '127.0.0.1', // 本地地址
    port: 8084, // 端口号
    open: true, // 配置项目在启动时自动在浏览器打开
    proxy: {
      '/api': { // '/api'是代理标识,一般是每个接口前的相同部分
        target: "http://localhost:8443", // 请求地址,一般是服务器地址
        changeOrigin: true, // 是否进行跨域
        pathRewrite: { // pathRewrite的作用是把请求接口中的 '/api'替换掉,一般是替换为空""
          '^/api': ""
        }
      }
    }
  }
4) 运行。
打开终端:npm run serve,访问:http://127.0.0.1:8084/login

到此,前端结束。
2. 后端
1) 创建Boot项目。注入web依赖。
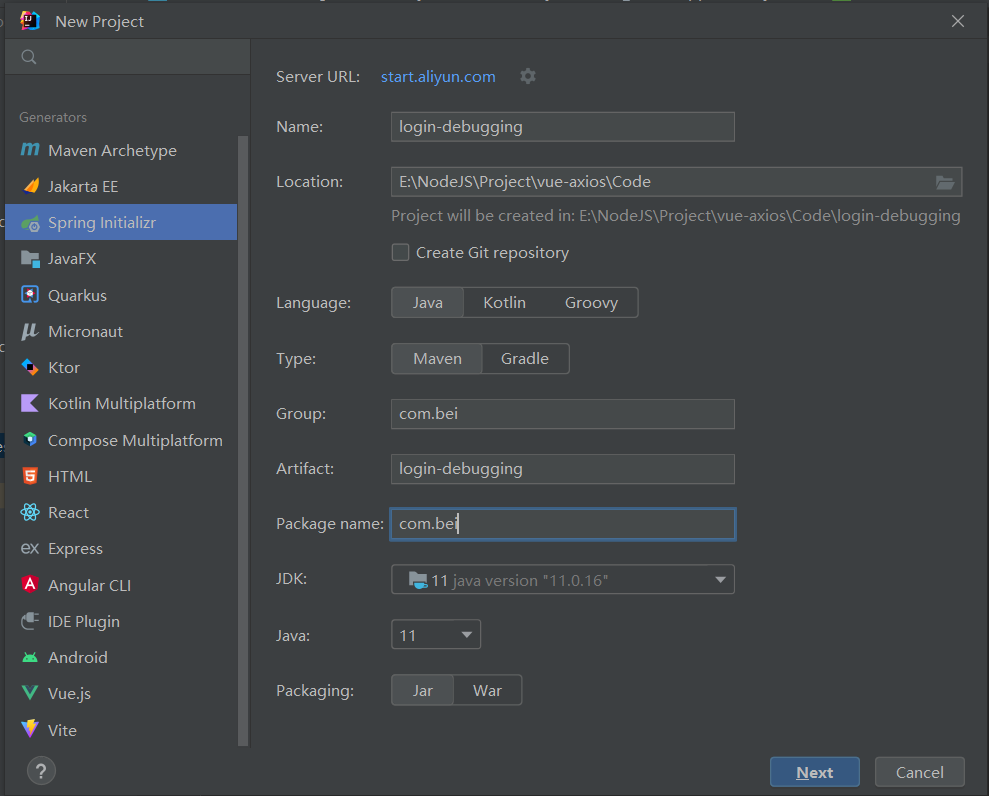

没有选择注入,直接copy。
        <dependency>
            <groupId>org.springframework.boot</groupId>
            <artifactId>spring-boot-starter-web</artifactId>
        </dependency>

        <dependency>
            <groupId>org.springframework.boot</groupId>
            <artifactId>spring-boot-starter-test</artifactId>
            <scope>test</scope>
        </dependency>
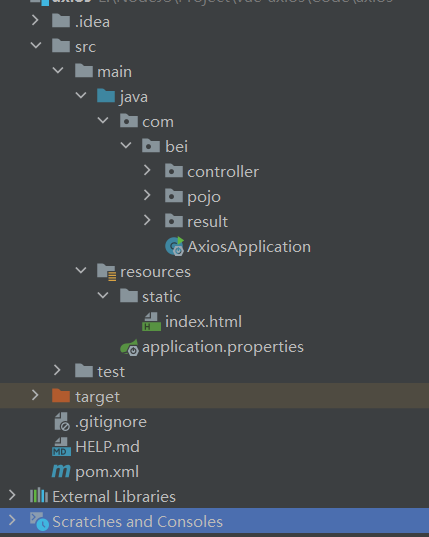
在启动类同级或下一级建包。
2) 实体类。pojo/User类
public class User {
    int id;
    String username;
    String password;

    public int getId() {
        return id;
    }

    public void setId(int id) {
        this.id = id;
    }

    public String getUsername() {
        return username;
    }

    public void setUsername(String username) {
        this.username = username;
    }

    public String getPassword() {
        return password;
    }

    public void setPassword(String password) {
        this.password = password;
    }
}
2) Result类。响应response。result/Result类。
public class Result {
    // 响应码
    private int code;

    public Result(int code) {
        this.code = code;
    }

    public int getCode() {
        return code;
    }

    public void setCode(int code) {
        this.code = code;
    }
}
3) Login。controller/LoginController类。
import org.springframework.stereotype.Controller;
import org.springframework.web.bind.annotation.*;
import org.springframework.web.util.HtmlUtils;

import java.util.Objects;

@Controller
public class LoginController {

    @CrossOrigin
    @PostMapping(value = "api/login")
    @ResponseBody
    public Result login(@RequestBody User requestUser) {
    // 对 html 标签进行转义,防止 XSS 攻击
        String username = requestUser.getUsername();
        username = HtmlUtils.htmlEscape(username);

        if (!Objects.equals("admin", username) || !Objects.equals("123456", requestUser.getPassword())) {
            String message = "账号密码错误";
            System.out.println("test");
            return new Result(400);
        } else {
            return new Result(200);
        }
    }
}
Controller对于响应进行处理。设定账号密码为:admin、123456,分别接受对于User类内的username和password进行判断,返回不等同的Result(响应码);前端收到响应码(200)则接收成功,返回/index页面。
4) 配置端口。
application.properites 将默认端口改为:server.port=8443
3. 测试
前后端搞定后,访问: http://127.0.0.1:8084/login,账户密码登录后,可以看到,访问路径成为了 index内。

这是简单的本地前后端联调。


【推荐】国内首个AI IDE,深度理解中文开发场景,立即下载体验Trae
【推荐】编程新体验,更懂你的AI,立即体验豆包MarsCode编程助手
【推荐】抖音旗下AI助手豆包,你的智能百科全书,全免费不限次数
【推荐】轻量又高性能的 SSH 工具 IShell:AI 加持,快人一步
· winform 绘制太阳,地球,月球 运作规律
· AI与.NET技术实操系列(五):向量存储与相似性搜索在 .NET 中的实现
· 超详细:普通电脑也行Windows部署deepseek R1训练数据并当服务器共享给他人
· 【硬核科普】Trae如何「偷看」你的代码?零基础破解AI编程运行原理
· 上周热点回顾(3.3-3.9)