爬虫学习笔记
爬虫心事123:从刚认识Python到现在,目光所及之处必有爬虫文章。我却一直不感兴趣,一是网上爬取数据并分析的文章不光展现了技术实力,还有作者思路清晰分析的头头是道,作文水品也使我惭愧,所以我不愿沦为黑客盛行时代的脚本小子之流。二是以前公司需要新闻采集,那时不懂爬虫之类,便用PHP写了采集新闻的页面,填写URL,左右标签过滤之后,拿新闻列表和新闻。知道有爬虫之后,就认为我用PHP写的也算最简陋的爬虫,便对爬虫没有多大的兴趣。
就像初中周董火的一塌糊涂,我却不愿意听,除了资源难获取外主要还是抗拒大家都在狂热的东西就想做不一样的人。然而,现在还能想起有一年的暑假作业最后面带有七里香的歌词 窗外的麻雀 在电线杆上多嘴 你说这一句 很有夏天的感觉,偷偷听着周董补青春。
1. hello world 与 Requests 库
Requests 唯一的一个非转基因的 Python HTTP 库,人类可以安全享用。
爬取百度首页
# coding:utf-8
import requests

resp = requests.get('https://www.baidu.com')
html = resp.text.encode('ISO-8859-1').decode('utf-8')
print(resp.encoding)
print(html)
刚开始中文字为乱码,以为是gbk便转了一次,还是不行,直到在python爬虫编码彻底解决中知道requests.Response 类型的 encoding属性可以得到编码,输出是ISO-8859-1编码。chardet 之流的还是不用了。
如果报SSL错误,resp = requests.get('https://www.baidu.com', verify=False) 添加verify=False忽略证书即可。
图片二进制文件获取办法
# coding:utf-8
import requests
import os
import sys

url = 'http://docs.python-requests.org/zh_CN/latest/_static/requests-sidebar.png'
resp = requests.get(url)

img_name = os.path.basename(url)
img_path = sys.path[0]+'/'+img_name
# print(resp.content)
with open(img_path, 'wb') as f:
    f.write(resp.content)
    print(f"download image file : {img_path}")
将二进制写入文件。
response.content 和 response.text 区别
上面两次分别用了resp.text和resp.content获取响应数据,那么区别在哪?
response.content获取的是二进制文件,resp.text获取文本。
python response.text 和response.content的区别 中摘录:
response.content
- 类型:bytes
- 解码类型: 没有指定
- 如何修改编码方式:response.content.deocde("utf-8")
response.text
- 类型:str
- 解码类型: 根据HTTP 头部对响应的编码作出有根据的推测,推测的文本编码
- 如何修改编码方式:response.encoding="gbk"
勤查手册
那么response除了上面用过的encoding content text 外还有什么属性?去官网入门能手册看看 Requests 快速上手,很短很简洁很清晰。
从里面了解到:
你可以找出 Requests 使用了什么编码,并且能够使用
r.encoding属性来改变它:
>>> r.encoding
'utf-8'
>>> r.encoding = 'ISO-8859-1'
如果你改变了编码,每当你访问
r.text,Request 都将会使用r.encoding的新值。
所以第一个例子中,获取百度首页中html = resp.text.encode('ISO-8859-1').decode('utf-8')用ISO-8859-1编码再解码是不是有点多余,试着指定encoding后再获取内容。
resp = requests.get('https://www.baidu.com', verify=False)
# html = resp.text.encode('ISO-8859-1').decode('utf-8')
# print(resp.encoding)
# print(html)
resp.encoding = 'utf-8'
print(resp.text)
可以获取!所以有一份清晰的手册是多么的有用。感谢Requests各位作者 ❤
2. Beautiful Soup 库 提取数据
Beautiful Soup 是一个可以从HTML或XML文件中提取数据的Python库.
from bs4 import BeautifulSoup

html_doc = """
<html><head><title>The Dormouse's story</title></head>
<body>
<p class="title"><b>The Dormouse's story</b></p>

<p class="story">Once upon a time there were three little sisters; and their names were
<a href="http://example.com/elsie" class="sister" id="link1">Elsie</a>,
<a href="http://example.com/lacie" class="sister" id="link2">Lacie</a> and
<a href="http://example.com/tillie" class="sister" id="link3">Tillie</a>;
and they lived at the bottom of a well.</p>

<p class="story">...</p>
"""

soup = BeautifulSoup(html_doc, 'lxml')
# print(soup.prettify())
# print(soup.get_text())

# 获取标题标签、标签名、标题内容
title_tag = soup.title
tag_name = soup.title.name
title = soup.title.string
print(title_tag)
print(tag_name)
print(title)

print(soup.find_all('a'))
因为没有指定解析器,系统中安装了lxml,所以有警告说默认使用系统中已有最佳可用的HTML解析器 lxml,但是因为可能其他机器没有,所以要注意移植性啦。
UserWarning: No parser was explicitly specified, so I'm using the best available HTML parser for this system ("lxml").
Beautiful Soup选择最合适的解析器来解析这段文档,如果手动指定解析器那么Beautiful Soup会选择指定的解析器来解析文档.
获取标签和文本:
from bs4 import BeautifulSoup

lists = """
<a class="a1" href="http://www.baidu.com/">百度</a>,
<a class="a2" href="http://www.163.com/">网易</a>,
<a class="a3" href="http://www.sina.com/">新浪</a>
"""
b = BeautifulSoup(lists, 'lxml')
a_list = b.find_all('a')

print(a_list)
for a in a_list:
    print(a.get_text())  # get_text 获取标签文本
    print(a.get('href'))  # get 获取标签属性
    print(a['href'])  # 同上
获取教程页面的Top5 <code>元素(md中的 `):
# coding:utf-8
import requests
from bs4 import BeautifulSoup
from collections import Counter


def get_count(data):
    """ 获取元素出现次数最多的前5名 """
    count = Counter(data)
    count = count.most_common(5)
    return dict(count)


html = requests.get('https://www.yukunweb.com/2017/6/python-spider-BeautifulSoup-basic/')
content = html.text

soup = BeautifulSoup(content, 'lxml')
codes = soup.find_all('code')
top5 = get_count(codes)
print(top5)
页面出现Top5的code元素和次数:
{BeautifulSoup: 12, find_all(): 12, lxml: 9, Python: 8, find(): 6}
注:css选择器select()很强大,一般都可以匹配到,若不熟悉,可使用Chrome小功能:元素右击->copy->Copy selector

拿到 #\31 763845315 > div.reply-doc.content > p,只用div.reply-doc.content > p即可。
用的时候还是多Beautiful Soup 4.2.0 文档,有一点点长,抽时间看看就会得心应手。
实战:下载红楼梦
想要下载红楼,找到一个红楼梦资源,查看源码:
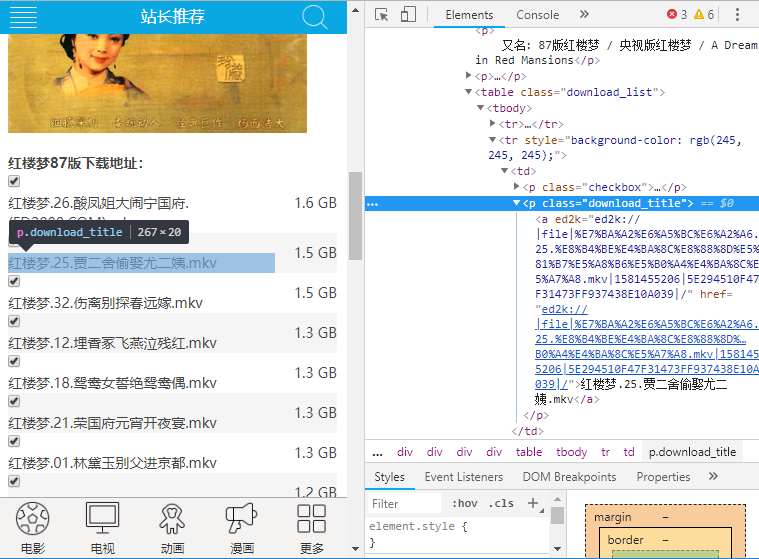
列表在download_list下,download_title下的a标签为每条的链接。用soup.select('.download_list .download_title > a')获取每条链接。就可以拿到每条ed2k磁力链
红楼梦.02.宝黛钗初会荣庆堂.mkv ed2k://|file|%E7%BA%A2%E6%A5%BC%E6%A2%A6.02.%E5%AE%9D%E9%BB%9B%E9%92%97%E5%88%9D%E4%BC%9A%E8%8D%A3%E5%BA%86%E5%A0%82.mkv|922919381|4458969531F1D4153EAB37F1E80F4AC2|/
红楼梦.23.慧紫娟情辞试忙玉.mkv ed2k://|file|%E7%BA%A2%E6%A5%BC%E6%A2%A6.23.%E6%85%A7%E7%B4%AB%E5%A8%9F%E6%83%85%E8%BE%9E%E8%AF%95%E5%BF%99%E7%8E%89.mkv|907433268|2AFA1AE36A5BC34F76CF07621B0D00F5|/
……
只打印链接然后复制到迅雷也可以,但是找到一个迅雷下载
# coding:utf-8
""" 调用迅雷下载 """
import subprocess
import base64
thunder_path = r'C:\Program Files (x86)\Thunder Network\Thunder\Program\Thunder.exe'


def Url2Thunder(url):
    url = 'AA' + url + 'ZZ'
    url = base64.b64encode(url.encode('ascii'))
    url = b'thunder://' + url
    thunder_url = url.decode()
    return thunder_url


def download_with_thunder(file_url):
    thunder_url = Url2Thunder(file_url)
    subprocess.call([thunder_path, thunder_url])
拿来集成下载之后,直接执行就能看到调用下载列表了:
注:ed2k不需要通过
Url2Thunder(url)转成thunder地址,但是转了也不影响。
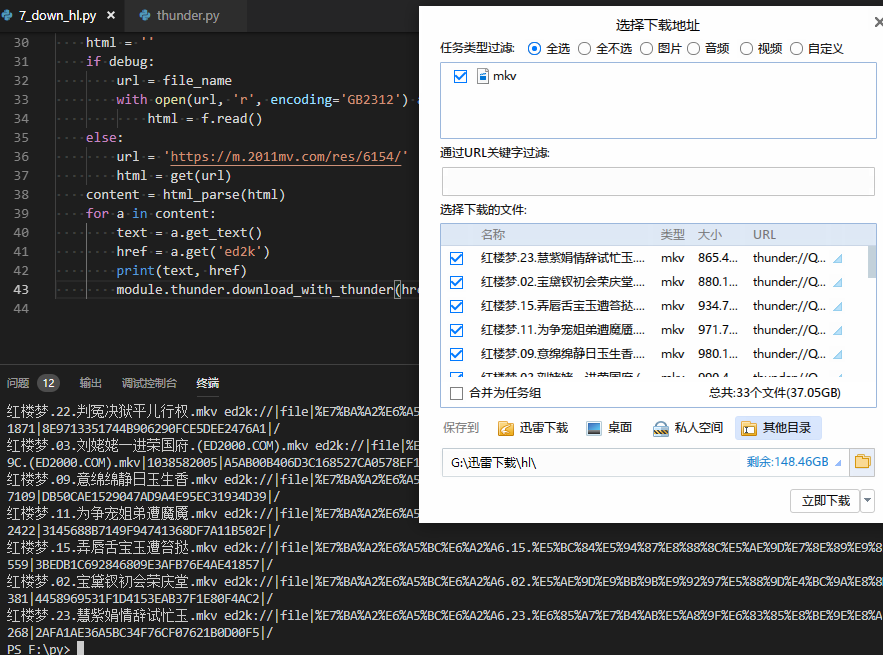
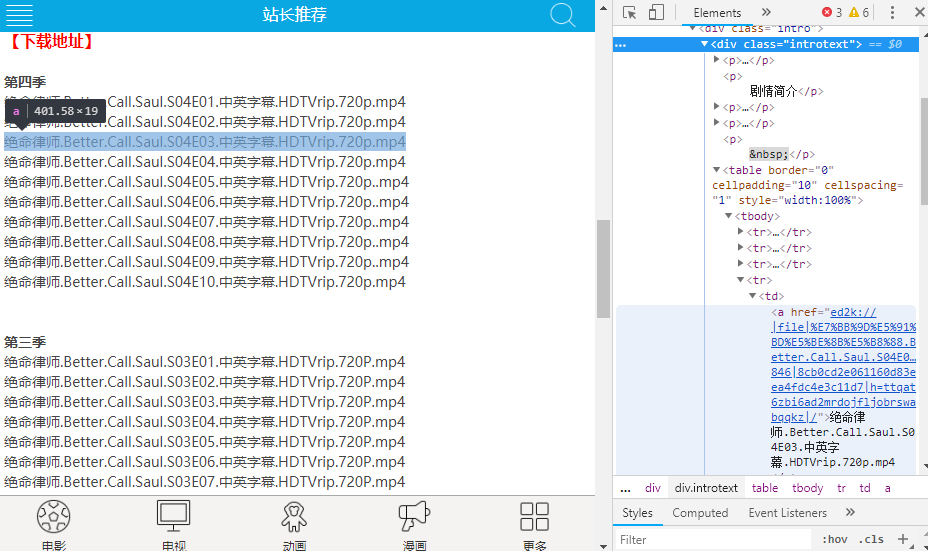
简单封装一次使调用更简单,而且要可限制条数,像limit,用切片完成。比如第二部我想下载风骚律师,但是资源里面有4季,而我只想要第三季的十集。
if __name__ == '__main__':
    # 红楼
    hl_down = Download(file_name='hl.html', encoding='GB2312')  # 第二次可加debug=True, 用文件调试,避免直接请求
    hl_down.get_video(
        'https://m.2011mv.com/res/6154/',
        '.download_list .download_title > a',
        'ed2k')

    # 风骚律师 第三季
    hl_down = Download(file_name='fxlo3.html', encoding='GB2312')
    hl_down.get_video(
        'https://m.2011mv.com/res/13969/',
        '.introtext table a',
        'href',
        10, 20)
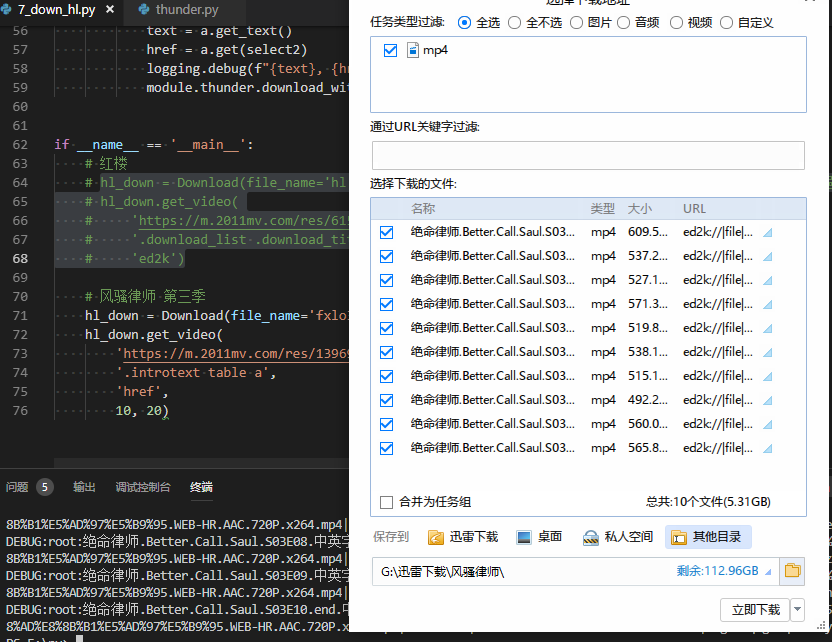
可以看到刚好抓取的是第三季十集,不过资源本身有问题最后不能下载,对于这篇本身没有影响。
3. 抓取土味情话(正则和bs4分别解析页面)
怎么在豆瓣贴回复中找到需要的土味情话?取字数,不妥,试试情感分析吧。用snownlp库。
获取当前页所有评论:
soup = BeautifulSoup(html, 'lxml')
content = soup.select('#comments div.reply-doc.content > p')
加了#commentsid筛选评论,排除高赞的重复数据。
结果:
可我想和你结尾
喜欢我吗,喜欢我就发豆邮给我 (ˊo̴̶̤⌄o̴̶̤ˋ)
撩
楼下继续
我有两把枪,一把叫射,另一把叫啊,美极了!
楼下接
我是灵儿你是什么呀
我不知道  哈哈哈
你是叮当呀
楼下继续
被你点赞的朋友圈是甜甜圈🍩
好甜  楼下继续
你喜欢喝水吗 喜欢 恭喜你已经喜欢70%的我了
甜的  小可爱  楼下继续
最有趣的等待是有你的未来
……
15条中,目标是最符合的11 13 15, 1 5 也较符合,其他的回复以及不知所云之类的就得抛弃了。
分词,jieba 和 snownlp自带
# 分词
    for i in content:
        text = i.get_text()
        print(text)

        s = SnowNLP(text)
        j = jieba.cut(text, cut_all=False)
        print("-> jieba: {0}  \n snownlp: {1}".format(','.join(j), ','.join(s.words)))
选几处不一样的分词结果
被你点赞的朋友圈是甜甜圈🍩
-> jieba: 被,你,点赞,的,朋友圈,是,甜甜,圈,🍩
 snownlp: 被,你点,赞,的,朋友,圈,是,甜,甜圈,🍩
好甜  楼下继续
-> jieba: 好,甜, , ,楼下,继续
 snownlp: 好,甜,楼下,继续
你喜欢喝水吗 喜欢 恭喜你已经喜欢70%的我了
-> jieba: 你,喜欢,喝水,吗, ,喜欢, ,恭喜,你,已经,喜欢,70%,的,我,了
 snownlp: 你,喜欢,喝,水,吗,喜欢,恭喜,你,已经,喜欢,70%,的,我,了
甜的  小可爱  楼下继续
-> jieba: 甜,的, , ,小可爱, , ,楼下,继续
 snownlp: 甜,的,小,可爱,楼下,继续
总体上,论分词还是jieba分词比较专业。
snownlp 直接分析的结果
for i in content:
        text = i.get_text()
        print(text)

        s = SnowNLP(text)
        print("snownlp: {0} ({1})".format(','.join(s.words), s.sentiments ))
挑选比较明显的一例:
超喜欢这句话耶 (0.7135350139260407)
近视600度,而你是我唯一一个不用戴眼镜也能在200米开外就一眼认出的女孩👧🏻 (0.28457337830335616)
这样不行……又过了三个小时,弄不了,放弃!
直接找些土味情话列表,爬吧。
爬取土味情话
找了两个链接分别抓取,使用简单封装的Download模块,第一次抓取到网页后直接用正则获取内容,第二次用soup选择器选取后,用正则批量获取结果,最后存入文本文件。每次使用的时候,第一次不开启debug,将会自动保存html文件,之后开启debug可用文件分析不用每次都拉网页。
	# 1 https://www.guaze.com/juzi/16832.html 这个数据特殊,保存用ISO 8859-1, 打开用GB2312
    # 使用:第一次不开启debug,将会写入文件,之后开启debug可用文件分析。
    # down = Download(file_name=sys.path[0]+'/whisper1.html', encoding='ISO 8859-1')
    down = Download(file_name=sys.path[0]+'/whisper1.html', encoding='GB2312', debug=True)  # 第二次可加debug=True, 用文件调试,避免直接请求
    html = down.get_text('https://www.guaze.com/juzi/16832.html', re.compile(r'\<p\>(\d+)[、]?((.*)(?=www)|(.*)(<\/p>))', re.I))
    # 处理数据
    html = [i[3] for i in html]
    # 写入文件
    down.save(sys.path[0]+"/whispers.txt", html)

    # 2 https://baijiahao.baidu.com/s?id=1612847567100515849&wfr=spider&for=pc
    # down = Download(file_name=sys.path[0]+'/whisper2.html')
    down = Download(file_name=sys.path[0]+'/whisper2.html', debug=True)
    html = down.get_text('https://baijiahao.baidu.com/s?id=1612847567100515849&wfr=spider&for=pc', '.bjh-p')
    # 处理数据
    html = '\n'.join([i.get_text() for i in html])
    html = re.findall(r'\d+[、](.*)', html)
    # 写入文件
    down.save(sys.path[0]+"/whispers.txt", html)
4. 豆瓣2018图书榜单 (json数据解析,图片存储)
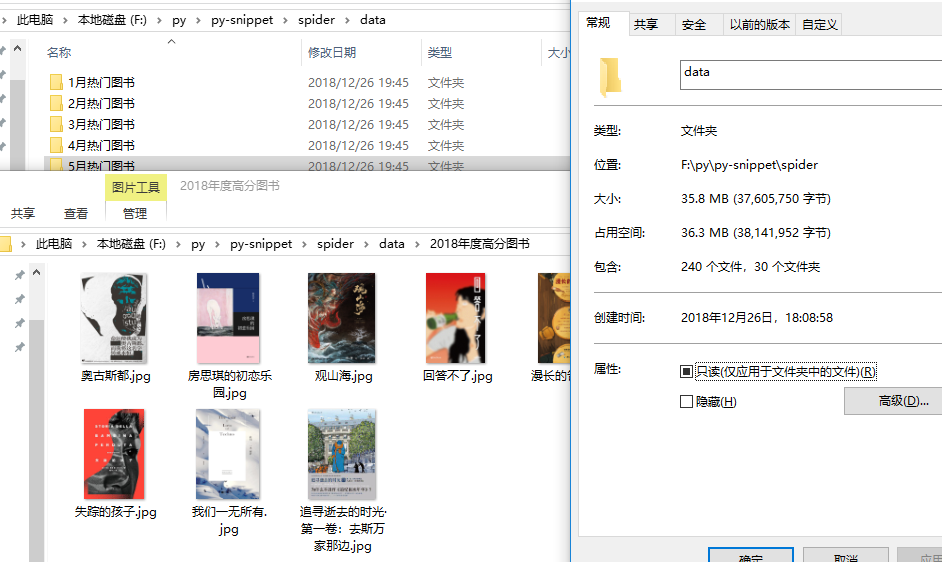
最终是:爬取所有分类榜,并建立文件夹存放榜单书籍图片,数据写入sqlite。
INFO:root:页码:1...
INFO:root:创建文件夹
INFO:root:f:\py\py-snippet\spider/data\2018年度高分图书
INFO:root:f:\py\py-snippet\spider/data\2018年度高分图书\失踪的孩子.jpg saved.
INFO:root:f:\py\py-snippet\spider/data\2018年度高分图书\追寻逝去的时光·第一卷:去斯万家那边.jpg saved.
INFO:root:f:\py\py-snippet\spider/data\2018年度高分图书\房思琪的初恋乐园.jpg saved.
INFO:root:f:\py\py-snippet\spider/data\2018年度高分图书\奥古斯都.jpg saved.
INFO:root:f:\py\py-snippet\spider/data\2018年度高分图书\我们一无所有.jpg saved.
INFO:root:f:\py\py-snippet\spider/data\2018年度高分图书\莫斯科绅士.jpg saved.
INFO:root:f:\py\py-snippet\spider/data\2018年度高分图书\如父如子.jpg saved.
INFO:root:f:\py\py-snippet\spider/data\2018年度高分图书\观山海.jpg saved.
INFO:root:f:\py\py-snippet\spider/data\2018年度高分图书\漫长的告别.jpg saved.
INFO:root:f:\py\py-snippet\spider/data\2018年度高分图书\回答不了.jpg saved.
INFO:root:写入分类:[2018年度高分图书], 条数:10
INFO:root:页码:2...
想直接在shell里运行sqlite命令,可以用如下脚本:
# A minimal SQLite shell for experiments

import sqlite3

con = sqlite3.connect(":memory:")
con.isolation_level = None
cur = con.cursor()

buffer = ""

print("Enter your SQL commands to execute in sqlite3.")
print("Enter a blank line to exit.")

while True:
    line = input()
    if line == "":
        break
    buffer += line
    if sqlite3.complete_statement(buffer):
        try:
            buffer = buffer.strip()
            cur.execute(buffer)

            if buffer.lstrip().upper().startswith("SELECT"):
                print(cur.fetchall())
        except sqlite3.Error as e:
            print("An error occurred:", e.args[0])
        buffer = ""

con.close()
查询数据库中所有书籍和各分类榜书籍数目:
Enter your SQL commands to execute in sqlite3.
Enter a blank line to exit.
select type, count(*) count from books;
[('book', 240)]
select class, count(*) count from books group by class order by id;
[('2018年度高分图书', 10), ('2018年度最受关注图书', 10), ('2018年度外国文学(小说类)', 10), ('2018年度外国文学(非小说类)', 10), ('2018年度中国文学(小说类
)', 10), ('2018年度中国文学(非小说类)', 10), ('2018年度历史·文化', 10), ('2018年度社科·纪实', 10), ('2018年度传记·人物', 10), ('2018年度科学·新知', 10)
, ('2018年度艺术·设计', 10), ('2018年度影视·戏剧', 10), ('2018年度商业·经管', 10), ('2018年度温暖·治愈', 10), ('2018年度科幻·奇幻', 10), ('2018年度悬疑·
推理', 10), ('2018年度绘本·漫画', 10), ('2018年度再版好书', 10), ('1月热门图书', 5), ('2月热门图书', 5), ('3月热门图书', 5), ('4月热门图书', 5), ('5月热门图
书', 5), ('6月热门图书', 5), ('7月热门图书', 5), ('8月热门图书', 5), ('9月热门图书', 5), ('10月热门图书', 5), ('11月热门图书', 5), ('12月热门图书', 5)]
插曲:
需要生成占位符时用occupy = tuple(['?']*len(keys)) 发现全是'?',应该只要?
insert into books('class', 'title', 'type', 'url', 'rating', 'rating_count', 'cover', 'book_id') values('?', '?', '?', '?', '?', '?', '?', '?')
换了两种方式:
# occupy = str(tuple([0]*len(keys))).replace('0', '?')
occupy = "("+("?,"*len(keys))[:-1]+")"
第一种太啰嗦又写了一个。 :-!
5. 多抓鱼再遇见
5.1 登录 (使用cookie)
requests使用Cookie很方便,直接将Cookie从浏览器复制过来:
url = "https://www.duozhuayu.com/api/user"
headers = {
    'Cookie': '_ga=GA1.2.1145311583.111; _gid=GA1.2.1993378194.111; fish_c0="2|1:0|10:1234567|7:fish_c0|24:N123543553544554545=|xxxxxxxxxxxxxxxxxxxxxxxx"',
    'User-Agent': 'Mozilla/5.0 (Windows NT 10.0; Win64; x64) AppleWebKit/537.36 (KHTML, like Gecko) Chrome/71.0.3578.98 Safari/537.36'
}
resp = requests.get(url, headers=headers)
print(json.loads(resp.text))
成功,响应数据为用户信息:
{'featuresEnabled': {'guess_you_like_test_b': False, 'openCollectionContributionComment': True, 'openCollection': True, 'guess_you_like_test_a': False}, 'isWechatSubscribed': True, 'name': '名称x', 'isPending': False, 'gender': 'unknown', 'avatarSmall': 'https://img.duozhuayu.com/...
不带Cookie则会响应401:
{'error': {'message': '登录已失效,请重新登录', 'name': 'AUTH_FAILED'}}
5.2 抓取一个分类下数据 (生成token)
数据接口在
https://www.duozhuayu.com/api/categories/135481276860730989/items?
下一页为 items?_offset=10&limit=10&after_id=5490 ,不过不需要自己组装,在第一页的响应数据里有下一页的链接。但是,这些都是次要的,因为请求头中带有token参数,只可以用来获取数据一次。
 # 分类数据获取
    headers={
        'x-api-version': '0.0.5',
        'x-refer-request-id': '0-1546048074037-61023',
        'x-request-id':'0-1546048074346-17714',
        'x-request-misc':'{"platform":"browser"}',
        'x-request-page':'/categories/135481276860730989',
        'x-request-token':'6461338df01a9dad0d4d9e2d09c7e3b4e0f2c5c00a4d0923',
        'x-security-key':'94587384',
        'x-timestamp':'1546048074347',
        'x-user-id':'0'
    }
    y.get_page_data(headers)
第一次可以获取数据,第二次就会报非法请求。
5.2.1 获取Token和Security-key
分析下参数
x-api-version: 0.0.5
x-refer-request-id: 0-1546048074037-61023
x-request-id: 0-1546048074346-17714 # 未登录第一位为0,否则为 user id
x-request-misc: {"platform":"browser"}
x-request-page: /categories/135481276860730989
x-request-token: 6461338df01a9dad0d4d9e2d09c7e3b4e0f2c5c00a4d0923
x-security-key: 94587384
x-timestamp: 1546048074347
x-user-id: 0  # 未登录为0,否则为 user id
有一些是固定的,其余的需要生成:
x-refer-request-id: 0-1546048074037-61023
x-request-id: 0-1546048074346-17714
x-request-token: 6461338df01a9dad0d4d9e2d09c7e3b4e0f2c5c00a4d0923
x-security-key: 94587384
x-timestamp: 1546048074347
x-refer-request-id x-request-id x-timestamp 都是和时间戳有关或者衍生的参数,核心是x-request-token
和 x-security-key。
抓包发现,https://www.duozhuayu.com/categories/135481276860730989 页面加载了4个JS,核心只有1个client.xxxxx.js:
https://www.google-analytics.com/analytics.js  # 统计分析,跳过
https://static.duozhuayu.com/static/manifest.93ae56791be488b2ba71.js  # 缓存跳过
https://static.duozhuayu.com/static/common.7ba0706773d1a80cd55e.js # 页面其他操作JS
https://static.duozhuayu.com/static/client.47ba39b15fabaca10208.js # 验证
client.47ba39b15fabaca10208.js中有我们需要的所有参数:
var ee = Date.now(), te = Math.floor(1e8 * Math.random()), ne = Object(u.d)(n().session).id || 0, re = s()(ee, ne, te);
return R.headers = Object.assign({}, R.headers, {
    "x-timestamp": ee,
    "x-security-key": te,
    "x-request-token": re,
    "x-user-id": ne
}),
需要拿到上面的四个参数,ne是用户id, 为0即可。调试JS,用Chrome 和Firefox都很卡,换Edge倒意外的好。
可能是我JS用的太烂,不知道有没有更好的调试方法了,开两个页面,一个是真实多抓鱼页面断点,一个是提取出的方法,原页面找变量的值,然后放到代码里。用了两个小时终于获取到了x-timestamp, x-security-key 和 x-request-token,并请求了一次,成功。(代码中省去了一些变量,详细可看Gtihub)
function yH(e,t,n,r,a){r==bG&&a==bG||(e=e[kG]?e[kG](r,a):Array[EG][kG][wG](e,r,a)),t[hG](e,n)}

function mH(e){
    return new Uint8Array(e)
}

function hH(e) {
    for (var t = [], n = IG; n < e[TG]; n += Yz)
        t[pG](e[n] << MU | e[n + rG] << uG | e[n + dG] << Kz | e[n + $z]);
    return t;
}

function zH(t) {
    if (! (this instanceof zH)) throw Error(te);
    Object.defineProperty(this, $, { value: pH(t, SG) }), this[X]();
}

zH[EG][X] = function () {
    var e = 10; //OH[this[$][TG]];
    if (e == bG)
        throw new Error(J);
    this[Z] = [], this[Q] = [];
    for (var t = IG; t <= e; t++)
        this[Z][pG]([IG, IG, IG, IG]), this[Q][pG]([IG, IG, IG, IG]);
    for (var n, r = (e + rG) * Yz, a = this[$][TG] / Yz, o = hH(this[$]), t = IG; t < a; t++)
        n = t >> dG, this[Z][n][t % Yz] = o[t], this[Q][e - n][t % Yz] = o[t];
    for (var i, c = IG, l = a; l < r;) {
        if (i = o[a - rG], o[IG] ^= CH[i >> uG & PG] << MU ^ CH[i >> Kz & PG] << uG ^ CH[i & PG] << Kz ^ CH[i >> MU & PG] ^ jH[c] << MU, c += rG, a != Kz)
            for (var t = rG; t < a; t++)
                o[t] ^= o[t - rG];
        else {
            for (var t = rG; t < a / dG; t++)
                o[t] ^= o[t - rG];
            i = o[a / dG - rG], o[a / dG] ^= CH[i & PG] ^ CH[i >> Kz & PG] << Kz ^ CH[i >> uG & PG] << uG ^ CH[i >> MU & PG] << MU;
            for (var t = a / dG + rG; t < a; t++)
                o[t] ^= o[t - rG];
        }
        for (var s, u, t = IG; t < a && l < r;)
            s = l >> dG, u = l % Yz, this[Z][s][u] = o[t], this[Q][e - s][u] = o[t++], l++;
    }
    for (var s = rG; s < e; s++)
        for (var u = IG; u < Yz; u++)
            i = this[Q][s][u], this[Q][s][u] = FH[i >> MU & PG] ^ DH[i >> uG & PG] ^ MH[i >> Kz & PG] ^ UH[i & PG];
}
zH[EG][Y] = function (e) {
    if (e[TG] != uG)
        throw new Error(q);
    for (var t = this[Z][TG] - rG, n = [IG, IG, IG, IG], r = hH(e), a = IG; a < Yz; a++)
        r[a] ^= this[Z][IG][a];
    for (var o = rG; o < t; o++) {
        for (var a = IG; a < Yz; a++)
            n[a] = PH[r[a] >> MU & PG] ^ IH[r[(a + rG) % Yz] >> uG & PG] ^ NH[r[(a + dG) % Yz] >> Kz & PG] ^ TH[r[(a + $z) % Yz] & PG] ^ this[Z][o][a];
        r = n[kG]();
    }
    for (var i, c = mH(uG), a = IG; a < Yz; a++)
        i = this[Z][t][a], c[Yz * a] = (CH[r[a] >> MU & PG] ^ i >> MU) & PG, c[Yz * a + rG] = (CH[r[(a + rG) % Yz] >> uG & PG] ^ i >> uG) & PG, c[Yz * a + dG] = (CH[r[(a + dG) % Yz] >> Kz & PG] ^ i >> Kz) & PG, c[Yz * a + $z] = (CH[r[(a + $z) % Yz] & PG] ^ i) & PG;
    return c;
}

var WH = function e(t, n, r) {
    if (!(this instanceof e))
        throw Error(te);
    if (this[W] = L, this[OG] = R, n) {
        if (n[TG] != uG)
            throw new Error(T);
    }
    else
        n = mH(uG);
    r || (r = rG), this[N] = r, this[I] = pH(n, SG), this[z] = new zH(t);
};

WH[EG][Y] = function (e) {
    if (e[TG] % this[N] != IG)
        throw new Error(P);
    for (var t, n = pH(e, SG), r = IG; r < n[TG]; r += this[N]) {
        t = this[z][Y](this[I]);
        for (var a = IG; a < this[N]; a++)
            n[r + a] ^= t[a];
        yH(this[I], this[I], IG, this[N]), yH(n, this[I], uG - this[N], r, r + this[N]);
    }
    return n;
}

function dH(e){return parseInt(e)===e}

function fH(e) {
    if (!dH(e[TG]))
        return NG;
    for (var t = IG; t < e[TG]; t++)
        if (!dH(e[t]) || e[t] < IG || e[t] > PG)
            return NG;
    return SG;
}

function pH(e, t) {

    if (e.buffer && ArrayBuffer.isView(e) && e.name === Uint8Array)
        return t && (e = e[kG] ? e[kG]() : Array[EG][kG][wG](e)), e;
    if (Array[xG](e)) {
        if (!fH(e))
            throw new Error("Array contains invalid value:" + e);
        return new Uint8Array(e);
    }
    if (dH(e[TG]) && fH(e))
        return new Uint8Array(e);
    throw new Error("unsupported array-like object");
}

function kH(e) {
    var t = [],
    n = 0;
    for (e = encodeURI(e); n < e.length;) {
        var r = e.charCodeAt(n++);
        r === 37 ? (t.push(parseInt(e.substr(n, 2), 16)), n += 2) : t.push(r)
    }
    return pH(t)
}

function _Ht(e) {
    n = '0123456789abcdef'
    for (var t = [], r = IG; r < e[TG]; r++) {
        var a = e[r];
        t[pG](n[(a & Qz) >> Yz] + n[a & tG]);
    }
    return t[Xz](Jz);
}

function s(e, t, n) {
    var i = [e, t, n].join(':'), c = kH(i), l = new WH(EH, wH), s = l[Y](c);
    return _Ht(s);
}


var ee = Date.now(),
te = Math.floor(1e8 * Math.random()),
ne = 0;
re = s(ee, ne, te);

console.log(ee)
console.log(te)
console.log(ne)
console.log(re)
接下来封装JS:使用execjs库来处理JS
import execjs
import os
import logging
logging.basicConfig(level=logging.DEBUG)
path1 = os.path.dirname(__file__)  # 当前路径


"""
    通过调用js, 获取token和加密数据
"""

def get_js(path, encodes='utf-8'):
    logging.debug("js file path is "+path)

    f = open(path, 'r', encoding=encodes)  # 打开JS文件
    line = f.readline()
    html_str = ''
    while line:
        html_str = html_str + line
        line = f.readline()
    return html_str

def load_sign_js(js_str):
    return execjs.compile(js_str)

def get_token():
    result = {}
    # get token
    sign_js_path = r'' + path1 + "\client.js"
    logging.info('get token js start.')
    sign_js = load_sign_js(get_js(sign_js_path, 'UTF-8'))
    logging.info('get token js ok.')
    result = sign_js.call('get_headers')

    return result
## 获取token
x_data = get_token()
x_data = {k: str(v) for k, v in x_data.items()}

headers={
    'x-api-version': '0.0.5',
    'x-refer-request-id': '0-1546336702230-61023',
    'x-request-id': '0-1546336702230-17714',
    'x-request-misc': '{"platform":"browser"}',
    'x-request-page': '/categories/135481276860730989',
    'x-request-token': x_data['token'],
    'x-security-key': x_data['security'],
    'x-timestamp': x_data['time'],
    'x-user-id': x_data['uid']
}
get_page_data(headers)
获取成功!bingo!
5.2.2 改进:生成器和Send
使用生成器和send动态的获取URL
    def get_page_data(self):
        """ 获取分页数据 """
        next_url = None

        while True:
            logging.debug(f"next_url:{next_url}")
            url = yield next_url
            if not url:
                return
            logging.debug(f"url:{url}")

            headers = self.assem_headers()
            logging.debug(f"headers:{headers}")
            for k, v in headers.items():
                self.headers[k] = v

            data = self.get(url)

            if data:
                logging.info(f"{url} data:{len(data['data'])}, books title:{self.get_all_title(data)}")
                try:
                    next_url = data['paging']['next']
                except KeyError:
                    next_url = None

    def get_data(self, pages, url_primer):
        """ 获取pages页数的数据 """
        url_generator = self.get_page_data()
        url_generator.send(None)
        url = url_primer
        for _ in range(pages):
            if not url:
                break
            url = url_generator.send(url)
调用几次之后,报错今日的访问额度已用完,请在微信内继续使用。换IP试试
5.2.3 添加代理IP
参考利用Python使用代理IP中的,去https://www.xicidaili.com/去拿IP。不过作者这种写法啰嗦了,用BeautifulSoup分析了页面后还用正则用的比较啰嗦。直接改一句话正则,这才是正则粗暴的强大。
原文中获取代理IP列表方法:
def get_proxy_list():
            target = 'http://www.xicidaili.com/nn/' + str(random.randint(0, 100))
            try:
                opener = urllib.request.build_opener()
                #header可以选自己浏览器的
                #样例:[('User-Agent','Mozilla/5.0 (Windows NT 6.1; Win64; x64) ''AppleWebKit/537.36 (KHTML, like Gecko)Chrome/56.0.2924.87 Safari/537.36')]
                opener.addheaders = self.headers
                urllib.request.install_opener(opener)
                html = urllib.request.urlopen(target).read().decode('utf-8')
                tr = BeautifulSoup(html, 'lxml').find_all('tr')
                p = re.compile('<[^>]+>')
                for tag in tr:
                    td_list = tag.find_all('td')
                    if len(td_list) > 0:
                        if str(td_list[5]) == '<td>HTTP</td>':
                        #将爬到的代理IP存到列表里面
                            self.proxy_list.append(p.sub('', str(td_list[1])) + ':' + p.sub('', str(td_list[2])))
            except Exception as b:
                self.logger.exception(b)
正则改后:
# coding:utf-8
""" 代理IP """
import requests
from random import randint
import re


class Proxy(object):
    def __init__(self):
        self.target = f"https://www.xicidaili.com/wn/{randint(0, 100)}"
        self.headers = {'User-Agent': "Mozilla/5.0 (Windows NT 6.1; WOW64) AppleWebKit/537.11 (KHTML, like Gecko) Chrome/23.0.1271.64 Safari/537.11"}

    def get(self):
        resp = requests.get(self.target, headers=self.headers)
        data = resp.text
        ip_list = re.findall(r'((\d{1,3}\.){3}\d+)[^\d]+(\d+)', data)
        proxy_list = [f"{i[0]}:{i[2]}" for i in ip_list]
        return proxy_list

if __name__ == "__main__":
    data = Proxy().get()
    print(data)
输出:
['121.61.25.213:9999', '121.61.33.80:9999', ...]
正则可视化:

简单的代理池好了,代理为https
self.proxies = {
	'https': "https://" + self.proxy_ip
}
用了好久去访问,一直报由于目标计算机积极拒绝,无法连接,以为是代理和但是requests.get时参数为verify=False的原因呢,弄了好久不是的。只是因为代理全挂了,原来不是代理池而是一潭死水啊。
写一个验证代理ip是否有效的方法:
def check_proxy_ip(self):
    """ 验证IP是否可用 """
    if not self.proxy_ip:
        self.proxy_ip = self.get_proxy()
    if self.proxy_ip:
        ip, port = self.proxy_ip.split(':')
        logging.debug(f"check ip {ip}:{port}")
        try:
            telnetlib.Telnet(ip, port, timeout=10)
        except Exception as e:
            logging.debug('error')
            self.proxy_ip = None
            return False
            # self.check_proxy_ip()
        else:
            return True
验证了好多页,发现没有一个好的,这个站也太水了。在某站手动选了几个发现一个好的 😄
https://61.145.182.27:53281
优化代码后拿上去试,拿到有效数据,验证了网站只是封杀了IP。
INFO:root:https://www.duozhuayu.com/api/categories/135481276860730989/items?limit=15&after_id=2014935363555&offset=30 data:15, books title:['灿烂千阳', '看见', '渴望生活', '阅读是一座随身携带的避难所', '微积分学教程(第3卷)', '雕梁画栋', '月亮与六便士', '万水千山走遍', '公主走进黑森林:用荣格的观点探索童话世界', '恶意', '尤比克', '天生幸存者', '联邦党人文集', '影响力', '漢語俗字研究(增訂本)']
DEBUG:root:next_url:https://www.duozhuayu.com/api/categories/135481276860730989/items?limit=15&after_id=2014925696244&offset=45
到这里就将多抓鱼的分类能拿下来了,经历了解析数据、获取Token、使用yield和send、使用和检测代理IP。
6. Scrapy 使用
就来试一个爬取所有腾讯全端 AlloyTeam 团队博客文章的小项目吧。
文章详情没有接口,直接渲染的页面输出。保存博客内容有两种取舍,1. 存储包含div便签的内容 2. 只取文本。这两种都不妥,一个文章不能丢了链接和图片,而且技术文章必有code块。猜测博文内容使用的markdown,是不是md也不重要,明确了自己的需求:爬取博客内容,必须有链接和图片以及代码块,用markdown存储。
6.1 分析解析过程拿到内容
BeautifulSoup中标签有next_element 属性,可以指向下一个解析的对象。用<p><a>原文地址</a></p>标签为例,输出每个标签content和相应的标签名tag:
while True:
	try:
		print(f"content:{p}  tag:{p.name}")
		p = p.next_element
	except AttributeError as e:
		print(e)
		break
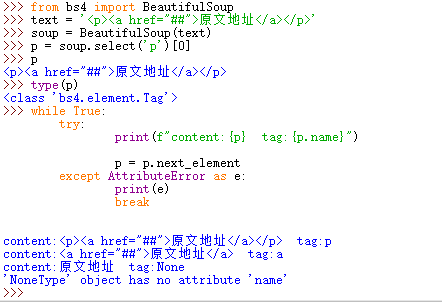
通过结果可以看到通过标签依次读取(就是bs4的解析过程): p > a > 内容
content:<p><a href="##">原文地址</a></p>  tag:p
content:<a href="##">原文地址</a>  tag:a
content:原文地址  tag:None
通过next_element 可获取到所有的标签,当标签名为None时,则代表为内容,不为None时,分别分析。
6.2 处理所需数据
分别处理a,img以及代表代码块的标签div.crayon-pre分别处理。
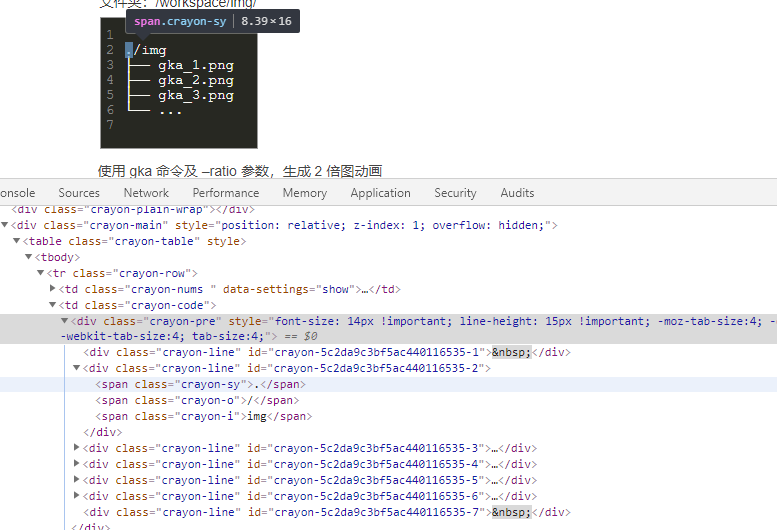
代码块不能直接取div.crayon-pre然后get_text(),结果 ./img├── gka_1.png├── gka_2.png├── gka_3.png└── ...没有换行。所以得转换一下:
elif tag_name == 'div' and tag.has_attr('class') and _code_class in tag['class']:
    logging.debug("代码块")
    # 获取每行code,添加回车
    temp_code = []
    for line in tag.select('div.crayon-line')[:]:
        line_code = line.get_text()
        temp_code.append(line_code)
    code = '\n'.join(temp_code)
    logging.debug(f"code={code}")
    # 避免内容再取到,取前一个对象的兄弟标签
    tag = tag.previous_element.next_sibling
    continue
输出:
DEBUG:root:代码块
DEBUG:root:code=
./img
├── gka_1.png
├── gka_2.png
├── gka_3.png
└── ...
因为一些原因最后使用了crayon-row。
由于next_element 会一直迭代到原文档的最后,所以将内容文档树独立出来,可以使用extract()方法:
这个方法实际上产生了2个文档树: 一个是用来解析原始文档的
BeautifulSoup对象,另一个是被移除并且返回的tag.被移除并返回的tag可以继续调用extract方法。
过了五百年... 中途加了标题的获取,因为很简单
elif re.search(r'h\d', tag_name):
logging.debug("标题")
head_grade = int(re.sub(r"h(\d)", r"\1",tag_name))
md_head = f"{'#'*head_grade} {tag.string}"
content_text.append(md_head)
tag = tag.next_element
最终的 html转md的 简陋效果:

Scrapy真是个好东西,让我没关心爬虫,把精力都放到获取内容上。难道这就是本节没有机会谈Scrapy而一直在弄BeautifulSoup的原因 😃
将抓取内容这块集成到爬虫里面并且输出就好了,结束。纳尼?完全没有说到使用Scrapy嘛。
6.3 使用过程
简述:简单实用且高效,就使用了三个命令
创建项目
scrapy startproject project_name
爬取操作
scrapy crawl spider_name
输出文件
scrapy crawl spider_name -o xxx.json
操作:
创建项目使用命令 scrapy startproject allow_blog
数据容器:
# file: items.py
import scrapy

class AlloyBlogItem(scrapy.Item):
    url = scrapy.Field()
    urid = scrapy.Field()
    title = scrapy.Field()
    author = scrapy.Field()
    content = scrapy.Field()
爬虫文件内容精简如下:
# file: Spider/blog.py
class BlogSpider(Spider):
    name = "blog"
    allowd_domains = ["alloyteam.com"]
    start_urls = ['http://www.alloyteam.com/page/0/']

    def parse(self, response):
        """ 解析函数 """
        urls = re.findall(r'href="([^\"]*)".*blogTitle', response.text)
        for url in urls:
            yield Request(url, callback=self.parse_article)

    def parse_article(self, response):
        """ 解析博客文章 """
        url = response.url

        soup = BeautifulSoup(response.text, 'lxml')

        item = AlloyBlogItem()
        item['title'] = soup.find('a', 'blogTitle btitle').string
        item['author'] = soup.find(rel='author').string
        item['url'] = url
        item['urid'] = url.split('/')[-2]

        # 内容获取
        content = soup.select(".content_banner > .text")[0]
        md_text = self.html_to_md(content)
        md_str = '\n'.join(md_text)
        md_str = f"> [{item['title']}]({url})\n" + md_str
        item['content'] = md_str

        '''
        # 也可直接写入md后缀文件
        path = item['urid'] + '.md'
        with open(path, 'w', encoding='utf-8') as f:
            f.write(path)
        '''

        yield item

    @staticmethod
    def html_to_md(content_tag):
        """ 文章内容html解析为md """
        pass
运行命令scrapy crawl blog即开始自动爬取,这里的blog为爬虫名,是上面BlogSpider中的name="blog"属性。
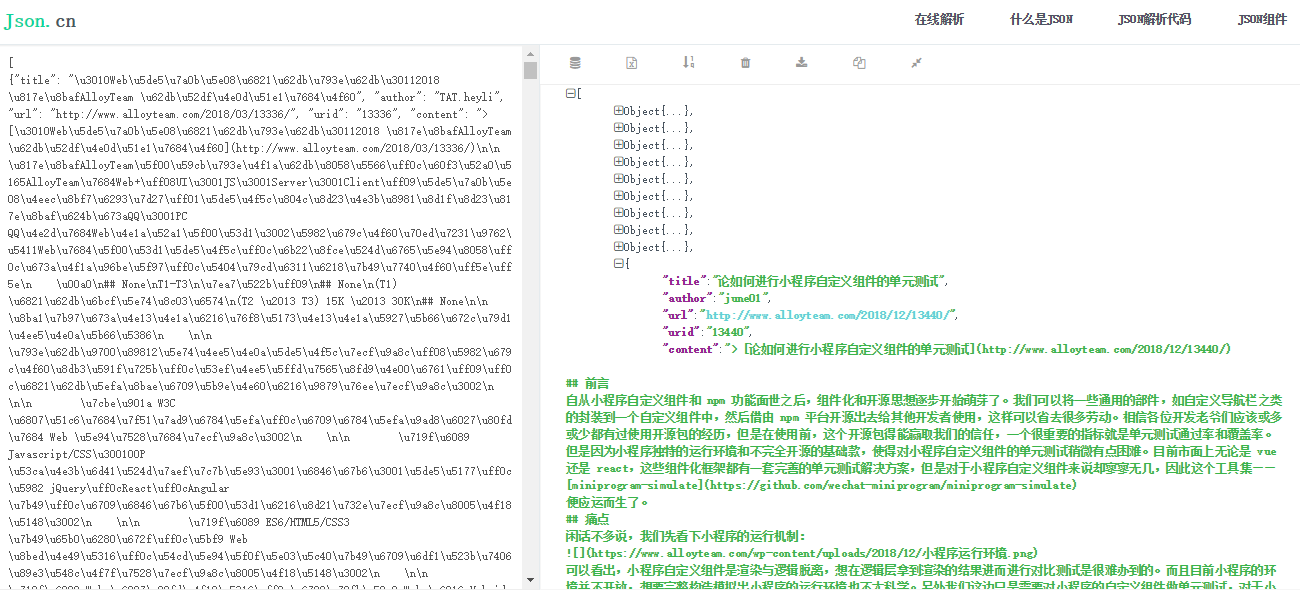
但这里还未存储,可开启注释中的直接写入md后缀的markdown文件,名称会取url中的路径名当唯一id。或者使用命令scrapy crawl blog -o data.json存储自定义的AlloyBlogItem数据(类似字典数据)为json文件。
数据展示:10个md文件以及一个json文件:

json文件也有十条数据,每条都包含title author url urid content,上面定义的AlloyBlogItem数据。
其他文件:管道pipelines.py处理数据、中间件middlewares.py和设置settings .py以后再用吧。
爬虫就到这儿吧。这篇断断续续实践有半个月了,19年的第一篇技术文章就拿这篇滥竽充数吧!


 浙公网安备 33010602011771号