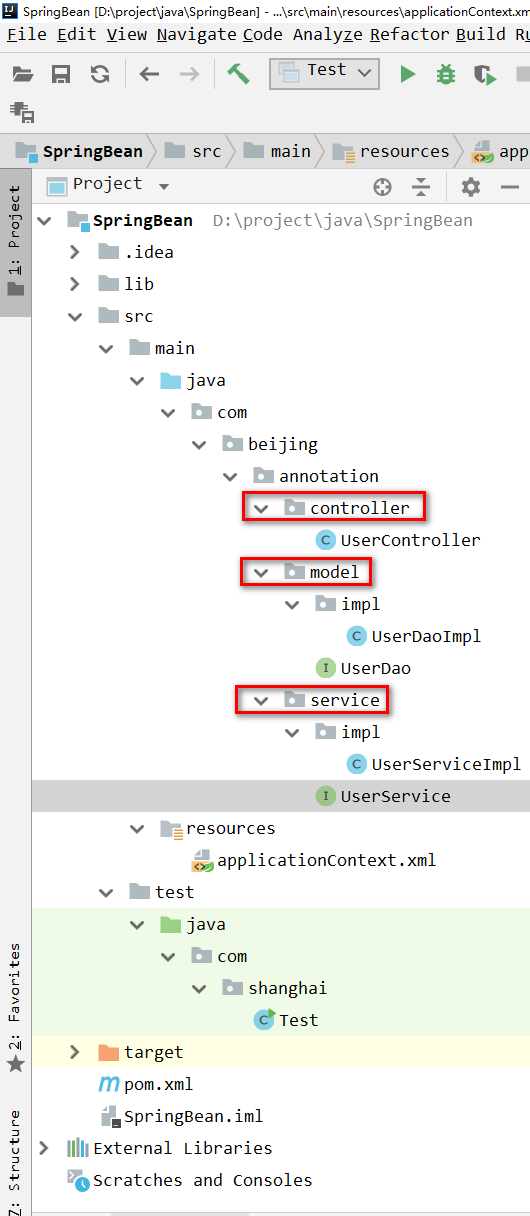
注解在spring中的简单使用(SpringBean)

Spring-bean
model
package com.beijing.annotation.model;

public interface UserDao {
    public void say();
}


package com.beijing.annotation.model.impl;

import com.beijing.annotation.model.UserDao;
import org.springframework.stereotype.Repository;

@Repository("userDao")
public class UserDaoImpl implements UserDao {
    public void say() {
        System.out.println("userdao say:how are you?");
    }
}
service
package com.beijing.annotation.service;

public interface UserService {
    public void say();
}


package com.beijing.annotation.service.impl;

import com.beijing.annotation.service.UserService;
import com.beijing.annotation.model.UserDao;
import org.springframework.beans.factory.annotation.Autowired;
import org.springframework.stereotype.Service;

import javax.annotation.Resource;

@Service("userService")
public class UserServiceImpl implements UserService {
    //方法1
//    @Resource(name = "userDao")
    //方法2
    @Autowired
    private UserDao userDao;
    public void say() {
//        调用userDao中的say方法
        this.userDao.say();
        System.out.println("userService:fine");
    }
}
controller
package com.beijing.annotation.controller;

import com.beijing.annotation.service.UserService;
import org.springframework.beans.factory.annotation.Autowired;
import org.springframework.stereotype.Controller;

import javax.annotation.Resource;

@Controller("userController")
public class UserController {
    //方法1
//    @Resource(name = "userService")
    //方法2
    @Autowired
    private UserService userService;
    public void say(){
        this.userService.say();
        System.out.println("userController say: good");
    }
}
applicationContext.xml
<?xml version="1.0" encoding="UTF-8"?>
<beans xmlns="http://www.springframework.org/schema/beans"
       xmlns:xsi="http://www.w3.org/2001/XMLSchema-instance"
       xmlns:context="http://www.springframework.org/schema/context"
       xsi:schemaLocation="http://www.springframework.org/schema/beans
       http://www.springframework.org/schema/beans/spring-beans.xsd http://www.springframework.org/schema/context http://www.springframework.org/schema/context/spring-context.xsd">
<!--方法1-->
    <!--使用context 命名空间,在配置文件中开启相应的注解处理器-->
    <!--分别定义3个Bean实例-->
    <!--<context:annotation-config/>-->
    <!--<bean id="userDao" class="com.beijing.annotation.model.impl.UserDaoImpl"/>-->
    <!--<bean id="userService" class="com.beijing.annotation.service.impl.UserServiceImpl"/>-->
    <!--<bean id="userController" class="com.beijing.annotation.controller.UserController"/>-->

<!--方法2  -->
    <!--使用bean 元素的autowire属性完成自动装配-->
    <bean id="userDao" class="com.beijing.annotation.model.impl.UserDaoImpl"/>
    <bean id="userService" class="com.beijing.annotation.service.impl.UserServiceImpl" autowire="byName"/>
    <bean id="userController" class="com.beijing.annotation.controller.UserController" autowire="byName"/>

<!--方法3  推荐使用这个-->
    <context:component-scan base-package="com.beijing.annotation"/>


</beans>
测试
package com.shanghai;

import com.beijing.annotation.controller.UserController;
import org.springframework.context.ApplicationContext;
import org.springframework.context.support.ClassPathXmlApplicationContext;

public class Test {
    public static void main(String[] args) {
//      初始化spring 容器,加载配置文件
        ApplicationContext applicationContext=new ClassPathXmlApplicationContext("applicationContext.xml");
//      获取UserController 实例
        UserController userController= (UserController) applicationContext.getBean("userController");
//      调用UserController中的say()方法
        userController.say();

    }
}
posted on 2018-11-16 23:57 Indian_Mysore 阅读(183) 评论(2) 收藏 举报


 浙公网安备 33010602011771号