


K8S 部署过程
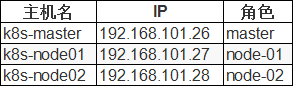
服务规划
一、Kubernetes安装前准备
1、关闭交换空间
# 1、临时并永久关闭交换空间
swapoff -a &&  sed -i '/ swap / s/^\(.*\)$/#\1/g' /etc/fstab

# 2、查看是否关闭成功
free -m
2、关闭防火墙
## 临时并永久关闭防火墙(centos7以上系统)
systemctl stop firewalld && systemctl disable firewalld
3、关闭 SELinux
## 临时并永久关闭SELinux
setenforce 0 && sed -i 's/^SELINUX=.*/SELINUX=disabled/' /etc/selinux/config
4、修改 DNS,方便上网
[root@localhost ~]# vi /etc/resolv.conf
nameserver 8.8.8.8
nameserver 114.114.114.114
5、修改名称解析
cat  >> /etc/hosts << EOF
192.168.101.26 k8s-master
192.168.101.27 k8s-node01
192.168.101.28 k8s-node02
EOF
6、配置主机名
# 在各自对应的主机上执行对应操作
hostnamectl set-hostname k8s-master
hostnamectl set-hostname k8s-node01
hostnamectl set-hostname k8s-node02
7、升级内核
# 1、查看当前内核版本(当前版本为3.10.0)
[root@k8s-master ~]# uname -r
3.10.0-693.el7.x86_64

2、调整内核参数
cat> /etc/sysctl.d/kubernetes.conf << EOF
net.bridge.bridge-nf-call-ip6tables=1
net.bridge.bridge-nf-call-iptables=1
net.ipv4.ip_forward=1
net.ipv4.tcp_tw_recycle=0
vm.swapppiness=0  #禁止使用SWAP空间,只有当系统 OOM 时才允许使用它
vm.overcommit_memory=1
vm.panic_on_oom=0 # 开启OOM
net.ipv6.conf.all.disabe_ipv6=1
EOF

# 3、重新加载
sysctl -p /etc/sysctl.d/kubernetes.conf

# 4、安装Key
rpm --import https://www.elrepo.org/RPM-GPG-KEY-elrepo.org
yum install https://www.elrepo.org/elrepo-release-7.el7.elrepo.noarch.rpm

# 5、查看内核列表
yum --disablerepo="*" --enablerepo="elrepo-kernel" list available --showduplicates

# 6、安装内核
yum -y install --enablerepo="elrepo-kernel" kernel-ml
# 或者单独安装内核:yum -y install kernel-ml-5.9.6-1.el7.elrepo.x86_64.rpm

# 7、设置开机从新的内核启动
grub2-set-default 0
grub2-mkconfig -o /boot/grub2/grub.cfg

# 8、重启服务器并查看内核
reboot
uname -r

[root@k8s-master01 ~]# uname -r
5.9.6-1.el7.elrepo.x86_64
8、开启 IPVS 前置条件
# 1、加载模块
modprobe br_netfilter

# 2、创建参数脚本
yum -y install ipvsadm ipset
cat > /etc/sysconfig/modules/ipvs.modules  <<EOF
#!/bin/bash
modprobe -- ip_vs
modprobe -- ip_vs_rr
modprobe -- ip_vs_wrr
modprobe -- ip_vs_sh
modprobe -- nf_conntrack_ipv4
EOF

# 3、配置生效
chmod 755 /etc/sysconfig/modules/ipvs.modules \
&& bash /etc/sysconfig/modules/ipvs.modules \
&& sleep 5 && lsmod | grep -e ip_vs -e nf_conntrack_ipv4
二、、安装 Docker 服务
参考 https://www.cnblogs.com/wangzy-tongq/p/13993493.html
三、安装 Kubernetes 必备工具
# 1、配置YUM源
cat << EOF > /etc/yum.repos.d/kubernetes.repo
[kubernetes]
name=Kubernetes
baseurl=https://mirrors.aliyun.com/kubernetes/yum/repos/kubernetes-el7-x86_64/
enabled=1
gpgcheck=0
EOF

# 2、所有节点安装必备工具,版本不加默认为最新版,我这边指定了1.14.0版本
yum  -y  install kubelet-1.14.0 kubeadm-1.14.0 kubectl-1.14.0 --disableexcludes=kubernetes(用自定义的Kubernetes)

# 3、启动服务(无需启动)
systemctl enable kubelet

# 4、查看版本
kubeadm version                #kubeadm版本号
kubelet --version            #kubelet版本号
四、创建配置文件信息
# 1、创建集群目录并进入
mkdir -p /usr/local/kubernetes/cluster
cd /usr/local/kubernetes/cluster

# 2、导出配置文件
kubeadm config print init-defaults --kubeconfig ClusterConfiguration > kubeadm.yml

# 3、备份并修改导出的配置文件,修改内容如下
[root@k8s-master cluster]# cp kubeadm.yml kubeadm.yml-bak
[root@k8s-master cluster]# cat kubeadm.yml
apiVersion: kubeadm.k8s.io/v1beta1
bootstrapTokens:
- groups:
  - system:bootstrappers:kubeadm:default-node-token
  token: abcdef.0123456789abcdef
  ttl: 24h0m0s
  usages:
  - signing
  - authentication
kind: InitConfiguration
localAPIEndpoint:
  advertiseAddress: 192.168.101.26      #######修改一: 修改为主节点IP为maser的实际IP,默认配置为1.2.3.4
  bindPort: 6443
nodeRegistration:
  criSocket: /var/run/dockershim.sock
  name: k8s-master01
  taints:
  - effect: NoSchedule
    key: node-role.kubernetes.io/master
---
apiServer:
  timeoutForControlPlane: 4m0s
apiVersion: kubeadm.k8s.io/v1beta1
certificatesDir: /etc/kubernetes/pki
clusterName: kubernetes
controlPlaneEndpoint: ""
controllerManager: {}
dns:
  type: CoreDNS
etcd:
  local:
    dataDir: /var/lib/etcd
imageRepository:  registry.aliyuncs.com/google_containers   #######修改二: 修改镜像下载地址为阿里云地址,默认为国外下载地址:k8s.gcr.io
kind: ClusterConfiguration
kubernetesVersion: v1.14.0          #######修改三:修改为Kubernetes实际安装版本,否则服务起不来。查看版本命名kubeadm version
networking:
  dnsDomain: cluster.local
  podSubnet: "10.244.0.0/16"        #######修改四:配置Pod所在网段为我们虚拟机不冲突的网段(这里用的是Flannel默认网段),默认配置为:podSubnet: ""
  serviceSubnet: 10.96.0.0/12
scheduler: {}
初始化主节点
[root@k8s-master cluster]# kubeadm init --config=kubeadm.yml --experimental-upload-certs | tee kubeadm-init.log
###########以下为输出信息,内容同步到kubeadm-init.log日志里,方便后续查看内容信息
[init] Using Kubernetes version: v1.14.0
[preflight] Running pre-flight checks
    [WARNING IsDockerSystemdCheck]: detected "cgroupfs" as the Docker cgroup driver. The recommended driver is "systemd". Please follow the guide at https://kubernetes.io/docs/setup/cri/
    [WARNING Hostname]: hostname "k8s-master01" could not be reached
    [WARNING Hostname]: hostname "k8s-master01": lookup k8s-master01 on 8.8.8.8:53: no such host
[preflight] Pulling images required for setting up a Kubernetes cluster
[preflight] This might take a minute or two, depending on the speed of your internet connection
[preflight] You can also perform this action in beforehand using 'kubeadm config images pull'
[kubelet-start] Writing kubelet environment file with flags to file "/var/lib/kubelet/kubeadm-flags.env"
[kubelet-start] Writing kubelet configuration to file "/var/lib/kubelet/config.yaml"
[kubelet-start] Activating the kubelet service
[certs] Using certificateDir folder "/etc/kubernetes/pki"
[certs] Generating "ca" certificate and key
[certs] Generating "apiserver" certificate and key
[certs] apiserver serving cert is signed for DNS names [k8s-master01 kubernetes kubernetes.default kubernetes.default.svc kubernetes.default.svc.cluster.local] and IPs [10.96.0.1 192.168.101.26]
[certs] Generating "apiserver-kubelet-client" certificate and key
[certs] Generating "front-proxy-ca" certificate and key
[certs] Generating "front-proxy-client" certificate and key
[certs] Generating "etcd/ca" certificate and key
[certs] Generating "etcd/server" certificate and key
[certs] etcd/server serving cert is signed for DNS names [k8s-master01 localhost] and IPs [192.168.101.26 127.0.0.1 ::1]
[certs] Generating "apiserver-etcd-client" certificate and key
[certs] Generating "etcd/peer" certificate and key
[certs] etcd/peer serving cert is signed for DNS names [k8s-master01 localhost] and IPs [192.168.101.26 127.0.0.1 ::1]
[certs] Generating "etcd/healthcheck-client" certificate and key
[certs] Generating "sa" key and public key
[kubeconfig] Using kubeconfig folder "/etc/kubernetes"
[kubeconfig] Writing "admin.conf" kubeconfig file
[kubeconfig] Writing "kubelet.conf" kubeconfig file
[kubeconfig] Writing "controller-manager.conf" kubeconfig file
[kubeconfig] Writing "scheduler.conf" kubeconfig file
[control-plane] Using manifest folder "/etc/kubernetes/manifests"
[control-plane] Creating static Pod manifest for "kube-apiserver"
[control-plane] Creating static Pod manifest for "kube-controller-manager"
[control-plane] Creating static Pod manifest for "kube-scheduler"
[etcd] Creating static Pod manifest for local etcd in "/etc/kubernetes/manifests"
[wait-control-plane] Waiting for the kubelet to boot up the control plane as static Pods from directory "/etc/kubernetes/manifests". This can take up to 4m0s
[apiclient] All control plane components are healthy after 15.001525 seconds
[upload-config] storing the configuration used in ConfigMap "kubeadm-config" in the "kube-system" Namespace
[kubelet] Creating a ConfigMap "kubelet-config-1.14" in namespace kube-system with the configuration for the kubelets in the cluster
[upload-certs] Storing the certificates in ConfigMap "kubeadm-certs" in the "kube-system" Namespace
[upload-certs] Using certificate key:
718cc006cd91e1cca3e3f28e5c98eddadd1cf8650d6c7333cf7d2dcd247dd166
[mark-control-plane] Marking the node k8s-master01 as control-plane by adding the label "node-role.kubernetes.io/master=''"
[mark-control-plane] Marking the node k8s-master01 as control-plane by adding the taints [node-role.kubernetes.io/master:NoSchedule]
[bootstrap-token] Using token: abcdef.0123456789abcdef
[bootstrap-token] Configuring bootstrap tokens, cluster-info ConfigMap, RBAC Roles
[bootstrap-token] configured RBAC rules to allow Node Bootstrap tokens to post CSRs in order for nodes to get long term certificate credentials
[bootstrap-token] configured RBAC rules to allow the csrapprover controller automatically approve CSRs from a Node Bootstrap Token
[bootstrap-token] configured RBAC rules to allow certificate rotation for all node client certificates in the cluster
[bootstrap-token] creating the "cluster-info" ConfigMap in the "kube-public" namespace
[addons] Applied essential addon: CoreDNS
[addons] Applied essential addon: kube-proxy

Your Kubernetes control-plane has initialized successfully!  ###########初始化成功

To start using your cluster, you need to run the following as a regular user: ###########若要使用集群,必须执行以下步骤。root用户一般复制前两句命令即可,第三个命令为非root用户使用

  mkdir -p $HOME/.kube
  sudo cp -i /etc/kubernetes/admin.conf $HOME/.kube/config
  sudo chown $(id -u):$(id -g) $HOME/.kube/config

You should now deploy a pod network to the cluster.            ##########配置pod网络
Run "kubectl apply -f [podnetwork].yaml" with one of the options listed at:
  https://kubernetes.io/docs/concepts/cluster-administration/addons/

Then you can join any number of worker nodes by running the following on each as root:

kubeadm join 192.168.101.26:6443 --token abcdef.0123456789abcdef \
    --discovery-token-ca-cert-hash sha256:a83c85d21b249f854f8ab24990c52b9ca705cae72c7a3b63764611032a757cdd  #########客户机加入集群时需要使用,注意token会过期
[root@k8s-master01 cluster]#
mkdir -p $HOME/.kube
sudo cp -i /etc/kubernetes/admin.conf $HOME/.kube/config
查看节点信息
[root@k8s-master cluster]# kubectl get nodes
NAME           STATUS     ROLES    AGE     VERSION
k8s-master01   NotReady   master   6m10s   v1.14.0

# NotReady 是因为还没有配置网络插件,需要网络插件,如Flannel
添加 Flannel 网络插件
# 1、下载资源配置清单
wget https://raw.githubusercontent.com/coreos/flannel/master/Documentation/kube-flannel.yml

# 2、运行资源清单
kubectl apply -f kube-flannel.yml

# 3、再次查看状态信息(STATUS 状态变成 Ready)
kubectl get nodes

# 输出如下:
NAME         STATUS   ROLES    AGE   VERSION
k8s-master   Ready    master   13m   v1.14.0

# 4、查看网卡,发现多处一个 flannel.1: 网卡
ifconfig
从节点加入主节点
# 验证信息从主节点初始化日志里面查找
kubeadm join 192.168.101.26:6443 --token abcdef.0123456789abcdef \
    --discovery-token-ca-cert-hash sha256:a83c85d21b249f854f8ab24990c52b9ca705cae72c7a3b63764611032a757cdd

## 以下为输出信息
[root@k8s-node02 ~]# kubeadm join 192.168.101.26:6443 --token abcdef.0123456789abcdef \
>     --discovery-token-ca-cert-hash sha256:a83c85d21b249f854f8ab24990c52b9ca705cae72c7a3b63764611032a757cdd
[preflight] Running pre-flight checks
    [WARNING IsDockerSystemdCheck]: detected "cgroupfs" as the Docker cgroup driver. The recommended driver is "systemd". Please follow the guide at https://kubernetes.io/docs/setup/cri/
    [WARNING Service-Kubelet]: kubelet service is not enabled, please run 'systemctl enable kubelet.service'
[preflight] Reading configuration from the cluster...
[preflight] FYI: You can look at this config file with 'kubectl -n kube-system get cm kubeadm-config -oyaml'
[kubelet-start] Downloading configuration for the kubelet from the "kubelet-config-1.14" ConfigMap in the kube-system namespace
[kubelet-start] Writing kubelet configuration to file "/var/lib/kubelet/config.yaml"
[kubelet-start] Writing kubelet environment file with flags to file "/var/lib/kubelet/kubeadm-flags.env"
[kubelet-start] Activating the kubelet service
[kubelet-start] Waiting for the kubelet to perform the TLS Bootstrap...

This node has joined the cluster:
* Certificate signing request was sent to apiserver and a response was received.
* The Kubelet was informed of the new secure connection details.

Run 'kubectl get nodes' on the control-plane to see this node join the cluster.   ######查看节点信息,确认是否加入成功


[root@k8s-node01 cluster]# kubectl get nodes
NAME           STATUS     ROLES    AGE   VERSION
k8s-master01   NotReady   master   44m   v1.14.0
k8s-node01     NotReady   <none>   28m   v1.14.0
k8s-node02     NotReady   <none>   27m   v1.14.0
结束!!!
