Jumpserver2.23部署手册
1、配置
系统:Centos7.9*2
配置:2CUP*4G
192.168.100.102:数据库几redis服务器
192.168.100.103:jumpserver服务器
2、要求
需要连接 互联网
使用 root 用户执行

官网下载地址:https://community.fit2cloud.com/#/download/jumpserver/v2-23-4
官网问题汇总:https://kb.fit2cloud.com/archives/73
官网知识库:https://kb.fit2cloud.com/categories/jumpserver
3、部署jdk环境
tar -zxvf jdk-8u202-linux-x64.tar.gz -C /usr/local/
vim /etc/profile
尾部添加以下内容
jdk8
export JAVA_HOME=/usr/local/jdk1.8.0_202/
export CLASSPATH=.:\(JAVA_HOME/lib/dt.jar:\)JAVA_HOME/lib/tools.jar
export PATH=\(JAVA_HOME/bin:\)PATH
source /etc/profile
[root@localhost ~]# java -version
java version "1.8.0_202"
Java(TM) SE Runtime Environment (build 1.8.0_202-b08)
Java HotSpot(TM) 64-Bit Server VM (build 25.202-b08, mixed mode)
4、部署mysql
在192.168.100.102上
yum -y localinstall http://mirrors.ustc.edu.cn/mysql-repo/mysql57-community-release-el7.rpm
yum install -y mysql-community-server
# 从MySQL的日志中 找到root账号的临时密码
grep 'temporary password' /var/log/mysqld.log

# 使用root账号登录 输入临时密码 登录成功
mysql -uroot -p

# 修改root账号的密码 使用MYSQL_NATIVE_PASSWORD的加密方式 这种方式大多数客户端都可以连接
ALTER USER 'root'@'localhost' IDENTIFIED WITH MYSQL_NATIVE_PASSWORD BY 'MyNewPass4!';

# 创建MySQL数据库
create database jumpserver default charset 'utf8';
CREATE USER 'USER'@'%' IDENTIFIED WITH MYSQL_NATIVE_PASSWORD BY 'USER_PWD';
# 对数据库授权
grant all on jumpserver.* to jumpserver@127.0.0.1 identified by '123.com';
GRANT ALL ON *.* TO 'USER'@'%';
# 刷新权限
FLUSH PRIVILEGES;
退出
exit
5、部署redis
redis官网:https://redis.io/download/
redis各版本下载地址:https://download.redis.io/releases/
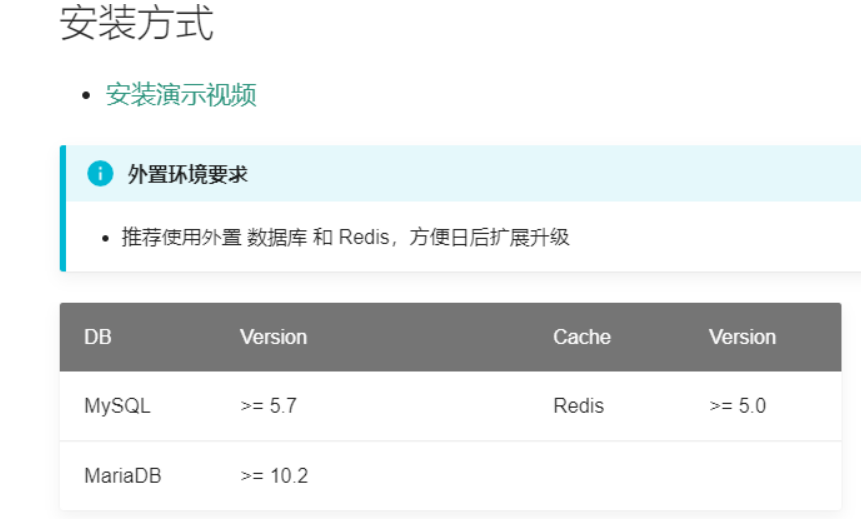
根据要求需要5.0以上的redis
cd /opt/soft/
wget https://download.redis.io/releases/redis-6.0.16.tar.gz
tar -zxvf redis-6.0.16.tar.gz -C /usr/local/redis6
make

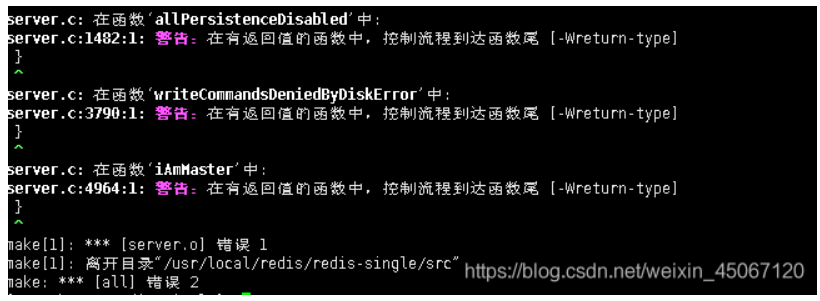
注意:6.0版本出现无法Make编译报错可能是缺少编译环境gcc和tcl
安装gcc,先清理掉上一步编译产生的文件,执行命令
make distclean
1.1这里遇到一个问题:在安装6.0.1版本make时会遇到这样一个错误,server.c:xxxx:xx: error: ‘xxxxxxxx’ has no member named ‘xxxxx
原因:gcc编译工具版本的问题,centos7默认安装的版本是4.8.5,但是要求对应版本要在5.3以上,查看gcc版本命令
gcc -v
1.2解决方法:升级到5.3以上版本,依次执行命令
yum -y install centos-release-scl
yum -y install devtoolset-9-gcc devtoolset-9-gcc-c++ devtoolset-9-binutils
scl enable devtoolset-9 bash
echo “source /opt/rh/devtoolset-9/enable” >>/etc/profile --使永久生效
2)安装tcl,执行命令
yum install tcl -y
重新编译
make
make PREFIX=/usr/local/redis6 install
vim redis.co
bind 0.0.0.0
daemonize yes
./redis-server ../redis.conf
6、部署docker环境(可以不部署)
wget -O /etc/yum.repos.d/docker-ce.repo https://mirrors.aliyun.com/docker-ce/linux/centos/docker-ce.repo
yum install -y docker-ce
mkdir /etc/docker/
vim /etc/docker/daemon.json
{
"registry-mirrors": ["https://docker.mirrors.ustc.edu.cn"],
"data-root": "/data/docker",
"exec-opts": ["native.cgroupdriver=systemd"],
"log-driver": "json-file",
"log-opts": { "max-size": "300m","max-file": "3" },
"live-restore": true
}
mkdir -p /data/docker
systemctl start docker && systemctl enable docker
[root@localhost ~]# docker -v
Docker version 20.10.17, build 100c701
7、部署jumpserver
在192.168.100.103上
cd /opt/soft
wget https://community.fit2cloud.com/#/download/jumpserver/v2-23-4
tar -zxvf jumpserver-offline-installer-v2.20.0-amd64-150.tar.gz -C /opt/
cd /opt/jumpserver-offline-installer-v2.23.2-amd64-26/
./jmsctl.sh install
8、问题
vim /opt/jumpserver/config/nginx/lb_http_server.conf
server中添加(websocket报错)
proxy_set_header Upgrade $http_upgrade;
proxy_set_header Connection "upgrade";


