Vue nodejs商城-订单模块
一、订单列表渲染
新建OrderConfirm.vue订单确认页面,添加路由
src/router/index.js添加路由
-
import OrderConfirm from '@/views/OrderConfirm' // 订单确认页面
-
-
export default new Router({
-
routes: [
-
{
-
path: '/orderConfirm', // 订单确认页面路由
-
name: 'OrderConfirm',
-
component: OrderConfirm
-
}
-
]
-
})
src/views/OrderConfirm.vue
要获取订单列表,不需要再重新写接口,只需要使用查询购物车列表的接口,提取出购物车列表。在渲染时页面时,判断选中的商品才显示v-if="item.checked=='1'"。
对于一些价格数字不要忘记格式化,使用过滤器对价格进行格式化。
-
<!--列表渲染-->
-
<ul class="cart-item-list">
-
<li v-for="item in cartList" v-if="item.checked=='1'">
-
<!-- 商品图片和商品名称 -->
-
<div class="cart-tab-1">
-
<div class="cart-item-pic">
-
<img :src="'/static/'+item.productImage" :alt="item.productName">
-
</div>
-
<div class="cart-item-title">
-
<div class="item-name">{{item.productName}}</div>
-
</div>
-
</div>
-
<!-- 商品单价 -->
-
<div class="cart-tab-2">
-
<div class="item-price">{{item.salePrice | currency('$')}}</div>
-
</div>
-
<!-- 商品数量 -->
-
<div class="cart-tab-3">
-
<div class="item-quantity">
-
<div class="select-self">
-
<div class="select-self-area">
-
<span class="select-ipt">×{{item.productNum}}</span>
-
</div>
-
</div>
-
<div class="item-stock item-stock-no">In Stock</div>
-
</div>
-
</div>
-
<!-- 商品总金额 -->
-
<div class="cart-tab-4">
-
<div class="item-price-total">{{(item.salePrice*item.productNum) | currency('$')}}</div>
-
</div>
-
</li>
-
</ul>
-
-
-
<!-- Price count -->
-
<div class="price-count-wrap">
-
<div class="price-count">
-
<ul>
-
<li>
-
<span>Item subtotal:</span> <!-- 订单总金额 -->
-
<span>{{subTotal | currency('$')}}</span>
-
</li>
-
<li>
-
<span>Shipping:</span> <!-- 配送费 -->
-
<span>{{shipping | currency('$')}}</span>
-
</li>
-
<li>
-
<span>Discount:</span> <!-- 折扣 -->
-
<span>{{discount | currency('$')}}</span>
-
</li>
-
<li>
-
<span>Tax:</span> <!-- 税费 -->
-
<span>{{tax | currency('$')}}</span>
-
</li>
-
<li class="order-total-price">
-
<span>Order total:</span> <!-- 用户支付总金额 -->
-
<span>{{orderTotal | currency('$')}}</span>
-
</li>
-
</ul>
-
</div>
-
</div>
-
-
import axios from 'axios'
-
import {currency} from '@/util/currency.js' // 对价格格式化的通用方法
-
-
export default {
-
data(){
-
return {
-
shipping: 100, // 配送费
-
discount:200, // 折扣
-
tax:400, // 扣税
-
-
subTotal:0, // 订单总金额(是购物车选中商品的总金额)
-
-
orderTotal:0, // 总金额+配送费-折扣+税费 = orderTotal用户需要支付的金额,默认为0
-
-
cartList:[] // 购物车列表
-
}
-
},
-
mounted(){
-
this.init();
-
},
-
filters:{ // 定义局部过滤器
-
currency:currency // currency.js传过来的本就是函数
-
},
-
methods:{
-
init(){
-
axios.get('/users/cartList').then((response)=>{ // 订单确认列表不需要再写接口,直接用购物车列表的接口,渲染页面时选取选中的商品作为订单确认的商品
-
let res= response.data;
-
this.cartList = res.result;
-
-
this.cartList.forEach((item)=>{ // 遍历购物车商品,获取选中商品的总金额
-
if(item.checked == '1'){
-
this.subTotal += item.salePrice*item.productNum;
-
}
-
})
-
-
this.orderTotal = this.subTotal+this.shipping-this.discount+this.tax; // 获取用户最终支付的金额,(总金额+配送费-折扣+税费)
-
})
-
}
-
}
-
}
二、创建订单功能实现
(1)点击支付跳转到支付页面,支付是由第三方做的集成的支付,没办法模拟复杂的支付场景,现在只做点击支付创建订单和跳转到成功页面,支付功能省略掉。
(2)生成的订单里面有订单生成的时间,首先需要有对时间格式化的函数方法。
时间格式化server/util/util.js
-
/**
-
* Created by jacksoft on 17/4/26.
-
* 直接对Date对象原型添加方法
-
*/
-
Date.prototype.Format = function (fmt) {
-
var o = {
-
"M+": this.getMonth() + 1, //月份
-
"d+": this.getDate(), //日
-
"h+": this.getHours(), //小时
-
"m+": this.getMinutes(), //分
-
"s+": this.getSeconds(), //秒
-
"q+": Math.floor((this.getMonth() + 3) / 3), //季度
-
"S": this.getMilliseconds() //毫秒
-
};
-
if (/(y+)/.test(fmt)) fmt = fmt.replace(RegExp.$1, (this.getFullYear() + "").substr(4 - RegExp.$1.length));
-
for (var k in o)
-
if (new RegExp("(" + k + ")").test(fmt)) fmt = fmt.replace(RegExp.$1, (RegExp.$1.length == 1) ? (o[k]) : (("00" + o[k]).substr(("" + o[k]).length)));
-
return fmt;
-
}
-
-
module.exports = {};
订单生成接口 server/routes/users.js
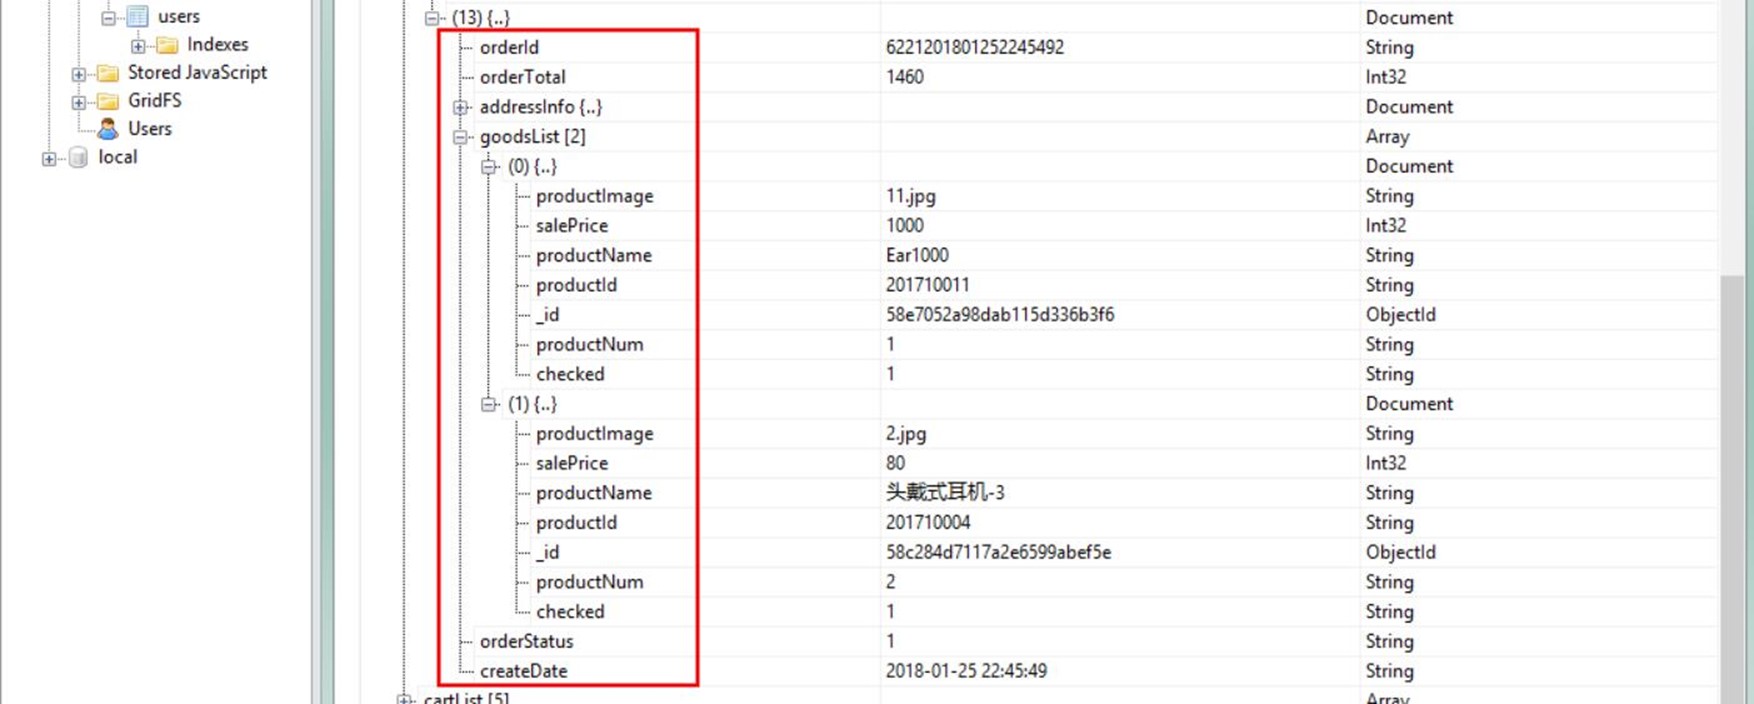
订单生成是将订单信息(包含订单Id/订单总金额/地址信息/下单的商品信息/订单状态/订单创建时间等)存入数据库。
-
require('./../util/util'); // 引入格式化函数
-
-
// 创建订单功能
-
router.post('/payMent', function(req,res,next){
-
// 前端传参:订单的地址id;订单最终的总金额
-
var userId = req.cookies.userId,
-
addressId = req.body.addressId,
-
orderTotal = req.body.orderTotal;
-
User.findOne({userId:userId}, function(err,doc){
-
if(err){
-
res.json({
-
status:'1',
-
msg:err.message,
-
result:''
-
})
-
}else{
-
var address = '',goodsList = [];
-
// 获取当前用户的地址信息
-
doc.addressList.forEach((item)=>{
-
if(addressId == item.addressId){
-
address = item;
-
}
-
})
-
// 获取当前用户的购物车的购买商品
-
doc.cartList.filter((item)=>{
-
if(item.checked == '1'){
-
goodsList.push(item);
-
}
-
})
-
-
//创建订单Id
-
var platform = '622'; // 平台系统架构码
-
var r1 = Math.floor(Math.random()*10);
-
var r2 = Math.floor(Math.random()*10);
-
-
var sysDate = new Date().Format('yyyyMMddhhmmss'); // 系统时间:年月日时分秒
-
var orderId = platform+r1+sysDate+r2; // 21位
-
-
// 订单创建时间
-
var createDate = new Date().Format('yyyy-MM-dd hh:mm:ss');
-
-
// 生成订单
-
var order = {
-
orderId:orderId, // 订单id
-
orderTotal:orderTotal, // 订单总金额(直接拿前端传过来的参数)
-
addressInfo:address, // 地址信息
-
goodsList:goodsList, // 购买的商品信息
-
orderStatus:'1', // 订单状态,1成功
-
createDate:createDate // 订单创建时间
-
}
-
-
// 订单信息存储到数据库
-
doc.orderList.push(order);
-
-
doc.save(function (err1,doc1) {
-
if(err1){
-
res.json({
-
status:"1",
-
msg:err.message,
-
result:''
-
});
-
}else{
-
// 返回订单的id和订单的总金额给前端,下一个页面要用到
-
res.json({
-
status:"0",
-
msg:'',
-
result:{
-
orderId:order.orderId,
-
orderTotal:order.orderTotal
-
}
-
});
-
}
-
});
-
}
-
})
-
})
src/views/OrderConfirm.vue
传参要传订单的地址id和订单的总金额
订单的地址id从订单页面的路由获取参数id值 http://localhost:8080/#/orderConfirm?addressId=100001 的100001,this.$route.query.addressId
成功时跳转到订单成功页面this.$router.push({path:'/orderSuccess?orderId='+res.result.orderId})
-
// 点击支付按钮
-
payMent(){ // 点击支付
-
-
// 从路由那里获取到订单地址的id
-
// http://localhost:8080/#/orderConfirm?addressId=100001
-
var addressId = this.$route.query.addressId;
-
-
axios.post('/users/payMent',{
-
addressId:addressId,
-
orderTotal:this.orderTotal
-
}).then((response)=>{
-
let res = response.data;
-
if(res.status == '0'){
-
console.log('order created success');
-
-
// 路由跳转到订单成功页面
-
this.$router.push({
-
path:'/orderSuccess?orderId='+res.result.orderId
-
})
-
}
-
})
-
}
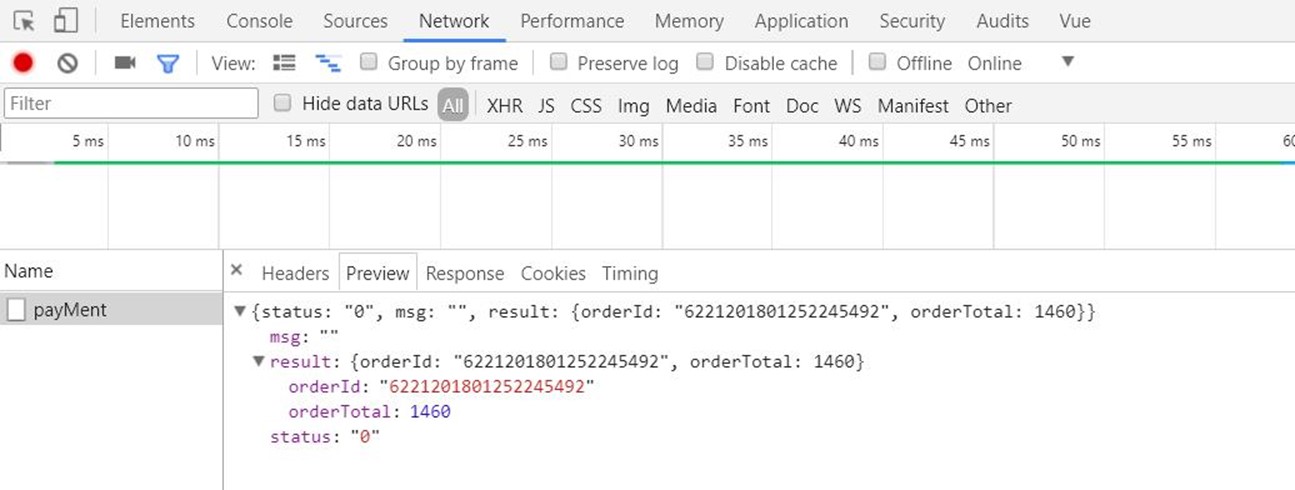
点击支付按钮,请求成功,返回生成的订单Id(orderId)和订单总金额(orderTotal)。订单Id=6221201801252245492,622=平台架构码/1=随机数r1/20180125224549=年月日时分秒/2=随机数r2
三、订单成功页面
新建订单成功页面组件src/views/orderSuccess.vue,添加页面路由
src/router/index.js
-
import OrderSuccess from '@/views/OrderSuccess' // 订单成功页面
-
-
export default new Router({
-
routes: [
-
{
-
path: '/orderSuccess', // 订单成功頁面
-
name: 'OrderSuccess',
-
component: OrderSuccess
-
}
-
]
-
})
后端接口server/routes/users.js,根据前端传的订单Id查询订单信息
-
//根据订单Id查询订单信息
-
router.get("/orderDetail", function (req,res,next) {
-
var userId = req.cookies.userId,
-
orderId = req.param("orderId"); // 前端传过来的订单id
-
User.findOne({userId:userId}, function (err,userInfo) {
-
if(err){
-
res.json({
-
status:'1',
-
msg:err.message,
-
result:''
-
});
-
}else{
-
var orderList = userInfo.orderList; // orderList订单列表
-
if(orderList.length>0){ // 说明有订单
-
var orderTotal = 0;
-
// 遍历订单列表,根据订单id得到该订单总金额orderTotal
-
orderList.forEach((item)=>{
-
if(item.orderId == orderId){
-
orderTotal = item.orderTotal;
-
}
-
});
-
if(orderTotal>0){
-
res.json({
-
status:'0',
-
msg:'',
-
result:{
-
orderId:orderId,
-
orderTotal:orderTotal
-
}
-
})
-
}else{
-
res.json({
-
status:'120002',
-
msg:'无此订单',
-
result:''
-
});
-
}
-
}else{
-
res.json({
-
status:'120001',
-
msg:'当前用户未创建订单',
-
result:''
-
});
-
}
-
}
-
})
-
});
前端页面初始化时get请求,传参订单id,返回订单的总金额渲染页面。订单的id从路由获取,http://localhost:8080/#/orderSuccess?orderId=6221201801252245492 中的orderId:this.$route.query.orderId
-
<p>
-
<span>Order ID:{{orderId}}</span>
-
<span>Order total:{{orderTotal|currency('$')}}</span>
-
</p>
-
export default {
-
data(){
-
return {
-
orderId:'', // 订单id
-
orderTotal:0 // 订单总金额
-
}
-
},
-
mounted(){
-
// 从路由那里获取到订单id
-
// http://localhost:8080/#/orderSuccess?orderId=6221201801252245492
-
var orderId = this.$route.query.orderId;
-
console.log("orderId:"+orderId);
-
-
if(!orderId){
-
return;
-
}
-
axios.get("/users/orderDetail",{
-
params:{
-
orderId:orderId
-
}
-
}).then((response)=>{
-
let res = response.data;
-
if(res.status == '0'){
-
this.orderId = orderId;
-
this.orderTotal = res.result.orderTotal;
-
}
-
})
-
},
-
filters:{ // 定义局部过滤器
-
currency:currency // currency.js传过来的本就是函数
-
}
-
}


 浙公网安备 33010602011771号