

OSG 使用整理(1):搭建场景图
一、搭建场景图
1.1 创建几何节点
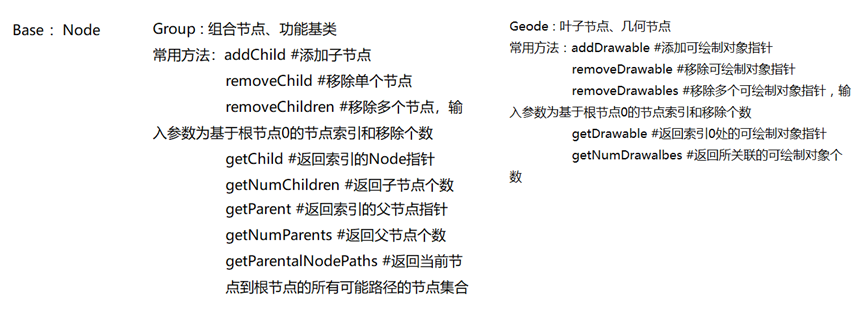
场景图是表示图形与状态对象的空间布局的节点的层次图结构图,它描述了从根节点到可绘制对象一层层渲染属性和状态。
场景图由Node基类派生的子节点类型构成,常用的节点类继承关系和作用如下图所示。
示例为使用OSG创建最简单的场景图过程

 1 #include <osg/Group>
 2 #include <osgDB/ReadFile>
 3 #include <osgViewer/Viewer>
 4 int main()
 5 {
 6   osg::ref_ptr<osg::Node> model1 = osgDB::readNodeFile(
 7     "cessna.osg" );
 8   osg::ref_ptr<osg::Node> model2 = osgDB::readNodeFile( "cow.osg" );
 9   osg::ref_ptr<osg::Group> root = new osg::Group;
10   root->addChild( model1.get() );
11   root->addChild( model2.get() );
12   osgViewer::Viewer viewer;
13   viewer.setSceneData( root.get() );
14   return viewer.run();
15 }
ShapeDrawable类可以快速便捷创建基本图元显示,示例为通过ShapeDrawable类创建三个基本图元,并挂载到场景图中显示。
 1 #include <osg/ShapeDrawable>
 2 #include <osg/Geode>
 3 #include <osgViewer/Viewer>
 4 int main()
 5 {
 6     osg::ref_ptr<osg::ShapeDrawable> shape1 = new     osg::ShapeDrawable;
 7     shape1->setShape( new osg::Box(osg::Vec3(-3.0f, 0.0f, 0.0f),
 8                                2.0f, 2.0f, 1.0f) );
 9     osg::ref_ptr<osg::ShapeDrawable> shape2 = new     osg::ShapeDrawable;
10     shape2->setShape( new osg::Sphere(osg::Vec3(3.0f, 0.0f, 0.0f),
11                                   1.0f) );
12     shape2->setColor( osg::Vec4(0.0f, 0.0f, 1.0f, 1.0f) );
13     osg::ref_ptr<osg::ShapeDrawable> shape3 = new     osg::ShapeDrawable;
14     shape3->setShape( new osg::Cone(osg::Vec3(0.0f, 0.0f, 0.0f),
15                                 1.0f, 1.0f) );
16     shape3->setColor( osg::Vec4(0.0f, 1.0f, 0.0f, 1.0f) );
17
18     osg::ref_ptr<osg::Geode> root = new osg::Geode;
19     root->addDrawable( shape1.get() );
20     root->addDrawable( shape2.get() );
21     root->addDrawable( shape3.get() );
22     osgViewer::Viewer viewer;
23     viewer.setSceneData( root.get() );
24     return viewer.run();
25
26 }
osg::Geometry类封装了OpenGL顶点数组对象,记录了不同的数组类型,添加进osg::Geode对象后,使用这些数组生成复杂的几何模型。
osg::Geometry类管理一组顶点对象,顶点拥有位置、纹理坐标、颜色、法向坐标、雾坐标等多个数值特性。
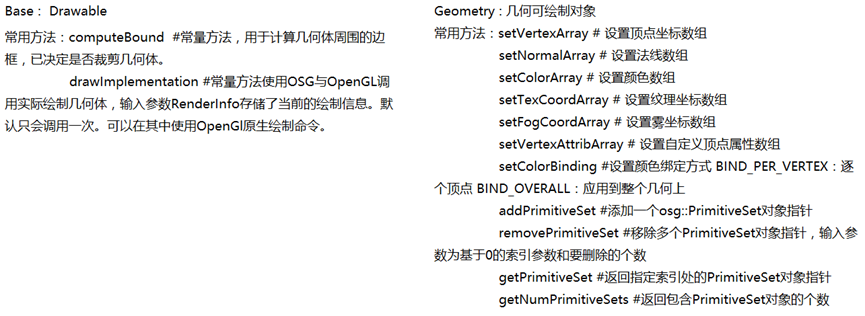
osg::PrimitiveSet类派生了子类来封装了OpenGL的glDrawArrays和glDrawElements指令。例如osg::DrawArrays 类实例化的时候osg::DrawArrays(mode, first, count),第一个参数指定渲染的基元类型,GL_POINTS,GL_LINE_STRIP,GL_LINE_LOOP,GL_LINES,GL_TRIANGLE_STRIP,GL_TRIANGLE_FAN,GL_TRIANGLES,GL_QUAD_STRIP,GL_QUADS与GL_POLYGON;第二个参数指定起始索引;第三个参数指定个数。
示例为通过osg::Geometry类创建四边形绘制对象,并挂载到场景图中渲染显示。
 1 #include <osg/Geometry>
 2 #include <osg/Geode>
 3 #include <osgViewer/Viewer>
 4 int main()
 5 {
 6
 7   osg::ref_ptr<osg::Vec3Array> vertices = new osg::Vec3Array;
 8   vertices->push_back( osg::Vec3(0.0f, 0.0f, 0.0f) );
 9   vertices->push_back( osg::Vec3(1.0f, 0.0f, 0.0f) );
10   vertices->push_back( osg::Vec3(1.0f, 0.0f, 1.0f) );
11   vertices->push_back( osg::Vec3(0.0f, 0.0f, 1.0f) );
12
13   osg::ref_ptr<osg::Vec3Array> normals = new osg::Vec3Array;
14   normals->push_back( osg::Vec3(0.0f,-1.0f, 0.0f) );
15
16   osg::ref_ptr<osg::Vec4Array> colors = new osg::Vec4Array;
17   colors->push_back( osg::Vec4(1.0f, 0.0f, 0.0f, 1.0f) );
18   colors->push_back( osg::Vec4(0.0f, 1.0f, 0.0f, 1.0f) );
19   colors->push_back( osg::Vec4(0.0f, 0.0f, 1.0f, 1.0f) );
20   colors->push_back( osg::Vec4(1.0f, 1.0f, 1.0f, 1.0f) );
21
22   osg::ref_ptr<osg::Geometry> quad = new osg::Geometry;
23   quad->setVertexArray( vertices.get() );
24   quad->setNormalArray( normals.get() );
25   quad->setNormalBinding( osg::Geometry::BIND_OVERALL );
26   quad->setColorArray( colors.get() );
27   quad->setColorBinding( osg::Geometry::BIND_PER_VERTEX );
28
29   quad->addPrimitiveSet( new osg::DrawArrays(GL_QUADS, 0, 4) );
30
31   osg::ref_ptr<osg::Geode> root = new osg::Geode;
32   root->addDrawable( quad.get() );
33   osgViewer::Viewer viewer;
34   viewer.setSceneData( root.get() );
35   return viewer.run();
36 }
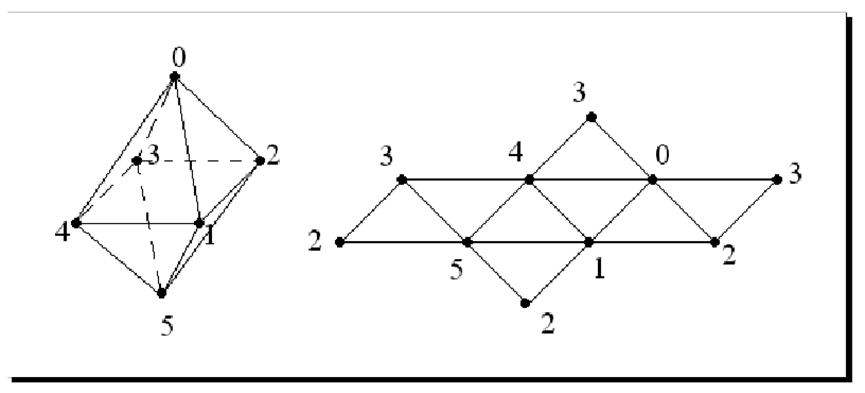
此外osg::PrimitiveSet的子类osg::DrawElementsUInt可以用于索引位置,避免使用大量重复顶点。示例为使用osg::DrawElementsUInt绘制一个八面体并显示。八面体结构及展开后的索引图如下所示,八面体有6个顶点,每一个为4个三角形所共享,当使用osg::DrawArray绘制时需要提供具有24个元素的顶点数组来正确渲染8个面,然而使用osg::DrawElementsUInt 只需要6个点,仅仅额外提供构成8个面的索引数组。
 1 #include <osg/Geometry>
 2 #include <osg/Geode>
 3 #include <osgUtil/SmoothingVisitor>
 4 #include <osgViewer/Viewer>
 5 int main()
 6 {
 7   osg::ref_ptr<osg::Vec3Array> vertices = new osg::Vec3Array(6);
 8   (*vertices)[0].set( 0.0f, 0.0f, 1.0f);
 9   (*vertices)[1].set(-0.5f,-0.5f, 0.0f);
10   (*vertices)[2].set( 0.5f,-0.5f, 0.0f);
11   (*vertices)[3].set( 0.5f, 0.5f, 0.0f);
12   (*vertices)[4].set(-0.5f, 0.5f, 0.0f);
13   (*vertices)[5].set( 0.0f, 0.0f,-1.0f);
14
15   osg::ref_ptr<osg::DrawElementsUInt> indices =
16     new osg::DrawElementsUInt(GL_TRIANGLES, 24);
17   (*indices)[0] = 0; (*indices)[1] = 1; (*indices)[2] = 2;
18   (*indices)[3] = 0; (*indices)[4] = 2; (*indices)[5] = 3;
19   (*indices)[6] = 0; (*indices)[7] = 3; (*indices)[8] = 4;
20   (*indices)[9] = 0; (*indices)[10]= 4; (*indices)[11]= 1;
21   (*indices)[12]= 5; (*indices)[13]= 2; (*indices)[14]= 1;
22   (*indices)[15]= 5; (*indices)[16]= 3; (*indices)[17]= 2;
23   (*indices)[18]= 5; (*indices)[19]= 4; (*indices)[20]= 3;
24   (*indices)[21]= 5; (*indices)[22]= 1; (*indices)[23]= 4;
25
26   osg::ref_ptr<osg::Geometry> geom = new osg::Geometry;
27   geom->setVertexArray( vertices.get() );
28   geom->addPrimitiveSet( indices.get() );
29   osgUtil::SmoothingVisitor::smooth( *geom );
30
31   osg::ref_ptr<osg::Geometry> geom = new osg::Geometry;
32   geom->setVertexArray( vertices.get() );
33   geom->addPrimitiveSet( indices.get() );
34   osgUtil::SmoothingVisitor::smooth( *geom );
35
36   osg::ref_ptr<osg::Geode> root = new osg::Geode;
37   root->addDrawable( geom.get() );
38   osgViewer::Viewer viewer;
39   viewer.setSceneData( root.get() );
40   return viewer.run();
41
42 }
对于高级研究,我们甚至可以添加具有不同绘制模式的多个基元集合,例如,使用GL_QUADS渲染锥底,使用GL_TRIANGLES_FAN渲染三角面。


【推荐】国内首个AI IDE,深度理解中文开发场景,立即下载体验Trae
【推荐】编程新体验,更懂你的AI,立即体验豆包MarsCode编程助手
【推荐】抖音旗下AI助手豆包,你的智能百科全书,全免费不限次数
【推荐】轻量又高性能的 SSH 工具 IShell:AI 加持,快人一步
· winform 绘制太阳,地球,月球 运作规律
· AI与.NET技术实操系列(五):向量存储与相似性搜索在 .NET 中的实现
· 超详细:普通电脑也行Windows部署deepseek R1训练数据并当服务器共享给他人
· 【硬核科普】Trae如何「偷看」你的代码?零基础破解AI编程运行原理
· 上周热点回顾(3.3-3.9)