Python基础 | 0.3.Python环境搭建
由于我之前用过Python(在Windows上使用Pycharm和Sublime),所以还算比较熟悉。出于以后工程、工作的考虑,准备更多的在Centos7(默认自带Python2.7)上使用Vim编程,因此这篇博客关注的是在Centos7安装Python3.
1.Centos7 中 yum 的使用
YUM是一个基于PRM管理的后台程序,能够从指定的服务器自动下载PRM安装包,且能够自动安装,能够有效的解决存在依赖性的软件包。
详细了解见于Linux(挖坑,后续补上)
2.安装Python3
-
(1)安装编译环境
[root@xxxxxx /]# yum groupinstall 'Development Tools' [root@xxxxxx /]# yum install zlib-devel bzip2-devel openssl-devel ncurses-devel -
(2)下载Python3.6.5
[root@xxxxxx /]# wget --no-check-certificate https://www.python.org/ftp/python/3.6.5/Python-3.6.5.tgz -
(3)创建安装目录
[root@xxxxxx /]# sudo mkdir /usr/local/python3 -
(4)解压后进入文件夹
[root@xxxxxx /]# tar -zxvf Python-3.6.5.tgz [root@xxxxxx /]# cd Python-3.6.5/ -
(5)编译安装
[root@xxxxxx /]# ./configure --prefix=/usr/local/python3 --enable-optimizations [root@xxxxxx /]# make [root@xxxxxx /]# make install -
(6)创建Python3链接
[root@xxxxxx /]# ln -s /usr/local/python3/bin/python3.6 /usr/bin/python3 -
(7)创建Pip3链接
[root@xxxxxx /]# ln -s /usr/local/python3/bin/pip3 /usr/bin/pip3 -
(8)升级Pip3
[root@xxxxxx /]# pip3 install --upgrade pip -
(9)安装python-dev和python3-dev
[root@xxxxxx /]# pip3 install python-dev python3-dev
3.安装虚拟环境virtualenvwrapper
-
什么是虚拟环境?
- 答:虚拟环境是用于依赖项管理和项目隔离的Python工具,允许Python站点包(第三方库)安装在本地特定项目的隔离目录中,而不是全局安装(即作为系统范围内的Python的一部分)。
-
虚拟环境使用举例
- 当你同时开发几个项目时,有的使用python2,有的项目使用python3;web开发时,可能使用的django版本也不相同等等。我们开发时,为了避免这种包管理混乱的情况,可以将不同的项目建立各自独立的开发环境,这些开发环境之间没有关系、互不干扰。
-
(1)安装virtualenvwrapper
[root@xxxxxx /]# yum install python-setuptoold python-devel [root@xxxxxx /]# pip3 install virtualenvwrapper -
(2)编辑bashrc环境
- <1>使用 vim 打开 bashrc
[root@xxxxxx /]# sudo vim ~/.bashrc - <2>在末尾添加如下代码并保存
# add the following code
export WORKON_HOME=~/.virtualenvs #指定virtualenvwrapper环境的目录
export VIRTUALENVWRAPPER_PYTHON=/usr/bin/python3.6 #指定virtualenvwrapper通过哪个python版本来创建虚拟环境
source /usr/local/bin/virtualenvwrapper.sh
- <1>使用 vim 打开 bashrc
4.创建虚拟环境并完成第一个程序
对于初学者来说,其实没必要使用虚拟环境,但为了养成习惯,创建虚拟环境来进行学习代码。
-
(1)创建并进入、退出、删除虚拟环境
- a.创建虚拟环境
- 由于在编辑bashrc环境时制定了默认的解释器为python3,因此不需要使用 -p 参数即可创建虚拟环境
- 在这里创建了虚拟环境,名称为 lianxi ,从下面可以看到,创建完成时候,自动进入虚拟环境
[root@xxxxxx /]# mkvirtualenv lianxi Using base prefix '/usr/local' New python executable in /root/.virtualenvs/lianxi/bin/python3.6 Also creating executable in /root/.virtualenvs/lianxi/bin/python Please make sure you remove any previous custom paths from your /root/.pydistutils.cfg file. Installing setuptools, pip, wheel... done. virtualenvwrapper.user_scripts creating /root/.virtualenvs/lianxi/bin/predeactivate virtualenvwrapper.user_scripts creating /root/.virtualenvs/lianxi/bin/postdeactivate virtualenvwrapper.user_scripts creating /root/.virtualenvs/lianxi/bin/preactivate virtualenvwrapper.user_scripts creating /root/.virtualenvs/lianxi/bin/postactivate virtualenvwrapper.user_scripts creating /root/.virtualenvs/lianxi/bin/get_env_details (lianxi)[root@xxxxxx /]# (lianxi)[root@xxxxxx /]# python -V Python 3.6.5 (lianxi)[root@xxxxxx /]# - b.进入虚拟环境
- 当我们并非新创建虚拟环境时,怎么进入虚拟环境呢???
- 使用 workon 命令,即可列出当前有哪些可用的虚拟环境,选择进入即可。示例:
[root@xxxxxx /]# workon lianxi otherenv [root@xxxxxx /]# workon lianxi (lianxi)[root@xxxxxx /]# - c.退出虚拟环境
- 退出当前虚拟环境时,输入 deactivate 回车即可
(lianxi)[root@xxxxxx /]# deavticate [root@xxxxxx /]# - d.删除虚拟环境
- 删除虚拟环境时,使用 rmvirtualenv lianxi 删除即可。删除之前必须先退出虚拟环境。
- 此时,在使用 workon ,则找不到 lianxi ,即表示 linaxi虚拟环境 已经别删除。
[root@xxxxxx /]# rmvirtualenv lianxi
[root@xxxxxx /]# workon
otherenv
[root@xxxxxx /]#
- a.创建虚拟环境
-
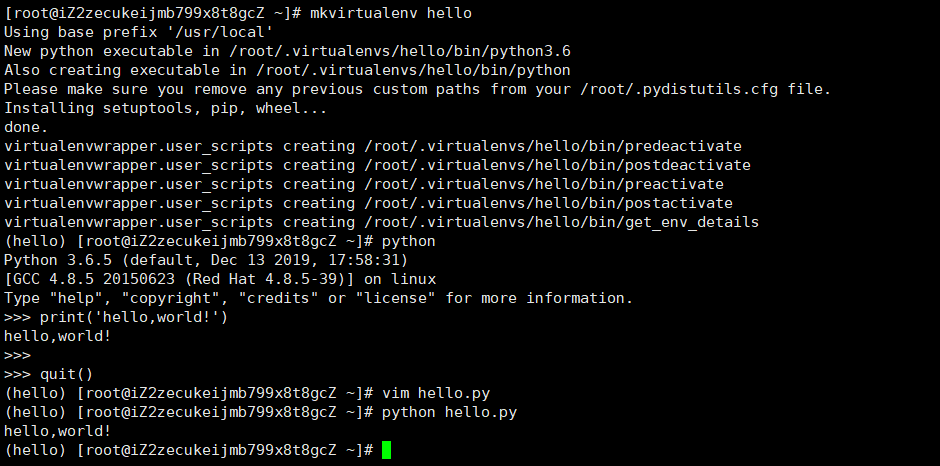
(2)创建虚拟环境hello,并使用 交互式、文件式 完成第一个python程序
-
a.创建虚拟环境hello
[root@xxxxxx /]# mkvirtualenv hello Using base prefix '/usr/local' New python executable in /root/.virtualenvs/hello/bin/python3.6 Also creating executable in /root/.virtualenvs/hello/bin/python Please make sure you remove any previous custom paths from your /root/.pydistutils.cfg file. Installing setuptools, pip, wheel... done. virtualenvwrapper.user_scripts creating /root/.virtualenvs/hello/bin/predeactivate virtualenvwrapper.user_scripts creating /root/.virtualenvs/hello/bin/postdeactivate virtualenvwrapper.user_scripts creating /root/.virtualenvs/hello/bin/preactivate virtualenvwrapper.user_scripts creating /root/.virtualenvs/hello/bin/postactivate virtualenvwrapper.user_scripts creating /root/.virtualenvs/hello/bin/get_env_details (hello) [root@xxxxxx /]# -
b.使用交互式完成第一个程序编写
(hello) [root@xxxxxx /]# python Python 3.6.5 (default, Dec 13 2019, 17:58:31) [GCC 4.8.5 20150623 (Red Hat 4.8.5-39)] on linux Type "help", "copyright", "credits" or "license" for more information. >>> >>> print('hello,world!') hello,world! >>> >>> quit() (hello) [root@xxxxxx /]# -
c.使用文件式完成第一个程序编写
- 使用 vim 创建python文件,这里命名为 hello.py ,现在先创建在 / 目录下(暂不考虑linux的普通用户及文件目录)。
(hello) [root@xxxxxx /]# vim hello.py- 在打开的文件中,输入 i 进行编辑,输入下面代码
print('hello,world!')- 完成后,按键Esc进入命令模式,然后输入 :wq ,保存并退出
- 然后输入 python hello.py 运行文件。
(hello) [root@xxxxxx /]# python hello.py hello,world! (hello) [root@xxxxxx /]# -
d.图片显示上述过程

-

