visitor模式,又叫访问者模式,把结构和数据分开,编写一个访问者,去访问数据结构中的元素,然后把对各元素的处理全部交给访问者类。这样,当需要增加新的处理时候,只需要编写新的 访问者类,让数据结构可以接受访问者的访问即可。
本次,我们以电脑装机为例。需求是,想组装一台电脑,有三个硬件,显卡,CPU和硬盘,想装进电脑主机箱里面,只能采取接口的方式。首先我们假设使用的是usb接口去连接。
下面是具体的代码:因为要表现出接口可换的概念,我采用的是将电脑硬件和电脑本身的类以及接口的interface接口类放到一个包里面,设定这个包为框架包,是不允许修改的。
在框架包中
- ComputerPart硬件的父类,抽象类
package site.wangxin520.gof.visitor.framework;

/**
 * 电脑的零配件的父抽象类
 * @author wangXgnaw
 *
 */
public abstract class ComputerPart {

    /**
     * 所有的 零配件,都必须通过一个硬件接口进行连接
     * @param hardwareInterface
     */
    protected abstract void link(HardwareInterface hardwareInterface);

}
- 硬件的实现类CPU,下同
package site.wangxin520.gof.visitor.framework;

/**
 * 电脑的硬件CPU,用于数据的运算
 *
 * @author wangXgnaw
 *
 */
public class CPU extends ComputerPart {

    @Override
    protected void link(HardwareInterface hardwareInterface) {

        // 先得通过接口连接数据
        hardwareInterface.visitor(this);
        // 连接完了之后,就开始使用cpu
        System.out.println("连接上了之后,利用cpu进行计算数据");
    }

}
- 显卡VideoCard
package site.wangxin520.gof.visitor.framework;

/**
 * 电脑硬件之显卡 通过显卡可以进行电脑的屏幕图像的显示
 *
 * @author wangXgnaw
 *
 */
public class VideoCard extends ComputerPart {

    @Override
    protected void link(HardwareInterface hardwareInterface) {

        // 必须先用接口连接上显卡
        hardwareInterface.visitor(this);

        System.out.println("连接上显卡之后,显卡开始工作,提供图像");
    }

}
- 硬盘HardDisk
package site.wangxin520.gof.visitor.framework;

/**
 * 电脑硬件之硬盘
 *
 * @author wangXgnaw
 *
 */
public class HardDisk extends ComputerPart {

    @Override
    protected void link(HardwareInterface hardwareInterface) {
        // 必须先通过接口,把硬盘先连上,然后才能操作
        hardwareInterface.visitor(this);
        // 硬盘开始干活
        System.out.println("硬盘以及连接上了,开始存储数据");
    }

}
- Computer,电脑(主机箱)类
package site.wangxin520.gof.visitor.framework;

/**
 * 电脑的类,当需要装机的话,就先准备好硬件,即new出来,然后插上接口
 * @author wangXgnaw
 *
 */
public class Computer {

    /**
     * 想装机,先得提供硬件接口才行
     * @param hardwareInterface
     */
    public void useComputer(HardwareInterface hardwareInterface){

        //通过接口,连接cpu
        new CPU().link(hardwareInterface);
        //通过接口,连接显卡
        new VideoCard().link(hardwareInterface);
        //通过接口连接硬盘
        new HardDisk().link(hardwareInterface);

    }
}
- 硬件的接口类
package site.wangxin520.gof.visitor.framework;

/**
 * 硬件的接口
 * @author wangXgnaw
 *
 */
public interface HardwareInterface {

    //定义了一些接口,访问硬件用的
    public void visitor(CPU cpu);
    public void visitor(VideoCard vCard);
    public void visitor(HardDisk hd);

}
把上面的框架包封装起来,因为访问者模式要求,结构不能变化,只能变化数据操作上。
下面是可操作的包的内容:
- 自定义的接口类
package site.wangxin520.gof.visitor.use;

import site.wangxin520.gof.visitor.framework.CPU;
import site.wangxin520.gof.visitor.framework.HardDisk;
import site.wangxin520.gof.visitor.framework.HardwareInterface;
import site.wangxin520.gof.visitor.framework.VideoCard;

/**
 * 自定义的接口,实现了硬件接口的借口类
 * @author wangXgnaw
 *
 */
public class USBInterface implements HardwareInterface{

    @Override
    public void visitor(CPU cpu) {
        System.out.println("usb连接cpu");
    }

    @Override
    public void visitor(VideoCard vCard) {
        System.out.println("用usb连接显卡");
    }

    @Override
    public void visitor(HardDisk hd) {
        System.out.println("用usb连接硬盘");
    }

}
- 测试类
package site.wangxin520.gof.visitor.use;

import site.wangxin520.gof.visitor.framework.Computer;

/**
 * 访问者模式的测试类
 * @author wangXgnaw
 *
 */
public class Test {

    public static void main(String[] args) {

        //想要装机,先得装电脑的架子
        Computer computer=new Computer();
        //有架子后,就想着用什么接口去装电脑,这里是用usb接口去连接里面的硬件的。当然,也可以去换成其他接口
        computer.useComputer(new USBInterface());
    }

}
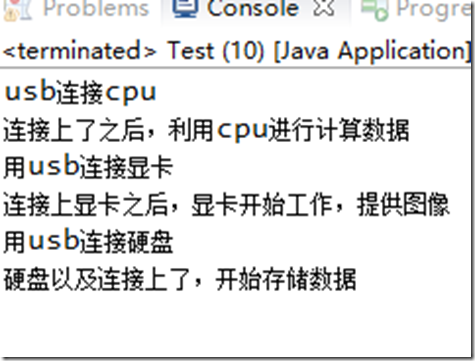
- 控制台输出结果
由此可见,visitor模式以及测试成功。
visitor模式的一大特点就是,结构是固定死的,你是不能改的,但你可以改一些结构的实现方式,即上述实例中的usb接口,你可以换成其他接口比如PCI……只要实现规定好的硬件接口interface类即可,这样一来,任凭怎么扩展,都不会修改到底层的结构,不会损坏“框架”了。
不过,这也算是最大的缺点。就是不能扩展里面的内容,就上述内容来说,只能扩展接口,而不能扩展里面硬件,或者修改电脑硬件的实现方式!


