pytorch_基于cifar创建自己的数据集并训练
基于cifar创建自己的数据集并训练
整体流程
- resize图像,在图像名称附上标签 eg: 1_a.jpg
- 获取图像的像素 R G B 合并在一个列表
- 将文件名、数据、标签和batch_label合并在一个字典中
- 用二进制的方式存储字典内容,得到和cifar相同的
- 修改 batches.meta 中的 内容,保存并替换原文件
源码如下
import numpy as np
import operator
from os import listdir
import sys
import pickle
import random

class makecifaData(object):
    def __init__(self):
        self.imgfolder = ''
        self.imgSavePath = ''
        self.DATA_dict = {}
        self.labels = []
        self.filenames = []
        self.data = []
        self.savefilepath = ''
        self.batch_label = ''
        self.img_size = 32

    def img_resize(self,label,_size = 32):
        # image resize to 32 32
        # image name list
        imglist = listdir(self.imgfolder)
        for img_name in imglist:
            currentpath=self.imgfolder+"/"+img_name
            im=Image.open(currentpath)
            #width=im.size[0]
            #height=im.size[1]
            x_s=_size
            y_s=_size
            out = im.resize((x_s,y_s),Image.ANTIALIAS)
            out.save(self.imgSavePath+"/"+str(label)+ '_' +str(img_name))

    def mkcf(self):
        imglist = listdir(self.imgfolder)
        for img_name in imglist:
            temp_R, temp_G, temp_B = [], [], []
            currentpath = self.imgfolder + "/" + img_name
            im = Image.open(currentpath)
            for i in range(0, self.img_size):
                for j in range(0, self.img_size):
                    temp_R.append(im.getpixel((i, j))[0])
                    temp_G.append(im.getpixel((i, j))[1])
                    temp_B.append(im.getpixel((i, j))[2])
            self.data.extend(temp_R)
            self.data.extend(temp_G)
            self.data.extend(temp_B)
            self.filenames.append(img_name.encode('utf-8'))
            self.labels.append(int(img_name.split('_')[0]))
        self.data = np.array(self.data, dtype=np.uint8)
        self.DATA_dict['batch_label'.encode('utf-8')] = self.batch_label.encode('utf-8')
        self.DATA_dict.setdefault('labels'.encode('utf-8'), self.labels)
        self.DATA_dict.setdefault('data'.encode('utf-8'), self.data)
        self.DATA_dict.setdefault('filenames'.encode('utf-8'), self.filenames)
        output = open(self.savefilepath, 'wb')
        pickle.dump(self.DATA_dict, output)
        output.close()
    def unpickle(self,file):
        with open(file, 'rb') as fo:
            dict = pickle.load(fo, encoding='latin-1')
        return dict
def main():
    MD = makecifaData()
    file_trian_val = ['train','val']
    Img_source_filename = ['cover','other','uncover']
    for save_file in file_trian_val:
        for i in range(len(Img_source_filename)):
            MD.imgfolder = 'E:\\2019PythonProject\\Pytorch_step1\\SourceImg\\'+ save_file + '\\' + Img_source_filename[i]
            MD.imgSavePath = 'E:\\2019PythonProject\\Pytorch_step1\\data_shanbu\\'+save_file
            MD.img_resize(i+1,_size=32)
    MD.img_size = 32
    MD.imgfolder = r'E:\2019PythonProject\Pytorch_step1\data_shanbu\train'
    MD.savefilepath = r'E:\2019PythonProject\Pytorch_step1\data_shanbu\data_batch_1.bin'
    MD.batch_label = 'train label 1 of 1'
    MD.mkcf()
    dic = {'num_cases_per_batch': 100, 'label_names': ['airplane', 'automobile', 'bird', 'cat', 'deer', 'dog', 'frog', 'horse', 'ship', 'truck'], 'num_vis': 3072}
    out_file = open('./batches.meta', 'wb')
    pickle.dump(dic, out_file)
    out_file.close()
    pass
开始训练
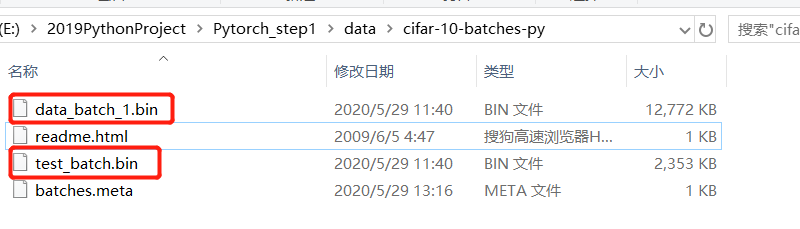
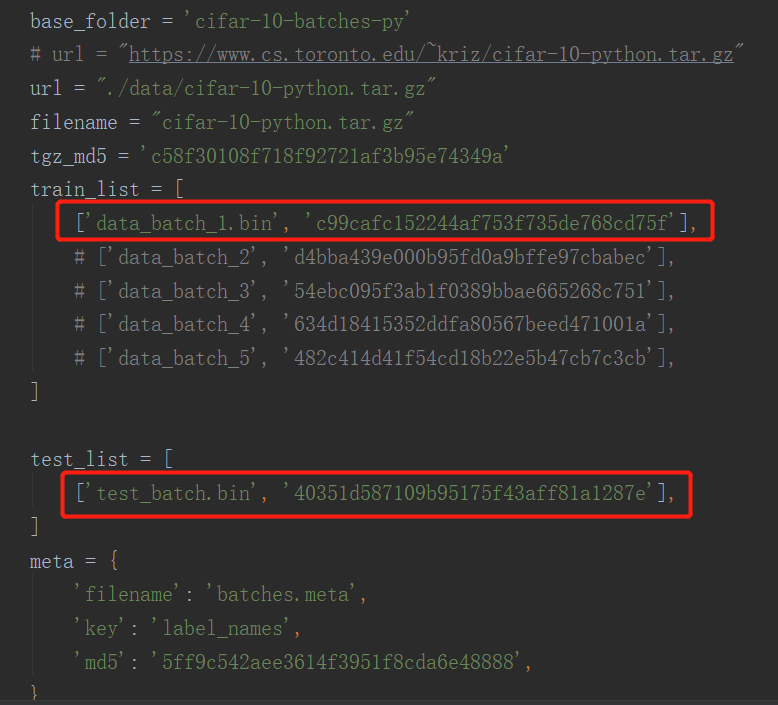
- 修改训练集和测试机list,原始的cifar有五个训练集,自己得到的只有一个,同时改一下名称.bin
![]()
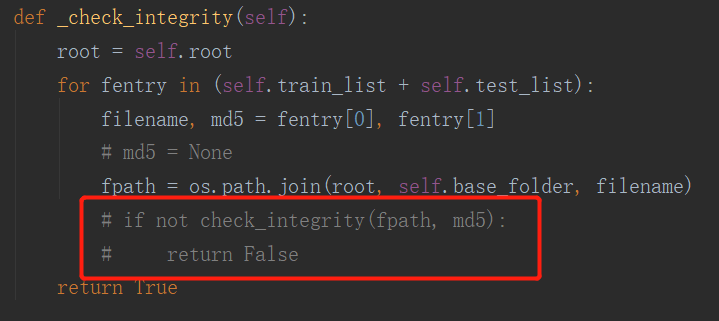
- 遇到的报错,看源码无关,就直接注释了
![]()
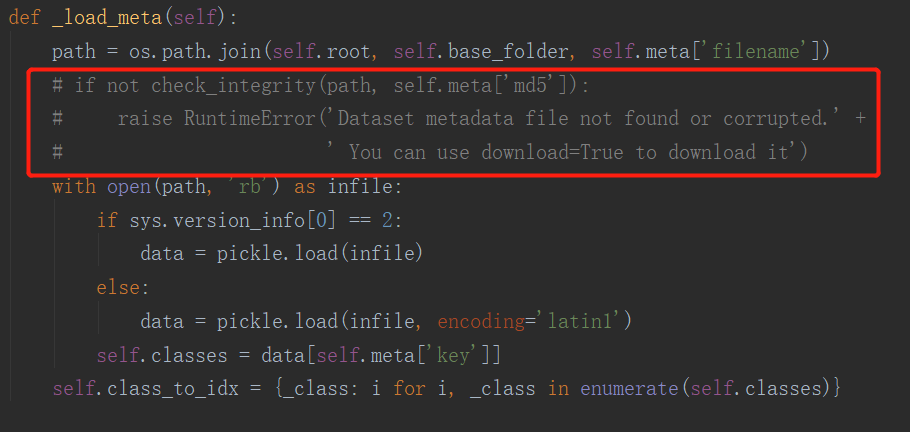
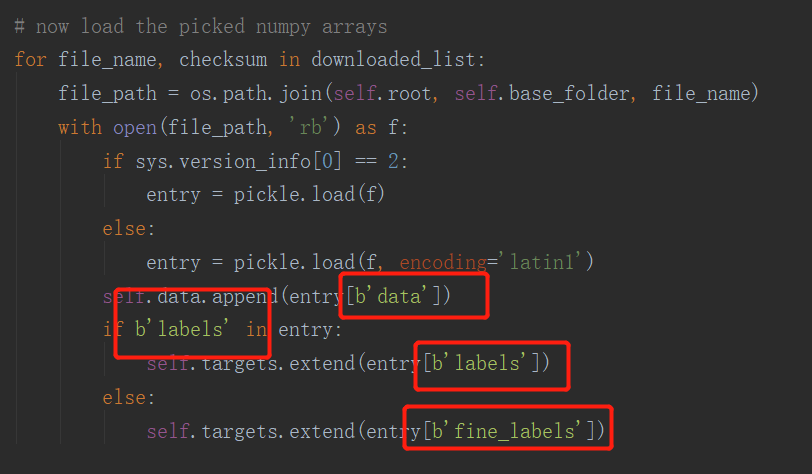
- 又遇到了报错,是因为新文件中 字典内的key 是b'data',都改一下即可
![]()
- 接下来就可以训练自己的数据集了,训练完可以保存模型
# 保存网络模型 保存整个模型
        torch.save(self.net, 'model.pkl')
改变数据集图像大小
- 之前resize后的图像大小为3232,有点小,改成128128,再训练
- 修改网络参数
class LeNet(nn.Module):
    # 一般在__init__中定义网络需要的操作算子,比如卷积、全连接算子等等
    def __init__(self):
        super(LeNet, self).__init__()
        # Conv2d的第一个参数是输入的channel数量,第二个是输出的channel数量,第三个是kernel size
        self.conv1 = nn.Conv2d(3, 6, 5)
        self.conv2 = nn.Conv2d(6, 16, 5)
        # 由于上一层有16个channel输出,每个feature map大小为5*5,所以全连接层的输入是16*5*5
        self.fc1 = nn.Linear(16 * 29 * 29, 120)
        self.fc2 = nn.Linear(120, 84)
        # 最终有10类,所以最后一个全连接层输出数量是10
        self.fc3 = nn.Linear(84, 10)
        self.pool = nn.MaxPool2d(2, 2)
    # forward这个函数定义了前向传播的运算,只需要像写普通的python算数运算那样就可以了
    def forward(self, x):
        x = F.relu(self.conv1(x))
        x = self.pool(x)
        x = F.relu(self.conv2(x))
        x = self.pool(x)
        # 下面这步把二维特征图变为一维,这样全连接层才能处理
        x = x.view(-1, 16*29*29)
        x = F.relu(self.fc1(x))
        x = F.relu(self.fc2(x))
        x = self.fc3(x)
        return x
- 开始训练
posted on 2020-05-29 14:17 wangxiaobei2019 阅读(907) 评论(0) 收藏 举报


 浙公网安备 33010602011771号