
[麦芽项目 day two] 二、搭建SpringBoot+Session+redis环境
request.getSession(),调用的底层是tomcat的managebase类管理的session map,其中key就是浏览器带过来的jessionid,value就是session。
微服务项目首先要解决的是全局session问题,考虑用redis实现,首先加入pom依赖:


 1 <!--redis-->
 2         <dependency>
 3             <groupId>org.springframework.boot</groupId>
 4             <artifactId>spring-boot-starter-data-redis</artifactId>
 5             <version>1.5.4.RELEASE</version>
 6         </dependency>
 7         <!-- redis session -->
 8         <dependency>
 9             <groupId>org.springframework.session</groupId>
10             <artifactId>spring-session-data-redis</artifactId>
11             <version>1.3.1.RELEASE</version>
12         </dependency>
然后在application-dev.yml文件写入:
 1 #redis配置
 2
 3   redis:
 4     host: 119.29.110.193
 5     port: 6379
 6     # REDIS (RedisProperties)
 7     # Redis数据库索引(默认为0)
 8     database: 0
 9     # Redis服务器连接密码(默认为空)
10     password:
11     # 连接池最大连接数(使用负值表示没有限制)
12     # 连接超时时间(毫秒)
13     timeout: 0
14     pool:
15       max-active: 8
16       # 连接池最大阻塞等待时间(使用负值表示没有限制)
17       max-wait: -1
18       # 连接池中的最大空闲连接
19       max-idle: 8
20       # 连接池中的最小空闲连接
21       min-idle: 0
最后写入两个配置类:
@Configuration
//maxInactiveIntervalInSeconds session超时时间,单位秒
@EnableRedisHttpSession(maxInactiveIntervalInSeconds = 600)
public class RedisSessionConfig {

}
@Configuration
@EnableCaching
public class RedisCacheConfig extends CachingConfigurerSupport {
    Logger logger = LoggerFactory.getLogger(RedisCacheConfig.class);
    @Value("${spring.redis.host}")
    private String host;

    @Value("${spring.redis.port}")
    private int port;

    @Value("${spring.redis.timeout}")
    private int timeout;

    @Value("${spring.redis.pool.max-idle}")
    private int maxIdle;

    @Value("${spring.redis.pool.max-wait}")
    private long maxWaitMillis;

    @Value("${spring.redis.password}")
    private String password;


    @Bean
    public JedisPool redisPoolFactory() {
        logger.info("JedisPool注入成功!!");
        JedisPoolConfig jedisPoolConfig = new JedisPoolConfig();
        jedisPoolConfig.setMaxIdle(maxIdle);
        jedisPoolConfig.setMaxWaitMillis(maxWaitMillis);

        JedisPool jedisPool = new JedisPool(jedisPoolConfig, host, port, timeout, password);

        return jedisPool;
    }


    @Bean
    public RedisTemplate<String, String> redisTemplate(RedisConnectionFactory cf) {
        RedisTemplate<String, String> redisTemplate = new RedisTemplate<String, String>();
        redisTemplate.setConnectionFactory(cf);
        return redisTemplate;
    }

    @Bean
    public CacheManager cacheManager(RedisTemplate redisTemplate) {
        RedisCacheManager cacheManager = new RedisCacheManager(redisTemplate);

        //默认超时时间,单位秒
        cacheManager.setDefaultExpiration(3000);
        //根据缓存名称设置超时时间,0为不超时
        Map<String,Long> expires = new ConcurrentHashMap<>();
        cacheManager.setExpires(expires);

        return cacheManager;
    }
}
运行,即可自动管理session了,别忘了在controller里调用
HttpSession session = request.getSession();
才能创建session。
如图:
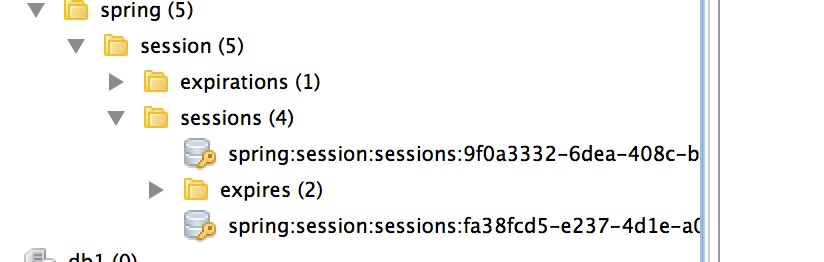
简单,done。

 浙公网安备 33010602011771号