opencv ffmpeg
Compiling OpenCV with CUDA and FFMpeg on Ubuntu 16.04
Goal: Compile OpenCV 3.X using CUDA and FFMpeg to accelerate Deep Learning applications consisting image/video processing
Environment:
Operating System => Linux Ubuntu 16.04 LTS
Python => Anaconda Python 3.5.4
CUDA => release 9.0, V9.0.176
OpenCV => 3.3.1
GPU and OpenCV
GPU-accelerated computing offloads compute-intensive portions of the application to the GPU, while the remainder of the code still runs on the CPU. From a user's perspective, applications simply run much faster.
Significant part of Computer Vision is image processing, the area that graphics accelerators were originally designed for. Other parts also support massive parallel computations and often naturally map to GPU architectures.
OpenCV GPU module is written using CUDA, therefore it benefits from the CUDA ecosystem.
The GPU module is designed as host API extension. This design provides the user an explicit control on how data is moved between CPU and GPU memory. Although the user has to write some additional code to start using the GPU, this approach is both flexible and allows more efficient computations. In general, it is a good idea to develop the application using the CPU part of OpenCV, and then accelerate it with the GPU module.
A comparison of performance on CPU and GPU provided below:
Reference link is provided in the end which describes the test and conditions
Tesla C2050 versus Core i5-760 2.8Ghz, SSE, TBB


FFMpeg and OpenCV
OpenCV can use the FFmpeg library (http://ffmpeg.org/) as backend to record, convert and stream audio and video. FFMpeg is a complete, cross-reference solution. If you enable FFmpeg while configuring OpenCV, then CMake will download and install the binaries in OPENCV_SOURCE_CODE/3rdparty/ffmpeg/. To use FFMpeg at runtime, you must deploy the FFMepg binaries with your application.
Install OpenCV 3.3 with Cuda 9.0
Prerequisites:
1. Python environment (anaconda/conda).
2. CUDA 9.0 libraries installed
Steps:
Step 1: Update/Upgrade pre-installed packages:
$sudo apt-get update
$sudo apt-get upgrade
Step 2: Install developer tools used to compile OpenCV 3.X:
$sudo apt-get install build-essential cmake pkg-config
Step 3: Install libraries and packages used to read various image formats from disk
$sudo apt-get install libjpeg8-dev libtiff5-dev libjasper-dev libpng12-dev
Step 4: Install a few libraries used to read video formats from disk.
$sudo apt-get install libavcodec-dev libavformat-dev libswscale-dev libv4l-dev
$sudo apt-get install libxvidcore-dev libx264-dev
Step 5:Install GTK so we can use OpenCV’s GUI features
$sudo apt-get install libgtk-3-dev
Step 6: Install packages that are used to optimize various functions inside OpenCV, such as matrix operations
$sudo apt-get install libatlas-base-dev gfortran
Step 7: Clone open cv from github. Make sure you have git installed.
$git clone https://github.com/opencv/opencv.git
$cd opencv
$git checkout 3.3.1
$cd ..
Step 8: Clone opencv_contrib from github.
$git clone https://github.com/opencv/opencv_contrib.git
$cd opencv_contrib
$git checkout 3.3.1
$cd ..
Note: Please make sure that you checkout the same version for opencv_contrib that you did for opencv above, otherwise you could run into compilation errors.
Step 9: Now set up the build
$cd opencv
$mkdir build
$cd build
Step 10: Run cmake command with appropriate options
$cmake -D CMAKE_BUILD_TYPE=RELEASE \
-D CMAKE_INSTALL_PREFIX=/usr/local \
-D INSTALL_C_EXAMPLES=ON \
-D INSTALL_PYTHON_EXAMPLES=ON \
-D OPENCV_EXTRA_MODULES_PATH=<<Directory>>/opencv_contrib/modules \
-D BUILD_EXAMPLES=ON \
-D BUILD_opencv_python2=OFF \
-D WITH_FFMPEG=1 \
-D WITH_CUDA=ON \
-D CUDA_GENERATION=Pascal \
-D ENABLE_FAST_MATH=1 \
-D CUDA_FAST_MATH=1 \
-D WITH_CUBLAS=1 \
-D PYTHON_DEFAULT_EXECUTABLE=/opt/anaconda/bin/python \
-D PYTHON3_INCLUDE_DIR=/opt/anaconda/include/python3.5m \
-D PYTHON3_LIBRARY=/opt/anaconda/lib/libpython3.5m.so \
-D PYTHON3_PACKAGES_PATH=/opt/anaconda/lib/python3.5 \
-D WITH_LAPACK=OFF \
-D PYTHON3_NUMPY_INCLUDE_DIRS=/opt/anaconda/lib/python3.5/site-packages/numpy/core/include ..
Note:
[if !supportLists]
-
Replace the <<Directory>> with path where opencv_contrib is cloned
-
For CUDA_GENERATION, change architecture accordingly (Pascal in our case).
-
Change Python related directories as per your installation
-
WITH_FFMPEG flag decided on compilation with FFMpeg
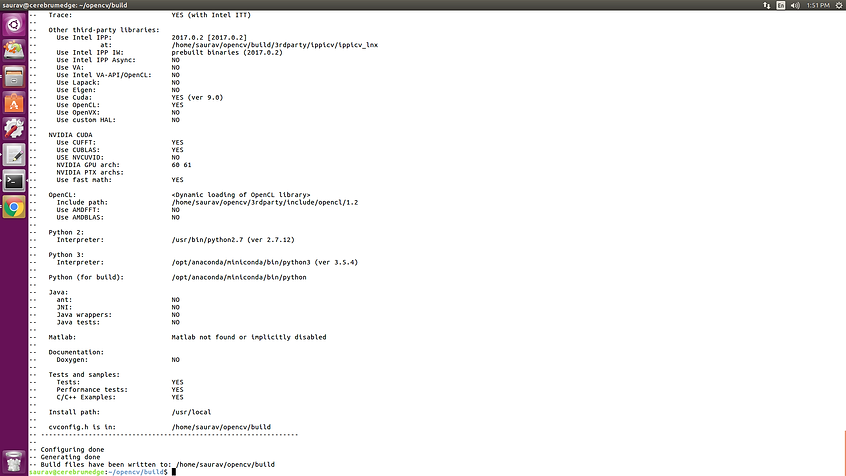
Verify the configuration before proceeding. Python (for build) and NVIDIA CUDA in particular.

Step 10: Make the build now.
$make -j16
Where number 16 should be replaced with the number of available cores on your processor to speedup the compilation time.
Step 11: Install OpenCV
$sudo make install
Step 11: To access OpenCV from Python, add environment variables in .bashrc
(Change directory as per your installation. The directory site-packages contains shared object cv2.cpython-35m-x86_64-linux-gnu.so after successful installation.)
export PYTHONPATH=$PYTHONPATH:/opt/anaconda/lib/python3.5/site-packages
export LD_LIBRARY_PATH=/opt/anaconda/lib${LD_LIBRARY_PATH:+:${LD_LIBRARY_PATH}}
Step 12: Verify opencv import in Python
$ python
Python 3.5.4 |Anaconda, Inc.| (default, Nov 20 2017, 18:44:38) [GCC 7.2.0] on linux
Type "help", "copyright", "credits" or "license" for more information.
>>> import cv2
>>> cv2.__version__
'3.3.1'
>>>
C++ codes can be tested as well. A set of sample programs are provided with OpenCV.
References:
-
Realtime Computer Vision with OpenCV: http://queue.acm.org/detail.cfm?id=2206309
-
CUDA with OpenCV: https://opencv.org/platforms/cuda.html
