由于状态零散地分布在许多组件和组件之间的交互中,大型应用复杂度也经常逐渐增长。为了解决这个问题,Vue 提供 vuex。
什么是Vuex
Vuex 是一个专为 Vue.js 应用程序开发的状态管理模式。它采用集中式存储管理应用的所有组件的状态,并以相应的规则保证状态以一种可预测的方式发生变化。
状态,其实指的是实例之间的共享数据,Vuex是管理应用中不同Vue实例之间数据共享的工具。
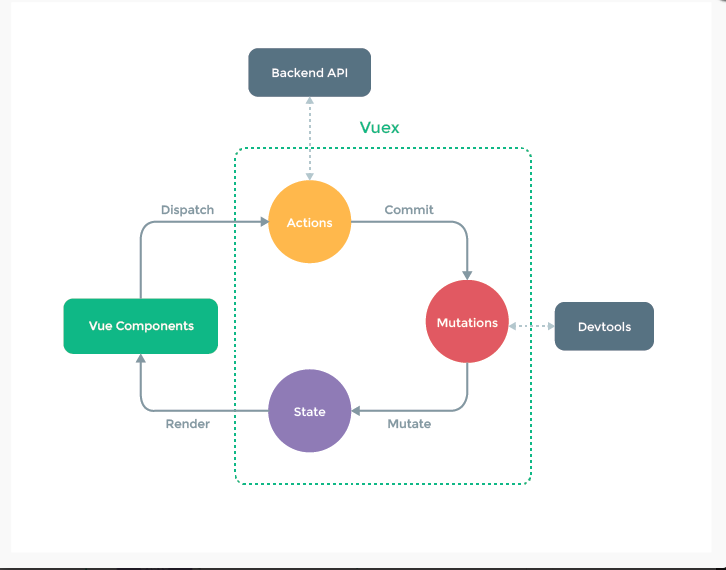
下图是Vuex官方提供的对于状态管理模式的设计理念。

为什么使用Vuex
通俗的讲,就是为了方便组件与组件之间的数据共享。
我们知道,父子组件之间想要共享数据,可以使用props属性,子父组件之间的通信可以使用$emit触发一个事件。
随着我们的web应用不断的丰富,组件之前通信采用的props和事件将会充斥着我们的整个项目,逻辑也会越来越复杂,程序员不得不将精力从业务逻辑的实现上转移到组件之间的通信上。日后的维护也会不断的复杂。
理论上,我们可以通过一个全局的共享数据来实现各个组件之间的数据共享,但是,当一个组件修改了这个全局数据时,其他组件对该全局数据的引用都会跟随者改变,并且不留下任何痕迹,这种实现方式,会导致调试变为噩梦。
这个时候,我们迫切需要一个管理组件之间数据的共享的工具,Vuex出现了。
什么情况下我该使用Vuex
虽然 Vuex 可以帮助我们管理共享状态,但也附带了更多的概念和框架。这需要对短期和长期效益进行权衡。
如果您不打算开发大型单页应用,使用 Vuex 可能是繁琐冗余的。确实是如此——如果您的应用够简单,您最好不要使用 Vuex。一个简单的 store 模式就足够您所需了。但是,如果您需要构建一个中大型单页应用,您很可能会考虑如何更好地在组件外部管理状态,Vuex 将会成为自然而然的选择。
如何使用Vuex
每一个 Vuex 应用的核心就是 store(仓库)。“store”基本上就是一个容器,它包含着你的应用中大部分的状态 (state)。Vuex 和单纯的全局对象有以下两点不同:
- Vuex 的状态存储是响应式的。当 Vue 组件从 store 中读取状态的时候,若 store 中的状态发生变化,那么相应的组件也会相应地得到高效更新。
- 你不能直接改变 store 中的状态。改变 store 中的状态的唯一途径就是显式地提交 (commit) mutation。这样使得我们可以方便地跟踪每一个状态的变化,从而让我们能够实现一些工具帮助我们更好地了解我们的应用。
安装
本文使用npm安装vuex,初始化一个vuex项目目录,然后:
1
|
npm install vuex --save
|
也可以直接下载vuex.js,然后在script标签中引用。
开始使用
1
2
3
4
5
6
7
8
9
10
11
12
13
14
15
16
17
18
19
20
21
22
23
24
25
26
27
28
29
30
31
32
33
34
35
36
37
38
39
40
41
42
43
44
45
46
47
48
|
<!DOCTYPE html>
<html lang="en">
<head>
  <meta charset="UTF-8">
  <title>Title</title>
  <script src="./node_modules/vue/dist/vue.min.js"></script>
  <script src="./node_modules/vuex/dist/vuex.min.js"></script>
</head>
<body>
  <div id="app"></div>
  <script>

    Vue.use(Vuex);

    const myStore = new Vuex.Store({
      state: {
        name: "Alex",
      },
      mutations: {},
      getters: {},
      actions: {}
    });

    let App = {
      template: `
        <div>
          <p>{{ name }}</p>
        </div>
      `,
      computed: {
        name: function () {
          return this.$store.state.name;
        },
      }
    };

    new Vue({
      el: "#app",
      store: myStore,
      template: `<app></app>`,
      components: {
        'app': App,
      },
    })
  </script>

</body>
</html>
|
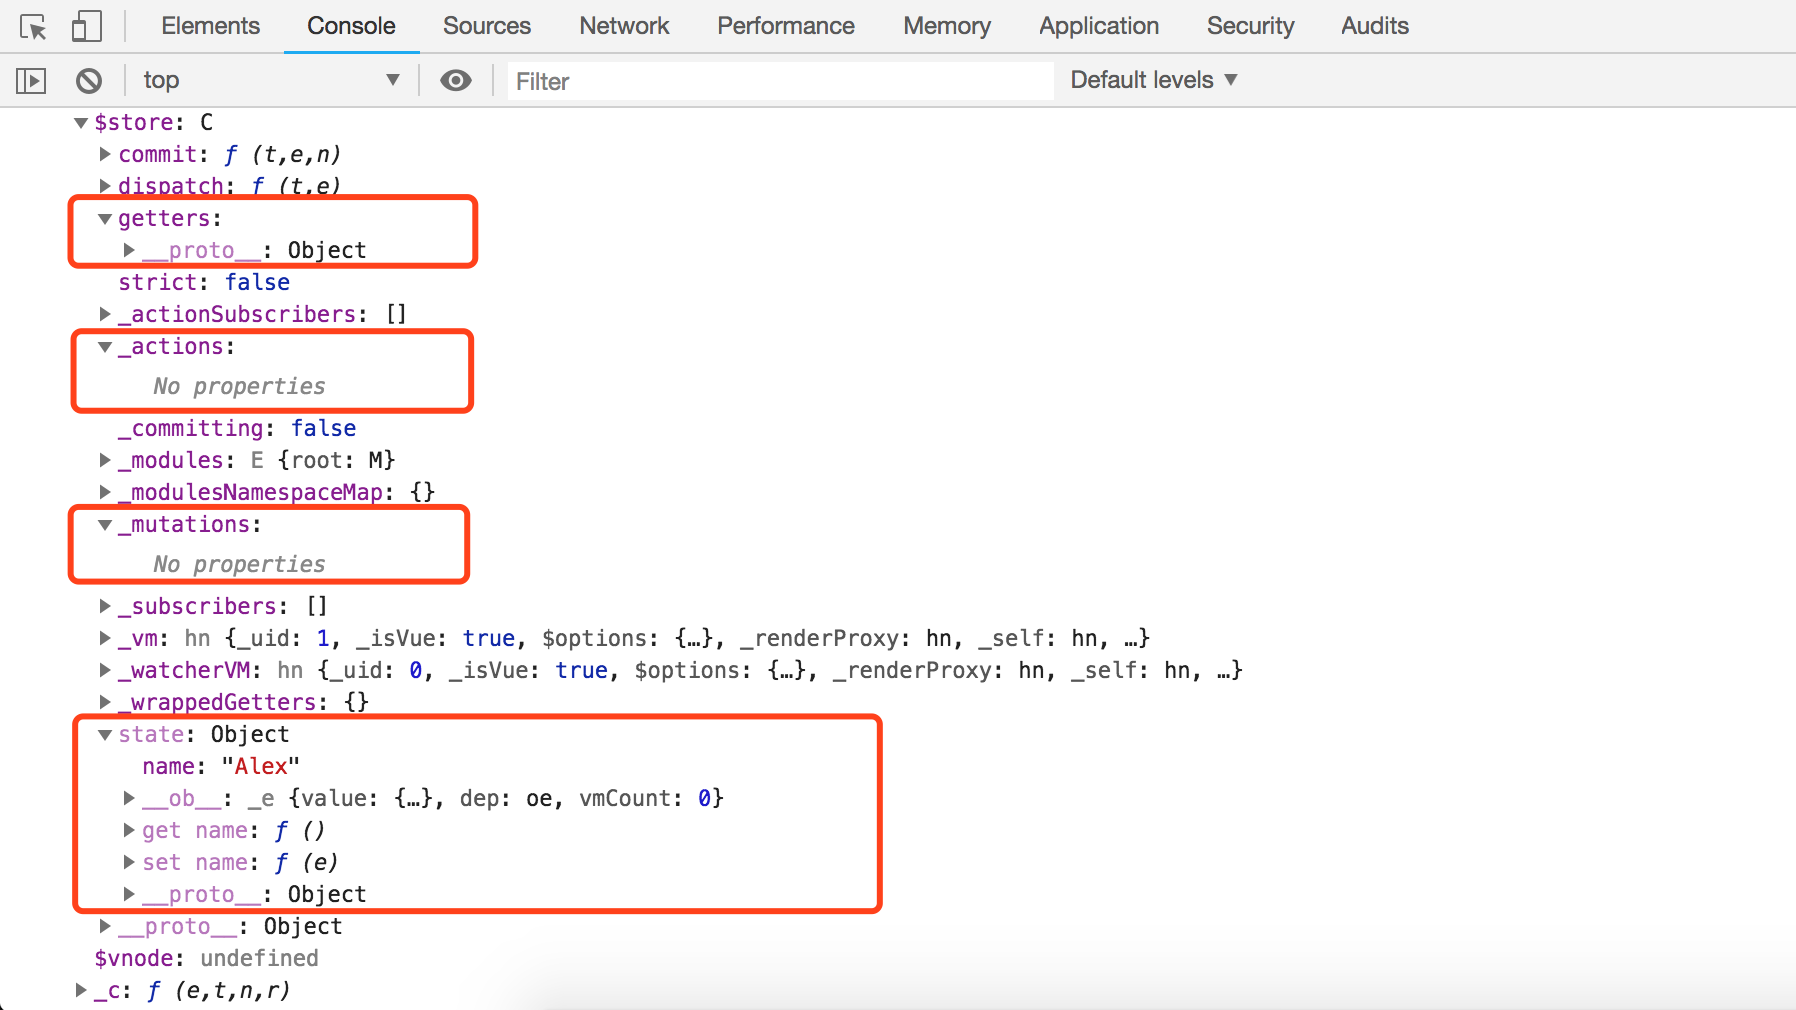
在以上代码中,我们使用Vue.use(Vuex)告诉Vue实例使用Vuex进行状态管理,并使用Vuex.Store创建了一个Vuex实例,上文提到,Store是Vuex的核心,它是一个容器,包含了几个核心属性。打印一下Vue实例对象,我们可以看到这几个核心属性,如下图:

创建Vue实例时将新建的Vuex实例注册到Vue实例中,即可在Vue实例中查看到$store属性。四个核心属性都已经创建好了。
核心概念
接下来,我们需要理解Vuex中的几个核心概念。
State
用来存放组件之间共享的数据。他跟组件的data选项类似,只不过data选项是用来存放组件的私有数据。
Getter
有时候,我们需要对state的数据进行筛选,过滤。这些操作都是在组件的计算属性进行的。
如果多个组件需要用到筛选后的数据,那我们就必须到处重复写该计算属性函数,或者将其提取到一个公共的工具函数中,并将公共函数多处导入 - 两者都不太理想。
如果把数据筛选完在传到计算属性里就不用那么麻烦了,这就是getter的作用,来看下面的代码:
1
2
3
4
5
6
7
8
9
10
11
12
13
14
15
16
17
18
19
20
21
22
23
24
25
26
27
28
29
30
31
32
33
34
35
36
37
38
39
40
41
42
43
44
45
46
47
48
49
50
51
52
53
54
55
|
<!DOCTYPE html>
<html lang="en">
<head>
  <meta charset="UTF-8">
  <title>Title</title>
  <script src="./node_modules/vue/dist/vue.min.js"></script>
  <script src="./node_modules/vuex/dist/vuex.min.js"></script>
</head>
<body>
  <div id="app"></div>

  <script>
    Vue.use(Vuex);

    const store = new Vuex.Store({
      state: {
        name: "Pizza",
        age: 22,
      },
      getters: {
        getAge: function (state) {
          return state.age + 1;
        }
      }
    });

    let App = {
      template: `
        <div>
          <span>{{ name  }}</span>
          <span>{{ age }}</span>
        </div>
      `,
      computed: {
        name: function () {
          return this.$store.state.name;
        },
        age: function () {
          return this.$store.getters.getAge;
        }
      },
    };

    new Vue({
      el: "#app",
      template: `<App></App>`,
      store: store,
      components: {
        App
      }
    })
  </script>

</body>
</html>
|
注意在getters中getAge必须使用state访问数据,而不是this。
在计算属性中,我们使用this.$store.getters.getAge来访问需要计算的数据。
Mutation
前面讲到的都是如何获取state的数据,那如何把数据存储到state中呢?
在 Vuex store 中,实际改变状态(state) 的唯一方式是通过提交(commit) 一个 mutation。
mutations下的函数接收state作为第一个参数,接收payload作为第二个参数,payload是用来记录开发者使用该函数的一些信息,有一点需要注意:mutations方法必须是同步方法!
请看下面的代码:
1
2
3
4
5
6
7
8
9
10
11
12
13
14
15
16
17
18
19
20
21
22
23
24
25
26
27
28
29
30
31
32
33
34
35
36
37
38
39
40
41
42
43
44
45
46
47
48
49
50
51
52
53
54
55
56
57
58
59
60
61
62
63
64
65
66
67
68
69
70
71
72
73
74
75
76
77
78
79
80
81
82
83
84
|
<!DOCTYPE html>
<html lang="en">
<head>
  <meta charset="UTF-8">
  <title>Title</title>
  <script src="./node_modules/vue/dist/vue.min.js"></script>
  <script src="./node_modules/vuex/dist/vuex.min.js"></script>
</head>
<body>
  <div id="app"></div>

  <script>
    Vue.use(Vuex);

    const store = new Vuex.Store({
      state: {
        name: "Pizza",
        age: 18,
        score: 100,
        hobby: ["girls", "books"]
      },
      mutations: {
        score: function (state, payload) {
          console.log("state: ", state);
          console.log("payload: ", payload);
          return state.score -= 10;
        },
        hobby: function (state, payload) {
          return state.hobby.push(payload);
        }
      },
      getters: {
        getAge: function (state) {
          return state.age + 1;
        }
      }
    });

    let App = {
      template: `
        <div>
          <p>{{ name }}</p>
          <p>{{ age }}</p>
          <p>{{ score }}</p>
          <p>{{ hobby }}</p>
          <button @click="changeScore">点击修改分数</button>
          <button @click="changeHobby">点击修改爱好</button>
      `,
      computed: {
        name: function () {
          return this.$store.state.name;
        },
        age: function () {
          return this.$store.state.age;
        },
        score: function () {
          return this.$store.state.score;
        },
        hobby: function () {
          return this.$store.state.hobby;
        }
      },
      methods: {
        changeScore: function () {
          this.$store.commit('score', 10);
        },
        changeHobby: function () {
          this.$store.commit('hobby', 'movie')
        }
      }
    };

    new Vue({
      el: "#app",
      template: `<App></App>`,
      components: {
        App
      },
      store
    })
  </script>

</body>
</html>
|
我们提交了一个this.$store.commit(“score”, 10),传入的第一个参数指的是mutations中定义的参数,第二个参数是需要变更的数据。
Action
Actions用来处理异步事务。
Actions 提交的是 mutations,而不是直接变更状态。也就是说,actions会通过mutations,让mutations帮他提交数据的变更。
Action 可以包含任意异步操作。比如ajax、setTimeout、setInterval。继续看下面的代码:
1
2
3
4
5
6
7
8
9
10
11
12
13
14
15
16
17
18
19
20
21
22
23
24
25
26
27
28
29
30
31
32
33
34
35
36
37
38
39
40
41
42
43
44
45
46
47
48
49
50
51
52
53
54
55
56
57
58
59
60
61
62
63
64
65
66
67
68
69
70
|
<!DOCTYPE html>
<html lang="en">
<head>
  <meta charset="UTF-8">
  <title>Title</title>
  <script src="./node_modules/vue/dist/vue.min.js"></script>
  <script src="./node_modules/vuex/dist/vuex.min.js"></script>
</head>
<body>
  <div id="app"></div>

  <script>
    Vue.use(Vuex);

    const store = new Vuex.Store({
      state: {
        name: 'Pizza',
        age: 18,
        score: 90,
      },
      mutations: {
        changeScoreAsync: function (state, payload) {
          return state.score += payload;
        }
      },
      actions: {
        addScore: function (context, payload) {
          setTimeout(() => context.commit("changeScoreAsync", payload), 3000);
        }
      }
    });

    let App = {
      template: `
        <div>
          <span>{{ name }}</span>
          <span>{{ age }}</span>
          <span>{{ score }}</span>
          <button @click="changeScore">点击一会儿修改数据</button>
      `,
      computed: {
        name: function () {
          return this.$store.state.name;
        },
        age: function () {
          return this.$store.state.age;
        },
        score: function () {
          return this.$store.state.score;
        },
      },
      methods: {
        changeScore: function () {
          this.$store.dispatch("addScore", 1);
        }
      }
    };

    new Vue({
      el: "#app",
      template: `<App></App>`,
      store,
      components: {
        App
      }
    })
  </script>

</body>
</html>
|
点击修改数据后,this.$store.dispatch找到actions中定义的方法,并将当前状态的store对象封装,传递给actions中函数的第一个参数context,随后由context.commit提交修改。
项目结构
Vuex 并不限制你的代码结构。但是,它规定了一些需要遵守的规则:
- 应用层级的状态应该集中到单个 store 对象中;
- 提交 mutation 是更改状态的唯一方法,并且这个过程是同步的;
- 异步逻辑都应该封装到 action 里面。
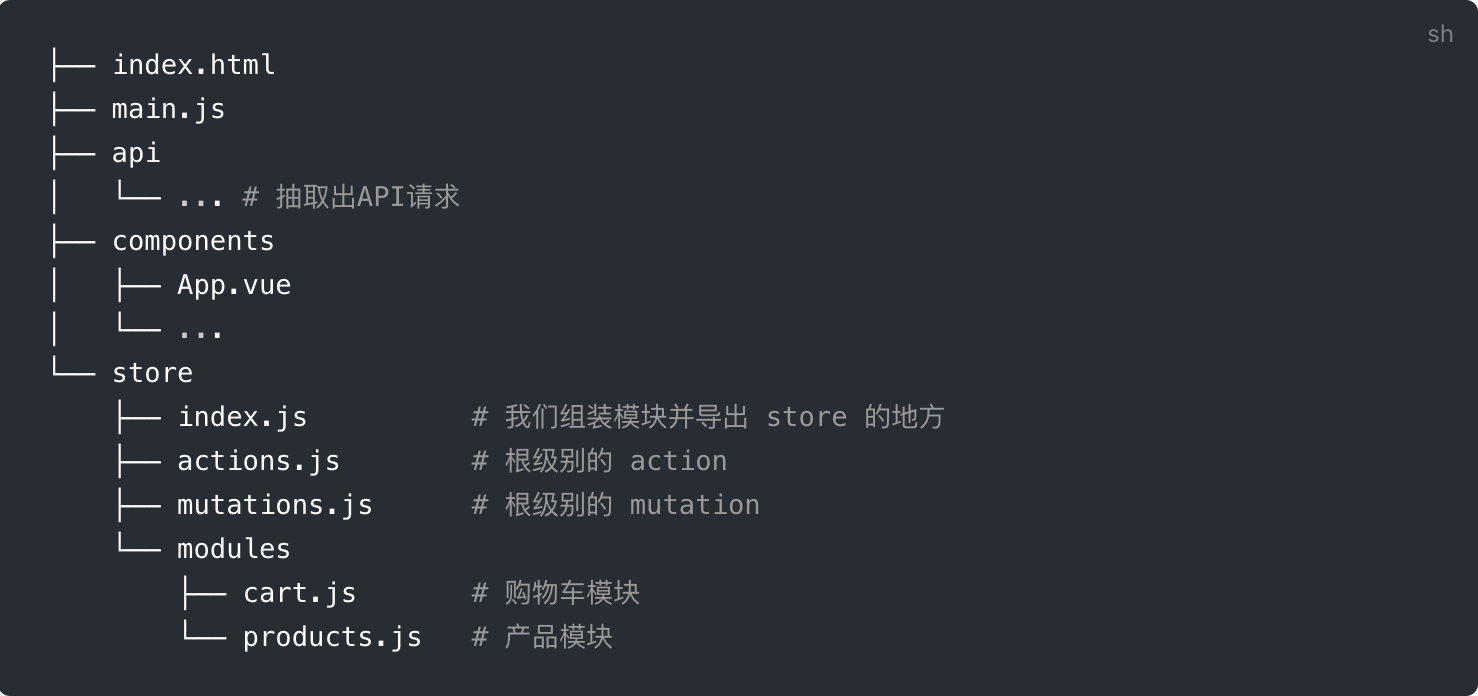
只要你遵守以上规则,如何组织代码随你便。如果你的 store 文件太大,只需将 action、mutation 和 getter 分割到单独的文件。
对于大型应用,我们会希望把 Vuex 相关代码分割到模块中。下面是项目结构示例:

以上,就是关于Vuex的使用介绍。


