2024.6.7
所学时间:3小时
代码行数:178
博客园数:1篇
所学知识:今天学习了python的可视化,学会了在开发的过程中,使用的python开发技术。首先使用了这五种库:
1.cv2:这是一个强大的图像处理库,它提供了处理图像的各种功能,包括加载、编辑和保存图像,以及实现各种图像处理算法,如滤波、边缘检测。
2.numpy:用于处理数组和矩阵数据。在图像处理中,它经常被用来进行图像数据的数学运算和转换,例如将图像转换为数组进行处理。
3.PIL:这是 Python 中用于图像处理的标准库,提供了创建、打开、编辑和保存图像的功能。
4.tkinter:用于创建用户界面。它提供了创建各种 GUI 组件的功能,如按钮、标签、文本框等,以及响应用户操作的功能。
5.filedialog:这是 tkinter 库中的一个模块,用于创建文件对话框,让用户选择文件。它用于让用户选择要进行美颜处理的照片文件。
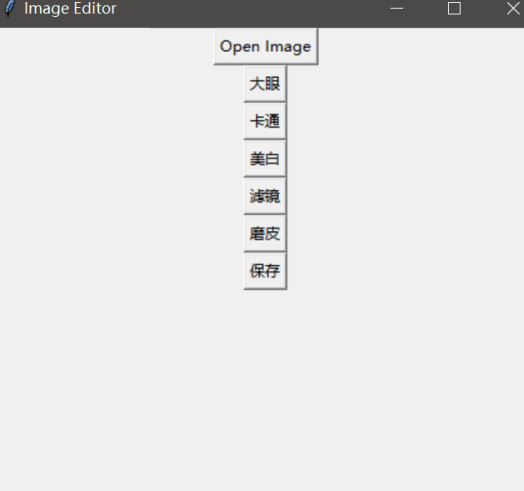
以下是大作业的功能:
1.导入照片:
用户可以从本地文件系统中选择并导入需要进行美颜修图的照片。
2.选择修图功能:
用户可以选择多种美颜修图功能,如磨皮、美白、瘦脸、大眼等。
3.预览修图效果:
用户可以实时预览每种修图功能的效果。
4.保存修图结果:
用户可以将修图后的照片保存到本地文件系统,以便后续查看或分享。
import cv2
import numpy as np
from PIL import Image, ImageTk
import tkinter as tk
from tkinter import filedialog
def convert_to_cartoon(image_path):
# 读取图像
image = cv2.imread(image_path)
# 将图像转换为卡通效果
gray = cv2.cvtColor(image, cv2.COLOR_BGR2GRAY)
gray = cv2.medianBlur(gray, 5)
edges = cv2.adaptiveThreshold(gray, 255, cv2.ADAPTIVE_THRESH_MEAN_C, cv2.THRESH_BINARY, 9, 9)
color = cv2.bilateralFilter(image, 9, 300, 300)
cartoon = cv2.bitwise_and(color, color, mask=edges)
return cartoon
def beautify(image_path):
# 读取图像
image = cv2.imread(image_path)
# 美颜处理
beauty_image = cv2.GaussianBlur(image, (0, 0), 25)
beauty_image = cv2.addWeighted(image, 1.5, beauty_image, -0.5, 0)
# 大眼效果
gray = cv2.cvtColor(image, cv2.COLOR_BGR2GRAY)
gray = cv2.medianBlur(gray, 5)
# 检测眼睛区域
eyes = cv2.CascadeClassifier(cv2.data.haarcascades + 'haarcascade_eye.xml')
eyes_rects = eyes.detectMultiScale(gray, scaleFactor=1.3, minNeighbors=5)
# 对每个检测到的眼睛区域进行处理
for (x, y, w, h) in eyes_rects:
eye_center = (x + w // 2, y + h // 2)
radius = int(np.sqrt((w + 6 + h + 2)) / 2)
cv2.circle(beauty_image, eye_center, radius, (0, 0, 0), -1)
return beauty_image
def cartoonize(image_path):
# 读取图像
image = cv2.imread(image_path)
# 将图像转换为卡通效果
gray = cv2.cvtColor(image, cv2.COLOR_BGR2GRAY)
gray = cv2.medianBlur(gray, 5)
edges = cv2.adaptiveThreshold(gray, 255, cv2.ADAPTIVE_THRESH_MEAN_C, cv2.THRESH_BINARY, 9, 9)
color = cv2.bilateralFilter(image, 9, 300, 300)
cartoon = cv2.bitwise_and(color, color, mask=edges)
return cartoon
def process(image_path):
# 读取图像
img = cv2.imread(image_path)
light=50
# 处理图像
h, w = img.shape[:2]
output = np.zeros((h, w, 3), np.uint8)
for i in range(0, h):
for j in range(0, w):
b, g, r = img[i, j]
x = int(b) + light
y = int(g) + light
z = int(r) + light
if x > 255:
x = 255
if y > 255:
y = 255
if z > 255:
z = 255
output[i, j] = x, y, z
output_rgb = cv2.cvtColor(output, cv2.COLOR_BGR2RGB)
return output_rgb
def convertt(image_path):
img = cv2.imread(image_path)
# 处理图像
gray_img = cv2.cvtColor(img, cv2.COLOR_BGR2GRAY) # 将图像转换为灰度图像
return gray_img
def smmo(image_path):
# 读取图像
image = cv2.imread(image_path)
# 处理图像
blurred = cv2.GaussianBlur(image, (0, 0), 1) # 对图像进行高斯模糊处理
return blurred
def open_file():
file_path = filedialog.askopenfilename()
if file_path:
image = Image.open(file_path)
image.thumbnail((400, 400))
photo = ImageTk.PhotoImage(image)
panel.config(image=photo)
panel.image = photo
def beautify_image():
global processed_image
processed_image = beautify(file_path)
show_processed_image()
def save_image():
global processed_image
if processed_image is not None:
save_path = filedialog.asksaveasfilename(defaultextension=".jpg")
if save_path:
cv2.imwrite(save_path, processed_image)
def cartoonize_image():
global processed_image
processed_image = cartoonize(file_path)
show_processed_image()
def process_image():
global processed_image, file_path
if file_path:
processed_image = process(file_path)
show_processed_image2()
def convertt_image():
global processed_image, file_path
if file_path:
processed_image = convertt(file_path)
show_processed_image()
def smoo_image():
global processed_image, file_path
if file_path:
processed_image = smmo(file_path)
show_processed_image()
def show_processed_image():
global processed_image
if processed_image is not None:
processed_image_rgb = cv2.cvtColor(processed_image, cv2.COLOR_BGR2RGB)
processed_image_pil = Image.fromarray(processed_image_rgb)
processed_image_pil.thumbnail((400, 400))
photo = ImageTk.PhotoImage(processed_image_pil)
panel.config(image=photo)
panel.image = photo
def show_processed_image2():
global processed_image
# Check if processed image exists
if processed_image is not None:
processed_image_pil = Image.fromarray(processed_image)
processed_image_pil.thumbnail((400, 400))
photo = ImageTk.PhotoImage(processed_image_pil)
panel.config(image=photo)
panel.image = photo
file_path = "Py\myself.jpg"
processed_image = None
root = tk.Tk()
root.title("Image Editor")
# 创建按钮
open_button = tk.Button(root, text="Open Image", command=open_file)
open_button.pack()
beautify_button = tk.Button(root, text="大眼", command=beautify_image)
beautify_button.pack()
cartoonize_button = tk.Button(root, text="卡通", command=cartoonize_image)
cartoonize_button.pack()
process_button=tk.Button(root,text="美白",command=process_image)
process_button.pack()
convertt_button=tk.Button(root,text="滤镜",command=convertt_image)
convertt_button.pack()
smoo_button=tk.Button(root,text="磨皮",command=smoo_image)
smoo_button.pack()
save_button = tk.Button(root, text="保存", command=save_image)
save_button.pack()
# 显示图片的面板
panel = tk.Label(root)
panel.pack()
root.mainloop()


 浙公网安备 33010602011771号