springmvc入门案例
Spring MVC入门案例(Eclipse实现)
需求:
(1)通过浏览器访问 http://localhost/项目名称/hello 地址,在控制台输出 "Hello SpringMVC·····"
(2)将请求转向 /WEB-INF/pages/home.jsp 页面
1 创建Maven—Javaweb工程
1、新建一个maven项目,通过Maven创建javaweb工程
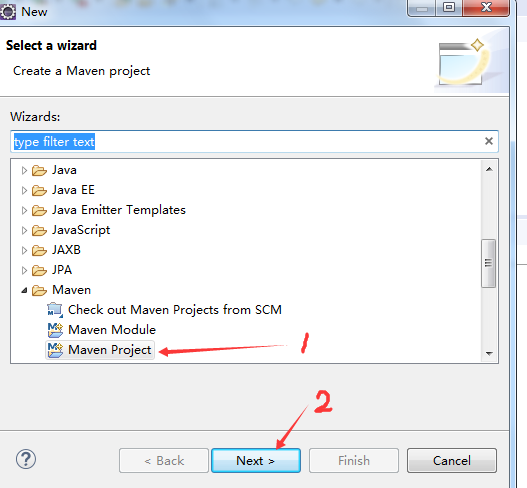
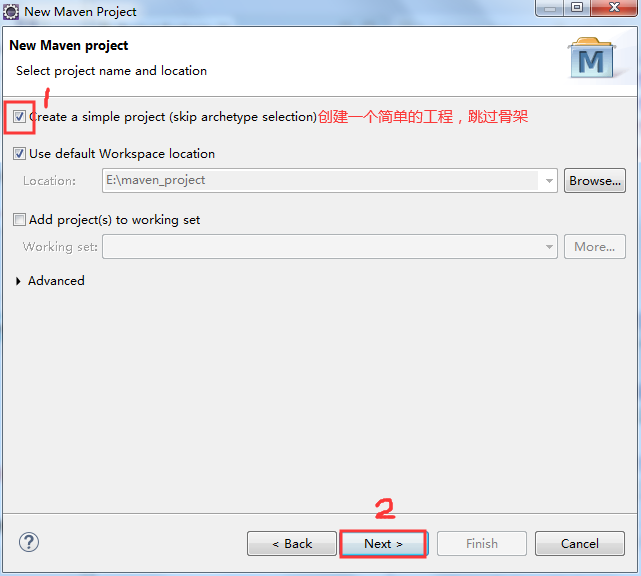
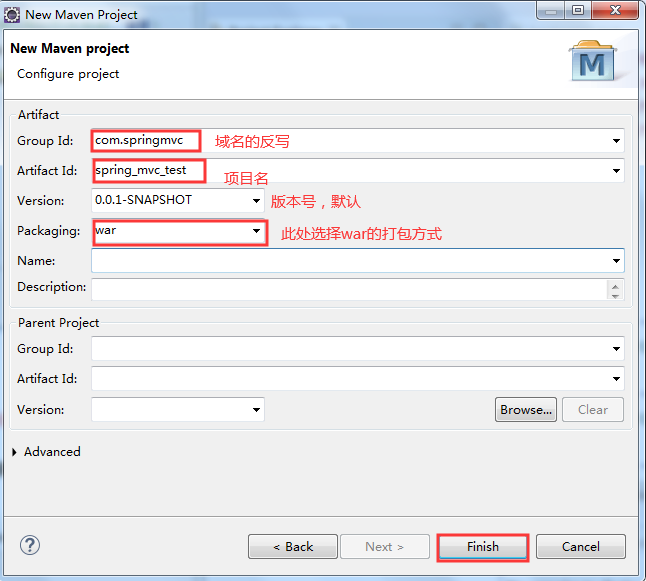
点击Finish后,会报一个错误web.xml文件不存在

自行创建一下WEB-INF目录,或者拷入其他文件也可以,注意在webapp下
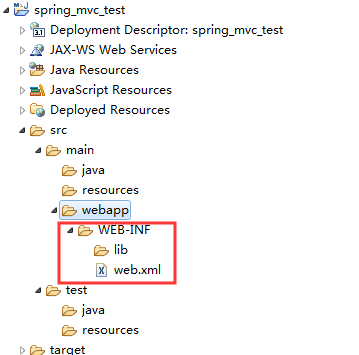
拷入后,错误消失

2、在pom.xml中引入springmvc所需jar包:将下面的配置直接拷贝到pom.xml中的根标签内
<!-- 集中定义依赖版本号 -->

<properties>

    <junit.version>4.10</junit.version>

    <spring.version>4.1.3.RELEASE</spring.version>

</properties>


<dependencies>

    <!-- 单元测试 -->

    <dependency>

       <groupId>junit</groupId>

       <artifactId>junit</artifactId>

       <version>${junit.version}</version>

        <scope>test</scope>

    </dependency>


    <!-- SpringMVC -->

    <dependency>

       <groupId>org.springframework</groupId>

       <artifactId>spring-webmvc</artifactId>

       <version>${spring.version}</version>

    </dependency>


    <!-- Servlet支持Request和Response -->

    <dependency>

       <groupId>javax.servlet</groupId>

       <artifactId>servlet-api</artifactId>

       <version>2.4</version>

       <scope>provided</scope>

    </dependency>


    <!-- java对象转换json的工具类 -->

    <dependency>

       <groupId>com.fasterxml.jackson.core</groupId>

       <artifactId>jackson-databind</artifactId>

       <version>2.5.1</version>

    </dependency>

</dependencies>
3 在web.xml中配置springmvc,将下面的配置直接拷入web.xml
<?xml version="1.0" encoding="UTF-8"?>

<web-app xmlns:xsi="http://www.w3.org/2001/XMLSchema-instance"

    xmlns="http://java.sun.com/xml/ns/javaee"

    xsi:schemaLocation="http://java.sun.com/xml/ns/javaee http://java.sun.com/xml/ns/javaee/web-app_2_5.xsd"

    id="WebApp_ID" version="2.5">


    <!-- 配置springmvc前端控制器, 将所有请求交给springmvc来处理 -->

    <servlet>

       <servlet-name>springmvc</servlet-name>

       <servlet-class>org.springframework.web.servlet.DispatcherServlet</servlet-class>


       <!-- 配置springmvc核心配置文件的位置,默认Springmvc的配置文件是在WEB-INF目录下,默认的名字为springmvc-servlet.xml,如果要放在其他目录,则需要指定如下配置:

       -->

       <init-param>

           <param-name>contextConfigLocation</param-name>

           <param-value>classpath:springmvc-config.xml</param-value>

       </init-param>

    </servlet>

    <!-- 其中的斜杠(/)表示拦截所有请求(除JSP以外), 所有请求都要经过springmvc前端控制器 -->

    <servlet-mapping>

       <servlet-name>springmvc</servlet-name>

       <url-pattern>/</url-pattern>

    </servlet-mapping>


</web-app>
4 创建并配置springmvc-config.xml 注意文件的位置,在resources下

直接复制下面配置文件的内容即可!
<?xml version="1.0" encoding="UTF-8"?>

<beans xmlns="http://www.springframework.org/schema/beans"

    xmlns:xsi="http://www.w3.org/2001/XMLSchema-instance" xmlns:mvc="http://www.springframework.org/schema/mvc"

    xmlns:context="http://www.springframework.org/schema/context"

    xsi:schemaLocation="http://www.springframework.org/schema/mvc

                     http://www.springframework.org/schema/mvc/spring-mvc-4.0.xsd

                     http://www.springframework.org/schema/beans

                     http://www.springframework.org/schema/beans/spring-beans-4.0.xsd

                     http://www.springframework.org/schema/context

                      http://www.springframework.org/schema/context/spring-context-4.0.xsd">


    <!-- 1.配置前端控制器放行静态资源(html/css/js等,否则静态资源将无法访问) -->

    <mvc:default-servlet-handler/>

    <!-- 2.配置注解驱动,用于识别注解(比如@Controller) -->

    <mvc:annotation-driven></mvc:annotation-driven>


    <!-- 3.配置需要扫描的包:spring自动去扫描 base-package 下的类,

       如果扫描到的类上有 @Controller、@Service、@Component等注解,

       将会自动将类注册为bean

     -->

    <context:component-scan base-package="com.tedu.controller">

    </context:component-scan>


    <!-- 4.配置内部资源视图解析器

       prefix:配置路径前缀

       suffix:配置文件后缀

     -->

    <bean class="org.springframework.web.servlet.view.InternalResourceViewResolver">

       <property name="prefix" value="/WEB-INF/pages/"/>

       <property name="suffix" value=".jsp"/>

    </bean>
</beans>
5 创建并实现HelloController类
1、创建com.springmvctest.HelloController类
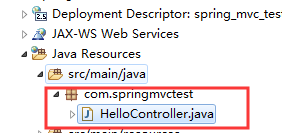
2、实现HelloController类
package com.springmvctest;

import org.springframework.stereotype.Controller;
import org.springframework.web.bind.annotation.RequestMapping;

@Controller /* 这个注解表示当前类是属于控制层 */
public class HelloController {
    /* http://localhost/项目名称/hello */
    @RequestMapping("/hello")
    /* 这个注解用于:映射请求的资源路径(/hello)和当前方法(hello)的对应关系
                * 当浏览器请求 /hello 路径时, 将会访问(执行)当前这个方法 */
    public String hello() {
        System.out.println("hello springmvc...");
        return "home";
     }

}
6 创建并实现home.jsp
WEB-INF/pages/home.jsp
<%@ page language="java" contentType="text/html; charset=UTF-8"
    pageEncoding="UTF-8"%>
<!DOCTYPE html>
<html>
<head>
<meta charset="UTF-8">
<title>Insert title here</title>
</head>
<body>
    <h1>Hello SpringMVC·····</h1>
</body>
</html>
7 访问测试
打开浏览器,输入url地址:http://localhost:8080/spring_mvc_test/hello 地址,访问结果如下:

8 在用eclipse创建完SpringMVC案例后,配置文件都没有错,启动Tomcat就报错!!!访问以下链接
https://www.cnblogs.com/wangrui-liyin/p/11973264.html


