深度学习框架PyTorch一书的学习-第三章-Tensor和autograd-2-autograd
参考https://github.com/chenyuntc/pytorch-book/tree/v1.0
希望大家直接到上面的网址去查看代码,下面是本人的笔记
torch.autograd就是为了方便用户使用,专门开发的一套自动求导引擎,她能够根据输入和前向传播过程自动构建计算图,并执行反向传播
1.Variable
深度学习算法的本质是通过反向函数求导数,pytorch的Autograd模块实现了此功能。在Tensor上的所有操作,Autograd都能够为他们自动提供微分,避免手动计算的复杂过程
其中Autograd.Variable是Autograd的核心类。Tensor被封装成Variable后,可以调用它的.backward实现反向传播,自动计算所有梯度

- data : 保存Variable所包含的Tensor
- grad : 保存data对应的梯度,grad也是一个Variable(即也有data\grad\grad_fn三个值),而不是Tensor,它和data的形状一样
- grad_fn : 指向一个Function对象,这个Function用来反向传播计算输入的梯度,记录variable的操作历史,即它是什么操作的输出,用来构建计算图。如果某一个变量是由用户创建的,则它为叶子节点,对应的grad_fn等于None
Variable的构造函数需要传入tensor,同时有两个可选参数:
- requires_grad(bool):是否需要对该variable进行求导
- volatile(bool):设置为True,构建在该variable之上的图都不会求导,专为推理阶段设计
Variable支持大多数tensor支持的函数,但其不支持部分inplace函数,因为这些函数会修改tensor自身,而在反向传播中,variable需要缓存原来的tensor来计算梯度
如果想要计算各个Variable的梯度,只需要调用根节点variable的backward方法,autograd会自动沿着计算图反向传播,计算每一个叶子节点的梯度
variable.backward(grad_variables=None, retain_graph=None, create_graph=None)的参数:
- grad_variables:形状与variable一致,对于y.backward(),其相当于链式法则
 。grad_variables也可以是tensor或序列
 - retain_graph:反向传播 需要缓存一些中间结果,反向传播后,这些缓存就被清空,可以通过指定这个参数不清空缓存用来进行多次反向传播
- create_graph:对反向传播过程再次构建计算图,可通过backward of backward实现求高阶导数
举例:
from __future__ import print_function
import torch as t
from torch.autograd import Variable as V
生成a:
#从tensor中创建variable,指定需要求导
a = V(t.ones(3,4), requires_grad=True)
a
返回:
tensor([[1., 1., 1., 1.],
        [1., 1., 1., 1.],
        [1., 1., 1., 1.]], requires_grad=True)
生成b:
b = V(t.zeros(3,4))
b
返回:
tensor([[0., 0., 0., 0.],
        [0., 0., 0., 0.],
        [0., 0., 0., 0.]])
生成c,实现对a,b的操作:
#函数的使用与tensor一致
#也可以写成c = a+b
c = a.add(b)
c
返回:
tensor([[1., 1., 1., 1.],
        [1., 1., 1., 1.],
        [1., 1., 1., 1.]], grad_fn=<AddBackward0>)
反向:
d = c.sum()
d.backward()#反向传播
⚠️
#注意tensor和variable两者操作的区别
#前者在取data后变成tensor,从tensor计算sum得到float
#后者计算sum后仍然是Variable
c.data.sum(), c.sum()
返回:
(tensor(12.), tensor(12., grad_fn=<SumBackward0>))
查看梯度:
#反向传播后就能够查看变量的梯度了
a.grad
返回:
tensor([[1., 1., 1., 1.],
        [1., 1., 1., 1.],
        [1., 1., 1., 1.]])
说明:
#此处虽然没有指定c需要求导,但c依赖于a,而a需要求导
#因此c的requires_grad属性会自动设置为True
a.requires_grad, b.requires_grad, c.requires_grad
返回:
(True, False, True)
#由用户创建的variable是叶子节点,其对应的grad_fn是None
a.is_leaf, b.is_leaf, c.is_leaf
返回:
(True, True, False)
#c.grad是None,c不是叶子节点,它的梯度是用来计算a的梯度的
#虽然c.requires_grad为True,但是其梯度在计算完后会被释放
c.grad is None #返回True
接下来我们看看autograd计算的导数和我们手动推导的区别

def f(x) :
    '''计算y'''
    y = x**2 * t.exp(x)
    return y

def gradf(x):
    '''手动自动求导'''
    dx = 2*x*t.exp(x) + x**2*t.exp(x)
    return dx
生成x开始计算y:
x = V(t.randn(3,4), requires_grad=True)
y = f(x)
y
返回:
tensor([[0.0090, 0.3115, 1.2975, 0.4315],
        [0.5321, 0.3219, 0.1713, 0.3801],
        [0.1355, 0.0842, 0.1229, 0.4506]], grad_fn=<MulBackward0>)
反向传播:
y.backward(t.ones(y.size())) #grad_variables形状与y一致
x.grad
返回:
tensor([[-0.1716,  1.7068,  4.6518, -0.2922],
        [-0.0763,  1.7446,  1.1561, -0.3552],
        [ 0.9972, -0.4043, -0.4409,  2.1901]])
grad_variables为什么这样设置,可见:pytorch的backward
#autograd的计算结果与利用公式的计算结果一致
gradf(x)
返回:
tensor([[-0.1716,  1.7068,  4.6518, -0.2922],
        [-0.0763,  1.7446,  1.1561, -0.3552],
        [ 0.9972, -0.4043, -0.4409,  2.1901]], grad_fn=<AddBackward0>)
2.计算图
pytorch中autograd的底层采用了计算图,其是一种有向无环图(DAG),用于计算算子和变量之间的关系
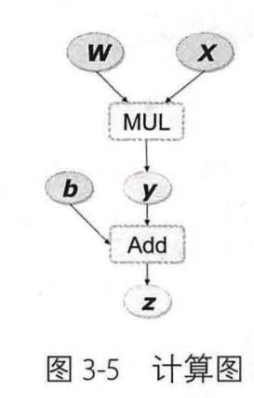
如表达式z = wx +b可分解成y = wx, z = y+b,其计算图如下所示:
一般用矩形表示算子,椭圆表示变量,即图中的MUL和ADD都是算子,w,x,b为变量

如这个有向无环图,X和b是叶子节点,这些节点通常由用户自己创建,不依赖于其他变量。z称为根节点,是计算图的最终目标。
利用链式法则很容易求得各个叶子节点的梯度:

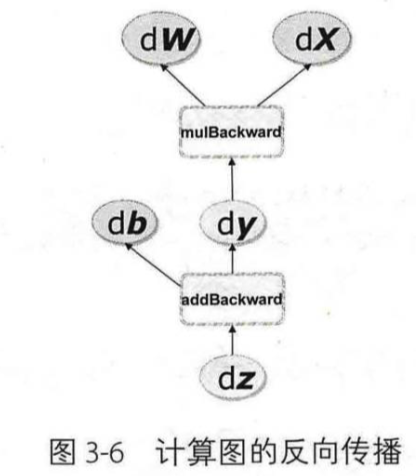
有了计算图,上述链式求导即可利用计算图的反向传播自动完成,其过程如下:

在pytorch实现中,autograd会随着用户的操作,记录生成当前variable的所有操作,由此建立一个有向无环图,每一个变量在图中的位置可以通过其grad_fn属性在图中的位置推测得到
用户每进行一次 操作,相应的计算图就会发生变化
每一个前向传播操作的函数都有与之对应的反向传播函数用来计算输入的各个variable的梯度,这些函数的函数名通常以Backward结尾,代码实现:
x = V(t.ones(1))
b = V(t.rand(1),requires_grad=True)
w = V(t.rand(1),requires_grad=True)
y = w * x #等价于 y = w.mul(x)
z = y + b #等价于 z = y.add(b)
查看requires_grad:
x.requires_grad,b.requires_grad,w.requires_grad
返回:
(False, True, True)
#虽然未指定y.requires_grad为True,但由于y依赖于需要求导的w
#故而y.requires_grad自动设置为True
y.requires_grad #返回True
查看叶子节点:
x.is_leaf,b.is_leaf,w.is_leaf
返回:
(True, True, True)
y.is_leaf, z.is_leaf
返回:
(False, False)
查看grad_fn:
#grad_fn可以查看这个variable的反向传播函数
#z是add函数的输出,所以它的反向传播函数是AddBackward
z.grad_fn
返回:
<AddBackward0 at 0x116776240>
next_functions:
#next_functions保存grad_fn的输入,grad_fn的输入是一个tuple
#第一个是y,它是乘法mul的输出,所以对应的反向传播函数y.grad_fn是MulBackward
#第二个是b,它是叶子节点,由用户创建,grad_fn为None,但是有
z.grad_fn.next_functions
返回:
((<MulBackward0 at 0x116776c50>, 0), (<AccumulateGrad at 0x116776828>, 0))
#Variable的grad_fn对应着图中的function
z.grad_fn.next_functions[0][0] == y.grad_fn #返回True
#第一个是w,叶子节点,需要求导,梯度是累加的
#第二个是x,叶子节点,不需要求导,所以为None
y.grad_fn.next_functions
返回:
((<AccumulateGrad at 0x116776ba8>, 0), (None, 0))
#叶子节点的grad_fn是None
w.grad_fn, x.grad_fn
返回:
(None, None)
计算w的梯度时需要用到x的数值(因为![]() ),这些数值在前向过程中会保存下来成buffer,在计算完梯度后会自动清空。
),这些数值在前向过程中会保存下来成buffer,在计算完梯度后会自动清空。
为了能够多次反向传播,需要指定retain_graph来保留这些buffer
y.grad_fn.saved_variables
返回错误:
AttributeError: 'MulBackward0' object has no attribute 'saved_variables'
原因确实是版本问题,PyTorch0.3 中把许多python的操作转移到了C++中,saved_variables 现在是一个c++的对象,无法通过python访问。(https://github.com/chenyuntc/pytorch-book/issues/7)
可以查看这里进行学习https://github.com/chenyuntc/pytorch-book/blob/0.3/chapter3-Tensor和autograd/Autograd.ipynb,省掉上面的操作:
#使用retain_graph来保存buffer
z.backward(retain_graph=True)
w.grad
返回:
tensor([1.])
#多次反向传播,梯度累加,这就是w中AccumulateGrad标识的含义
z.backward()
w.grad
返回:
tensor([2.])
PyTorch使用的是动态图,它的计算图在每次前向传播时都是从头开始构建,所以它能够使用Python控制语句(如for、if等)根据需求创建计算图。这点在自然语言处理领域中很有用,它意味着你不需要事先构建所有可能用到的图的路径,图在运行时才构建。
def abs(x):
    if x.data[0] > 0:return x
    else: return -x
x = V(t.ones(1),requires_grad=True)
y = abs(x)
y.backward()
x.grad
返回:
tensor([1.])
x = V(-1*t.ones(1),requires_grad=True)
y = abs(x)
y.backward()
x.grad
返回:
tensor([-1.])
如果不使用.float(),报错:
RuntimeError: Only Tensors of floating point dtype can require gradients
如果使用data[0],报错:
IndexError: invalid index of a 0-dim tensor. Use tensor.item() to convert a 0-dim tensor to a Python number
最终正确版:
def f(x):
    result = 1
    for ii in x:
        if ii.data > 0:result = ii*result #这里如果使用data[0]会报错
    return result
x = V(t.arange(-2, 4).float(),requires_grad=True) #这里如果不使用.float()会报错
y = f(x) # y = x[3]*x[4]*x[5]
y.backward()
x.grad
返回:
tensor([0., 0., 0., 6., 3., 2.])
变量的requires_grad属性默认为False,如果某一个节点requires_grad被设置为True,那么所有依赖它的节点requires_grad都是True。这其实很好理解,对于,x.requires_grad = True,当需要计算
时,根据链式法则,
,自然也需要求
,所以y.requires_grad会被自动标为True.
volatile=True是另外一个很重要的标识,它能够将所有依赖于它的节点全部都设为volatile=True(默认为True),其优先级比requires_grad=True高。volatile=True的节点不会求导,即使requires_grad=True,也无法进行反向传播。对于不需要反向传播的情景(如inference,即测试推理时),该参数可实现一定程度的速度提升,并节省约一半显存,因其不需要分配空间计算梯度。
x = V(t.ones(1))
w = V(t.rand(1),requires_grad=True)
y = x*w
#y依赖于x,w,但x.volatile = True,w.requires_grad = True
x.requires_grad, w.requires_grad, y.requires_grad
返回:
(False, True, True)
x.volatile, w.volatile, y.volatile
报错:
/anaconda2/envs/deeplearning3/lib/python3.6/site-packages/ipykernel_launcher.py:1: UserWarning: volatile was removed (Variable.volatile is always False)
  """Entry point for launching an IPython kernel.
返回与预期不符:
(False, False, False)
该属性已经在0.4版本中被移除了(我使用的是pytorch-1.0.1),可以使用with torch.no_grad()代替该功能,函数可以使用装饰器@torch.no_grad(),即:
>>> x = torch.tensor([1], requires_grad=True)
>>> with torch.no_grad():
...   y = x * 2
>>> y.requires_grad
False
>>> @torch.no_grad()
... def doubler(x):
...     return x * 2
>>> z = doubler(x)
>>> z.requires_grad
False
详细内容可见https://pytorch.org/docs/master/autograd.html#locally-disable-grad
所以现在一般只使用requires_grad来查看,不使用volatile了
在反向传播过程中非叶子节点的导数计算完之后即被清空。若想查看这些变量的梯度,有两种方法:
- 使用autograd.grad函数
- 使用hook
autograd.grad和hook方法都是很强大的工具,更详细的用法参考官方api文档,这里举例说明基础的使用。推荐使用hook方法,但是在实际使用中应尽量避免修改grad的值。
x = V(t.ones(3),requires_grad=True)
y = V(t.rand(3),requires_grad=True)
y = x*w
# y依赖于w,而w.requires_grad = True
z = y.sum()
x.requires_grad, w.requires_grad, y.requires_grad
返回:
(True, True, True)
#非叶子节点grad计算完后自动清空,所以y.grad为None
z.backward()
x.grad, w.grad, y.grad
返回:
(tensor([0.8205, 0.8205, 0.8205]), tensor([3.]), None)
第一种方法:
#第一种方法:使用grad获得中间变量的梯度
x = V(t.ones(3), requires_grad=True)
w = V(t.rand(3), requires_grad=True)
y = x * w
z = y.sum()
#Z对y的梯度,隐式调用backward()
t.autograd.grad(z, y)
返回:
(tensor([1., 1., 1.]),)
第二种方法:
#第二种方法:使用hook
#hook是一个函数,输入是梯度,不应该有返回值
def varaible_hook(grad):
    print('y的梯度:\r\n',grad)
x = V(t.ones(3), requires_grad=True)
w = V(t.rand(3), requires_grad=True)
y = x * w
#注册hook
hook_handle = y.register_hook(varaible_hook) #存储的是那个值的梯度就对那个值进行注册hook
z = y.sum()
z.backward()

#除非你每次都要用hook,否则用完后记得移除hook
hook_handle.remove()
返回:
y的梯度:
 tensor([1., 1., 1.])
最后再来看看variable中grad属性和backward函数grad_variables参数的含义,这里直接下结论:
- variable
的梯度是目标函数
对
的梯度,
,形状和
一致。
- 对于y.backward(grad_variables)中的grad_variables相当于链式求导法则中的
中的
。z是目标函数,一般是一个标量,故而
的形状与variable
的形状一致。
z.backward()在一定程度上等价于y.backward(grad_y)。z.backward()省略了grad_variables参数,是因为是一个标量,而
x = V(t.arange(0,3).float(),requires_grad=True)
y = x**2 + x*2
z = y.sum()
z.backward() #z是标量,即一个数,所以可以省略参数
x.grad
返回:
tensor([2., 4., 6.])
x = V(t.arange(0,3).float(), requires_grad=True)
y = x**2 + x*2
z = y.sum()
y_grad_variables = V(t.Tensor([1,1,1])) # dz/dy,因为y不是标量,即一个数
y.backward(y_grad_variables) #从y开始反向传播
x.grad
返回:
tensor([2., 4., 6.])
另外值得注意的是,只有对variable的操作才能使用autograd,如果对variable的data直接进行操作,将无法使用反向传播。除了对参数初始化,一般我们不会修改variable.data的值。
在PyTorch中计算图的特点可总结如下:
- autograd根据用户对variable的操作构建其计算图。对变量的操作抽象为
Function。 - 对于那些不是任何函数(Function)的输出,由用户创建的节点称为叶子节点,叶子节点的
grad_fn为None。叶子节点中需要求导的variable,具有AccumulateGrad标识,因其梯度是累加的。 - variable默认是不需要求导的,即
requires_grad属性默认为False,如果某一个节点requires_grad被设置为True,那么所有依赖它的节点requires_grad都为True。 - (deprecated)variable的
volatile属性默认为False,如果某一个variable的volatile属性被设为True,那么所有依赖它的节点volatile属性都为True。volatile属性为True的节点不会求导,volatile的优先级比requires_grad高。 - 多次反向传播时,梯度是累加的。反向传播的中间缓存会被清空,为进行多次反向传播需指定
retain_graph=True来保存这些缓存。 - 非叶子节点的梯度计算完之后即被清空,可以使用
autograd.grad或hook技术获取非叶子节点的值。 - variable的grad与data形状一致,应避免直接修改variable.data,因为对data的直接操作无法利用autograd进行反向传播
- 反向传播函数
backward的参数grad_variables可以看成链式求导的中间结果,如果是标量,可以省略,默认为1 - PyTorch采用动态图设计,可以很方便地查看中间层的输出,动态的设计计算图结构。
3.扩展autograd
目前绝大多数函数都可以使用autograd实现反向求导,但如果需要自己写一个复杂的函数,不支持自动反向求导怎么办? 写一个Function,实现它的前向传播和反向传播代码,Function对应于计算图中的矩形, 它接收参数,计算并返回结果。下面给出一个例子。
class Mul(Function):
    @staticmethod
    def forward(ctx, w, x, b, x_requires_grad=True):
        ctx.x_requires_grad = x_requires_grad
        ctx.save_for_backward(w, x)#存储用来反向传播的参数
        output = w*x +b
        return output

    @staticmethod
    def backward(ctx, grad_output):
        w, x = ctx.save_variables
        grad_w = grad_output * x
        if ctx.x_requires_grad:
            grad_x = grad_output * w
        else:
            grad_x = None
        grad_b = grad_output * 1
        return grad_w, grad_x, grad_b, None
上面这种写法是有问题的:
NameError: name 'Function' is not defined
分析如下:
- 自定义的Function需要继承autograd.Function,没有构造函数
__init__,forward和backward函数都是静态方法 - forward函数的输入和输出都是Tensor,backward函数的输入和输出都是Variable
- backward函数的输出和forward函数的输入一一对应,backward函数的输入和forward函数的输出一一对应
- backward函数的grad_output参数即t.autograd.backward中的
grad_variables - 如果某一个输入不需要求导,直接返回None,如forward中的输入参数x_requires_grad显然无法对它求导,直接返回None即可
- 反向传播可能需要利用前向传播的某些中间结果,需要进行保存,否则前向传播结束后这些对象即被释放
Function的使用利用Function.apply(variable)
from torch.autograd import Function
class MultiplyAdd(Function):

    @staticmethod
    def forward(ctx, w, x, b):
        print('type in forward', type(x))
        ctx.save_for_backward(w, x)#存储用来反向传播的参数
        output = w*x +b
        return output

    @staticmethod
    def backward(ctx, grad_output):
        w, x = ctx.saved_variables #deprecated,现在使用saved_tensors
        print('type in backward',type(x))
        grad_w = grad_output * x
        grad_x = grad_output * w
        grad_b = grad_output * 1
        return grad_w, grad_x, grad_b
调用方法一:
类名.apply(参数)
输出变量.backward()
x = V(t.ones(1))
w = V(t.rand(1),requires_grad=True)
b = V(t.rand(1),requires_grad=True)
print('开始前向传播')
z = MultiplyAdd.apply(w, x, b)
print('开始反向传播')
z.backward()

# x不需要求导,中间过程还是会计算它的导数,但随后被清空
x.grad, w.grad, b.grad
警告:
/anaconda2/envs/deeplearning3/lib/python3.6/site-packages/ipykernel_launcher.py:13: DeprecationWarning: 'saved_variables' is deprecated; use 'saved_tensors'
  del sys.path[0]
返回:
开始前向传播
type in forward <class 'torch.Tensor'>
开始反向传播
type in backward <class 'torch.Tensor'>
(None, tensor([1.]), tensor([1.]))
调用方法二
类名.apply(参数)
输出变量.grad_fn.apply()
x = V(t.ones(1))
w = V(t.rand(1),requires_grad=True)
b = V(t.rand(1),requires_grad=True)
print('开始前向传播')
z = MultiplyAdd.apply(w, x, b)
print('开始反向传播')

# 调用MultiplyAdd.backward
# 会自动输出grad_w, grad_x, grad_b
z.grad_fn.apply(V(t.ones(1)))
返回:
开始前向传播
type in forward <class 'torch.Tensor'>
开始反向传播
type in backward <class 'torch.Tensor'>
Out[68]:
(tensor([1.]), tensor([0.8597], grad_fn=<MulBackward0>), tensor([1.]))
之所以forward函数的输入是tensor,而backward函数的输入是variable,是为了实现高阶求导。backward函数的输入输出虽然是variable,但在实际使用时autograd.Function会将输入variable提取为tensor,并将计算结果的tensor封装成variable返回。在backward函数中,之所以也要对variable进行操作,是为了能够计算梯度的梯度(backward of backward)。下面举例说明,有关torch.autograd.grad的更详细使用请参照文档。
x = V(t.Tensor([5]),requires_grad=True)
y = x**2
grad_x = t.autograd.grad(y,x,create_graph=True)
grad_x # dy/dx = 2 * x
返回:
(tensor([10.], grad_fn=<MulBackward0>),)
grad_grad_x = t.autograd.grad(grad_x[0],x)
grad_grad_x #二阶导数 d(2x)/dx = 2
返回:
(tensor([2.]),)
这种设计虽然能让autograd具有高阶求导功能,但其也限制了Tensor的使用,因autograd中反向传播的函数只能利用当前已经有的Variable操作。这个设计是在0.2版本新加入的,为了更好的灵活性,也为了兼容旧版本的代码,PyTorch还提供了另外一种扩展autograd的方法。
PyTorch提供了一个装饰器@once_differentiable,能够在backward函数中自动将输入的variable提取成tensor,把计算结果的tensor自动封装成variable。有了这个特性我们就能够很方便的使用numpy/scipy中的函数,操作不再局限于variable所支持的操作。但是这种做法正如名字中所暗示的那样只能求导一次,它打断了反向传播图,不再支持高阶求导。
上面所描述的都是新式Function,还有个legacy Function,可以带有__init__方法,forward和backwad函数也不需要声明为@staticmethod,但随着版本更迭,此类Function将越来越少遇到,在此不做更多介绍。
上面这些都是比较老的写法了,现在都不使用了,现在的声明都类似:
class StyleLoss(nn.Module):

    def __init__(self, target_feature):
        super(StyleLoss, self).__init__()
        self.target = gram_matrix(target_feature).detach()

    def forward(self, input):
        G = gram_matrix(input)
        self.loss = F.mse_loss(G, self.target)
        return input
backward方法都不自己写了,都使用autograd
此外在实现了自己的Function之后,还可以使用gradcheck函数来检测实现是否正确。gradcheck通过数值逼近来计算梯度,可能具有一定的误差,通过控制eps的大小可以控制容忍的误差。
下面举例说明如何利用Function实现sigmoid Function
class Sigmoid(Function):
    @staticmethod
    def forward(ctx, x):
        output = 1 / (1 + t.exp(-x))
        ctx.save_for_backward(output)
        return output

    @staticmethod
    def backward(ctx, grad_output):
        output, = ctx.saved_tensors
        grad_x = output * (1 - output) *grad_output
        return grad_x
#采用数值逼近方式检验计算梯度的公式对不对
test_input =V(t.randn(3,4), requires_grad=True)
t.autograd.gradcheck(Sigmoid.apply, (test_input,), eps=1e-3) #返回True
def f_sigmoid(x):
    y = Sigmoid.apply(x)
    y.backward(t.ones(x.size()))

def f_naive(x):
    y = 1/(1 + t.exp(-x))
    y.backward(t.ones(x.size()))

def f_th(x):
    y = t.sigmoid(x)
    y.backward(t.ones(x.size()))
测试:
import time
x = V(t.randn(100, 100), requires_grad=True)
start_sigmoid = time.time()
for i in range(100):
    f_sigmoid(x)
end_sigmoid = time.time()

print(end_sigmoid-start_sigmoid)
start_naive = time.time()
for i in range(100):
    f_naive(x)
end_naive = time.time()
print(end_naive-start_naive)

start_th = time.time()
for i in range(100):
    f_th(x)
end_th = time.time()
print(end_th-start_th)
返回:
0.01591801643371582
0.02293086051940918
0.010257244110107422
显然f_sigmoid要比单纯利用autograd加减和乘方操作实现的函数快不少,因为f_sigmoid的backward优化了反向传播的过程。另外可以看出系统实现的buildin接口(t.sigmoid)更快。
4.小试牛刀——用Variable实现线性回归
import torch as t
from torch.autograd import Variable as V
from matplotlib import pyplot as plt
from IPython import display
#设置随机数种子,为了在不同人电脑上运行时下面的输入一致
t.manual_seed(1000)
def get_fake_data(batch_size=8):
    ''' 产生随机数据:y = x*2 + 3,加上了一些噪声'''
    x = t.rand(batch_size,1) * 20
    y = x * 2 + (1 + t.randn(batch_size, 1))*3
    return x, y
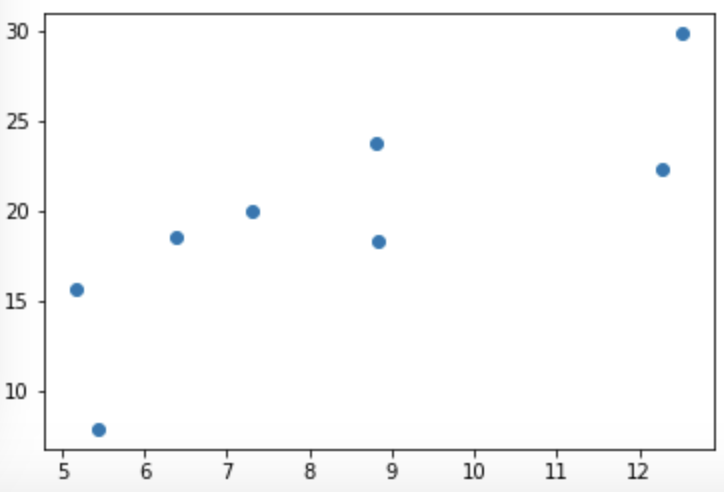
# 来看看产生x-y分布是什么样的
x, y = get_fake_data()
plt.scatter(x.squeeze().numpy(), y.squeeze().numpy())
图示:

#随机初始化参数
w = V(t.rand(1,1), requires_grad=True)
b = V(t.zeros(1,1), requires_grad=True)

lr = 0.001 #学习率

for ii in range(8000):#8000次迭代
    x, y = get_fake_data()
    x, y  = V(x), V(y)

    #forward:计算loss
    y_pred = x.mm(w) + b.expand_as(y)
    loss = 0.5 * (y_pred - y) ** 2
    loss = loss.sum()

    # backward:手动计算梯度
    loss.backward()

    # 更新参数
    w.data.sub_(lr * w.grad.data)
    b.data.sub_(lr * b.grad.data)

    #梯度清零
    w.grad.data.zero_()
    b.grad.data.zero_()

    if ii%1000 == 0:
        # 画图
        display.clear_output(wait=True)
        x = t.arange(0, 20).float().view(-1, 1)
        y = x.mm(w.data) + b.data.expand_as(x)
        plt.plot(x.numpy(), y.numpy()) # predicted

        x2, y2 = get_fake_data(batch_size=20)
        plt.scatter(x2.numpy(), y2.numpy()) # true data

        plt.xlim(0,20)
        plt.ylim(0,41)
        plt.show()
        plt.pause(0.5)

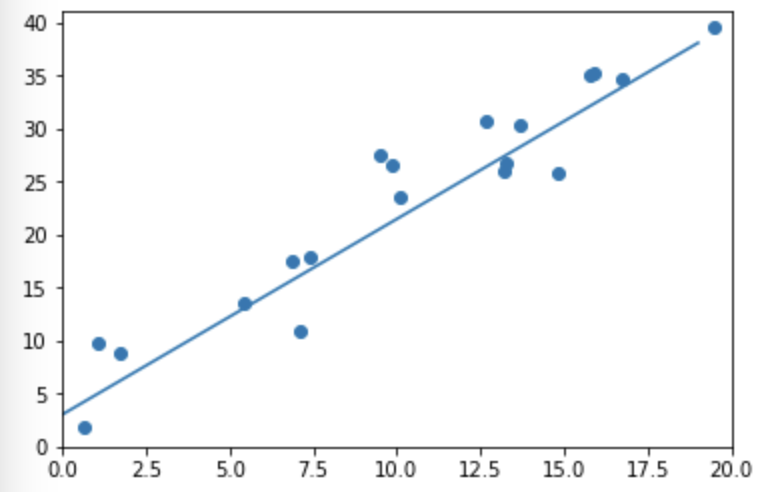
print(w.data.squeeze(), b.data.squeeze())
返回:
tensor(2.0516) tensor(2.9800)
图示:


