iOS开发——技术精华Swift篇&Swift 2.0和Objective-C2.0混编之第三方框架的使用
swift 语言是苹果公司在2014年的WWDC大会上发布的全新的编程语言。Swift语言继承了C语言以及Objective-C的特性,且克服了C语言的兼容性问题。Swift语言采用安全编程模式,且引入了多种新功能,使得编程工作更加简便,灵活!
2015年6月9日苹果又一次给所有开发之者带来了一个惊喜,那就是今年年底swift讲开源,者队iOS开发着来说无疑是一个值得兴奋的消息,可是就在这短短的几个月里面swift吸引了越来越多的开发者去学习,不仅仅是iOS开发者。
然而,在我们学习和使用swift的时候遇到一个最大的问题就是,之前在使用Objective-C开发iOS程序的时候,有大量的框架可以使用,或者是工具类什么的,而且有些功能实现起来很简单(虽然swift实现也不难),导致开发者不知所错,这个时候苹果的一个非常好的技术就非常有用了(虽然这个技术也是很早就出来了,基本上随着swift1.0出来的,但是那个时候还不够完善),那就是混编,其实就是在swift中编写OC代码,或者在OC中编写swift代码(这种方法很少有人用)。
混编是一个很神奇的技术,这里就不多介绍内在含义了,下面我们就来看看在swift怎么编写Objective-C代码:
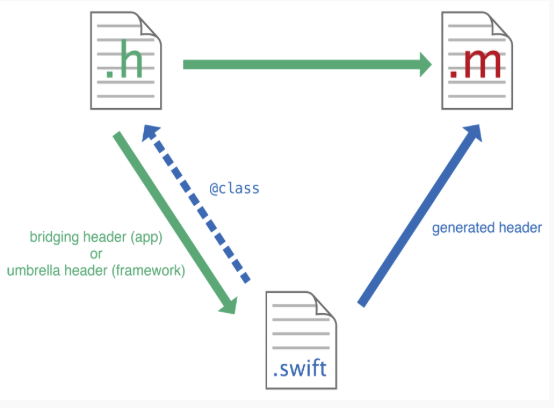
首先,在下面这篇文章中我已经介绍什么怎么为混编做准备(就是关于桥接文件的配置),如果你还不知道去做那么就先看看再来开始接下来的精彩时刻!
http://www.cnblogs.com/iCocos/p/4694563.html
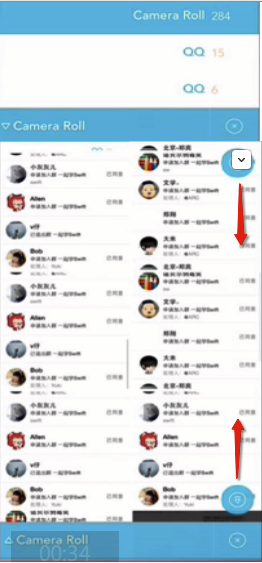
1:MJRefresh(小码哥出品,质量优保障,哈哈):一个集成下拉刷新和上啦加载更多的非常有名的第三方库
1         self.tableView.addLegendHeaderWithRefreshingTarget(self, refreshingAction: "headRefresh")
2
3         self.tableView.addGifFooterWithRefreshingTarget(self, refreshingAction: "footRefresh")
实现相应的监听方法

 1  func headRefresh(){
 2
 3         self.Delay(2, closure: { () -> () in
 4
 5             self.ObjectArray.removeAll(keepCapacity: false)
 6
 7             self.i = 0
 8
 9             for self.i ; self.i < 10 ; self.i++ {
10
11                 self.ObjectArray.append("\(self.i)")
12
13             }
14
15             self.tableView.header.endRefreshing()
16
17             self.tableView.reloadData()
18
19         })
20
21     }
22
23     func footRefresh(){
24
25         self.Delay(2, closure: { () -> () in
26
27             var j = self.i + 10
28
29             for self.i ; self.i < j ; self.i++ {
30
31                 self.ObjectArray.append("\(self.i)")
32
33             }
34
35             self.tableView.footer.endRefreshing()
36
37             self.tableView.reloadData()
38
39         })
40
41     }
42
43     func Delay(time:Double,closure:()->()){
44
45        dispatch_after(dispatch_time(DISPATCH_TIME_NOW, Int64(time * Double(NSEC_PER_SEC))), dispatch_get_main_queue(), closure)
46
47     }

2:ProgressHUD:指示器
1         ProgressHUD.show("亲爱的,别急嘛~~~")
2
3
4
5         ProgressHUD.showSuccess("人家准备好了!")

还有更多功能清查看相关文章
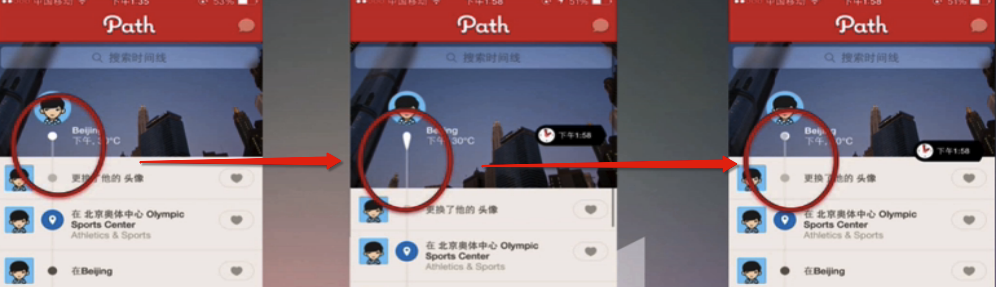
3:PathCover :主页风格
 1  var head:XHPathCover!
 2
 3
 4
 5         head = XHPathCover(frame: CGRectMake(0, 0, 320, 200))
 6
 7         head.setBackgroundImage(UIImage(named: "BG"))
 8
 9         head.setAvatarImage(UIImage(named: "cute_girl.jpg"))
10
11         head.isZoomingEffect = true;
12
13         head.setInfo(NSDictionary(objectsAndKeys: "StrongX",XHUserNameKey,"iOS工程师",XHBirthdayKey)as [NSObject:AnyObject])
14
15         head.avatarButton.layer.cornerRadius = 33;
16
17         head.avatarButton.layer.masksToBounds = true
18
19         head.handleRefreshEvent = {
20
21             self.headRefresh()
22
23         }
24
25         tableView.tableHeaderView = head;
26
27
28
29     func scrollViewDidScroll(scrollView: UIScrollView) {
30
31         head.scrollViewDidScroll(scrollView)
32
33     }
34
35     func scrollViewDidEndDecelerating(scrollView: UIScrollView) {
36
37         head.scrollViewDidEndDecelerating(scrollView)
38
39     }
40
41     func scrollViewDidEndDragging(scrollView: UIScrollView, willDecelerate decelerate: Bool) {
42
43         head.scrollViewDidEndDragging(scrollView, willDecelerate: decelerate)
44
45     }
46
47     func scrollViewWillBeginDragging(scrollView: UIScrollView) {
48
49         head.scrollViewWillBeginDragging(scrollView)
50
51     }
4:SDWebImage:图片缓存
 1         SDImageCache.sharedImageCache().clearDisk()
 2
 3         SDImageCache.sharedImageCache().clearMemory()
 4
 5
 6
 7         var image = UIImageView(frame: CGRectMake(10, 10, 60, 60))
 8
 9         image.layer.cornerRadius = 30
10
11         image.layer.masksToBounds = true
12
13         image.sd_setImageWithURL(NSURL(string: "http://ac-hn8w3hlp.clouddn.com/fVju6pA4WGzVGNGsVdVXEzB.png"), placeholderImage: UIImage(named: "cute_girl.jpg"))
14
15         cell.contentView.addSubview(image)
5:拓展Extension(可以相当于OC中的分类):
 1 extension UIView {
 2
 3     func sayHello(){
 4
 5         println("哈喽,大家好,欢迎l来到iOS梦工厂”)
 6
 7     }
 8
 9
10
11 }
使用:
        head.sayHello()


        tableView.sayHello()
6:自定义类型:实现画图
 1 import UIKit
 2
 3
 4
 5 class LineView: UIView {
 6
 7
 8
 9    var labelTile = ["动态","关注","粉丝","文章","文集"]
10
11     override func drawRect(rect: CGRect) {
12
13         var context = UIGraphicsGetCurrentContext()
14
15         CGContextSetRGBStrokeColor(context, 0, 0, 0, 0.3)
16
17         CGContextSetLineWidth(context, 0.5)
18
19
20
21         for var i = 1 ; i <= 4 ; i++ {
22
23             CGContextMoveToPoint(context, (CGFloat)(i)*rect.width/5, 10)
24
25             CGContextAddLineToPoint(context, (CGFloat)(i)*rect.width/5, rect.height - 10)
26
27         }
28
29
30
31         CGContextMoveToPoint(context, 0, 5)
32
33         CGContextAddLineToPoint(context, rect.width, 5)
34
35
36
37         CGContextMoveToPoint(context, 0, rect.height - 5)
38
39         CGContextAddLineToPoint(context, rect.width, rect.height - 5)
40
41
42
43         CGContextStrokePath(context)
44
45
46
47     }
48
49
50
51     override init(frame: CGRect) {
52
53         super.init(frame: frame)
54
55         self.backgroundColor = UIColor.whiteColor()
56
57         for var i = 0 ; i<5 ; i++ {
58
59             var label = UILabel(frame: CGRectMake((CGFloat)(i) * frame.width / 5, frame.height / 3, frame.width / 5, frame.height / 3 * 2))
60
61
62
63             label.text = labelTile[i]
64
65             label.textColor = UIColor.grayColor()
66
67             label.font = UIFont.systemFontOfSize(13)
68
69             label.textAlignment = NSTextAlignment.Center
70
71             self.addSubview(label)
72
73
74
75         }
76
77
78
79
80
81     }
82
83
84
85     required init(coder aDecoder: NSCoder) {
86
87         fatalError("init(coder:) has not been implemented")
88
89     }
90
91
92
93 }
94
95
96
97         var Line = LineView(frame: CGRectMake(0, 200, 320, 60))
98
99        HeadView.addSubview(Line)

7:PhotoBrowser:图片浏览器
 1 HZPhotoBrowserDelegate
 2
 3
 4
 5  func PhotoBrowser(){
 6
 7         var BrowserVC = HZPhotoBrowser()
 8
 9         BrowserVC.sourceImagesContainerView = head.avatarButton
10
11         BrowserVC.imageCount = 1
12
13         BrowserVC.currentImageIndex = 0
14
15         BrowserVC.delegate = self
16
17         BrowserVC.show()
18
19     }
20
21     func photoBrowser(browser: HZPhotoBrowser!, placeholderImageForIndex index: Int) -> UIImage! {
22
23         return head.avatarButton.currentImage
24
25     }
26
27     func photoBrowser(browser: HZPhotoBrowser!, highQualityImageURLForIndex index: Int) -> NSURL! {
28
29         var url = NSURL(string: "http://ac-hn8w3hlp.clouddn.com/dGWm2GEFNFoisI6beHBUQjD.png")
30
31         return url
32
33     }

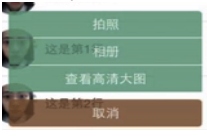
8:XActionSheet:提示框
 1 XActionSheetDelegate
 2
 3         var action = XActionSheet()
 4
 5         action.delegate = self
 6
 7         action.addButtonwithTitle("拍照")
 8
 9         action.addCancelButton("取消")
10
11         action.addButtonwithTitle("相册")
12
13         action.addButtonwithTitle("查看高清大图")
14
15         self .presentViewController(action, animated: true) { () -> Void in
16
17
18
19         }
20
21     func buttonClick(index: Int) {
22
23         println("\(index)")
24
25         if(index == 2){
26
27             var BrowserVC = HZPhotoBrowser()
28
29             BrowserVC.sourceImagesContainerView = head.avatarButton
30
31             BrowserVC.imageCount = 1
32
33             BrowserVC.currentImageIndex = 0
34
35             BrowserVC.delegate = self
36
37             BrowserVC.show()
38
39         }
40
41     }
42
43         var action = XActionSheet()
44
45         action.delegate = self
46
47         action.addCancelButtonWithTitle("取消")
48
49         action.addButtonWithTitle("拍照")
50
51         action.addButtonWithTitle("相册")
52
53         action.addButtonWithTitle("查看高清大图")
54
55         self.presentViewController(action, animated: true) { () -> Void in
56
57
58
59         }
9:DoImage:图片选择器
 1 DoImagePickerControllerDelegate
 2
 3   var picker = DoImagePickerController(nibName: "DoImagePickerController", bundle: nil)
 4
 5             picker.delegate = self
 6
 7             picker.nMaxCount = 1
 8
 9             picker.nColumnCount = 2
10
11             self.presentViewController(picker, animated: true, completion: nil)
12
13     func didCancelDoImagePickerController() {
14
15         self.dismissViewControllerAnimated(true, completion: { () -> Void in
16
17
18
19         })
20
21     }
22
23     func didSelectPhotosFromDoImagePickerController(picker: DoImagePickerController!, result aSelected: [AnyObject]!) {
24
25         var image = aSelected.first as! UIImage
26
27         head.avatarButton.setImage(image, forState: UIControlState.Normal)
28
29         self.dismissViewControllerAnimated(true, completion: { () -> Void in
30
31
32
33         })
34
35     }
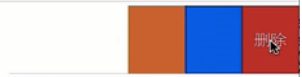
10:SwipeableCell:TableView左滑更多按钮
 1 SwipeableCellDelegate,SwipeableCellDataSource
 2
 3
 4
 5  cell.delegate = self
 6
 7         cell.dataSource = self
 8
 9         cell.setNeedsUpdateConstraints()
10
11         if(self.isEding .containsObject(indexPath)){
12
13             cell.openCell(false)
14
15         }else{
16
17             cell.closeCell(false)
18
19         }
20
21  /**
22
23     *  SwipeableCellDelegate SwipeableCellDataSource
24
25     */
26
27
28
29     func swipeableCellDidOpen(cell: SwipeableCell!) {
30
31         var indexpath = tableView.indexPathForCell(cell) as NSIndexPath!
32
33         self.isEding.addObject(indexpath)
34
35     }
36
37     func swipeableCellDidClose(cell: SwipeableCell!) {
38
39         var indexpath = tableView.indexPathForCell(cell) as NSIndexPath!
40
41         self.isEding.removeObject(indexpath)
42
43     }
44
45     func swipeableCell(cell: SwipeableCell!, didSelectButtonAtIndex index: Int) {
46
47         if(index == 0){
48
49             var indexpath = tableView.indexPathForCell(cell) as NSIndexPath!
50
51             ObjectArray.removeAtIndex(indexpath.row)
52
53             self.isEding.removeObject(indexpath)
54
55             tableView.deleteRowsAtIndexPaths([indexpath], withRowAnimation: UITableViewRowAnimation.Left)
56
57         }
58
59         println(index)
60
61     }
62
63     func numberOfButtonsInSwipeableCell(cell: SwipeableCell!) -> Int {
64
65         return 3;
66
67     }
68
69
70
71     func swipeableCell(cell: SwipeableCell!, buttonForIndex index: Int) -> UIButton! {
72
73         var btn = UIButton(frame: CGRectMake(0, 0, 60, 60))
74
75         if(index == 0){
76
77             btn.backgroundColor = UIColor.redColor()
78
79             btn.setTitle("删除", forState: UIControlState.Normal)
80
81         }
82
83         if(index == 1){
84
85             btn.backgroundColor = UIColor.blueColor()
86
87         }
88
89         if(index == 2){
90
91             btn.backgroundColor = UIColor.orangeColor()
92
93         }
94
95         return btn;
96
97     }
11:EAIntroView:新特性引导界面
 1 EAIntroDelegate
 2
 3   func guideView(){
 4
 5         self.navigationController?.navigationBar.hidden = true
 6
 7         var page1 = EAIntroPage()
 8
 9         page1.bgImage = UIImage(named: "image1.jpg")
10
11         page1.title = "华于形,美于心"
12
13         page1.titleFont = UIFont.systemFontOfSize(20)
14
15         page1.titlePositionY = 400
16
17         page1.desc = "StrongX的美容医院,欢迎你~~"
18
19
20
21         var page2 = EAIntroPage()
22
23         page2.bgImage = UIImage(named: "image2.jpg")
24
25         page2.title = "德艺双馨,妙手天成"
26
27         page2.titlePositionY = 400
28
29         page2.titleFont = UIFont.systemFontOfSize(20)
30
31
32
33         var page3 = EAIntroPage()
34
35         page3.bgImage = UIImage(named: "image3.jpg")
36
37         page3.title = "表面文章,内在功夫"
38
39         page3.titlePositionY = 400
40
41         page3.titleFont = UIFont.systemFontOfSize(20)
42
43
44
45         var intro = EAIntroView(frame: self.view.frame, andPages: [page1,page2,page3])
46
47         intro.delegate = self
48
49         intro.showInView(self.view)
50
51     }
52
53
54
55     func introDidFinish(introView: EAIntroView!) {
56
57         self.navigationController?.navigationBar.hidden = false
58
59     }

12:AwesomeMenu:Path菜单
 1 AwesomeMenuDelegate
 2
 3
 4
 5  var storyMenuImage = UIImage(named: "bg-menuitem.png")
 6
 7         var storyMenuImagePressed = UIImage(named: "bg-menuitem-highlighted.png")
 8
 9         var startImage = UIImage(named: "icon-star")
10
11
12
13
14
15         var item1 = AwesomeMenuItem(image: storyMenuImage, highlightedImage: storyMenuImagePressed, contentImage: startImage, highlightedContentImage: nil)
16
17         var item2 = AwesomeMenuItem(image: storyMenuImage, highlightedImage: storyMenuImagePressed, contentImage: startImage, highlightedContentImage: nil)
18
19         var item3 = AwesomeMenuItem(image: storyMenuImage, highlightedImage: storyMenuImagePressed, contentImage: startImage, highlightedContentImage: nil)
20
21         var item4 = AwesomeMenuItem(image: storyMenuImage, highlightedImage: storyMenuImagePressed, contentImage: startImage, highlightedContentImage: nil)
22
23         var item5 = AwesomeMenuItem(image: storyMenuImage, highlightedImage: storyMenuImagePressed, contentImage: startImage, highlightedContentImage: nil)
24
25
26
27         var addmenu = AwesomeMenuItem(image: UIImage(named: "bg-addbutton.png"), highlightedImage: UIImage(named: "bg-addbutton-highlighted"), contentImage: UIImage(named: "icon-plus"), highlightedContentImage: UIImage(named: "icon-plus-highlighted"))
28
29
30
31         var menu = AwesomeMenu(frame: self.view.frame, startItem: addmenu, menuItems: [item1,item2,item3,item4,item5])
32
33         menu.delegate = self;
34
35         self.view.addSubview(menu)
36
37
38
39         menu.rotateAngle = (CGFloat)(M_PI)/2
40
41         menu.menuWholeAngle = (CGFloat)(M_PI)/2
42
43
44
45         menu.timeOffset = 0.1
46
47
48
49         menu.farRadius = 200
50
51         menu.nearRadius = 100
52
53         menu.endRadius = 150
54
55
56
57
58
59
60
61
62
63
64
65
66
67     func awesomeMenu(menu: AwesomeMenu!, didSelectIndex idx: Int) {
68
69         println("\(idx)")
70
71     }

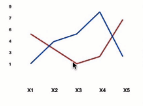
13:PNGChar:图表
点状图----
 1 func LineChart(){
 2
 3         println("LineChart")
 4
 5         var LineChart = PNLineChart(frame: CGRectMake(0, 100, 320, 200))
 6
 7         LineChart.setXLabels(["X1","X2","X3","X4","X5"], withWidth: 50)
 8
 9         var dataArray = [5,3,1,2,7]
10
11         var LineData = PNLineChartData()
12
13         LineData.color = UIColor.redColor()
14
15         LineData.itemCount = (UInt)(dataArray.count)
16
17         LineData.getData = ({(index:UInt)->PNLineChartDataItem in
18
19             var y:CGFloat = (CGFloat)(dataArray[(Int)(index)])
20
21             return PNLineChartDataItem(y: y)
22
23         })
24
25
26
27         var dataArray2 = [1,4,5,8,2]
28
29         var LineData2 = PNLineChartData()
30
31         LineData2.color = UIColor.blueColor()
32
33         LineData2.itemCount = (UInt)(dataArray2.count)
34
35         LineData2.getData = ({(index:UInt)->PNLineChartDataItem in
36
37             var y:CGFloat = (CGFloat)(dataArray2[(Int)(index)])
38
39             return PNLineChartDataItem(y: y)
40
41         })
42
43
44
45         LineChart.chartData = [LineData,LineData2]
46
47         LineChart.strokeChart()
48
49         self.view.addSubview(LineChart)
50
51     }
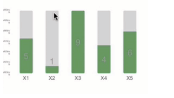
柱状图----
 1  func BarChart(){
 2
 3         println("BarChart")
 4
 5         var barChart = PNBarChart(frame: CGRectMake(0, 100, 320, 200))
 6
 7         barChart.xLabels = ["X1","X2","X3","X4","X5"]
 8
 9         barChart.yValues = ["5","1","9","4","6"]
10
11         barChart.strokeChart()
12
13         self.view.addSubview(barChart)
14
15
16
17     }
圆状图----
 1  func CircleChart(){
 2
 3         println("CircleChart")
 4
 5
 6
 7 //        var CircleChart = PNCircleChart(frame: CGRectMake(0, 100, 320, 200), total: NSNumber(double: 100), current: NSNumber(double: 60), clockwise: false)
 8
 9         var CircleChart = PNCircleChart(frame:  CGRectMake(0, 100, 320, 200), total: NSNumber(double: 100), current: NSNumber(double: 60), clockwise: false, shadow: false, shadowColor: UIColor.redColor())
10
11         CircleChart.strokeColor = UIColor.blueColor()
12
13         CircleChart.strokeChart()
14
15         self.view.addSubview(CircleChart)
16
17
18
19     }

饼状图----
 1  func PieChart(){
 2
 3         println("PieChart")
 4
 5
 6
 7         var items = [PNPieChartDataItem(value: 10, color: UIColor.grayColor(), description: "小波"),
 8
 9         PNPieChartDataItem(value: 30, color: UIColor.blueColor()),
10
11             PNPieChartDataItem(value: 20, color: UIColor.redColor(), description: "StrongX")]
12
13
14
15         var PieChart = PNPieChart(frame: CGRectMake(0, 200, 250, 200), items: items)
16
17         PieChart.descriptionTextColor = UIColor.whiteColor()
18
19         PieChart.descriptionTextFont = UIFont.systemFontOfSize(14)
20
21         PieChart.strokeChart()
22
23         self.view.addSubview(PieChart)
24
25
26
27     }

实现图表之后的必备的三步曲
标签:Legend
 1   LineData2.dataTitle = "iCocos"
 2
 3         LineData.dataTitle = "iOS"
 4
 5         LineChart.legendStyle = PNLegendItemStyle.Serial
 6
 7
 8
 9         var legend = LineChart.getLegendWithMaxWidth(320)
10
11         legend.frame = CGRectMake(0, 320, 320, 100)
12
13         self.view.addSubview(legend)
14
15
更新:Updata
 1  var dataArray3 = [3,6,8,12,5]
 2
 3         var LineData3 = PNLineChartData()
 4
 5         LineData3.color = UIColor.blueColor()
 6
 7         LineData3.itemCount = (UInt)(dataArray3.count)
 8
 9         LineData3.getData = ({(index:UInt)->PNLineChartDataItem in
10
11             var y:CGFloat = (CGFloat)(dataArray3[(Int)(index)])
12
13             return PNLineChartDataItem(y: y)
14
15         })
16
17         LineData3.dataTitle = "iCocos"
18
19         LineChart.updateChartData(LineData3, LineData)
20
21         LineChart.strokeChart()
22
23
24
25         var legend2 = LineChart.getLegendWithMaxWidth(320)
26
27         legend.frame = CGRectMake(0, 300, 320, 100)
28
29         self.view.addSubview(legend)
回调:Callback
 1 LineChart.delegate = self
 2
 3
 4
 5
 6
 7
 8
 9     /**
10
11     * Callback method that gets invoked when the user taps on the chart line.
12
13     */
14
15     - (void)userClickedOnLinePoint:(CGPoint)point lineIndex:(NSInteger)lineIndex
16
17     {
18
19         //实现数据刷新的代码
20
21     }
22
23
24
25     /**
26
27     * Callback method that gets invoked when the user taps on a chart line key point.
28
29     */
30
31     - (void)userClickedOnLineKeyPoint:(CGPoint)point
32
33     lineIndex:(NSInteger)lineIndex
34
35     pointIndex:(NSInteger)pointIndex{
36
37         //实现数据刷新的代码
38
39
40
41     }
14:AFN
 1 let afn = AFHTTPRequestOperationManager()
 2
 3 afn.GET("http://www.baidu.com", parameters: nil, success: { (oper, data) -> Void in
 4
 5     print(data)
 6
 7 }) { (opeation, error) -> Void in
 8
 9     print(error)
10
11 }
关于网络请求的,AFN作者为神马提供了一个通AFN一样好用的框架Alamofire
1 https://api.500px.com/v1/photos").responseJSON() {
2
3   (_, _, data, _) in
4
5   println(data)
6
7
8
9
总结:

好了,终于简单粗暴的的总结了一些了,后面笔者会更加深入的学习并且研究相关技术,花更多的时间进行分享相关技术并且优化,因为目前来说使用swift开发app混编时必须会的。
如果你喜欢笔者的文章,请为笔者点赞,欢迎转载!
