Vue 尚硅谷 Vue 、 VueComponet、脚手架、 npm view webpack versions查看版本、$childrens、 $slots
https://developer.mozilla.org/zh-CN/ MDN查询用法
console.dir(Vue) //查看Vue对象属性
Vue.config/Vue.data/Vue.component/Vue.directive/
//定义组件
const school = Vue.extend({
  template: `
    <h2>{{message}}</h2>
  `,
  data(){
     message: 'nihao, hello'
  }
})

//局部注册组件
new Vue({
  el: '#root',
  components: {
     school
  }
})

//全局注册
Vue.component('school', school)

使用方法:
<div id="root">
  <school></school>
  <school></school>
</div>

Vue中使用组件的三大步骤:
一、定义组件(创建组件)
二、注册组件
三、使用组(写组件标签)
一、如何定义一个组件?
使用Vue.extend(options)创建。其中options和new Vue(options)时传入的那个options几乎一样。但也有点区别
区别如下:
1.el不要写,为什么? - 最终所有的组件都要经过一个vm的管理,由vm中的el决定服务哪个容器。
2.data必须写成函数。为什么? - 避免组件被复用时,数据存在引用关系。备注:使用template可以配置组件结构。
二、如何注册组件?
1.局部注册:靠new Vue的时候传入components选项
2.全局注册:靠Vue.component('组件名',组件)
三、编写组件标签:
<school></school>
几个注意点:
1.关于组件名:
一个单词组成:
第一种写法(首字母小写):school
第二种写法(首字母大写):School

多个单词组成:
第一种写法(kebab-case命名):my-school
第二种写法(CamelCase命名):MySchool(需要Vue脚手架支持)

备注:
(1)组件名尽可能回避HTML中已有的元素名称,例如:h2、H2不行。
(2).可以使用name配置项指定组件在开发者工具中呈现的名字。

2.关于组件标签:
第一种写法:<school></school>
第二种写法:<school/>
备注:不用使用脚手架时,<school/>会导致后续组件不能渲染。
3.一个简写方式:
const school =Vue.extend(options)可简写为:const school=options对象形式
关于VueComponent:

1.school组件本质是一个名为VueComponent的构造函数,且不是程序员定义的,是Vue.extend生成的。

2.我们只需要写<school/>或<school></school>,Vue解析时会带我们创建school组件的实例对象,即Vue帮我们执行的:new VueComponent(options)。

3.特别注意:每次调用Vue.extend,返回的都是一个全新的VueComponent!!!!
4.关于this指向:
(1)组件配置中:
data函数、methods中的函数、watch中的函数、computed中的函数 它们的this均是【VueComponent实例对象】
(2).new Vue(options)配置中:
data函数、methods中的函数、watch中的函数、computed中的函数 它们的this均是【Vue实例对象】。

5.VueComponent的实例对象,以后简称vc(也可称之为:组件实例对象)。 Vue的实例对象,以后简称vm。
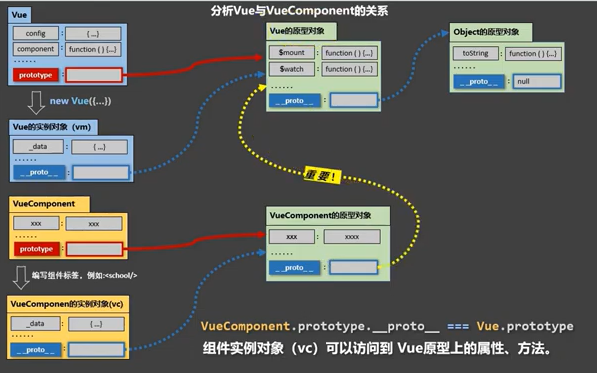
1.一个重要的内置关系:VueComponent.prototype. __proto__ === Vue.prototype
2.为什么要有这个关系:让组件实例对象(vc)可以访问到 Vue原型上的属性、方法。
重点理解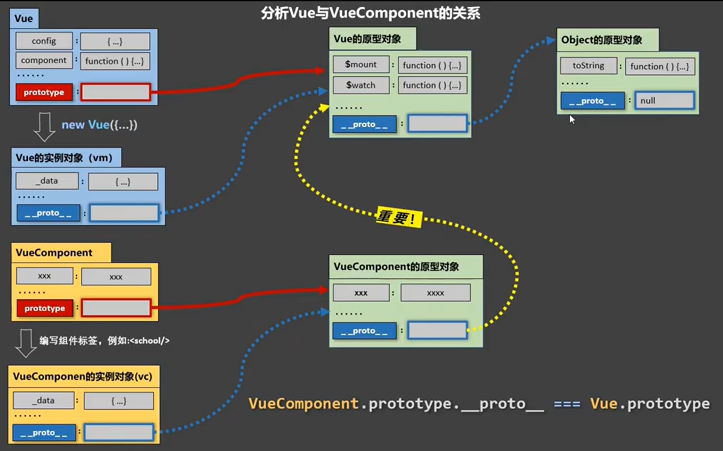
脚手架:
https://cli.vuejs.org/zh/
3.1.2 具体步骤
第一步(仅第一次执行):全局安装@vue/cli。
npm install-g @vue/cli
第二步:切换到你要创建项目的目录,然后使用命令创建项目
vue create xxxx、vue init webpack xxxx
第三步:启动项目←
npm run serve
备注:"

1.如出现下载缓慢请配置npm淘宝镜像:npm config set registry
https://registry.npm.taobao.org
关于不同版本的Vue:
1.vue.js与vue.runtime.xxx.js的区别:
(1).vue.js是完整版的Vue,包含:核心功能+模板解析器。
(2).vue.runtime.xxx.js是运行版的Vue,只包含:核心功能:没有模板解析器。
2.因为vue.runtime.xxx.js没有模板解析器,所以不能使用template配置项,需要使用 render数接收到的createElement数去指定具体内容。
脚手架的配置生成出来,便以查看:
vue inspect > output.js
组件传递数据
<Student name="" :age="18"/>

//如果props接收的数据要修改,请绑定到data变量myAge
data() {
  return {
    myAge: this.age
  }
}
写法一:
props: ['name', 'age']
写法二:
props: {
  name: String,
  age: Number
}
写法三:
props: {
  name: {
    type: String,
    required: true
  },
  age: {
    type: Number,
    default: 99//默认值 ,和required不同时使用,没有意义
  }
}

用法:
<div>姓名:{{name}},年龄: {{age}}</div>
混合:
//也可以全局混合:main.js中引入
import {hunhe, hunhe2} from '../mixin'
Vue.config.productionTip = false
Vue.mixin(hunhe)
Vue.mixin(hunhe2)

多个组件共用的配置提取成一个混入对象   mixin混入
//混合用法:
//data和methods冲突时,以原先为主,而不会替换。mounted钩子冲突时,同时执行,先执行混合,再执行原先的。
import {hunhe, hunhe2} from '../mixin'

mixins: [hunhe, hunhe2]

---mixin---
export const hunhe = {
  methods: {
    showName() {
      alert(this.name)
    }
  },
  mounted() {
    console.log('你好啊!')
  }
}

export const hunhe2 = {
  data() {
    return {
      x: 100,
      y: 200
    }
  }
}
插件plugins
定义全局插件
-----plugins.js-----
export default {
  install(Vue, x, y, z) {
      //过滤器
      Vue.filter('', function(value){});

      //指令
      Vue.directive('fbind', {})

      //定义混入
      Vue.mixin({});

      //给Vue添加原型方法
      Vue.prototype.hello = () => {alert('你好啊!')}
  }
}

main.js引入
import plugins from './plugins'
Vue.use(plugins, x, y, z)//这样,所有页面都能用,允许传参数
解决class样式冲突
<style scoped>这样定义局部样式,scoped不适合App.vue(App.vue可以定义全局的样式)。
<style lang="css">默认或<style lang="less">
npm view webpack versions、npm view less-loader versions查看版本
npm i less-loader@7 这样默认安装7版本里面最新版
npm i nanoid 一个简易的uuid生成器
import {nanoid} from 'nanoid'
const obj = {id: nanoid(), title: e.target.value, done: false}
总结TodoList案例
1.组件化编码流程:
(1)拆分静态组件:组件要按照功能点拆分,命名不要与html元素冲突
(2).实现动态组件:考虑好数据的存放位置,数据是一个组件在用,还是一些组件在用:
    1).一个组件在用:放在组件自身即可。
    2).一些组件在用:放在他们共同的父组件上(状态提升)。
(3).实现交互:从绑定事件开始。
2.props适用于:
(1).父组件=>子组件 通信
(2).子组件=>父组件 通信(要求父先给子一个函数)
3.使用v-model时要切记:v-model绑定的值不能是props传过来的值,因为props是不可以修改的!
4.props传过来的若是对象类型的值,修改对象中的属性时Vue不会报错,但不推荐这样做。
浏览器本地存储: localStorage 清除cookie缓存自动删除 /sessionStorage 浏览器关闭自动删除
ref组件vc间通信(vc)
##ref属性
1.被用来给元素或子组件注册引用信息(id的替代者)
2.应用在html标签上获取的是真实DOM元素,应用在组件标签上是组件实例对象(vc)
3.使用方式:
打标识:<h1 ref="xxx">.....</h1> 或 <School ref="xxx"></School>获取:this.$refs.xxx
组件间通讯
方法一:props
App.vue
<School :getSchoolName="getSchoolName"/>
methods: {
  getSchooleName(name) {
    console.log('@', name)
  }
}
School.vue
<button @click="getSchool"></button>
props: ['getSchoolName']
methods: {
  getSchool() {
    this.getSchoolName(name)
  }
}

方法二:自定义事件绑定 子给父传参
App.vue
<Student @eventName="getStudentName"/>
methods: {
  getStudentName(name, ...param){
    cosole.log('@@', name, param)
  }
}

Student.vue
<button @click="sendStudentName"></button>
data(){
 return {
    name: '学生姓名'
  }
},
methods: {
  sendStudentName(){
    this.$emit('eventName', this.name, 666, 888, 900)
  }
}
自定义事件解绑:谁绑定找谁解绑
Student.vue
<button @click="unbind">解绑</button
methods: {
  unbind() {
    this.$off('eventName')//解绑一个自定义事件
    this.$off(['eventName', 'testEventName'])//解绑多个自定义事件
    this.$off()//暴力解绑多个事件
  }
}

方法三:子给父传参
<School ref="student"/>
methods: {
  getStudentName(name){
    console.log('@', name)
  }
},
mouted(){
  this.$refs.student.$on('eventName', this.getStudentName)//调用methods方法,或者使用匿名函数即箭头函数
  this.$refs.student.$once('eventName', this.getStudentName)
  setTimeout( ()=>{//延迟3秒执行
    $this.$refs.student.$on('eventName', this.getStudentName)
  }, 3000)
}


方法四:
<Student @click.native="show"/> //在组件上写原生事件,需要使用.native这样才能绑定原生事件有效。


方法五:
全局事件总线:
new Vue({
  el: '#app',
  render: h => h(App),
  beforeCreate(){
    Vue.prototype.$bus = this
  }
})
//其他页面:

//提供数据:
this.$bus.$emit('hello', this.demo)

//接收数据
mounted(){
  this.$bus.$on('hello', (data)=>{
    console.log(data)
  })
},
beforeDestroy() {
  this.$bus.$off('hello’)//全局事件总线,必须要销毁。
}
一般不用消息订阅。使用Vue全局事件
消息的订阅与发布(兄弟组件间数据通讯)
安装 npm i pubsub-js

1.引入
import pubsub from 'pubsub-js'

2.订阅消息:接收数据
mounted() {
  this.pubId = pubsub.subscribe('hello', (msgName, data) =>console.log(msgName, data) )
},
beforeDestroy: {
  pubsub.unsubscribe(this.pubId)//取消订阅
}

3.发布消息:提供数据

methods: {
  sendStudentName(){
    pubsub.publish('hello', 666)
  }
}
if(obj.hasOwnProperty('isEdit')){}
if(e.target.value.trim()){}
<input ref="inputTitle"/>
$nextTick是加载完DOM,后再执行该代码段,才能获取到焦点
this.$nextTick(function(){
  this.$refs.inpuTitle.focus()
})


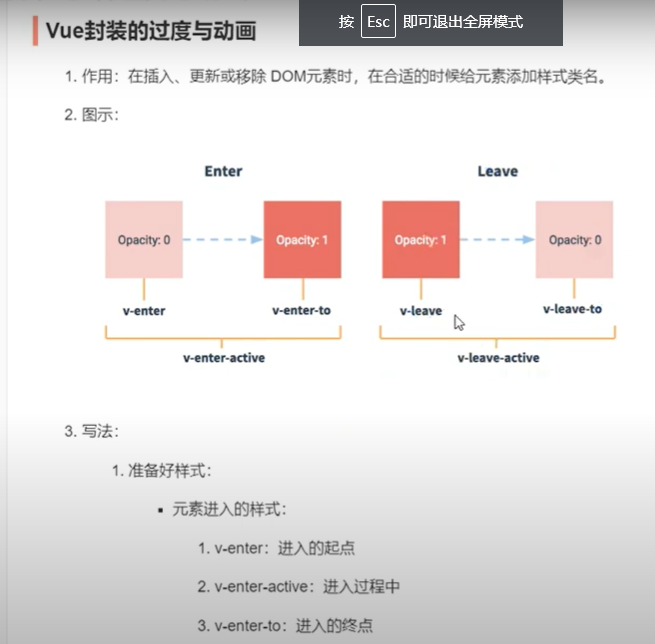
Vue支持的
写法一:动画效果
<button @click="isShow = !isShow">显示/隐藏</button>
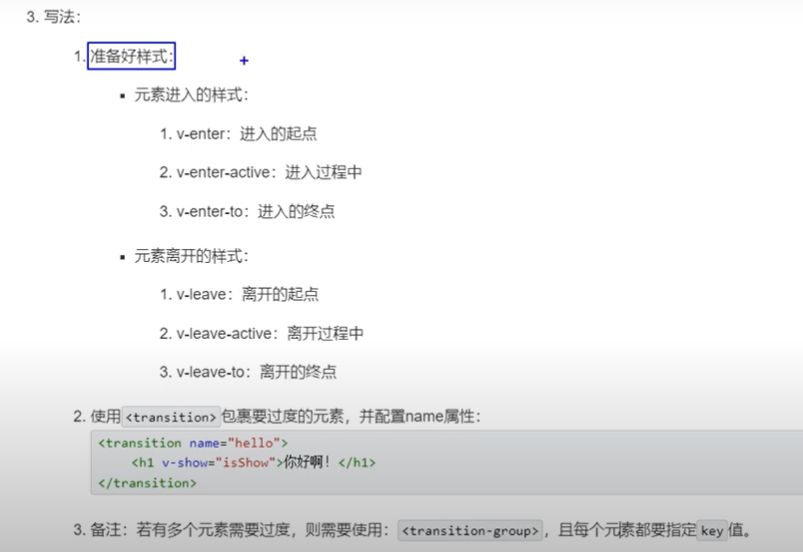
<transition name="hello" appear>
  <h1 v-show="isShow"> 你好啊!</h1>
</transition>

data(){
  return {
    isShow: true
  }
}

<style scoped>
.v-enter-active, .hello-enter-active{
  animation: atguigu 0.5s linear;
}

.v-leave-active, .hello-leave-active {
  animation: atguigu 0.5s linear reverse;
}

@keyframes atguigu {
  from {
    transform: translateX(-100%);
  }
  to {
    transform: translateX(0px);
  }
}
</style>

写法二:
过度效果
h1 {
 transition: 0.5s linear;
}
或:
.hello-enter-active, .hello-leave-active{
 transition: 0.5s linear;
}

.hello-enter,.hello-leave-to {
  transform: translateX(-100%);
}
.hello-enter-to, .hello-leave {
  transform: translateX(0);
}
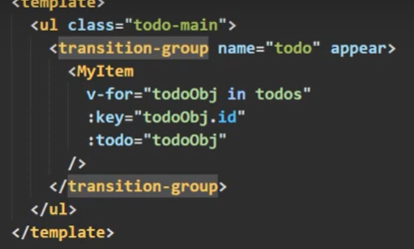
<transition-group name="hello" appear>
  <h1 v-show="isShow" key="1"></h1>
  <h1 v-show="!isShow" key="2"><h1>
</transition-group>

成形的样式库:
http://npmjs.com   搜索animate.css
1.安装
npm install animate.css --save
2.引入
import 'animate.css'
3.使用
<transition-group
  appear
  name="animate__animated animate__bounce"
  enter-active-class="animate__swing"
  leave-active-class="animalte__backOutUp"
>
  <h1 v-show="isShow" key="1"></h1>
  <h1 v-show="!isShow" key="2"><h1>
</transition-group>
