vue3基础上
vue
[DOC]
1. 网站开发Vue3基础
1.1 什么是Vue【官网】
- Vue是一款用于构建用户界面的JavaScript框架。它基于标准HTML、CSS和JavaScript构建,并提供了一套声明式的、组件化的编程模型,帮助你高效的开发用户界面。无论是简单还是复杂的界面,Vue都可以胜任。
- Vue是一个框架,也是一个生态。其功能覆盖了大部分前端开发常见的需求。
1.2 为什么要使用Vue
- 简单易学
- 渐进式框架
- 组件化开发
- 响应式数据绑定
- 性能好和轻量级
1.3 Vue初体验-实现计数器
<!DOCTYPE html>
<html>
    <!-- 导入vue的库,从公网CDN导入 -->
    <script src="https://unpkg.com/vue@3/dist/vue.global.js"></script>
    <!-- 创建一个带有id="app"的div,vue应用程序的根元素 -->
    <div id="app">
        <!-- vue语法中的插值表达式,可以直接显示vue定义的数据内容 -->
        <p>{{ message }}</p>
        <p>{{ count }}</p>
        <!-- 定义了一个按钮,绑定了一个指令click -->
        <button @click="count++">
            Count is :{{ count }}
        </button>
    </div>

    <script>
        // 从vue对象中提取出createApp这个函数
        // vue.createApp
    const { createApp } = Vue
    // 创建一个新的Vue应用实例,并将其挂载到id为app的这个元素上
    createApp({
        // data是用于定义组件或实例中的数据
        data() {
        // 把数据导出,可以被元素使用
        // 这些是双向绑定的
        return {
            message: 'Hello Vue',
            count: 0
        }
        }
    }).mount('#app')
    </script>
</html>
1.4 Vue新一代脚手架Vite项目工程化
PS C:\Users\86152\Desktop\VUE基础> npm create vite@4.3.2
√ Project name: ... vue-study
√ Select a framework: » Vue
√ Select a variant: » JavaScript

Scaffolding project in C:\Users\86152\Desktop\VUE基础\vue-study...

Done. Now run:

  cd vue-study
  npm install
  npm run dev

npm notice
npm notice New major version of npm available! 9.5.1 -> 10.5.0
npm notice Changelog: https://github.com/npm/cli/releases/tag/v10.5.0
npm notice Run npm install -g npm@10.5.0 to update!
npm notice
PS C:\Users\86152\Desktop\VUE基础> cd .\vue-study\
PS C:\Users\86152\Desktop\VUE基础\vue-study> npm install

added 25 packages, and audited 26 packages in 56s

4 packages are looking for funding
  run `npm fund` for details

found 0 vulnerabilities
PS C:\Users\86152\Desktop\VUE基础\vue-study> npm run dev

> vue-study@0.0.0 dev
> vite


  VITE v4.5.3  ready in 494 ms

  ➜  Local:   http://localhost:5173/
  ➜  Network: use --host to expose
  ➜  press h to show help
1.5 Vite项目工程化详解
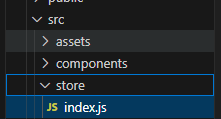
目录结构介绍
- node_modules: 存放项目依赖的其他模块
- public: 用于存放静态文件,可以使用/xxxx进行访问,一般会 把第三方的文件放在这个目录
- src: 项目源代码目录
- assets: 也是用来存放静态文件,比如说字体、图片、ocon等
- components: 用于存放组件,一个个Vue文件
- App.vue: 项目的根组件,index.html通过导入main.js实现
App.vue和index.html的内容绑定,同时其他组件也通过App.vue
进行导入。 - main.js: 程序的入口文件,可以实现App.vue和index.html的绑定
- style.css: 全局样式表,也是通过main.js导入的
- package.json: 项目的描述文件,依赖的包、版本
- 没有被列出来的一些目录:
- src/
- router: vue路由配置目录
- store: 状态存储
- views: 页面组件
- utils: 封装的工具类
- config: 程序配置
- api: 后端接口配置
- src/
1.6 Vue中setup的ref和reactive的区别
// ref reactive 区别
// ref: 一般用于定义简单的响应式数据
// reactive: 一般用于创建一个响应式对象
const count = ref(0)
const name = ref("wer")
console.log(name)
name.value = "wer-new"
console.log(name)

// 定义一个对象
const info = reactive({
  name: "wer",
  age: 25,
  address: "beiJing"
})
1.7 Vue定义只读数据
// Vue定义一个只读数据
const readOnlyData = readonly("我是只读数据,不能修改")
console.log(readOnlyData)
1.8 Vue指令
1.8.1 v-on
// 定义一个事件函数
const plus1 = (step) => {
  count.value += step
}

v-on 可以简写成 @
    <button type="button" @click="plus1(2)">count is {{ count }}</button>
1.8.2 v-model
let inputValue = ref(1)
// 定义一个事件函数
const plus1 = () => {
  count.value += inputValue.value
  console.log("step:", inputValue.value)
}

</script>

<template>

  <div class="card">
    <!-- v-model: 用来实现数据的双向绑定的 -->
    <input v-model="inputValue" placeholder="请输入你要加的值" />
    <button type="button" @click="plus1(inputValue)">count is {{ count }}</button>
    <p>用户信息:{{ info }}</p>
    <p>用户姓名:{{ info.name }}</p>
  </div>
如果在输入框中修改的话,会将数字改成字符串,我们需要用修饰符去处理
1.8.3 v-model修饰符
  <div class="card">
    <!-- v-model: 用来实现数据的双向绑定的 -->
    <!--
      修饰符
      .number: 把value转成number类型
      .trim: 去除左右两边的空格
      .lazy: 当数据失去焦点或者回车时才会更新
     -->
    <input v-model.number="inputValue" placeholder="请输入你要加的值" />
    <button type="button" @click="plus1(inputValue)">count is {{ count }}</button>
    <p>用户信息:{{ info }}</p>
    <p>用户姓名:{{ info.name }}</p>
  </div>
1.8.4 v-show
const display = () => {
  boolValue.value = !boolValue.value
}

let boolValue = ref(true)
</script>

<template>

  <div class="card">
    <!-- v-model: 用来实现数据的双向绑定的 -->
    <!--
      修饰符
      .number: 把value转成number类型
      .trim: 去除左右两边的空格
      .lazy: 当数据失去焦点或者回车时才会更新
     -->
    <input v-model.number="inputValue" placeholder="请输入你要加的值" />
    <button type="button" @click="plus1(inputValue)">count is {{ count }}</button>
    <p>用户信息:{{ info }}</p>
    <p>用户姓名:{{ info.name }}</p>
    <!-- v-show: 可以帮助我们很简单的实现元素的显示和隐藏 -->
    <h1 v-show="boolValue">这是一个标题</h1>
    <button type="button" @click="display()" >{{ boolValue?"隐藏":"显示" }}</button>
  </div>
1.8.5 v-if-else
    <!-- v-show: 可以帮助我们很简单的实现元素的显示和隐藏 -->
    <h1 v-if="boolValue">这是一个v-if控制的标题</h1>
    <h1 v-else>这是v-else控制的标题</h1>
    <button type="button" @click="display()" >{{ boolValue?"隐藏":"显示" }}</button>

    <!--
      v-if
      是根据表达式的真假直接去操作DOM,而v-show只是操作元素的display属性
      v-if开销比较大,v-show开销比较小
      至于用谁,
      切换比较频繁的场景用show,不频繁的用if,复杂的逻辑用if
     -->
1.8.6 v-for
// v-for
let menu = reactive(["土豆丝", "尖椒肉丝", "红烧肉"])
let menuPrice = reactive([
  {
    "name": "土豆丝",
    "price": 10
  },
  {
    "name": "尖椒肉丝",
    "price": 20
  },
  {
    "name": "红烧肉",
    "price": 30
  }
])

// 定义一个对象
const info = reactive({
  name: "wer",
  age: 25,
  address: "beiJing"
})

    <!-- v-for
      用来遍历数据,然后渲染页面的指令
    -->
    <ul>
      <li v-for="item in 10">{{ item }}</li>
    </ul>

    <!-- 遍历数组的数据 -->
    <span>本店今天的菜单:</span>
    <ul>
      <li v-for="(item, index) in menu">{{ item }} --- {{ index }}</li>
    </ul>

    <!-- 遍历数组嵌套对象的数据 -->
    <span>菜品和价格</span>
    <ul>
      <li v-for="(menu, index) in menuPrice">
      {{ index }} - 菜名:{{ menu.name }} - 价格:{{ menu.price }}
      </li>
    </ul>
    <!-- 遍历对象的数据 -->
    <span>info中的信息是</span>
    <ul>
      <li v-for="(value, key) in info">
      {{ key }}: {{ value }}
      </li>
    </ul>
给数组里动态加数据
let menu = reactive(["土豆丝", "尖椒肉丝", "红烧肉"])
let newItem = ref()
let submitItem = () => {
  menu.push(newItem.value)
  newItem.value = ""
}

    <span>本店今天的菜单:</span>
    <ul>
      <li v-for="(item, index) in menu">{{ index }} --- {{ item }}</li>
    </ul>
    <input v-model="newItem" placeholder="请输入今天要加的菜品"/>
    <button type="button" @click="submitItem()">提交</button>
1.9 vue computed和methods的区别
<script setup>
import { computed, ref } from 'vue'
// methods: 一种定义方法的方式,这些方法可以被模板中的某个位置调用,
// 每次调用都会执行方法里面的代码,然后去处理业务逻辑、处理事件等
// computed: 一种定义计算属性的方法,根据依赖的数据动态计算并返回一个新值
// computed是具有缓存性质的,只有当依赖的数据发生变化时才会重新计算。
let price = ref(10)
let count = ref(20)
let total = ref(0)

let costTotal = () => {
  console.log("开始计算")
  total.value = price.value * count.value
}

// 定义一个计算属性
let costTotalComputed = computed(
  () => {
    console.log("计算属性开始计算")
    return price.value * count.value
  }
)

</script>

<template>
  <div>
    <input v-model.number="price" placeholder="请输入价格:" />
    <input v-model.number="count" placeholder="请输入数量:" />
    <button type="button" @click="costTotal()">计算</button>
    <p>总价格:{{ total }}</p>
    <p>{{ costTotalComputed }}</p>
  </div>
</template>

<style scoped>

</style>
1.10 vue使用watch监听数据
<script setup>
import { watch, ref } from 'vue'
let message = ref("")
/*
wathch(监听的数据,("现在的值", "现在的值") => {
  动作
})
*/
watch(message, (newValue, oldValue) => {
  console.log(newValue, oldValue)
})

</script>

<template>
  <div>
    <input v-model.lazy="message" placeholder="请输入新值" />
  </div>
</template>

<style scoped>

</style>
1.11 vue 监听多个数据
<script setup>
import { watch, ref } from 'vue'
let message = ref("")
let confirmMessage = ref("")
/*
wathch(监听的数据,("现在的值", "现在的值") => {
  动作
})
*/
watch([message, confirmMessage], (newValue, oldValue) => {
  console.log(newValue, oldValue)
  if (newValue[0] == newValue[1]){
    console.log("两次输入的密码一致,提交到后台处理")
  } else {
    alert("两次输入的值不一致")
  }
})

</script>

<template>
  <div>
    <input v-model.lazy="message" placeholder="请输入密码" />
    <input v-model.lazy="confirmMessage" placeholder="确认密码" />
  </div>
</template>

<style scoped>

</style>
1.12 vue监听对象数据变化
<script setup>
import { watch, ref, reactive } from 'vue'
let message = ref("")
let confirmMessage = ref("")
/*
wathch(监听的数据,("现在的值", "现在的值") => {
  动作
})
*/
// 监听多个值
watch([message, confirmMessage], (newValue, oldValue) => {
  console.log(newValue, oldValue)
  if (newValue[0] == newValue[1]){
    console.log("两次输入的密码一致,提交到后台处理")
  } else {
    alert("两次输入的值不一致")
  }
})

// 监听对象
// 定义一个对象
const userInfo = reactive({
  name: "wangErrui",
  age: 21,
  address: "beiJing",
  // 数据嵌套
  phone: {
    price: 9899,
    type: "iphone"
  }
})
// 监听对象的某一个值时需要写成getter函数才可以,
// 否则会报错HelloWorld.vue:29 [Vue warn]: Invalid watch source:
// 21 A watch source can only be a getter/effect function, a ref, a reactive object, or an array of these types.
watch(()=>userInfo.age, (newValue, oldValue) => {
  console.log(newValue, oldValue)
})
// 如果监听的数据嵌套的层数过多,有可能监听不到,我们需要加options {deep: true}
watch(()=>userInfo.phone.price, (newValue, oldValue) => {
  console.log(newValue, oldValue)
}, {deep: true})
</script>

<template>
  <div>
    <input v-model.lazy="message" placeholder="请输入密码" />
    <input v-model.lazy="confirmMessage" placeholder="确认密码" />
    <input v-model.lazy.number="userInfo.age" placeholder="请输入你的年龄" />
    <input v-model.lazy.number="userInfo.phone.price" placeholder="请输入手机的价格" />
  </div>
</template>

<style scoped>

</style>
1.13 vue键盘修饰符
<script setup>
import { ref } from 'vue'
let message = ref("")

let enterHandler = () =>{
  console.log("您敲击的回车", "输入了值:", message.value)
}
let deleteHandler = () =>{
  console.log("您敲击的删除", "输入了值:", message.value)
}
let tabHandler = () =>{
  console.log("您敲击的tab", "输入了值:", message.value)
}
let ctrlEnterHandler = () =>{
  console.log("您敲击的ctrl+enter", "输入了值:", message.value)
  alert(message.value)
}

// ctrl
let v = ref(0)

</script>

<template>
  <div>
<!--
  keydown: 键盘的按下事件
  keyup: 键盘的抬起事件

 -->
  <span>回车事件:</span>
  <input v-model.lazy="message" placeholder="敲击回车" @keyup.enter="enterHandler" /><br/>
  <input v-model.lazy="message" placeholder="敲击回车" @keydown.enter="enterHandler" /><br/>
  <span>删除事件</span><br/>
  <input v-model.lazy="message" placeholder="敲击回车" @keyup.delete="deleteHandler" />
  <span>tab事件</span><br/>
  <!--
    当监听的tab是keyup时,只有按tab并且抬起的时候进入到了该input内,才会执行tabHandler
   -->
  <input v-model.lazy="message" placeholder="敲击tab" @keyup.tab="tabHandler" />
  <input v-model.lazy="message" placeholder="敲击tab" @keydown.tab="tabHandler" />
  <p>ctrl+enter</p>
  <input v-model="message" placeholder="敲击ctrl+enter" @keyup.ctrl.enter="ctrlEnterHandler" />

  <!-- 按着ctrl不放,才可以操作 -->
  <p>{{ v }}</p>
  <button type="button" @click.ctrl="v++">点我加一</button>
  </div>
</template>

<style scoped>

</style>
1.14 vue鼠标修饰符
  <!-- 鼠标的左击和右击 -->
  <button type="button" @click.left="v++">点我加一</button>
  <textarea @click.right="rightHandler" oncontextmenu="return false">鼠标右击事件</textarea>
  <!-- 鼠标右击的另外一种写法 -->
  <textarea @contextmenu.prevent="rightHandler">鼠标右击事件</textarea>
2. 网站开发vue3进阶
2.1 什么是vue组件
vue组件可以将一个复杂的应用程序(或者是页面)拆分成多个小的模块,
每个模块可以独立的进行开发和测试。在vue中组件是通过虚拟的DOM来实现的,
可以将复杂的页面拆分成多个小的DOM节点,每个节点对应一个组件,然后这些
组件组合成一个完整的页面。
2.2 vue自定义组件
在components下写一个vue文件
自定义一个ButtonCounter组件
components/ButtonCounter.vue
<!-- 写js代码或者vue代码 -->
<script setup>
import { ref } from 'vue'
let count = ref(0)
</script>

<!-- 写HTML文档 -->
<template>
    <button class="button" @click="count++">You clicked me {{ count }} times</button>
</template>

<!-- 写组件的样式 -->
<style scoped>
.button {
    font-size: 30px;
    background-color: red;
}
</style>
在App.vue中引用
<script setup>
import HelloWorld from './components/HelloWorld.vue'
import ButtonCounter from './components/ButtonCounter.vue'
</script>

<template>
  <div>
  </div>
  <HelloWorld msg="Vite + Vue" />
  <!-- 直接引用 ButtonCounter -->
  <ButtonCounter></ButtonCounter>
</template>

<style scoped>
.logo {
  height: 6em;
  padding: 1.5em;
  will-change: filter;
  transition: filter 300ms;
}
.logo:hover {
  filter: drop-shadow(0 0 2em #646cffaa);
}
.logo.vue:hover {
  filter: drop-shadow(0 0 2em #42b883aa);
}
</style>
2.3 vue组件传值defineProps
<!-- 写js代码或者vue代码 -->
<script setup>
import { ref, } from 'vue'
let count = ref(0)
// 定义组件可以接收的参数
const props = defineProps({
    // 定义参数
    // 参数名: 参数数据类型
    step: Number
})
const plus = () => {
    count.value += props.step
}
</script>

<!-- 写HTML文档 -->
<template>
    <div>
    <!-- <button class="button" @click="count++">You clicked me {{ count }} times</button> -->
    <p>你传递的step是: {{ props.step }}</p>
    <button class="button" @click="plus()">{{ count }}</button>
    </div>
</template>

<!-- 写组件的样式 -->
<style scoped>
.button {
    font-size: 30px;
    background-color: red;
}
</style>
调用组件时传参,
<template>
  <div>
  </div>
  <HelloWorld msg="Vite + Vue" />
  <!-- 直接引用 -->
  <!-- step默认传的是string,要传number需要加上:实现动态绑定 -->
  <ButtonCounter :step="6"></ButtonCounter>
</template>
2.4 vue组件传值可选配置
<script setup>
import { ref, } from 'vue'
let count = ref(0)
// 定义组件可以接收的参数
const props = defineProps({
    // 定义参数
    // 参数名: 参数数据类型
    step: {
        type: Number,
        // 必须要传递参数
        // required: true,
        // 设置默认值
        default: 10,
    }

})
const plus = () => {
    count.value += props.step
}
</script>
2.5 vue组件自定义校验
<script setup>
import { ref, } from 'vue'
let count = ref(0)
// 定义组件可以接收的参数
const props = defineProps({
    // 定义参数
    // 参数名: 参数数据类型
    step: {
        type: Number, // Strin, Array, Object
        // 必须要传递参数
        // required: true,
        // 设置默认值
        default: 8,
        // 自定义校验规则
        validator: function(value) {
            console.log("传递的step是:", value)
            // 返回true:校验通过
            // 返回false:校验失败
            if (value < 10){
                console.log("您传递的参数为:",value, "小于10")
                return true
            } else {
                console.log("您传递的参数为:",value, "不小于10")
                return false
            }
        }
    }

})
const plus = () => {
    count.value += props.step
}
</script>
2.6 vue组件单向数据流
- 子组件内不能修改父组件的值
- 只能在父组件中修改
2.7 vue组件定义emit事件
- 在子组件内定义一个emit事件
const emit = defineEmits(['changeValue']) - 在子组件内调用事件(此处用了一个button来触发事件)
<button @click="modifyMsg()">修改msg - 在父组件内监听事件
<Message :msg="msg" @change-value="modifyMsg"> - 监听到事件后触发函数modifyMsg
const modifyMsg = (value) => {
// 1)直接修改
//msg.value = "不接收参数可以直接修改"
// 2)接收参数进行修改
msg.value = value
}
<!-- 写js代码或者vue代码 -->
<script setup>
import { ref, } from 'vue'
// 定义组件可以接收的参数
const props = defineProps({
    // 定义参数
    // 参数名: 参数数据类型
    msg: {
        type: String, // String, Array, Object
    }

})
// 在子组件中通过emit调用父组件来修改父组件的值
const emit = defineEmits(['changeValue'])
// 子组件内不能修改父组件的值
const modifyMsg = () => {
    emit('changeValue', "我是子组件,我要修改你的值")
}
</script>

<!-- 写HTML文档 -->
<template>
    <div>
    <p>{{ props.msg }}</p>
    <button @click="modifyMsg()">修改msg</button>
    </div>
</template>

<!-- 写组件的样式 -->
<style scoped>
.button {
    font-size: 30px;
    background-color: red;
}
</style>
<script setup>
import HelloWorld from './components/HelloWorld.vue'
import ButtonCounter from './components/ButtonCounter.vue'
import Message from './components/Message.vue';
import { ref } from 'vue'
const msg = ref("我是父组件传递的参数,子组件不能修改")

const modifyMsg = (value) => {
  // 接收参数进行修改
  msg.value = value
}
</script>

<template>
  <div>
  </div>
  <HelloWorld msg="Vite + Vue" />
  <!-- 直接引用 -->
  <ButtonCounter :step="2"></ButtonCounter>
  <Message :msg="msg" @change-value="modifyMsg"></Message>
</template>

<style scoped>
.logo {
  height: 6em;
  padding: 1.5em;
  will-change: filter;
  transition: filter 300ms;
}
.logo:hover {
  filter: drop-shadow(0 0 2em #646cffaa);
}
.logo.vue:hover {
  filter: drop-shadow(0 0 2em #42b883aa);
}
</style>
2.8 vue插槽Slot介绍与使用
<script setup>
// 插槽:插槽是vue中的一种特殊的机制,它可以让我们在组件中定义可插入区域,
//       也就是可以在不同的位置插入不同的内容。
// 可以让一个通用的组件展示不同的内容
</script>

<template>
    <div>
        <!-- 定义一个插槽 -->
        <slot>
            这是插槽的默认值
        </slot>
    </div>
</template>

<style scoped>

</style>
2.9 vue具名插槽-命名插槽
给每个插槽起个名字
<script setup>
// 插槽:插槽是vue中的一种特殊的机制,它可以让我们在组件中定义可插入区域,
//       也就是可以在不同的位置插入不同的内容。
// 可以让一个通用的组件展示不同的内容
</script>

<template>
    <div>
        <!-- 定义一个插槽 -->
        <slot name="header">
            <p>这是插槽的默认值</p>
        </slot>
        <slot name="main">
            <p>这是插槽的默认值</p>
        </slot>
        <slot name="footer">
            <p>这是插槽的默认值</p>
        </slot>
    </div>
</template>

<style scoped>

</style>
  <SlotDemo>
    <!-- 第一种写法 -->
    <template v-slot:header>
      <P>这是header头定义</P>
    </template>
    <!-- 第二种写法 推荐使用-->
    <template #main >
      <div style="font-size: 30px; background-color: blue; width: 300px; height: 300px;">
        <P>这是main</P>
      </div>
    </template>
    第三种写法 -->
    <template #footer>
      <P>这是footer尾部定义</P>
    </template>
  </SlotDemo>
2.10 vue共享数据的Provide发布和Inject订阅
<script setup>
import MessageProvide from './MessageProvide.vue'
import { provide, ref } from 'vue';

// 订阅和发布数据
// provide:用来发布数据
// Inject: 用来订阅数据
let defaultMsg = ref("这是父组件发布的数据")
// 发布一个数据
// provide语法:provide("发布的命令", "你要发布谁")
provide('message', defaultMsg)
</script>

<template>
    <MessageProvide></MessageProvide>
</template>

<style scoped>

</style>
<script setup>
import { inject } from 'vue';

// 订阅数据
let injectMsg = inject('message')
</script>

<template>
    <div>
        <p>{{ injectMsg }}</p>
    </div>
</template>

<style scoped>

</style>
2.11 vue发布函数修改provide的数据
- 父组件发布一个数据
let defaultMsg = ref("这是父组件发布的数据")
provide('message', defaultMsg) - 子组件订阅父组件发布的数据
let injectMsg = inject('message')
<script setup>
import MessageProvide from './MessageProvide.vue'
import { provide, ref } from 'vue';

// 订阅和发布数据
// provide:用来发布数据
// Inject: 用来订阅数据
let defaultMsg = ref("这是父组件发布的数据")
// 发布一个数据
// provide语法:provide("发布的命令", "你要发布谁")
provide('message', defaultMsg)

// 发布一个用于修改数据的函数
const modifyHandler = (newValue) => {
    defaultMsg.value = newValue
}
// 发布一个函数
provide('modifyHandler', modifyHandler)
</script>

<template>
    <MessageProvide></MessageProvide>
</template>

<style scoped>

</style>
<script setup>
import { inject, ref } from 'vue';

// 订阅父组件发布的数据
// inject语法:inject('数据的名字')
let injectMsg = inject('message')

// 订阅父组件发布的修改数据的函数
let changeValue = inject('modifyHandler')
let newMsg = ref('')
const submit = () => {
    console.log("提交数据")
    changeValue(newMsg.value)
}
</script>

<template>
    <div>
        <p>{{ injectMsg }}</p>
        <input v-model="newMsg" placeholder="请输入新值"/>
        <button type="button" @click="submit">提交</button>
    </div>
</template>

<style scoped>

</style>
2.12 vue发布只读数据
父组件发布的数据也可以通过子组件直接修改,但是不符合vue单向数据流的规则
父组件发布一个只读数据,子组件只能通过订阅父组件发布的函数修改
let defaultMsg = ref("这是父组件发布的数据")

// 发布一个数据
// provide语法:provide("发布的命令", "你要发布谁")
// provide('message', defaultMsg)

// 发布一个只读数据
provide('message', readonly(defaultMsg))
2.13 vue生命周期了解
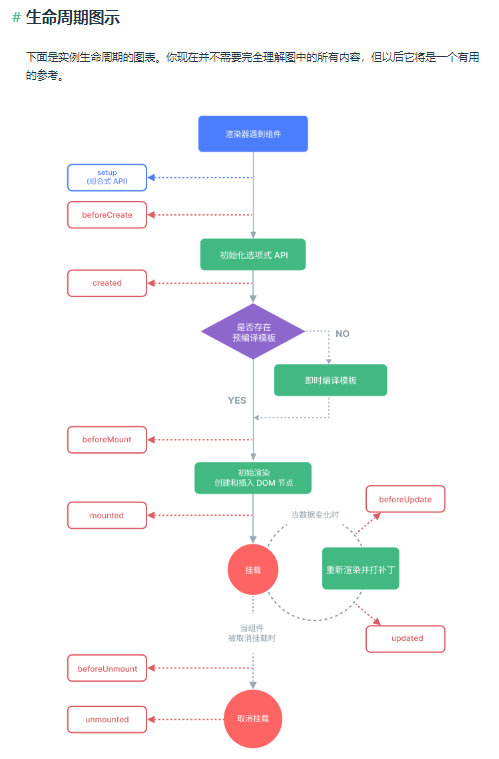
2.14 vue生命周期钩子函数使用
<script setup>
import { onBeforeMount, onMounted, onBeforeUpdate, onUpdated, onBeforeUnmount, onUnmounted } from 'vue';

// 生命周期钩子函数
// vue2 --> vue3
// beforeCreate, Created --> setup
// beforeMount --> onBeforeMount
onBeforeMount(
    () => {
        console.log("钩子函数: onBeforeMount")
    }
)

// mounted --> onMounted
onMounted(
    () => {
        console.log("钩子函数: onMounted")
    }
)

// beforeUpdate --> onBeforeUpdate
onBeforeUpdate(
    () => {
        console.log("钩子函数: onBeforeUpdate")
    }
)

// updated --> onUpdated
onUpdated(
    () => {
        console.log("钩子函数: onUpdated")
    }
)

// befroeDestroy --> onBeforeUnMount
onBeforeUnmount(
    () => {
        console.log("钩子函数: onBeforeUnMount")
    }
)

// destoryed --> onUnmounted
onUnmounted(
    () => {
        console.log("钩子函数: onUnmounted")
    }
)
</script>

<template>

</template>
3. 网站开发vue3高级
3.1 什么是状态管理器Pinia
pinia: vue的状态管理库,它可以定义一些全局的数据或者是共享状态,之前叫做vuex,可以理解为pinia或者vuex具有存储数据的作用,这个数据可以在任意的页面或者组件中使用;
使用pinia的场景:
- 用户登录状态
- 应用程序设置
- 共享数据
- 全局状态
3.2 vue状态管理器基本使用
安装一下pinia
npm install pinia@2.1.4
main.js
import { createApp } from 'vue'
import { createPinia } from 'pinia'
import './style.css'
import App from './App.vue'

const pinia = createPinia()
const app = createApp(App)

app.use(pinia)
app.mount('#app')
在src下创建一个store的目录,在store下创建一个index.js文件
index.js
import { defineStore } from "pinia";

// 创建一个全局的状态、容器
// 容器接收两个参数,第一个参数:容器的ID,第二个:容器的内容
// defineStore返回的是一个函数,这个函数按照useXXX去命名
// storeDemo --> userStoreDemo
export const useStoreDemo = defineStore("storeDemo", {
    // 容器的内容
    // state:用来存储全局状态/数据,可以理解为数据配置的位置
    // data
    state: () => {
        return {
            msg: "hello pinia"
        }
    },
    // 相当于计算属性
    getters: {},
    // 定义修改数据的方法
    // 相当于methods
    actions: {}
})
// 怎么被其他组件使用?
PiniaDemo.vue
<script setup>
import { storeToRefs } from 'pinia';
import { useStoreDemo } from '../store/index.js'

// 从pinia数据中解构出数据
const {msg} = storeToRefs(useStoreDemo())
</script>

<template>
    <p>{{ msg }}</p>
</template>

<style scoped>

</style>
3.3 vue状态管理器全局数据修改
- 在action中定义方法
import { defineStore } from "pinia";

// 创建一个全局的状态、容器
// 容器接收两个参数,第一个参数:容器的ID,第二个:容器的内容
// defineStore返回的是一个函数,这个函数按照useXXX去命名
// storeDemo --> userStoreDemo
export const useStoreDemo = defineStore("storeDemo", {
    // 容器的内容
    // state:用来存储全局状态/数据,可以理解为数据配置的位置
    // data
    state: () => {
        return {
            msg: "hello pinia"
        }
    },
    // 相当于计算属性
    getters: {},
    // 定义修改数据的方法
    // 相当于methods
    actions: {
        changeStoreDemo() {
            this.msg = "这是一个新值"
        }
    }
})
- 在vue文件中调用
1)绑定到一个变量上
const store = useStoreDemo()
2)从变量中解构响应式的数据
const { msg } = storeToRefs(store)
3)从变量中解构函数
const { changeStoreDemo } = store
然后就可以调用函数
方式:store.changeStoreDemo()
<script setup>
import { storeToRefs } from 'pinia';
import { useStoreDemo } from '../store/index.js'

// 从pinia数据中解构出响应式的数据
// const {msg} = storeToRefs(useStoreDemo())
// console.log(msg)

// 官方推荐写法
const store = useStoreDemo()
const { msg } = storeToRefs(store)
const { changeStoreDemo } = store
const changeValue = () => {
    // 调用函数的第一种写法
    // const { changeStoreDemo } = useStoreDemo()
    // changeStoreDemo()
    // 第二种写法:通过store调用
    store.changeStoreDemo()
}

</script>

<template>
    <p>{{ msg }}</p>
    <button type="button" @click="changeValue">改变</button>
</template>

<style scoped>

</style>
3.4 vue状态管理Action传递参数
export const useStoreDemo = defineStore("storeDemo", {
    // 容器的内容
    // state:用来存储全局状态/数据,可以理解为数据配置的位置
    // data
    state: () => {
        return {
            msg: "hello pinia"
        }
    },
    // 相当于计算属性
    getters: {},
    // 定义修改数据的方法
    // 相当于methods
    // 传参
    actions: {
        changeStoreDemo(value) {
            this.msg = value
        }
    }
})
    // 调用的时候传参
    store.changeStoreDemo("这是通过传参传过来的值")
3.5 vue路由管理vue router介绍
3.6 vue router Hash和History模式区别
3.7 vue Router Vite 的使用
安装
npm install vue-router@4.2.4
- 在App.vue中定义了三个 RouterLink
  <div>
    <p><RouterLink to="/">Go to Index</RouterLink></p>
    <p><RouterLink to="/home">Go to Home</RouterLink></p>
    <p><RouterLink to="/about">Go to About</RouterLink></p>
    <router-view></router-view>
  </div>
- 在router/index.js中定义了三个路由映射,分别映射到三个组件
定义路由映射
const routes = [
    { path: "/", component: Index },
    { path: "/about", component: About},
    { path: "/home", component: Home},
]
- 在views下写了三个组件
![]()

3.8 vue Router push和replace
  <div>
    <!-- 默认是push可以回退,replace不可以回退 -->
    <p><RouterLink to="/" replace>Go to Index</RouterLink></p>
    <p><RouterLink to="/home" replace>Go to Home</RouterLink></p>
    <p><RouterLink to="/about" replace>Go to About</RouterLink></p>
    <router-view></router-view>
  </div>
3.9 vue Router 动态路由
const routes = [
    { path: "/", component: Index },
    { path: "/about", component: About},
    { path: "/home", component: Home},
    { path: "/users/:id", component: User},
]
3.10 vue通过js跳转路由
RouterLink 不能做复杂的逻辑处理,所以需要通过js跳转路由
- 首先导入router
import router from './router/index.js'
- 定义一个通过js跳转路由的方法
const user = () => {
  router.push("/users/www")
}
- 配置调用
  <div>
    <!-- 默认是push可以回退,replace不可以回退 -->
    <p><RouterLink to="/" replace>Go to Index</RouterLink></p>
    <p><RouterLink to="/home" replace>Go to Home</RouterLink></p>
    <p><RouterLink to="/about" replace>Go to About</RouterLink></p>
    <!-- <p><RouterLink to="/users/ddd" replace>Go to User</RouterLink></p> -->
    <!-- 在button中调用函数 -->
    <button type="button" @click="user">我</button>
    <router-view></router-view>
  </div>
3.11 vue router 通过对象跳转路由传递参数
App.vue
// 定义一个通过js跳转路由的方法
const user = () => {
  // router.push("/users/www")
  // 通过对象跳转路由,并且传递参数
  router.push({
    // path: "/users",
    name: "users",
    params: {
      id: "www",
      username: "王二瑞"
    }
  })
}
通过对象跳转路由需要给该条路由 route 起个名字 name
index.js
// 3. 定义路由映射
const routes = [
    { path: "/", component: Index },
    { path: "/about", component: About},
    { path: "/home", component: Home},
    // 通过对象跳转路由需要给该条路由起个名字 name
    { path: "/users/:id:username", component: User, name: "users"},
]
js如何获取参数
<script setup>
// js如何获取参数
import {useRoute} from 'vue-router'
const route = useRoute()
// 获取参数
console.log("username:", route.params.username)
</script>
3.12 vue useRouter和useRoute
最好使用官方的内置函数实例化router
<script setup>
// 导入router的两种方法
// 1.导入router
// import router from './router/index.js'
// 2. 通过内置函数实例化一个router进行路由的跳转或者操作
import {useRouter} from 'vue-router'
const router =useRouter()
</script>
3.13 vue router路由懒加载
// 直接导入
// import User from "../views/User.vue"

// 使用路由懒加载的方式导入组件
const User = () => import("../views/User.vue")
3.14 vue router路由嵌套
路由嵌套:独立出来一个对象,/list是父路由,子路由tv和moive不需加/list
// 创建一个路由对象,
// list/tv list/moive
const listRoutes = {
    path: "/list", component: () => import("../views/list/List.vue"),
    children: [
        { path: "tv", component: () => import("../views/list/Tv.vue") },
        { path: "moive", component: () => import("../views/list/Moive.vue") },
    ]
}

// 3. 定义路由映射
routes里面都是对象
const routes = [
    listRoutes,
    { path: "/", component: Index },
    { path: "/about", component: About},
    { path: "/home", component: Home},
    // 通过对象跳转路由需要给该条路由起个名字 name
    { path: "/users/:id:username", component: User, name: "users"},
]
3.15 vue router路由全局守卫
// 定义一个全局的守卫,去判断请求链接中有没有token字段
router.beforeEach(
    (to, from, next) => {
        console.log("to:", to)
        console.log("from:", from)
        console.log("next:", next)
        next()
    }
)
3.16 vue router路由独享守卫
4. Axios
4.1 Axios后端接口调用介绍
Axios 是一个基于 promise 网络请求库,作用于node.js 和浏览器中。 它是 isomorphic 的(即同一套代码可以运行在浏览器和node.js中)。在服务端它使用原生 node.js http 模块, 而在客户端 (浏览端) 则使用 XMLHttpRequests。
4.2 Axios发送Get请求和带参数请求
<script setup>
import axios from 'axios'
// 定义调用接口的函数
const getUserList = () => {
    console.log("调用成功")
    const getUserApi = "https://mock.apipark.cn/m1/3307193-2737101-default/user/info"
    // 用axios发起一个get请求
    axios.get(getUserApi)
    .then((response) => {
        // 打印获取的数据
        // response是被axios封装的对象,对象中data属性是真实的后端返回的数据
        // 所以需要使用response.data拿到后端返回的数据
        // 后端数据格式
        /*
            {
                data: {},       // 真实的数据
                status: 200,    // 请求状态
                message:        // 提示信息
            }
        */
        console.log(response)
        console.log(response.data)
    })
    .catch((err) => {
        console.log(err);
    });
}

// 带参数的get调用
const getUserListWithParams = () => {
    console.log("调用成功")
    const getUserApiWithParams = "https://mock.apipark.cn/m1/3307193-2737101-default/user/info"
    // 用axios发起一个get请求
    axios.get(getUserApiWithParams, {
        // 写我们的参数
        params: {
            limit: 10,
            age: 20,
        }
    })
    .then((response) => {
        console.log(response)
        console.log(response.data)
    })
    .catch((err) => {
        console.log(err);
    });
}
</script>

<template>
    <div>
        <h1>Axios</h1>
        <button @click="getUserList">获取用户列表</button>
        <button @click="getUserListWithParams">根据条件获取用户列表</button>
    </div>
</template>

<style scoped>

</style>
4.3 Axios请求数据双向绑定
数据双向绑定的一个逻辑:
- 首先定义了一个响应式的对象data
let data = reactive({
userList: [],
status: "",
message: "",
})
- 后端接口拿到的数据可以直接赋值到data对象的某一个属性上
data.userList = response.data.data
data.status = response.data.status
data.message = response.data.message
- 通过toRefs将数据从data中解构出来给template来渲染我们的页面
const {userList, status, message} = toRefs(data)
<script setup>
import axios from 'axios'
import { reactive, toRefs } from 'vue';

let data = reactive({
    userList: [],
    status: "",
    message: "",
})


// 定义调用接口的函数
const getUserList = () => {
    console.log("调用成功")
    const getUserApi = "https://mock.apipark.cn/m1/3307193-2737101-default/user/info"
    // 用axios发起一个get请求
    axios.get(getUserApi)
    .then((response) => {
        // 打印获取的数据
        // response是被axios封装的对象,对象中data属性是真实的后端返回的数据
        // 所以需要使用response.data拿到后端返回的数据
        // 后端数据格式
        /*
            {
                data: {},       // 真实的数据
                status: 200,    // 请求状态
                message:        // 提示信息
            }
        */
        // console.log(response)
        // console.log(response.data)
        data.userList = response.data.data
        data.status = response.data.status
        data.message = response.data.message
        console.log("userList:", data.userList)
    })
    .catch((err) => {
        console.log(err);
    });
}

// 带参数的get调用
const getUserListWithParams = () => {
    console.log("调用成功")
    const getUserApiWithParams = "https://mock.apipark.cn/m1/3307193-2737101-default/user/info"
    // 用axios发起一个get请求
    axios.get(getUserApiWithParams, {
        // 写我们的参数
        params: {
            limit: 10,
            age: 20,
        }
    })
    .then((response) => {
        console.log(response)
        console.log(response.data)
    })
    .catch((err) => {
        console.log(err);
    });
}

// 从data中解构出userList数组,template中就直接可以用userList(标准写法),不需要用data.userList
const {userList, status, message} = toRefs(data)

</script>

<template>
    <div>
        <h1>Axios</h1>
        <button @click="getUserList">获取用户列表</button>
        <button @click="getUserListWithParams">根据条件获取用户列表</button>
        <ul>
            <!--
            在使用v-for时,需要给加上key(不能重复),没有的话,后续增删改查可能出现问题
            -->
            <li v-for="(item, index) in userList" :key="index">
                姓名: {{ item.name }}, 年龄: {{ item.age }}
            </li>
        </ul>
        <p>status: {{ status }}</p>
        <p>message: {{ message }}</p>
    </div>
</template>

<style scoped>

</style>
4.4 Axios使用请求配置调用接口
// 使用请求配置定义调用接口的函数
const getOrderList = () => {
    console.log("调用成功")
    const getUserApi = "https://mock.apipark.cn/m1/3307193-2737101-default/user/info"
    // 用axios发起一个get请求
    axios({
        url: getUserApi,
        method: "get",
        params: {
            limit: 10,
            age: 20,
        }
    })
    .then((response) =>
        // console.log(response)
        // console.log(response.data)
        data.userList = response.data.data
        data.status = response.data.status
        data.message = response.data.message
        console.log("userList:", data.userList)
    })
    .catch((err) => {
        console.log(err);
    });
}
4.5 Axios创建和发送post类型的请求
// 使用请求配置定义调用接口post请求的函数
const postOrderList = () => {
    console.log("调用成功")
    const postUserApi = "https://mock.apipark.cn/m1/3307193-2737101-default/user/modify"
    // 用axios发起一个post请求
    axios({
        url: postUserApi,
        method: "post",
        // data里面定义上传到后端接口的数据
        data: {
            // 上传数据的格式,是要提前规定好的
            tableNum: 1,
            orderList: [
                {
                    name: "韭菜鸡蛋",
                    price: 15,
                },
                {
                    name: "小炒肉",
                    price: 20,
                },
            ]
        }
    })
    .then((response) => {
        data.message = response.data.message
        alert("下单成功")
        console.log("message:", data.message)

    })
    .catch((err) => {
        console.log(err);
    });
}
4.6 axios接口超时配置
timeout单位ms
const postOrderList = () => {
    console.log("调用成功")
    const postUserApi = "https://mock.apipark.cn/m1/3307193-2737101-default/user/modify"
    // 用axios发起一个post请求
    axios({
        url: postUserApi,
        method: "post",
        // data里面定义上传到后端接口的数据
        data: {
            // 上传数据的格式,是要提前规定好的
            tableNum: 1,
            orderList: [
                {
                    name: "韭菜鸡蛋",
                    price: 15,
                },
                {
                    name: "小炒肉",
                    price: 20,
                },
            ],
            timeout: 2000,
        }
    })
    .then((response) => {
        data.message = response.data.message
        alert("下单成功")
        console.log("message:", data.message)

    })
    .catch((err) => {
        console.log(err);
    });
}
4.7 Axios自定义请求头
一般我们会将token加到请求头header中
const postOrderList = () => {
    console.log("调用成功")
    const postUserApi = "https://mock.apipark.cn/m1/3307193-2737101-default/user/modify"
    // 用axios发起一个post请求
    axios({
        url: postUserApi,
        method: "post",
        // data里面定义上传到后端接口的数据
        data: {
            // 上传数据的格式,是要提前规定好的
            tableNum: 1,
            orderList: [
                {
                    name: "韭菜鸡蛋",
                    price: 15,
                },
                {
                    name: "小炒肉",
                    price: 20,
                },
            ],
            timeout: 2000,
        },
        headers: {
            token: "xxxx",
        }
    })
    .then((response) => {
        data.message = response.data.message
        alert("下单成功")
        console.log("message:", data.message)

    })
    .catch((err) => {
        console.log(err);
    });
}
4.8 Axios定义全局配置
// axios全局配置
axios.defaults.timeout = 2000
axios.defaults.baseURL = "https://mock.apipark.cn/m1/3307193-2737101-default/user"
4.9 Axios拦截器介绍-请求拦截器
4.10 Axios拦截器介绍-请求拦截器
添加时间戳解决浏览器缓存的问题
// 添加请求拦截器
axios.interceptors.request.use(function (config) {
    // 在发送请求之前做些什么
    console.log("请求拦截器:", config)
    config.headers.Authorization = 'yyyyyyyyyyyyyyyyyyyyyyy'
    // 添加时间戳在请求当中
    if (config.method == "get") {
        // 解决缓存
        let timeStamp = (new Date()).getTime()
        console.log("timeStamp", timeStamp)
        if (config.params) {
            // 判断请求有没有params,此时为真,说明有
            config.params.timeStamp = timeStamp
        } else {
            config.params = {
                timeStamp: timeStamp,
            }
        }
    }
    return config;
  }, function (error) {
    // 对请求错误做些什么
    return Promise.reject(error);
  });
4.11 Axios拦截器介绍-响应拦截器
// 添加响应拦截器
axios.interceptors.response.use(function (response) {
    // 2xx 范围内的状态码都会触发该函数。
    // 对响应数据做点什么
    if (response.data.status === 200) {
        return Promise.resolve(response)
    } else if (response.data.status === 401) {
        // 说明我们的token已经失效了
        alert("token已失效")
    }
    return response;
  }, function (error) {
    // 超出 2xx 范围的状态码都会触发该函数。
    // 对响应错误做点什么
    alert("响应数据有些问题")
    return Promise.reject(error);
  });
4.12 Axios接口封装
// 封装axios
/*
    1. 封装可以简化我们接口调用的代码,可以去掉一些 重复的代码
    2. 换掉axios也是非常简单的
    3.
*/

import axios from 'axios'
const request = (url = '', data = {}, method = "get", timeout = 5000) => {
    console.log("使用封装函数去处理请求")
    return new Promise((resolve, reject)=>{
        console.log("使用axios请求接口")
        const methodLower = method.toLowerCase()
        if (methodLower === "get") {
            axios({
                method: methodLower,
                params: data,
                timeout: timeout,
                url: url,
            }).then((response)=>{
                // 能拿到正常的数据
                resolve(response)
            }).catch((error)=>{
                reject(error)
            })
        } else if (methodLower === "post") {
            axios({
                method: methodLower,
                data: data,
                timeout: timeout,
                url: url,
            }).then((response)=>{
                // 能拿到正常的数据
                resolve(response)
            }).catch((error)=>{
                reject(error)
            })
        }
    })
}
4.13 Axios接口封装测试
<script setup>
import request from '../api/index.js'
const encapGet = () => {
    request(
        "https://mock.apipark.cn/m1/3307193-2737101-default/user/info",
        {},
        "GET",
        5000
    )
}

const encapPost = () => {
    request(
        "https://mock.apipark.cn/m1/3307193-2737101-default/user/modify",
        {
            "name": "xxx",
            "price": 18
        },
        "POST",
        2000
    )
}
</script>

<template>
    <div>
        <button type="button" @click="encapGet">封装测试Get</button>
        <button type="button" @click="encapPost">封装测试Post</button>
    </div>
</template>

<style scoped>

</style>
5. 脚手架项目开发
5.1 登录页实现
5.1.1 脚手架项目基本配置
1. 创建vite项目
npm create vite@4.4.0

2. 安装
npm install

3. 启动
npm run dev

4. 安装router
npm install vue-router@4 --save

5. 安装pinia
npm install pinia@2.1.4 --save

6. 安装axios
npm install axios@1.4.0 --save

7. 导入elementPlus
npm install element-plus --save // --save 会将包的信息记录在package-lock.json中
5.1.2 登录页-路由及登录框实现
5.1.3 登录页-实现用户名密码和登录按钮
5.1.4 登录页-实现输入框清空和密码显示功能
5.1.5 登录页-实现用户登录输入校验
- 首先在<el-form 中加入了:rules="rules",表示使用了rules校验规则
- 在script中加入rules对象
const rules = reactive({
// username的名称必须和<el-form-item  prop="username">prop的名称相同
  username: [
    { required: true, message: '请输入用户名', trigger: 'blur' },
  ],
  password: [
    { required: true, message: '请输入密码', trigger: 'blur' },
  ],
})
<script setup>
import { reactive, ref } from 'vue';
import { User, Lock } from '@element-plus/icons-vue';
const loginInfo = reactive({
    username: "",
    password: ""
})
const loginRef = ref()
const rules = reactive({
  username: [
    { required: true, message: '请输入用户名', trigger: 'blur' },
  ],
  password: [
    { required: true, message: '请输入密码', trigger: 'blur' },
  ],
})
</script>

<template>
    <el-card style="max-width: 480px">
      <h2>衡水中学学生管理系统</h2>
      <el-form
      ref="loginRef"
      :model="loginInfo"
      status-icon
      :rules="rules"
      >

      <el-form-item  prop="username">
        <el-input
        :prefix-icon="User"
        clearable
        v-model="loginInfo.username"
        />
      </el-form-item>
      <el-form-item  prop="password">
        <el-input
        :prefix-icon="Lock"
        show-password
        v-model="loginInfo.password"
        type="password"
        autocomplete="off"
        />
      </el-form-item>
      <el-form-item>
        <el-button type="primary" @click="submitForm(ruleFormRef)">
          登录
        </el-button>
      </el-form-item>
      </el-form>
    </el-card>
</template>

<style scoped>

</style>
5.1.6 登录页-根据校验结果设置登录的禁用状态
- 定义一个响应式变量loginButtonDisabled
let loginButtonDisabled = ref(true)
- 将变量loginButtonDisabled 动态绑定给按钮的 :disabled属性
        <el-button :disabled="loginButtonDisabled" type="primary" @click="submitForm(ruleFormRef)">
          登录
        </el-button>
- 用watch监听username和password输入的情况,
// 监听username和password输入的情况
watch([()=>loginInfo.username, ()=>loginInfo.password], ()=>{
  loginRef.value.validate((valid)=>{
    if(valid){
      loginButtonDisabled.value = false
    } else{
      loginButtonDisabled.value = true
    }
  })
} )
5.2 登录逻辑实现
5.2.1 登录逻辑-实现登录调用后台接口
// 定义登录函数submitForm
const submitForm = () => {
  console.log("loginInfo:",loginInfo)
  const loginApi = "https://mock.apipark.cn/m1/3307193-0-default/user/login"
  request(
    loginApi,
    {
    username: loginInfo.username,
    password: loginInfo.password
    },
    "POST",
    2000
).then((response)=>{
  console.log("登录response:", response)
})
}
5.2.2 登录逻辑-接口地址的接口方法的封装
- 封装接口地址
src/config/index.js
// 用来放置项目的配置信息

// 接口的配置
export const API_CONFIG = {
    loginApi: "https://mock.apipark.cn/m1/3307193-0-default/user/login",
    logoutApi: "https://mock.apipark.cn/m1/3307193-0-default/user/login"
}

// 全局变量
export const CONFIG = {
    TOKEN_NAME: "Authorization"
}
- 封装接口方法
src/api/login.js
// 取出来调用后端接口的地址
import { API_CONFIG } from '../config/index.js'
import request from '../api/index.js'
import { ElMessage } from 'element-plus'

export const login = (username, password) => {
    return request(API_CONFIG.loginApi, {username, password}, "POST", 2000).then((response)=>{
        console.log("登录response:", response)
        if (response.data.status === 200){
            ElMessage({
                message: response.data.message,
                type: 'success',
            })
        }
    })
}
实现登录成功 消息框 显示
1)导入ElMessage
import { ElMessage } from 'element-plus'
2) 使用方法
            ElMessage({
                message: response.data.message,
                type: 'success',
            })
5.2.3 登录逻辑-实现JWT-TOKEN的存储
// 取出来调用后端接口的地址
import { API_CONFIG, CONFIG } from '../config/index.js'
import request from '../api/index.js'
import { ElMessage } from 'element-plus'
export const login = (username, password) => {
return request(API_CONFIG.loginApi, {username, password}, "POST", 2000).then((response)=>{
console.log("登录response:", response)
if (response.data.status === 200){
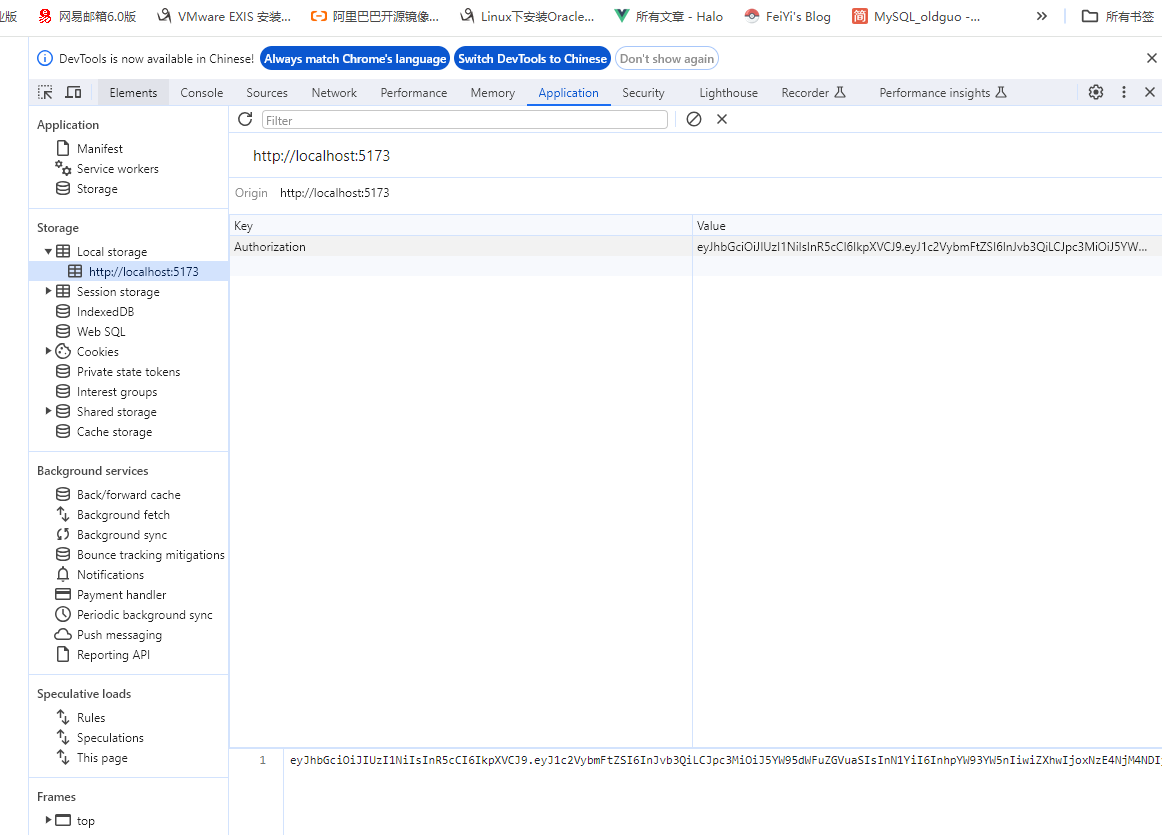
// 先拿到token,存储到浏览器本地的localStorage
const token = response.data.data.token
window.localStorage.setItem(CONFIG.TOKEN_NAME, token)
// 登录成功消息提示
ElMessage({
message: response.data.message,
type: 'success',
})
}
})
}
查看方法
5.2.4 登录逻辑-实现请求头添加认证TOKEN
- 添加axios请求拦截器
- 从localStorage中取出token的值
- 判断值是否为 "" || null
- 将token加到请求头config.headers中
src/api/index.js
// 封装axios
/*
    1. 封装可以简化我们接口调用的代码,可以去掉一些 重复的代码
    2. 换掉axios也是非常简单的
    3.
*/

import axios from 'axios'
import { CONFIG } from '../config/index.js'

const request = (url = '', data = {}, method = "get", timeout = 5000) => {
    console.log("使用封装函数去处理请求")
    return new Promise((resolve, reject)=>{
        console.log("使用axios请求接口")
        const methodLower = method.toLowerCase()
        if (methodLower === "get") {
            axios({
                method: methodLower,
                params: data,
                timeout: timeout,
                url: url,
            }).then((response)=>{
                // 能拿到正常的数据
                resolve(response)
            }).catch((error)=>{
                reject(error)
            })
        } else if (methodLower === "post") {
            axios({
                method: methodLower,
                data: data,
                timeout: timeout,
                url: url,
            }).then((response)=>{
                // 能拿到正常的数据
                resolve(response)
            }).catch((error)=>{
                reject(error)
            })
        }
    })
}

// 添加请求拦截器
axios.interceptors.request.use(function (config) {
    // 在发送请求之前做些什么
    console.log("请求拦截器:", config)
    // 添加时间戳在请求当中
    if (config.method == "get") {
        // 解决缓存
        let timeStamp = (new Date()).getTime()
        console.log("timeStamp", timeStamp)
        if (config.params) {
            // 判断请求有没有params,此时为真,说明有
            config.params.timeStamp = timeStamp
        } else {
            config.params = {
                timeStamp: timeStamp,
            }
        }
    }
    // 取出来token的值
    let TokenValue = ""
    try {
        TokenValue = window.localStorage.getItem(CONFIG.TOKEN_NAME)
    } catch (error) {
        TokenValue = ""
    }
    if (TokenValue == "" || TokenValue == null) {
        config.headers[CONFIG.TOKEN_NAME] = ""
    } else {
        config.headers[CONFIG.TOKEN_NAME] = TokenValue
    }
    return config;
  }, function (error) {
    // 对请求错误做些什么
    return Promise.reject(error);
  });

export default request
5.2.5 登录逻辑-判断登录状态是否已失效
src/api/index.js
// 添加响应拦截器
axios.interceptors.response.use(function (response) {
    // 2xx 范围内的状态码都会触发该函数。
    // 对响应数据做点什么
    if (response.data.status === 200) {
        return Promise.resolve(response)
    } else if (response.data.status === 401) {
        // 说明我们的token已经失效了
        // 删除token
        window.localStorage.removeItem(CONFIG.TOKEN_NAME)
        // 登录成功消息提示
        ElMessage({
            message: response.data.message,
            type: 'Warning',
        })
        // 跳转到登录页
        // 如何取到当前的path
        // 用route可以取,用router也可以取
        router.currentRoute.path != "/login" && router.replace("/login")
    }
    return response;
  }, function (error) {
    // 超出 2xx 范围的状态码都会触发该函数。
    // 对响应错误做点什么
    ElMessage({
        type: "error",
        message: "请求错误" + error.message
    })
    return Promise.reject(error);
  });
5.2.6 登录逻辑-实现首页路由并且登录后自动跳转
- 加上根路由
src/router/index.js
// 定义路由映射
const routes = [
    listRoutes,
    {
        path: "/login",
        component: Login,
    },
    {
        path: "/",
        component: Index,
    },
]
- 导入router,然后登录成功后跳转到首页
router.replace("/")
// 取出来调用后端接口的地址
import { API_CONFIG, CONFIG } from '../config/index.js'
import request from '../api/index.js'
import { ElMessage } from 'element-plus'
// import { useRouter } from 'vue-router'
import router from '../router/index.js'

// const router = useRouter()
export const login = (username, password) => {
    return request(API_CONFIG.loginApi, {username, password}, "POST", 2000).then((response)=>{
        console.log("登录response:", response)
        if (response.data.status === 200){
            // 先拿到token,存储到浏览器本地的localStorage
            const token = response.data.data.token
            window.localStorage.setItem(CONFIG.TOKEN_NAME, token)
            // 登录成功消息提示
            ElMessage({
                message: response.data.message,
                type: 'success',
            })
            // 登录成功跳转到首页
            router.replace("/")
        }
    })
}
5.2.7登录逻辑-实现页面未登录的请求拦截
src/router/index.js
// 定义一个全局守卫,去判断请求链接有没有token字段
router.beforeEach(
    (to, from, next) => {
        // 1. 访问的是login,携带了token ==> next("/")
        // 2. 访问的是/login,本地没有token ==> next()
        // 3. 访问的不是login, 但携带了token ==> next()
        // 4. 访问的不是login,没有携带token ==> next("/login")

        // 拿到访问路径
        const toPath = to.path
        const toLogin = toPath.indexOf("/login") // 如果返回0代表toPath中包括/login,返回-1则不包括

        // 判断本地有没有token
        const tokenStatus = window.localStorage.getItem(CONFIG.TOKEN_NAME)
        if (toLogin == 0 && tokenStatus) {
            next("/")
        } else if (toLogin == 0 && !tokenStatus) {
            next()
        } else if (tokenStatus) {
            next()
        } else {
            next("/login")
        }
    }
)
6. Layout页面布局
6.1 Layout-实现Layout的拆分
6.6 Layout-自动生成菜单
config/menu.js
export const MENU_CONFIG = [
    // 用户管理
    {
        title: "用户管理",
        index: "/user",
        icon: "",
        items: [
            // 添加用户
            {
                title: "添加用户",
                index: "/user/add"
            },
            // 删除用户
            {
                title: "删除用户",
                index: "/user/del"
            },
            // 修改用户
            {
                title: "修改用户",
                index: "/user/modify"
            }
        ]
    },
    // 产品管理
    {
        title: "产品管理",
        index: "/product",
        icon: "",
        subMenu: [
                // 用户管理
        {
        title: "水产品管理",
        index: "/product/aquatic",
        icon: "",
        items: [
            // 添加水产品
            {
                title: "添加水产品",
                index: "/product/aquatic/add"
            },
            // 删除水产品
            {
                title: "删除水产品",
                index: "/product/aquatic/del"
            }
        ]
        },
        {
            title: "电子产品管理",
            index: "/product/elec",
            icon: "",
            items: [
                // 添加电子产品
                {
                    title: "添加电子产品",
                    index: "/product/elec/add"
                },
                // 删除电子产品
                {
                    title: "删除电子产品",
                    index: "/product/elec/del"
                }
            ]
        },
        ]
    },
    // 订单管理
    {
        title: "订单管理",
        index: "/order",
        icon: "",
        subMenu: [
                // 用户管理
        {
        title: "水产品订单管理",
        index: "/order/aquatic",
        icon: "",
        items: [
            // 添加水产品
            {
                title: "添加水产品订单",
                index: "/order/aquatic/add"
            },
            // 删除水产品
            {
                title: "删除水产品订单",
                index: "/order/aquatic/del"
            }
        ]
        },
        {
            title: "电子产品订单管理",
            index: "/order/elec",
            icon: "",
            items: [
                // 添加电子产品
                {
                    title: "添加电子产品订单",
                    index: "/order/elec/add"
                },
                // 删除电子产品
                {
                    title: "删除电子产品订单",
                    index: "/order/elec/del"
                }
            ]
        },
        ]
    }
]
view/layout/components/Aside.vue
<template>
    <el-aside width="240px" style="border-right: 1px solid #cccccc;">
        <div class="aside-logo">
                <router-link to="/">
                    <el-button text style="font-size: 25px;">
                        <el-icon color="black" style="margin-right: 10px;"><Apple /></el-icon>
                        Admin
                    </el-button>
                </router-link>
        </div>
        <!-- menu -->
        <div>
            <!--
            default-active: 默认打开index="3的菜单"
            router: 是否启用 vue-router 模式。 启用该模式会在激活导航时以 index 作为 path 进行路由跳转
            -->
            <el-menu
                default-active="3"
                class="el-menu-vertical-demo dark-mode"
                router
            >
            <el-sub-menu v-for="menu in MENU_CONFIG" :key="menu.index" :index="menu.index">
                <template #title>
                    <el-icon></el-icon>
                    <span>{{ menu.title }}</span>
                </template>
                <!-- 判断是否有子菜单 -->
                 <!-- 有子菜单 -->
                <template v-if="menu.subMenu">
                    <el-sub-menu v-for="subMenu in menu.subMenu" :key="subMenu.index" :index="subMenu.index">
                        <template #title>
                        <el-icon></el-icon>
                        <span>{{ subMenu.title }}</span>
                        </template>
                        <el-menu-item v-for="item in subMenu.items" :key="item.index" :index="item.index">
                        <template #title>
                        <span>{{ item.title }}</span>
                        </template>
                    </el-menu-item>
                    </el-sub-menu>
                </template>
                 <!-- 没有子菜单 -->
                <template v-else>
                    <el-menu-item v-for="item in menu.items" :key="item.index" :index="item.index">
                        <template #title>
                        <span>{{ item.title }}</span>
                        </template>
                    </el-menu-item>
                </template>
            </el-sub-menu>


                <!-- <el-sub-menu index="/user">
                    <template #title>
                    <el-icon><location /></el-icon>
                    <span>用户管理</span>
                    </template>
                    <el-menu-item index="/user/add">
                     <el-icon><icon-menu /></el-icon>
                    <template #title>添加用户</template>
               </el-menu-item>
                </el-sub-menu>
                <el-menu-item index="2">
                     <el-icon><icon-menu /></el-icon>
                    <template #title>Navigator Three</template>
               </el-menu-item> -->
            </el-menu>
        </div>
    </el-aside>
<template>
6.7 Layout-使用iconfont定义菜单图标
资源管理-->我的项目
7. 管理功能实现
7.1 实现用户管理的路由映射
8. 页面Header布局与功能
8.1 Header-实现Header功能的布局
Header分为两个部分去做:
- 1)左上角一个折叠菜单栏的按钮
- 2)右上角一个用户退出的按钮
8.2 Header-实现用户退出的功能
我们将登陆的Token存储在了本地的Local storage中,
1)一般情况下做前后端分离的框架时,后端是可以不存储任何的Token的;
2)后端也可能会将Token存储在redis中,登录的时候后端会做一个二次的校验,如果redis中不存在就可能拒绝掉了,如果存在可能再会去判断Token是否合法;
8.3 Header-使用Pinia管理菜单的全局状态
8.5 Header-解决折叠卡顿的问题
Aside的折叠和menu的折叠产生了冲突,导致会卡顿,我们将menu的折叠动画关掉
            default-active: 默认打开index="3的菜单"
            router: 是否启用 vue-router 模式。 启用该模式会在激活导航时以 index 作为 path 进行路由跳转
            :default-active="$route.path" : 让当前访问路由为激活路由
            :collapse-transition="false"  : 关闭menu的折叠动画,否则会跟Aside的折叠产生冲突,导致折叠时卡顿
            <el-menu
                :default-active="$route.path"
                class="el-menu-vertical-demo dark-mode"
                router
                :collapse="isCollapse"
                style="border: none;"
                :collapse-transition="false"
            >
修改el-aside的样式
.el-aside {
    transition: width 0.25s;
    -webkit-transition: width 0.25s;
    -moz-transition: width 0.25s;
    -o-transition: width 0.25s;
}
元素太宽,Aside太小导致的,只需要调宽Aside的宽度就可以解决


 浙公网安备 33010602011771号