day14.3
day14.3
目录
nginx实现七层负载
为什么要使用负载均衡
1.解决web服务器的单点故障,让web服务器做成一个集群
2.将请求平均下发给后端的web服务端
负载均衡的叫法
LB:load balance
SLB:server load balance
公有云的叫法
阿里云:SLB
腾讯云:CLB
青云:QLB(LB)
ucloud:ULB
AWS:ELB
负载均衡产品
# 软件
	1.nginx
	2.HAproxy
	3.LVS

# 硬件
	1.F5
四层负载均衡和七层负载均衡的区别
1.一个是四层:传输层,一个是七层:应用层
2.四层传输速度要比七层快
3.四层无法识别域名,七层可以识别域名
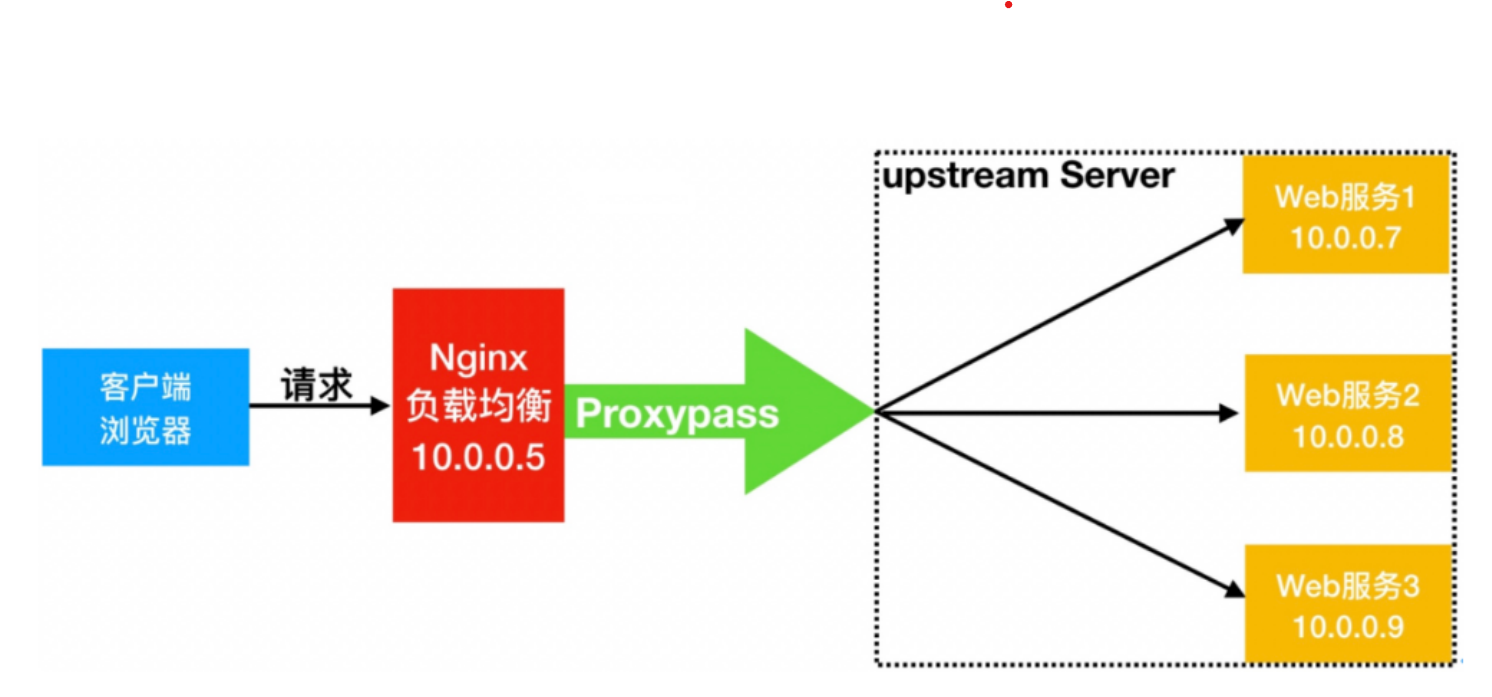
负载均衡实现场景
# nginx要实现负载均衡需要用到proxy_pass代理模块
# nginx负载均衡与nginx代理不同地方在于,nginx的一个location仅能代理一台服务器,而nginx负载均衡则是将客户端请求代理转发至一组upstream虚拟服务池
负载均衡的配置语法
# 官方语法
Syntax: upstream name { ... }
Default: —
Context: http

# 官方配置文件
模块名  后端主机池:名字
upstream backend {
    server backend1.example.com       weight=5;
    server backend2.example.com:8080;
    server unix:/tmp/backend3;
    server backup1.example.com:8080   backup;
    server backup2.example.com:8080   backup;
}

server {
    location / {
        proxy_pass http://backend;
    }
}

# 示例
upstream name {
server xxx;
server xxx;
}
配置负载均衡
| 主机名 | wanip | lanip | 角色 | 应用 |
|---|---|---|---|---|
| lb01 | 10.0.0.5 | 172.16.1.5 | 负载均衡 | nginx |
| web01 | 10.0.0.7 | 172.16.1.7 | web网站 | nginx、PHP |
| web02 | 10.0.0.8 | 172.16.1.8 | web网站 | nginx、PHP |
编辑nginx配置文件
# 1.编辑web01和web02的配置文件
[root@web01 code]# vim /etc/nginx/conf.d/lb.wc.conf
server{
listen 9999;
server_name lb.wc.com;
root /code/wc;
index index.html;
}
[root@web02 ~]# vim /etc/nginx/conf.d/lb.wc.conf
server{
listen 9999;
server_name lb.wc.com;
root /code/wc;
index index.html;
}
# 2.创建web01和web02的站点目录并写入内容
[root@web01 ~]# mkdir /code
[root@web01 ~]# cd /code/
[root@web01 code]# mkdir wc
[root@web01 code]# ll
total 0
drwxr-xr-x 2 root root 6 Jun 15 10:40 wc
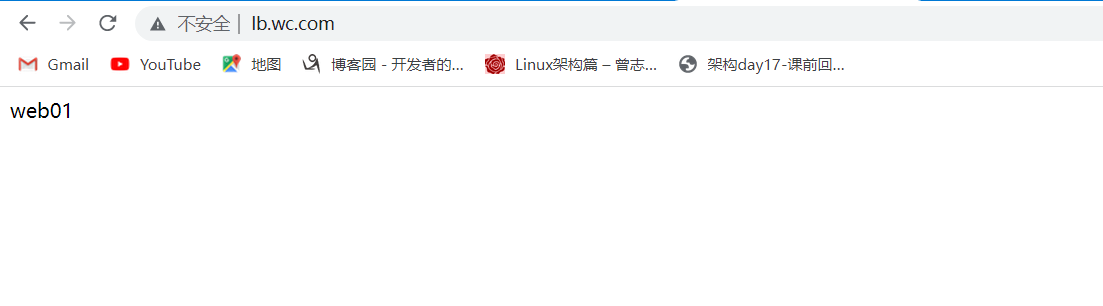
[root@web01 code]# echo 'web01' > /code/wc/index.html
[root@web01 code]# cat /code/wc/index.html
web01
[root@web02 ~]# mkdir /code
[root@web02 ~]# cd /code/
[root@web02 code]# mkdir wc
[root@web02 code]# ll
total 0
drwxr-xr-x 2 root root 6 Jun 15 10:40 wc
[root@web02 code]# echo 'web01' > /code/wc/index.html
[root@web02 code]# cat /code/wc/index.html
web01
# 3.检查语法重启nginx
[root@web01 code]# systemctl reload nginx
[root@web01 code]# nginx -t
nginx: the configuration file /etc/nginx/nginx.conf syntax is ok
nginx: configuration file /etc/nginx/nginx.conf test is successful
[root@web02 code]# systemctl reload nginx
[root@web02 code]# nginx -t
nginx: the configuration file /etc/nginx/nginx.conf syntax is ok
nginx: configuration file /etc/nginx/nginx.conf test is successful
# 4.域名解析
10.0.0.7 lb.wc.com
#10.0.0.8 lb.wc.com

配置负载均衡
# 1.配置负载均衡
[root@lb01 nginx]# vim /etc/nginx/conf.d/lb.wc.conf

upstream lb.wc.com {
        server 172.16.1.8:9999;
        server 172.16.1.7:9999;
}
server {
        listen 80;
        server_name lb.wc.com;

        location /{
        proxy_pass http://lb.wc.com;
        include proxy_params;

}
}
负载均衡常见典型故障
# 如果后台服务连接超时,Nginx是本身是有机制的,如果出现一个节点down掉的时候,Nginx会更据你具体负载均衡的设置,将请求转移到其他的节点上,但是,如果后台服务连接没有down掉,但是返回错误异常码了如:504、502、500,这个时候你需要加一个负载均衡的设置,如下:proxy_next_upstream http_500 | http_502 | http_503| http_504 |http_404;意思是,当其中一台返回错误码404,500...等错误时,可以分配到下一台服务器程序继续处理,提高平台访问成功率。
解决方法
[root@lb01 nginx]# vim /etc/nginx/conf.d/lb.wc.conf

upstream lb.wc.com {
        server 172.16.1.8:9999;
        server 172.16.1.7:9999;
}
server {
        listen 80;
        server_name lb.wc.com;

        location /{
        proxy_pass http://lb.wc.com;
# 遇到如下状态码的机器,跳过请求的下发,直到下发到其他正常的服务器
        proxy_next_upstream error timeout http_500 http_502 http_503 http_504;
        include proxy_params;

}
}
负载均衡的调度算法
| 调度算法 | 概述 |
|---|---|
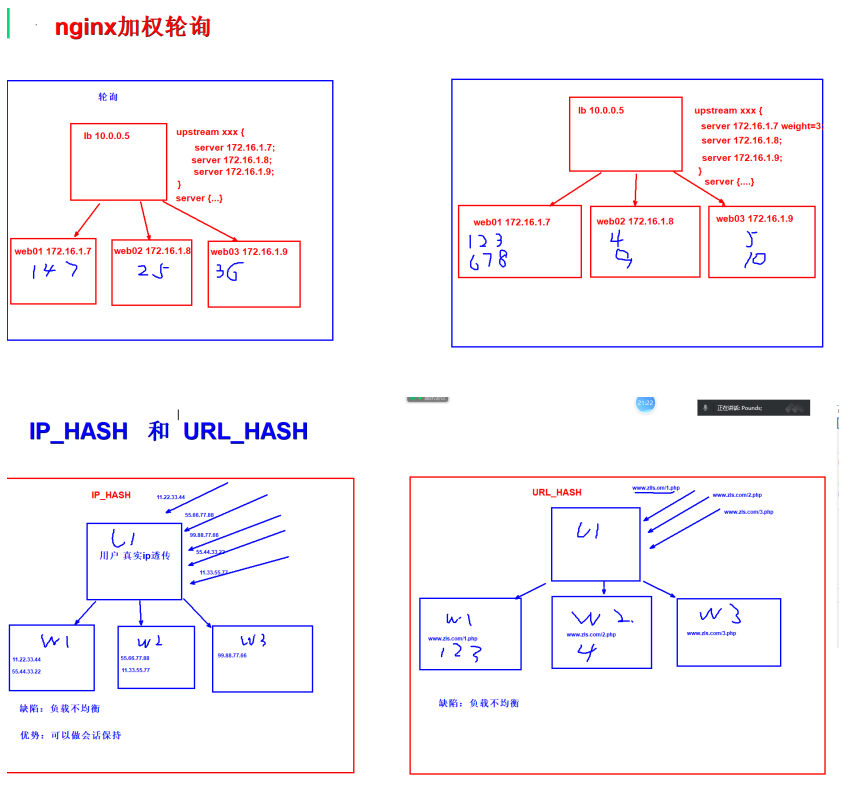
| 轮询 (rr) | nginx做负载均衡默认使用轮询的调度算法;将请求平均下发到后端的web服务端 |
| 加权轮询 (wrr) | 增加权重,根据服务器配置,给轮询加上权重 |
| 源ip (ip_hash) | 根据用户的IP,将同一IP地址请求,下发到同一台服务器上 |
| 源URL (URL_hash) | 根据用户访问的URL,将同一的URL请求,下发到同一服务器上 |
| 最小连接数 (least_conn) | 哪台服务器的连接数最少,就将请求下发到该服务器上 |
调度算法配置
# 1.加权轮询
[root@lb01 conf.d]# vim lb.wc.conf
upstream lb.wc.com {
	server 172.16.1.8:9999 weight=5;
	server 172.16.1.7:9999;
}
server {
	listen 80;
	server_name lb.wc.com;

	location /{
	proxy_pass http://lb.wc.com;
	include proxy_params;

}
}

# 2.ip_hash
[root@lb01 conf.d]# vim lb.wc.conf
upstream lb.wc.com {
	ip_hash;
	server 172.16.1.8:9999;
	server 172.16.1.7:9999;
}
server {
	listen 80;
	server_name lb.wc.com;

	location /{
	proxy_pass http://lb.wc.com;
	include proxy_params;

}
}
负载均衡后端状态
# down状态:只是负载均衡不对该标识的服务器下发请求,后端服务机并没有真正宕机
[root@lb01 conf.d]# vim lb.wc.conf
upstream lb.wc.com {
	server 172.16.1.8:9999 down;
	server 172.16.1.7:9999;
}
server {
	listen 80;
	server_name lb.wc.com;

	location /{
	proxy_pass http://lb.wc.com;
	include proxy_params;

}
}

# 2.backup 状态:备份,当前其他没有backup标识机器都宕机时,才会给服务器发请求
[root@lb01 conf.d]# vim lb.wc.conf
upstream lb.wc.com {
	server 172.16.1.8:9999 backup;
	server 172.16.1.7:9999;
}
server {
	listen 80;
	server_name lb.wc.com;

	location /{
	proxy_pass http://lb.wc.com;
	include proxy_params;

}
}

# 3.额外参数
max_fails:负载均衡访问后端,最大错误次数,到该指定次数后,不给该服务器发送请求

fail_timeout:配合max_fails使用,规定不发请求的时间段

max_conn:限制该后端web服务器最大连接数为1024个

[root@lb01 conf.d]# vim lb.wc.conf
upstream lb.wc.com {
	server 172.16.1.8:9999 max_fails=3 fail_timeout=10s max_conns=1024;
	server 172.16.1.7:9999;
}
server {
	listen 80;
	server_name lb.wc.com;

	location /{
	proxy_pass http://lb.wc.com;
	include proxy_params;

}
}
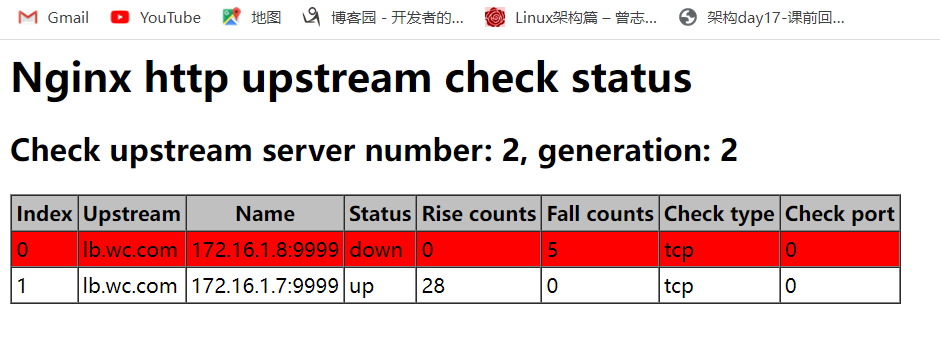
nginx负载均衡健康检查模块
# 1.安装依赖
[root@lb01 ~]# yum install -y pcre-devel openssl-devel
# 2.停掉yum安装的nginx
[root@lb01 ~]# systemctl stop nginx
# 3.下载源码包
[root@lb01 ~]# wget https://nginx.org/download/nginx-1.22.0.tar.gz
# 4.下载nginx健康检查第三方模块
[root@lb01 ~]# wget https://github.com/yaoweibin/nginx_upstream_check_module/archive/master.zip
# 5.解压nginx源码包和第三方模块包
[root@lb01 ~]# mkdir /app
[root@lb01 ~]# tar xf nginx-1.22.0.tar.gz
[root@lb01 ~]# unzip master.zip
# 6.打补丁
[root@lb01 ~]# cd nginx-1.22.0/
[root@lb01 nginx-1.22.0]# patch -p1 </root/nginx_upstream_check_modulemaster/check_1.20.1+.patch
[root@lb01 nginx-1.22.0]# yum install -y patch
# 7.生成
[root@lb01 nginx-1.22.0]# ./configure --prefix=/app/nginx-1.22.0 --with-compat --with-file-aio --with-threads --with-http_addition_module --with-http_auth_request_module --with-http_dav_module --with-http_flv_module --with-http_gunzip_module --with-http_gzip_static_module --with-http_mp4_module --with-http_random_index_module --with-http_realip_module --with-http_secure_link_module --with-http_slice_module --with-http_ssl_module --with-http_stub_status_module --with-http_sub_module --with-http_v2_module --with-mail --with-mail_ssl_module --with-stream --with-stream_realip_module --with-stream_ssl_module --with-stream_ssl_preread_module --with-cc-opt='-O2 -g -pipe -Wall -Wp,-D_FORTIFY_SOURCE=2 -fexceptions -fstack-protector-strong --param=ssp-buffer-size=4 -grecord-gcc-switches -m64 -mtune=generic -fPIC' --with-ld-opt='-Wl,-z,relro -Wl,-z,now -pie' --add-module=/root/nginx_upstream_check_module-master
# 8.编译和安装
[root@lb01 nginx-1.22.0]# make && make install
# 9.nginx主配置文件,添加conf.d
[root@lb01 conf]# vim /app/nginx-1.22.0/conf/nginx.conf
#gzip on;
include /app/nginx-1.22.0/conf/conf.d/*.conf;
# 10.创建虚拟主机配置文件存放目录
[root@lb01 conf]# mkdir /app/nginx-1.22.0/conf/conf.d
# 11.编写负载均衡配置文件,添加location
[root@lb01 conf]# vim /app/nginx-1.22.0/conf/conf.d/lb.wc.conf
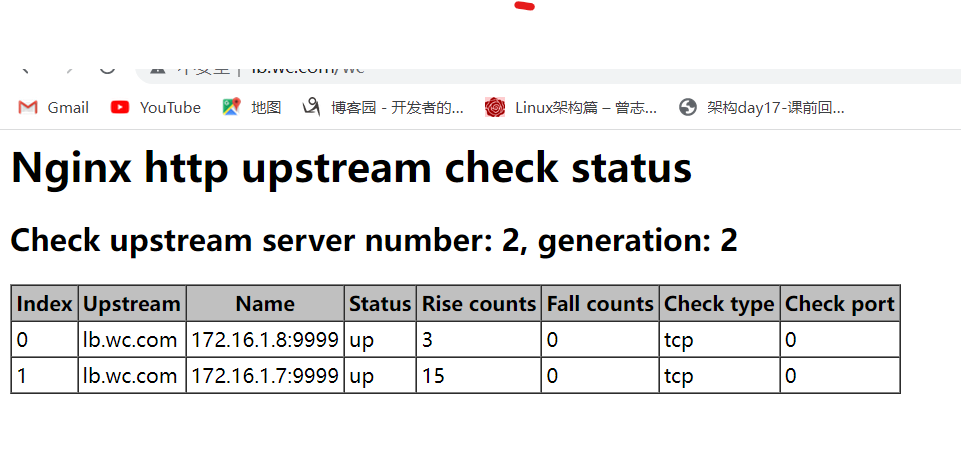
upstream lb.wc.com {
server 172.16.1.8:9999 max_fails=3 fail_timeout=10s max_conns=1024;
server 172.16.1.7:9999;
check interval=3000 rise=2 fall=3 timeout=1000 type=tcp;
}
server {
listen 80;
server_name lb.wc.com;
location /{
proxy_pass http://lb.wc.com;
#include proxy_params;
}
location /wc{
check_status;
}
}
# 12.语法检测
[root@lb01 conf]# /app/nginx-1.22.0/sbin/nginx -t
# 13.重启nginx
[root@lb01 conf]# /app/nginx-1.22.0/sbin/nginx -s reload

 浙公网安备 33010602011771号