day8.4
day8.5
定制rpm包
# 什么是定制rpm包
	将原本,使用源码安装的服务,打包成rpm包
安装fpm
# 1.下载阿里云的base源和epel源
wget-O /etc/yum.repos.d/CentOS-Base.repo https://mirrors.aliyun.com/repo/Centos-7.repo
wget-O /etc/yum.repos.d/epel.repo http://mirrors.aliyun.com/repo/epel-7.repo

# 2.安装ruby环境
 yum -y install ruby rubygems ruby-devel

# 3.查看默认源
gem sources

# 4.移除默认源
gem sources --remove https://rubygems.org/

# 5.添加新源
gem sources -a https://mirrors.aliyun.com/rubygems/

# 6.安装fpm
 gem install fpm -v 1.3.3

 gem install *.gem

'uccessfully installed fpm-1.3.3 (显示这个代表安装正确)
8 gems installed (安装到8次即可,一直安装就行)
使用rpm定制rpm包
# 命令
fpm:

# 选项
-s:值将什么打成rpm包
-t:打成是包
-n:指定包名
-v:指定版本号
-d:指定依赖包
--post-install:安装rpm包之后,要执行的脚本
--pre-install:安装rpm包之前,要执行的脚本
--post-uninstall:卸载rpm包之后,要执行的脚本
--pre-uninstall:卸载rpm之前,要执行的脚本
-f:指定要打包的路径
# 先编写nginx的rpm安装之后要执行的脚本
[root@66technicians ~]# vim post_nginx.sh
(脚本内容)
ln -s /opt/nginx-1.20.2 /opt/nginx
echo 'PATH="/opt/nginx/sbin:$PATH"' > /etc/profile.d/nginx.sh

# 运行fpm需要安装的rpmbulid
[root@66technicians ~]# yum install -y rpm-build

# 将nginx做成rpm包
[root@66technicians ~]# fpm -s dir -t rpm -n nginx -d 'openssl-devel,pcre-devel' --post-install /root/post_nginx.sh -f /opt/nginx-1.20.2/
no value for epoch is set, defaulting to nil {:level=>:warn}
no value for epoch is set, defaulting to nil {:level=>:warn}
Created package {:path=>"nginx-1.0-1.x86_64.rpm"}
源码安装nginx
# 1.nginx官网,下载源码包
https://nginx.org/

# 2.下载
[root@28technicians ~]# wegt https://nginx.org/download/nginx-1.20.2.tar.gz
2.1 查看
[root@28technicians ~]# ll
-rw-r--r--1 root root 1062124 Nov 1622:51 nginx-1.20.2.tar.gz

# 3.解压
[root@28technicians ~]# tar xf nginx-1.20.2.tar.gz

# 4.安装依赖包
1.生成依赖包命令
[root@28technicians ~]# ./configure --prefix=/opt/nginx-1.20.2 --with-http_ssl_module --with-http_stub_status_module

2.安装依赖包
[root@28technicians ~]#  yum install -y pcre-devel openssl-devel gcc gcc-c++ glibczlib-devel

'报错解决'
报错1.
./configure: error: C compiler cc is not found

报错原因:缺少C语言环境

解决方法:yum install -ygcc gcc-c++ glibc

报错2.
./configure: error: the HTTP rewrite module requires the PCRE library

报错原因:缺少pcre库文件
解决方法:yum install -y pcre-devl

报错3.
./configure: error: the HTTP rewrite module requires the OpenSSL library

报错原因:缺少openssl库文件
解决方法:yum install -y openssl-devel
# 5.编译
[root@28technicians nginx-1.20.2]# make
# 6.安装
[root@28technicians nginx-1.20.2]# make install
# 7.做软链接
[root@28technicians nginx-1.20.2]# ln -s /opt/nginx-1.20.2/ /opt/nginx
[root@28technicians nginx-1.20.2]# ll /opt
lrwxrwxrwx. 1 root root 18 Apr 27 16:54 nginx -> /opt/nginx-1.20.2/
drwxr-xr-x. 6 root root 54 Apr 27 16:53 nginx-1.20.2
# 8.启动nginx
[root@28technicians nginx-1.20.2]# nginx
# 9.检查是否启动成功
[root@28technicians nginx-1.20.2]# netstat -lntup
# 10.检查nginx进程
[root@28technicians nginx-1.20.2]# ps -ef|grep nginx
root 18385 1 0 16:55 ? 00:00:00 nginx: master process nginx
nobody 18386 18385 0 16:55 ? 00:00:00 nginx: worker process
root 18390 7203 0 16:57 pts/0 00:00:00 grep --color=auto nginx
# 11.关闭防火墙
[root@28technicians nginx-1.20.2]# systemctl stop firewalld
# 12.关闭selinux
[root@28technicians nginx-1.20.2]# setenforce 0
# 13.修改nginx配置文件
[root@28technicians html]# cd /opt/nginx/conf/
[root@28technicians conf]# vi nginx.conf
33 #gzip on;
34
35 server {
36 listen 80;
37 server_name localhost;
38 location / {
39 root /data/yum_data/;
40 autoindex on;
41 access_log off;
42 }
43 }
44
45
46 # another virtual host using mix of IP-, name-, and port-based configuration
# 14.创建以上同名目录
[root@28technicians conf]# mkdir /data/yum_data -p
# 15.重启nginx服务
[root@28technicians conf]# nginx -s reload
# 16.在/data/yum_data 创建nginx目录
mkdir data/yum_data/nginx
# 17.将nginx的rpm包上传的本机上(做yum源机器)
[root@66technicians ~]# scp nginx-1.10.0-1.el7.ngx.x86_64.rpm root@10.0.0.206:/root
# 18.查文件
[root@66technicians ~]# ll
-rw-r--r--. 1 root root 2801956 Apr 28 20:09 nginx-1.0-1.x86_64.rpm
# 19.将打包好的nginx的rpm包拷贝到nginx目录里
[root@28technicians ~]# cp nginx-1.0-1.x86_64.rpm /opt/nginx/html/nginx/
# 20.将nginx所需要的依赖包也下载到nginx目录里
[root@28technicians ~]# yum install -y pcre-devel --downloadonly --downloaddir=/opt/nginx/html/nginx/
# 21.查看nginx目录
[root@28technicians ~]# ll /opt/nginx/html/nginx/
-rw-r--r--. 1 root root 279472 Dec 3 05:01 krb5-devel-1.15.1-51.el7_9.x86_64.rpm
-rw-r--r--. 1 root root 191184 Apr 4 2020 libselinux-devel-2.5-15.el7.x86_64.rpm
-rw-r--r--. 1 root root 2801956 Apr 28 20:11 nginx-1.0-1.x86_64.rpm
-rw-r--r--. 1 root root 1581956 Mar 29 03:53 openssl-devel-1.0.2k-25.el7_9.x86_64.rpm
-rw-r--r--. 1 root root 491272 Aug 11 2017 pcre-devel-8.
# 22.将nginx目录变成仓库
[root@28technicians ~]# createrepo /opt/nginx/html/nginx/
# 23.压缩另一台机子原有的yum源
[root@66technicians opt]# gzip -r /etc/yum.repos.d/*
[root@66technicians opt]# ll /etc/yum.repos.d/
-rw-r--r--. 1 root root 601 Apr 21 11:00 CentOS-Base.repo.gz
-rw-r--r--. 1 root root 254 Apr 21 11:02 epel.repo.gz
# 24.编写配置文件
[root@66technicians opt]# vim nginx.repo
[root@66technicians yum.repos.d]# cat nginx.repo
[nginx]
name=1
baseurl=http://10.0.0.101/nginx/
gpgcheck=0
# 25.查看yum源仓库
[root@66technicians yum.repos.d]# yum repolist
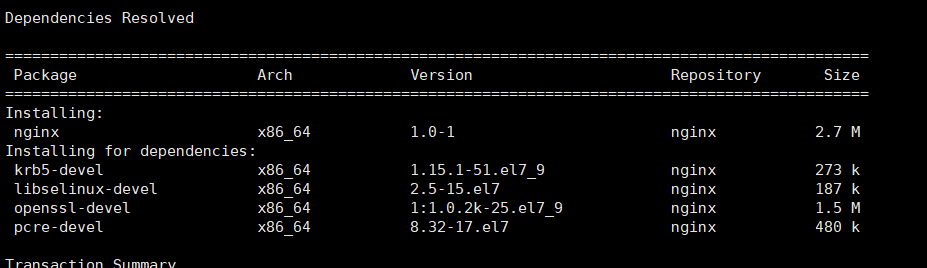
# 26.安装nginx(查看是否走的自己创建的nginx源)
[root@66technicians yum.repos.d]# yum -y install nginx
# 27.查看环境变量是否添加
[root@66technicians yum.repos.d]# echo $PATH
/opt/nginx/sbin:/usr/local/sbin:/usr/local/bin:/usr/sbin:/usr/bin:/root/bin
[root@66technicians yum.repos.d]# source /etc/profile
[root@66technicians yum.repos.d]# echo $PATH
/opt/nginx/sbin:/opt/nginx/sbin:/usr/local/sbin:/usr/local/bin:/usr/sbin:/usr/bin:/root/bin

# 28.查看软链接是否存在
[root@66technicians yum.repos.d]# ll /opt
total 0
lrwxrwxrwx. 1 root root 17 Apr 28 20:07 nginx -> /opt/nginx-1.20.2
drwxr-xr-x. 6 root root 74 Apr 28 20:27 nginx-1.20.2

 浙公网安备 33010602011771号