

Linux----------httpd的简介和安装及使用
一、httpd的简介
http是Apache超文本传输协议服务器的主程序。它是一个独立的后台进程,能够处理请求的子进程和线程
http常用用的两个版本是httpd-2.2和httpd-2.4
CentOS6系列的默认httpd版本是httpd-2.2版本的rpm包

CentOS7系列的默认httpd版本是httpd-2.4版本的rpm包
二、常用httpd版本特性
(1)httpd-2.2
事先创建进程
按需维持适当的进程
模块化设计,核心比较小,各种功能通过模块添加(包括PHP),支持运行时配置,支持单独编译模块
支持多种方式的虚拟主机配置,如基于ip的虚拟主机,基于端口的虚拟主机,基于域名的虚拟主机等
支持https协议(通过mod_ssl模块实现)
支持用户认证
支持基于IP或域名的ACL访问控制机制
支持每目录的访问控制(用户访问默认主页时不需要提供用户名和密码,但是用户访问某特定目录时需要提供用户名和密码)
支持URL重写
支持MPM(Multi Path Modules,多处理模块)。用于定义httpd的工作模型(单进程、单进程多线程、多进程、多进程单线程、多进程多线程)
(2)httpd-2.4
httpd-2.4的新特性:
MPM支持运行DSO机制(Dynamic Share Object,模块的动态装/卸载机制),以模块形式按需加载
支持event MPM,eventMPM模块生产环境可用
支持异步读写
支持每个模块及每个目录分别使用各自的日志级别
每个请求相关的专业配置,使用
增强版的表达式分析器
支持毫秒级的keepalive timeout
基于FQDN的虚拟主机不再需要NameVirtualHost指令
支持用户自定义变量
支持新的指令(AllowOverrideList)
降低对内存的消耗
三、httpd的工作模型
httpd有三种工作模式:prefork,worker,event
工作模式在/etc/httpd/conf.modules.d/00-mpm.conf定义,启动哪种模式就取消那行注释
prefork:多进程模型,预先生成进程,一个请求用一个进程响应
一个主进程负责生成n个子进程,子进程也称为工作进程
每个子进程处理一个用户请求,即使没有用户请求,也会预先生成多个空闲进程,随时等待请求到达,最大不会超过1024个
worker:基于线程工作,一个请求用一个线程响应(启动多个进程,每个进程生成多个线程)
event:基于时间的驱动,一个进程处理多个请求
四、httpd的程序环境即配置文件和重要目录
1.配置文件和重要目录
/var/log/httpd/access.lod 访问日志
/var/log/httpd/error_log 错误日志 (报错就观察此日志)
/var/www/html/* 站点文档目录
/usr/lib64/httpd/modules 模块存储路径
/etc/httpd/conf/httpd.conf 主配置文件
/etc/httpd/conf/*.conf 配置文件,被主配置文件包含
apachectl -t 或 httpd -t 检查配置文件是否有错误
httpd -x 测试服务运行
2.httpd自带的工具程序
httpasswd basic认证基于文件实现时,用到的账号密码文件生成工具
ab 压力测试工具
apachectl 类似systemctl命令,控制程序启动关闭
rotatelogs 日志滚动工具
curl 可用于http认证的命令
五、httpd常用的协议状态码
status(状态码):
1xx:100-101 信息提示
2xx:200-206 成功
3xx:300-305 重定向
4xx:400-415 错误类信息,客户端错误
5xx:500-505 错误类信息,服务器端错误
200: 成功,请求数据通过响应报文的entity-body部分发送;OK
301: 请求的URL指向的资源已经被删除;但在响应报文中通过首部Location指明了资源现在所处的新位置;Moved Permanently
302: 响应报文Location指明资源临时新位置 Moved Temporarily
304: 客户端发出了条件式请求,但服务器上的资源未曾发生改变,则通过响应此响应状态码通知客户端;Not Modifiled
401: 需要输入账号和密码认证方能访问资源;Unauthorized
403: 请求被禁止;Forbidden
404: 服务器无法找到客户端请求的资源;Not Found
500: 服务器内部错误;Internal Server Error
502: 代理服务器从后端服务器收到了一条伪响应,如无法连接到网关;Bad Gateway
503 – 服务不可用,临时服务器维护或过载,服务器无法处理请求
504 – 网关超时
六、httpd常用配置
1.访问控制
法则 功能
Require all granted 允许所有主机访问
Require all deny 拒绝所有主机访问
Require ip IPADDR 授权指定来源地址的主机访问
Require not ip IPADDR 拒绝指定来源地址的主机访问
Require host HOSTNAME 授权指定来源主机名的主机访问
Require not host HOSTNAME 拒绝指定来源主机名的主机访问
IPADDR的类型 HOSTNAME的类型
IP:192.168.1.1
Network/mask:192.168.1.0/255.255.255.0
Network/Length:192.168.1.0/24
Net:192.168 FQDN:特定主机的全名
DOMAIN:指定域内的所有主机
httpd-2.4版本默认是拒绝所有主机访问的,安装后必须修改显示授权访问
配置示例: 允许除了ip192.168.60.55以外的所有主机访问
<Directory /var/www/html/www>
Require not ip 192.168.60.55
Require all granted
2.虚拟主机
虚拟主机有三种:
1)相同ip不同端口
2)不同ip相同端口
3)相同ip相同端口不同域名
七、三种虚拟主机配置示例:
http2.2版本里,在<VirtualHost *:80>上面加一行
NameVirtualHost
测试时,需要做主机名解析 vim /etc/hosts
windows主机名解析 C:\windows\system32\drivers\etc\hosts
找到文件无法修改,需要把文件拖到桌面修改,添加解析,再放回原位
1.相同ip不同端口
vim /etc/httpd-2.4/httpd.conf 修改主配置文件
Listen 80
Listen 81 (需要什么端口增加哪个端口)
<VirtualHost *:80>
ServerName wang.example.com
DocumentRoot "/usr/local/apache/htdocs/wang"
ErrorLog "logs/wang-error_log"
CustomLog "logs/wang-access_log" common
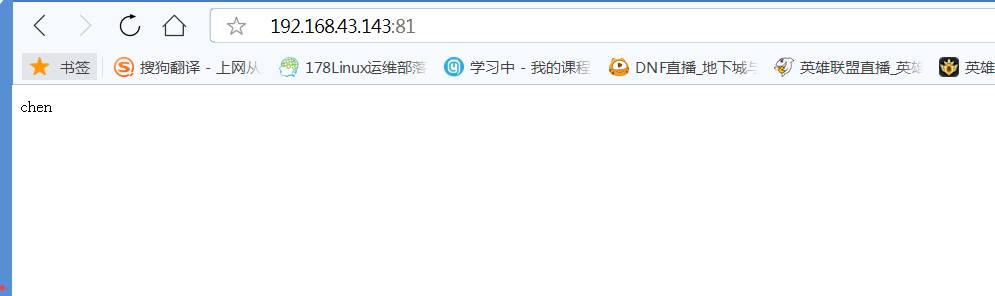
<VirtualHost *:81>
ServerName chen.example.com
DocumentRoot "/usr/local/apache/htdocs/wang
ErrorLog "logs/error_log"
CustomLog "logs/access_log" common

2.不同ip相同端口
网卡配置里增加ip 192.168.160.55
临时添加 ip addr add 192.168.160.55/24 dev ens33
永久添加 vim /etc/sysconfig/network-scright/ifcg-ens33
IPADDR=192.168.160.55
NETMASK=255.255.255.0
IPADDR=192.168.160.56
NETMASK=255.255.255.0
DNS=192.168.160.1
vim /etc/httpd-2.4/httpd.conf 修改主配置文件
<VirtualHost 192.168.160.55:80>
ServerName wang.example.com
DocumentRoot "/usr/local/apache/htdocs/wang"
ErrorLog "logs/wang-error_log"
CustomLog "logs/wang-access_log" common
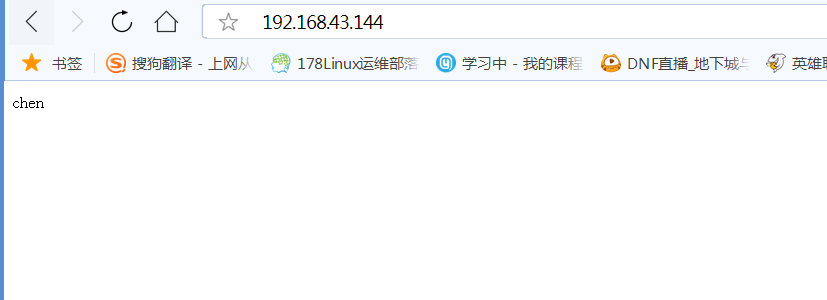
<VirtualHost 192.168.160.56:80>
ServerName chen.example.com
DocumentRoot "/usr/local/apache/htdocs/wang
ErrorLog "logs/chen-error_log"
CustomLog "logs/chen-access_log" common

3.相同ip相同端口不同域名
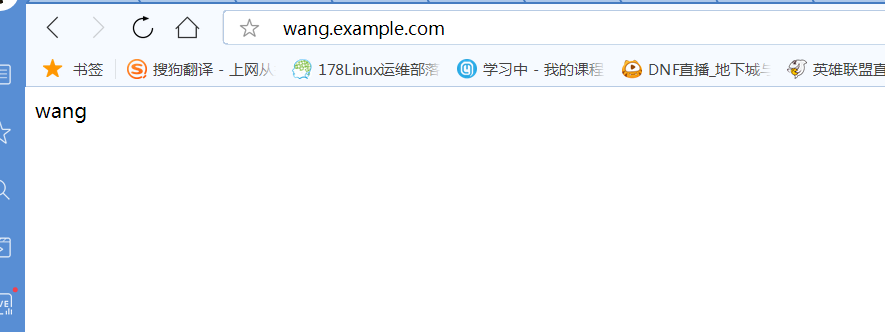
<VirtualHost *:80>
ServerName wang.example.com
DocumentRoot "/usr/local/apache/htdocs/wang"
ErrorLog "logs/wang-error_log"
CustomLog "logs/wang-access_log" common
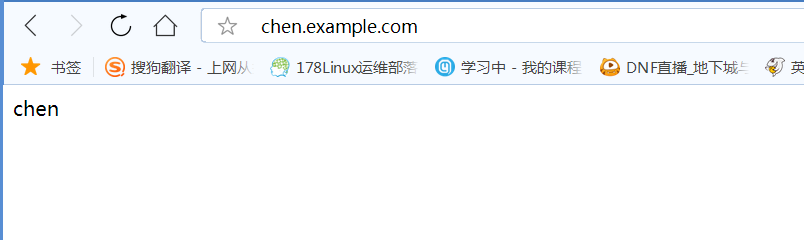
<VirtualHost *:80>
ServerName chen.example.com
DocumentRoot "/usr/local/apache/htdocs/chen
ErrorLog "logs//chen-error_log"
CustomLog "logs/chen-access_log" common
4.http配置注意事项
创建apache用户
useradd -s /sbin/nologin apache
创建网页目录并修改属主属组
mkdir -pv /usr/local/apache/htdocs/chen
chown -R apache.apache /usr/local/apache/htdocs/
创建网页
echo "wang" > /usr/local/apache/htdocs/wang/index.html
echo "chen" > /usr/local/apache/htdocs/chen/index.html
创建日志目录
mkdir /usr/local/apache/logs
chown -R /usr/local/apache/logs/{wang,chen}
启动服务后查看端口是否开启
ss -ntlp #httpd默认是80端口,https默认是443端口
八、配置https步骤
启用模块:编辑/etc/httpd/conf.modules.d/00-base.conf文件,添加
LoadModule ssl_module modules/mod_ssl.so
1.CA生成服务器证书
建立服务器密钥,括号必须要
cd /etc/pki/CA/
(umask 077;openssl genrsa -out private/cakey.pem 2048)
提取公钥
openssl rsa -in private/cakey.pem -pubout
建立服务器证书
openssl req -new -x509 -key private/cakey.pem -out cacert.pem -days 365
国家: CN
省:HuBei
城市:Wuhan
公司:runtime.example.com
需要颁发的网址:runtime.example.com
邮箱:123@123.com
openssl x509 -text -in cacert.pem
mkdir certs new certs crl
touch index.txt && echo 01 > serial
2.客户端(需要的服务器端),生成密钥
cd /etc/httpd && mkdir ssl && cd ssl
(umask 077;openssl genrsa -out httpd.key 2048)
生成证书签署请求
openssl req -new -key httpd.key -days 365 -out httpd.csr
客户端把证书请求文件发给CA
scp httpd.csr root@CA端ip:/root
CA签署客户端提交上来的证书
openssl ca -in /root/httpd.csr -out httpd.crt -days 365
3.配置httpd.conf
取消以下内容的注释
LoadModule ssl_module
Include /etc/httpd/extra/httpd-vhost.conf
Include /etc/httpd/extra/httpd-ssl.conf
4 .在httpd-vhost.conf配置虚拟主机 (httpd-ssl.conf设置也可以)
DocumentRoot "/usr/local/htdocs/wang"
Servername https://wang.example.com/
ErrorLog logs/ssl_error_log
TransferLog logs/ssl_access_log
LogLevel warn
SSLEngine on
5.在httpd-ssl.conf配置证书的路径
SSLCertificateFile /etc/httpd/conf/ssl/httpd.crt
SSLCertificateKeyFile /etc/httpd/conf/ssl/httpd.key
6.检查配置文件是否有语法错误。apachectl -t 或 httpd -t
7.启动或重启服务
8.客户端设置hosts并以域名验证
vim /etc/hosts
192.168.43.143 wang.example.com


【推荐】国内首个AI IDE,深度理解中文开发场景,立即下载体验Trae
【推荐】编程新体验,更懂你的AI,立即体验豆包MarsCode编程助手
【推荐】抖音旗下AI助手豆包,你的智能百科全书,全免费不限次数
【推荐】轻量又高性能的 SSH 工具 IShell:AI 加持,快人一步
· 从 HTTP 原因短语缺失研究 HTTP/2 和 HTTP/3 的设计差异
· AI与.NET技术实操系列:向量存储与相似性搜索在 .NET 中的实现
· 基于Microsoft.Extensions.AI核心库实现RAG应用
· Linux系列:如何用heaptrack跟踪.NET程序的非托管内存泄露
· 开发者必知的日志记录最佳实践
· TypeScript + Deepseek 打造卜卦网站:技术与玄学的结合
· Manus的开源复刻OpenManus初探
· AI 智能体引爆开源社区「GitHub 热点速览」
· C#/.NET/.NET Core技术前沿周刊 | 第 29 期(2025年3.1-3.9)
· 从HTTP原因短语缺失研究HTTP/2和HTTP/3的设计差异