Rust 实现的简单 http 转发
学习Rust时练手的小程序,功能类似代理,将网络请求转发到新的地址和端口。
目前只有http请求的转发,未来希望能够代理各种常用的网络协议。
代码地址:https://gitee.com/wangyubin/mario
概要
程序主要有2个参数:
- -L:监听的地址和端口
- -F:转发的地址和端口
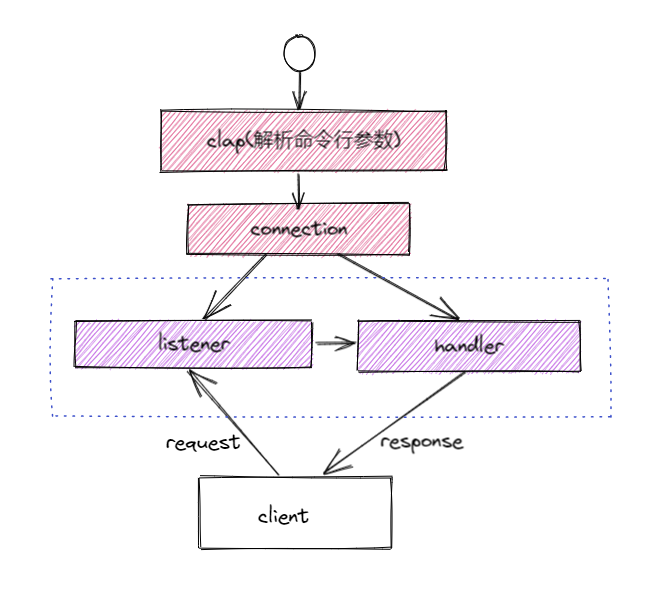
整体结构如下:

程序启动之后,解析 -L 和 -F 参数,获取相应的的地址和端口,然后生成2个 connection。
-L 参数对应的connection 生成监听器(listener), -F 参数对应的 connection 生成转发器(handler)。
client不直接请求最终的服务器,而是请求listener监听的地址,listener调用handler转发请求,并将请求结果返回给client。
主要模块
程序的主要功能包括:
命令行参数解析
Rust的命令行参数解析常用的库是 clap。
#[derive(Parser, Debug)]
#[clap(author, version, about, long_about = None)]
struct Args {
    /// Listen host and port
    #[clap(short = 'L', value_parser)]
    listen: String,

    /// Forward host and port
    #[clap(short = 'F', value_parser)]
    forward: String,
}

// 解析参数,获取地址和端口信息
fn parse_args(s: &str) -> Connection {
    let strs: Vec<&str> = s.split("://").collect();
    let hostport: Vec<&str> = strs[1].split(":").collect();

    let pt: Vec<&str> = strs[0].split("+").collect();
    let mut p = Protocol::Default;
    let mut t = Transport::Default;

    if pt.len() == 1 || pt.len() == 2 {
        p = match pt[0] {
            "http" => Protocol::Http,
            "http2" => Protocol::Http2,
            _ => Protocol::Default,
        }
    }

    if pt.len() == 2 {
        t = match pt[1] {
            "tcp" => Transport::Tcp,
            "tls" => Transport::Tls,
            _ => Transport::Default,
        }
    }

    let host = match hostport[0] {
        "" => "127.0.0.1",
        _ => hostport[0],
    };

    Connection::new(p, t, host, hostport[1].parse::<u32>().unwrap())
}
Connection 定义
Connection 保存了监听和转发所需要的相关信息,目前主要有4个字段
pub enum Protocol {
    Default,
    Http,
    Http2,
}
pub enum Transport {
    Default,
    Tcp,
    Tls,
}

// 监听或者转发的链接
pub struct Connection<'a> {
    pub protocol: Protocol,   // 通信协议
    pub transport: Transport, // 传输协议
    pub host: &'a str,        // 主机(ip或者域名)
    pub port: u32,            // 端口
}
Listener 定义
listener 是用来监听client请求的,目前是创建了一个简单的 TcpListener 来监听请求。
这里用到了另一个知名的Rust库:tokio。
pub struct HttpListener<'a> {
    conn: Connection<'a>,
}

impl<'a> HttpListener<'a> {
    pub fn new(conn: Connection) -> HttpListener {
        HttpListener { conn }
    }

    pub async fn listen(&self, handler: &dyn Handler) -> Result<(), Box<dyn Error>> {
        let addr = format!("{}:{}", self.conn.host, self.conn.port);
        let listener = TcpListener::bind(addr).await.unwrap();

        while let Ok((inbound, _)) = listener.accept().await {
            match handler.handle(inbound).await {
                Err(e) => println!("error={}", e),
                _ => println!("success"),
            }
        }

        Ok(())
    }
}
Handler 定义
handler是用来处理请求转发的,它的主要作用是将listener和真正的服务连接起来。
pub struct HttpHandler<'a> {
    conn: Connection<'a>,
}

impl<'a> HttpHandler<'a> {
    pub fn new(conn: Connection<'a>) -> HttpHandler<'a> {
        HttpHandler { conn }
    }
}

#[async_trait]
impl<'a> Handler for HttpHandler<'a> {
    async fn handle(&self, mut inbound: TcpStream) -> Result<(), Box<dyn Error>> {
        let proxy_addr = format!("{}:{}", self.conn.host, self.conn.port);
        let mut outbound = TcpStream::connect(proxy_addr).await?;

        let (mut ri, mut wi) = inbound.split();
        let (mut ro, mut wo) = outbound.split();

        let client_to_server = async {
            io::copy(&mut ri, &mut wo).await?;
            wo.shutdown().await
        };

        let server_to_client = async {
            io::copy(&mut ro, &mut wi).await?;
            wi.shutdown().await
        };

        tokio::try_join!(client_to_server, server_to_client)?;

        Ok(())
    }
}
对于不同的协议,会有不同的handler,所以封装了一个trait来解耦 listener和handler之间的联系。
#[async_trait]
pub trait Handler {
    async fn handle(&self, inbound: TcpStream) -> Result<(), Box<dyn Error>>;
}
这里需要安装 async_trait 这个额外的Rust库,因为Rust原生是不支持异步的trait的。
转发测试
最后看看测试的效果。
测试用的http服务
创建一个文本文件,然后用python在当前目录启动一个静态服务。
echo "hello rust" > hello.txt

python -m http.server 8080
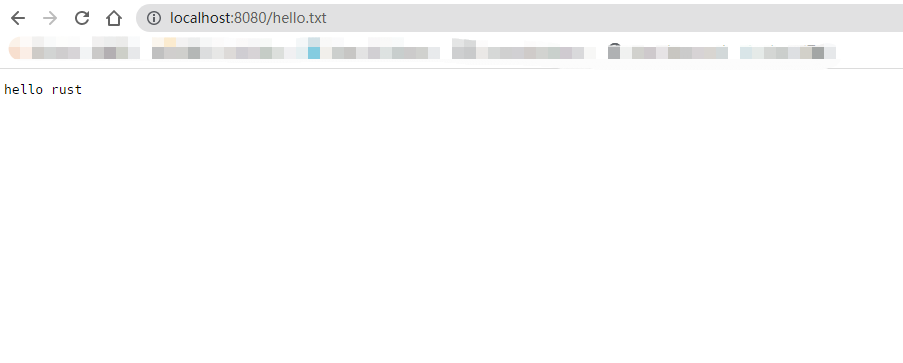
在8080端口启动一个静态http服务,浏览器访问 http://localhost:8080/hello.txt,显示如下:

开启转发
下载 https://gitee.com/wangyubin/mario 的代码,在代码根目录下运行如下命令:
cargo run -- -L http://0.0.0.0:8000 -F http://:8080
再次访问浏览器:http://localhost:8000/hello.txt,显示结果和转发一样:


【推荐】编程新体验,更懂你的AI,立即体验豆包MarsCode编程助手
【推荐】凌霞软件回馈社区,博客园 & 1Panel & Halo 联合会员上线
【推荐】抖音旗下AI助手豆包,你的智能百科全书,全免费不限次数
【推荐】博客园社区专享云产品让利特惠,阿里云新客6.5折上折
【推荐】轻量又高性能的 SSH 工具 IShell:AI 加持,快人一步
· 微软正式发布.NET 10 Preview 1:开启下一代开发框架新篇章
· 没有源码,如何修改代码逻辑?
· PowerShell开发游戏 · 打蜜蜂
· 在鹅厂做java开发是什么体验
· WPF到Web的无缝过渡:英雄联盟客户端的OpenSilver迁移实战
2011-10-21 《CLR Via C# 第3版》笔记之(十六) - 字符串