
前端【CSS】23【样式穿透】【svg精灵图制作】
1、样式穿透
在使用elementUI的时候,el-card提供了插槽,可以在使用的时候根据具名插槽指定自己想要的插槽内容,但是当要修改插槽内样式的时候,直接通过类名定位改样式,不好使,此时可以通过样式穿透来实现修改样式
 1 <template>
 2   <div class="login-page">
 3     <el-card>
 4       <!-- 1、卡片标题,使用具名插槽 -->
 5       <template #header>面经后台管理系统</template>
 6       <!-- 2、卡片内容,默认插槽,可以不用嵌套template -->
 7       卡片内容
 8     </el-card>
 9   </div>
10 </template>
11
12 <script>
13 import { loginAPI } from '@/api/user'
14
15 export default {
16   name: 'LoginIndex',
17 }
18 </script>
19
20 <style lang="scss" scoped>
21 .login-page {
22   height: 100vh;
23   background: url(@/assets/login-bg.svg) no-repeat center;
24   background-size: cover;
25   // 使用element-ui,组件名,就是类名
26   .el-card {
27     width: 420px;
28     position: absolute;
29     left: 50%;
30     top: 50%;
31     transform: translate(-50%, -50%);
32
33     // 想要修改具名插槽的样式, 直接通过.el-card__header类名修改,不好使
34     // 样式穿透,用于修改子组件元素的样式, 修改子组件header插槽的样式
35     ::v-deep .el-card__header {
36       text-align: center;
37       background-color: #727cf5;
38       color: #fff;
39       height: 80px;
40       line-height: 40px;
41     }
42     .el-form {
43       padding: 0 20px;
44     }
45   }
46 }
47 </style>
/deep/ 表示深度选择器
css中通常会在 style 标签内添加 scoped 来避免父组件对子组件的影响,添加了之后只能修改当前组件的样式。
这样做的原理是通过在打包的时候给每个样式都添加一个独一无二的hash值,从而避免父组件对子组件的样式的影响。
1 .title[data-v-211e4c4a] {  // 添加scoped后的效果
2     color: #ff0;
3 }
设置了上述scoped的话,如果想要在父组件中修改子组件的样式时应该怎么样做呢?
如果去掉scoped的话就会影响全局样式,但是加上scoped又不能在当前组件修改子组件的样式,这个时候就可以使用 /deep/ 了。
1 <style scoped>
2      /deep/ .title{
3         color: #ff0;
4     }
5 </style>
除了 /deep/ 以外,>>> 和 ::v-deep也可以实现同样的效果
注意:/deep/ 只能在像 less , sass 等css预处理器中使用,在原生css中使用无效,所以原生css当中应使用 >>> 。
css样式穿透
1 <style scoped>
2   父元素 >>> 子元素 {
3      color: red;
4   }
5 </style>
less样式穿透
1 <style lang="less" scoped>
2   父元素 /deep/  子元素 {
3      color: red
4   }
5 </style>
scss样式穿透
1 <style scoped>
2   父元素::v-deep  子元素 {
3      color: red
4   }
5 </style>
2、svg精灵图制作
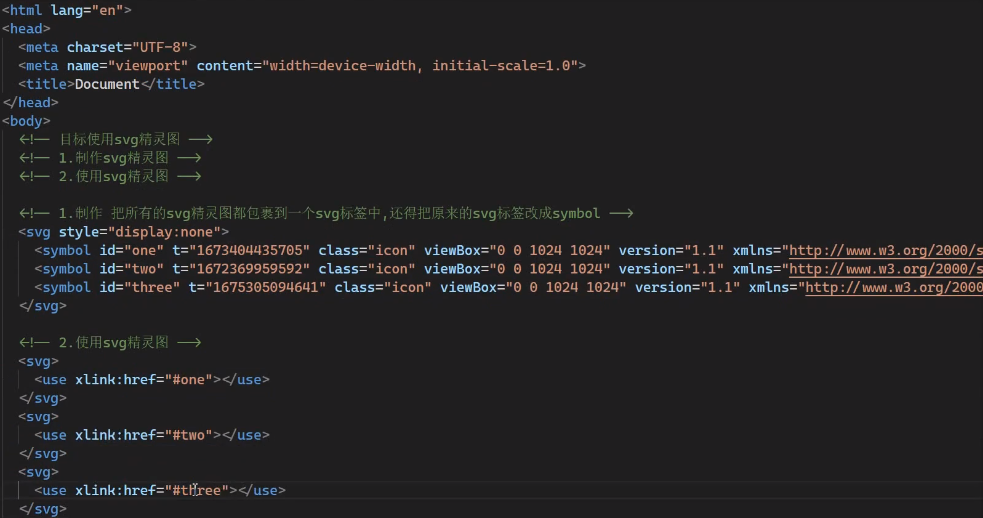
使用svg-sprite-loader
1、下载依赖
1 npm i svg-sprite-loader
2、添加配置vue.config.js
  1 'use strict'
  2 const path = require('path')
  3
  4 function resolve (dir) {
  5   return path.join(__dirname, dir)
  6 }
  7
  8 const port = process.env.port || 8081 // dev port
  9
 10 module.exports = {
 11   publicPath: '/',
 12   outputDir: 'dist',
 13   assetsDir: 'static',
 14   lintOnSave: process.env.NODE_ENV === 'development',
 15   productionSourceMap: false,
 16   // 配置代理转发
 17   devServer: {
 18     port: port,
 19     open: true,
 20     overlay: {
 21       warnings: false,
 22       errors: true
 23     }
 24   },
 25   configureWebpack: {
 26     name: '黑马智慧园区',
 27     resolve: {
 28       alias: {
 29         '@': resolve('src')
 30       }
 31     }
 32   },
 33   chainWebpack (config) {
 34     // it can improve the speed of the first screen, it is recommended to turn on preload
 35     config.plugin('preload').tap(() => [
 36       {
 37         rel: 'preload',
 38         // to ignore runtime.js
 39         // https://github.com/vuejs/vue-cli/blob/dev/packages/@vue/cli-service/lib/config/app.js#L171
 40         fileBlacklist: [/\.map$/, /hot-update\.js$/, /runtime\..*\.js$/],
 41         include: 'initial'
 42       }
 43     ])
 44     // 配置cdn
 45     // when there are many pages, it will cause too many meaningless requests
 46     config.plugins.delete('prefetch')
 47
 48     // 配置 svg-sprite-loader
 49     config.module
 50       .rule('svg')
 51       .exclude.add(resolve('src/icons'))
 52       .end()
 53     config.module
 54       .rule('icons')
 55       .test(/\.svg$/) // 查找所有 .svg结尾的文件
 56       .include.add(resolve('src/icons')) // 解析src/icons目录
 57       .end()
 58       .use('svg-sprite-loader')   // 使用svg-sprite-loader,帮助我们完成svg精灵图的制作
 59       .loader('svg-sprite-loader')
 60       .options({
 61         symbolId: 'icon-[name]'  // 指定symbolId格式,icon-文件名,如果不指定,则默认为文件名,
 62       })
 63       .end()
 64
 65     config
 66       .when(process.env.NODE_ENV !== 'development',
 67         config => {
 68           config
 69             .plugin('ScriptExtHtmlWebpackPlugin')
 70             .after('html')
 71             .use('script-ext-html-webpack-plugin', [{
 72               // `runtime` must same as runtimeChunk name. default is `runtime`
 73               inline: /runtime\..*\.js$/
 74             }])
 75             .end()
 76           config
 77             .optimization.splitChunks({
 78               chunks: 'all',
 79               cacheGroups: {
 80                 libs: {
 81                   name: 'chunk-libs',
 82                   test: /[\\/]node_modules[\\/]/,
 83                   priority: 10,
 84                   chunks: 'initial' // only package third parties that are initially dependent
 85                 },
 86                 elementUI: {
 87                   name: 'chunk-elementUI', // split elementUI into a single package
 88                   priority: 20, // the weight needs to be larger than libs and app or it will be packaged into libs or app
 89                   test: /[\\/]node_modules[\\/]_?element-ui(.*)/ // in order to adapt to cnpm
 90                 },
 91                 commons: {
 92                   name: 'chunk-commons',
 93                   test: resolve('src/components'), // can customize your rules
 94                   minChunks: 3, //  minimum common number
 95                   priority: 5,
 96                   reuseExistingChunk: true
 97                 }
 98               }
 99             })
100           // https:// webpack.js.org/configuration/optimization/#optimizationruntimechunk
101           config.optimization.runtimeChunk('single')
102         }
103       )
104   }
105 }
3、使用
使用时,通过xlink:href='#文件名称' 或者 xlink:href='#自定义的symbolId'

4、将这个svg封装成组件
 1 <template>
 2   <div v-if="isExternal" :style="styleExternalIcon" class="svg-external-icon svg-icon" v-on="$listeners" />
 3   <svg v-else :class="svgClass" aria-hidden="true" v-on="$listeners">
 4     <!--
 5       这里渲染svg图标的固定写法 iconName是由我们传给组件的iconClass和固定的字符串拼接得到的渲染名称
 6       我们传入不同的iconClass它就会渲染出来不同的图标!!!!
 7      -->
 8     <use :xlink:href="iconName" />
 9   </svg>
10 </template>
11
12 <script>
13 // doc: https://panjiachen.github.io/vue-element-admin-site/feature/component/svg-icon.html#usage
14 import { isExternal } from '@/utils/validate'
15
16 export default {
17   name: 'SvgIcon',
18   // props组件的参数 决定我们使用它的时候 如何通过传递不同的属性 让他渲染不同的小图标
19   props: {
20     iconClass: {
21       type: String,
22       required: true
23     },
24     className: {
25       type: String,
26       default: ''
27     }
28   },
29   computed: {
30     isExternal() {
31       return isExternal(this.iconClass)
32     },
33     iconName() {
34       return `#icon-${this.iconClass}`
35     },
36     svgClass() {
37       if (this.className) {
38         return 'svg-icon ' + this.className
39       } else {
40         return 'svg-icon'
41       }
42     },
43     styleExternalIcon() {
44       return {
45         mask: `url(${this.iconClass}) no-repeat 50% 50%`,
46         '-webkit-mask': `url(${this.iconClass}) no-repeat 50% 50%`
47       }
48     }
49   }
50 }
51 </script>
52
53 <style scoped>
54 .svg-icon {
55   width: 1em;
56   height: 1em;
57   vertical-align: -0.15em;
58   fill: currentColor;
59   overflow: hidden;
60 }
61
62 .svg-external-icon {
63   background-color: currentColor;
64   mask-size: cover!important;
65   display: inline-block;
66 }
67 </style>
5、使用组件
icons/index.js
 1 import Vue from 'vue'
 2 // 1.全局注册名称为 svg-icon 组件 在任何一个.vue文件中
 3 // 都可以通过 <svg-icon/> 进行图标渲染
 4 import SvgIcon from '@/components/SvgIcon'
 5 Vue.component('svg-icon', SvgIcon)
 6
 7 // 2. 把svg目录下的所有的.svg文件都变成 模块化可用的状态
 8 const req = require.context('./svg', false, /\.svg$/)
 9 const requireAll = requireContext => {
10   requireContext.keys().map(requireContext)
11 }
12
13 requireAll(req)
14
15 // 最终实现的效果:<svg-icon icon-class="svg图标的名称"/> -> 渲染出来一个图标
icons/svg/下面放全部的svg图
main.js中注册svg
1 // 注册svg
2 import '@/icons'
组件中使用上面的svg组件,此处的more就是渲染more.svg图标
1 <svg-icon icon-class="more" />

 浙公网安备 33010602011771号