
前端【VUE】11-vue3【搭建Vue3项目】【组合式API】【组合式函数】【2D和3D可视化大屏项目【基于逻辑、组件拆分】】【mixins提取公共逻辑】【微前端【qiankun、无界】】
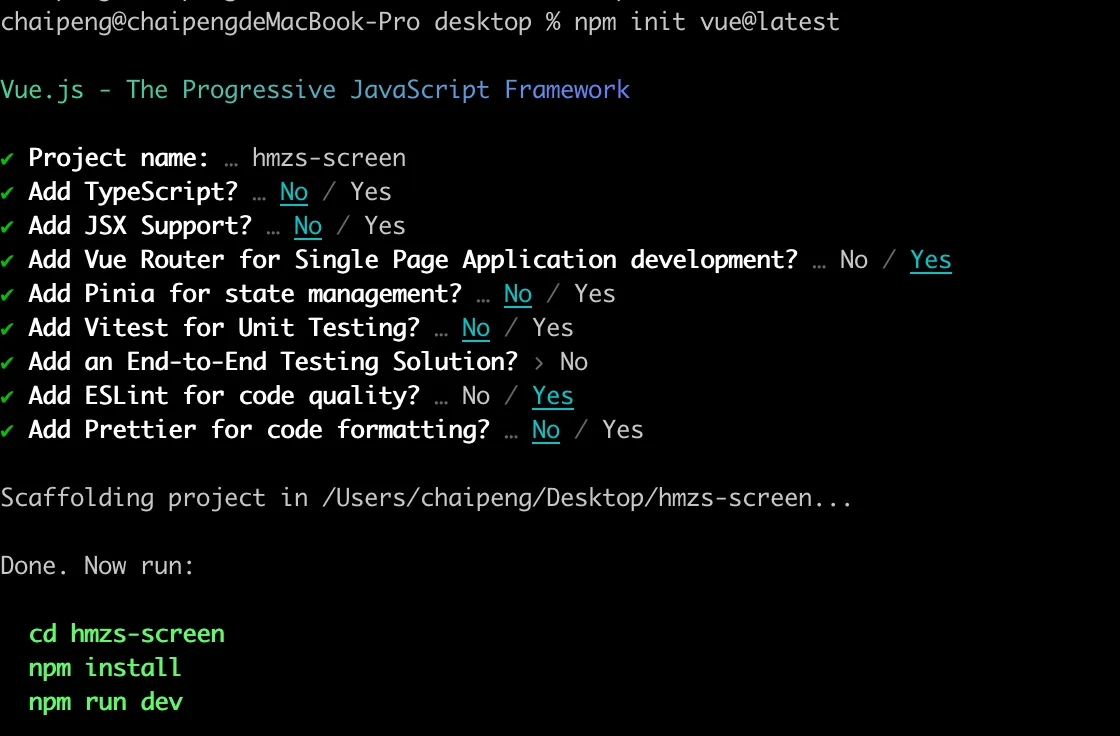
搭建vue3项目
前置条件 - 已安装18.0或更高版本的Node.js
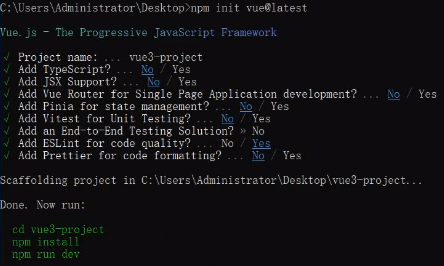
1、执行如下命令,这一指令将会安装并执行 create-vue,create-vue是Vue官方新的脚手架工具,底层切换到了 vite (下一代前端工具链),为开发提供极速响应
1 npm init vue@latest 或者 npm create vue@latest
效果如下
2、安装依赖
1 npm install
3、启动项目
1 npm run dev
4、项目打包
1 npm run build
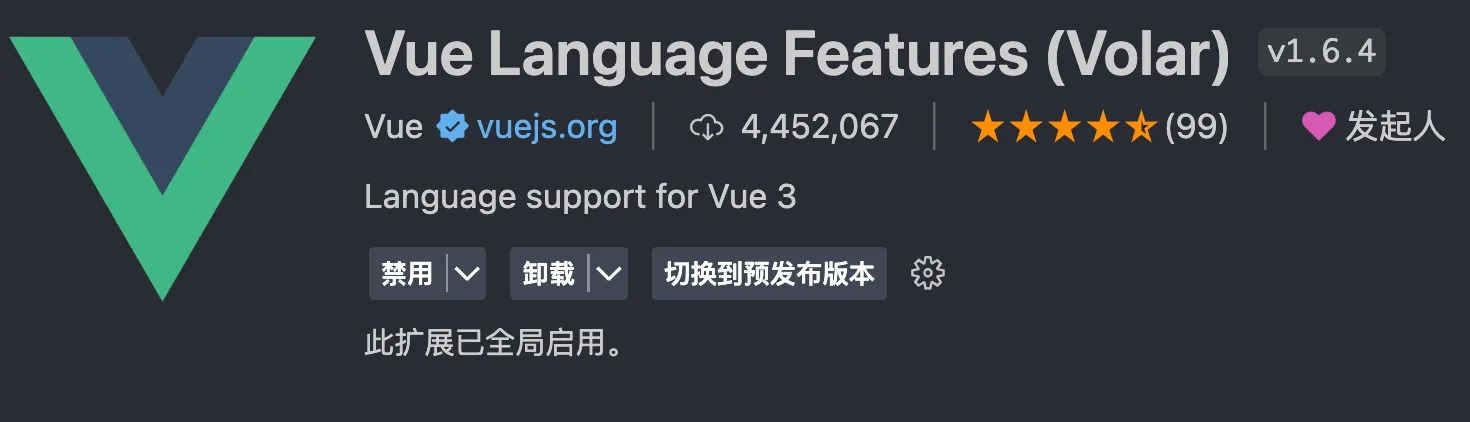
vscode更改Vetur工具为Volar
关键文件介绍
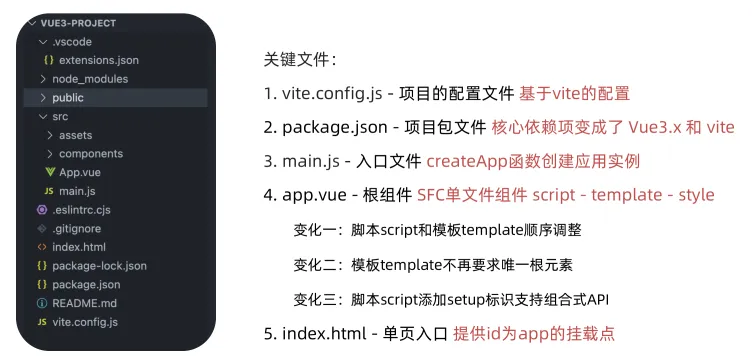
1、vite.config.js默认内容及介绍
 1 import { fileURLToPath, URL } from 'node:url'
 2
 3 import { defineConfig } from 'vite'
 4 import vue from '@vitejs/plugin-vue'
 5
 6 // https://vitejs.dev/config/
 7 export default defineConfig({
 8   plugins: [
 9     vue() // 指明要vite打包工具打包的是vue项目
10   ],
11   resolve: {
12     alias: {
13       // 设置别名, @ 指代的src目录
14       '@': fileURLToPath(new URL('./src', import.meta.url))
15     }
16   }
17 })
2、package.json默认文件内容及介绍
 1 {
 2   "name": "vue3-project",
 3   "version": "0.0.0",
 4   "private": true,
 5   "type": "module",  // 指定导包模式,ECMAScript 标准
 6   "scripts": {                // 定义的脚本
 7     "dev": "vite",            // 开发模式
 8     "build": "vite build",    // 生产模式打包
 9     "preview": "vite preview",
10     "lint": "eslint . --ext .vue,.js,.jsx,.cjs,.mjs --fix --ignore-path .gitignore"
11   },
12   "dependencies": {   // 生产依赖
13     "vue": "^3.4.21"
14   },
15   "devDependencies": { // 开发依赖
16     "@vitejs/plugin-vue": "^5.0.4",
17     "eslint": "^8.49.0",
18     "eslint-plugin-vue": "^9.17.0",
19     "vite": "^5.1.6"
20   }
21 }
组合式API - setup选项
App.vue替换成以下内容
选项式示例
 1 <script>
 2 // 选项式
 3 export default {
 4   data () {
 5     return {
 6       count: 0
 7     }
 8   },
 9   methods: {
10     addCount () {
11       this.count++
12     }
13   }
14 }
15 </script>
16
17 <template>
18   <div class="box">
19     <button @click="addCount">+{{ count }}</button>
20   </div>
21 </template>
22
23 <style scoped></style>
组合式示例
 1 <script>
 2 // 声明响应式数据, 第一步导入ref
 3 import { ref } from 'vue'
 4 export default {
 5   // 使用组合式API,必须加一个入口setup(最早执行的函数)
 6   setup () {
 7     // 定义响应式变量
 8     const count = ref(0) // 此处count并不是一个基本类型数据,而是通过ref包裹的对象
 9     const addCount = () => {
10       count.value++ // count是ref包裹的对象,所以要让其累加,需要调对象中的value属性
11     }
12
13     // 如果让模板使用setup中的方法和变量,需要return出去
14     return {
15       count,
16       addCount
17     }
18   }
19 }
20 </script>
21
22 <template>
23   <div class="box">
24     <button @click="addCount">+{{ count }}</button>
25   </div>
26 </template>
27
28 <style scoped></style>
setup选项的写法和执行时机
在beforeCreate钩子之前执行
setup中写代码的特点
在setup函数中写的数据和方法需要在末尾以对象的方式return,才能给模版使用
 1 <script>
 2   export default {
 3     setup(){
 4       const message = 'this is message'
 5       const logMessage = ()=>{
 6         console.log(message)
 7       }
 8       // 必须return才可以
 9       return {
10         message,
11         logMessage
12       }
13     }
14   }
15 </script>
<script setup>语法糖
script标签添加 setup标记之后
- 不再需要写export default {}
- 不再需要return
- 组件也无需注册直接使用
1 <script setup>
2   const message = 'this is message'
3   const logMessage = ()=>{
4     console.log(message)
5   }
6 </script>
组合式API - reactive和ref函数
reactive
接受对象类型数据的参数传入并返回一个响应式的对象
 1 <script setup>
 2  // 导入
 3  import { reactive } from 'vue'
 4  // 执行函数 传入参数 变量接收
 5  const state = reactive({
 6    msg:'this is msg'
 7  })
 8  const setSate = ()=>{
 9    // 修改数据更新视图
10    state.msg = 'this is new msg'
11  }
12 </script>
13
14 <template>
15   {{ state.msg }}
16   <button @click="setState">change msg</button>
17 </template>
ref
接收简单类型或者对象类型的数据传入并返回一个响应式的对象
通过ref包裹,返回一个响应式对象,这个响应式对象中value属性存储的就是我们传进去的希望转成响应式对象的内容,不管这个内容是基本类型还是对象类型,在script标签中想要拿到这个内容,都需要通过响应式对象.value拿到
 1 <script setup>
 2  // 导入
 3  import { ref } from 'vue'
 4  // 执行函数 传入参数 变量接收
 5  const count = ref(0)
 6  const setCount = ()=>{
 7    // 修改数据更新视图必须加上.value
 8    count.value++
 9  }
10 </script>
11
12 <template>
13   <button @click="setCount">{{count}}</button>
14 </template>
综合
 1 <script setup>
 2 // reactive 接受 对象类型 数据的参数传入并返回一个响应式的对象
 3 import { reactive } from 'vue'
 4 // 执行函数 传入参数 变量接收
 5 const state = reactive({
 6   count: 0
 7 })
 8 const addCount = () => {
 9   // 修改数据更新视图
10   state.count++
11 }
12
13 // ref      接收 简单类型 或者对象类型的数据传入并返回一个响应式的对象
14 // 简单类型
15 import { ref } from 'vue'
16 const count2 = ref(0)
17 const addCount2 = () => {
18   // 在script中使用ref生成响应式对象,如果想访问这个对象的原始值,必须加 .value
19   // 但是在模板template标签中使用响应式对象,不用加.value
20   count2.value++
21 }
22 // 对象类型
23 const user = ref({ age: 0, name: 'zhangsan' })
24 const addUserAge = () => {
25   // 在script中通过ref包裹的不管是基本类型还是对象类型,想要拿到原始值,都需要通过.value
26   user.value.age++
27 }
28 </script>
29
30 <template>
31   <div class="box1">
32     <button @click="addCount">+{{ state.count }}</button>
33   </div>
34   <br />
35   <div class="box2">
36     <button @click="addCount2">+{{ count2 }}</button>
37   </div>
38
39   <div class="box3">
40     <!-- ref包裹对象类型, 在template中也不需要.value,直接  对象.属性 -->
41     <button @click="addUserAge">+{{ user.age }}</button>
42   </div>
43 </template>
44
45 <style scoped></style>
reactive 对比 ref
- 都是用来生成响应式数据
- 不同点
- reactive不能处理简单类型的数据
- ref参数类型支持更好,但是必须通过.value做访问修改
- ref函数内部的实现依赖于reactive函数
- 在实际工作中的推荐
- 推荐使用ref函数,减少记忆负担
组合式API - computed
计算属性基本思想和Vue2保持一致,组合式API下的计算属性只是修改了API写法
 1 <script setup>
 2 import { ref, computed } from 'vue'
 3 // 原始属性
 4 const count = ref(0)
 5 // 计算属性
 6 const doubleCount = computed(() => count.value * 2)
 7 // 修改原始属性的方法
 8 const addCount = () => {
 9   count.value++
10 }
11 // 原始数据
12 const list = ref([1, 2, 3, 4, 5, 6, 7, 8])
13 // 计算属性
14 const filterList = computed(() => {
15   return list.value.filter(item => item > 2)
16 })
17 </script>
18
19 <template>
20   <div class="box1">
21     <!-- 使用组合式计算属性 -->
22     <span>{{ doubleCount }}</span>
23     <hr />
24     <button @click="addCount">+{{ count }}</button>
25     <hr />
26
27     <!-- 原始数据 -->
28     <span>{{ list }}</span>
29     <!-- 计算属性 -->
30     <span>{{ filterList }}</span>
31   </div>
32   <br />
33 </template>
34 <style scoped></style>
组合式API - watch
侦听一个或者多个数据的变化,数据变化时执行回调函数,俩个额外参数 immediate控制立刻执行,deep开启深度侦听
侦听单个数据
 1 <script setup>
 2 import { ref, watch } from 'vue'
 3 // 原始数据
 4 const count = ref(0)
 5 // 修改原始数据的方法
 6 const addCount = () => {
 7   count.value++
 8 }
 9 // 侦听原始数据
10 watch(count, (newValue, oldValue) => {
11   console.log('新值:' + newValue, '旧值:' + oldValue)
12 })
13 </script>
14
15 <template>
16   <div class="box1">
17     <button @click="addCount">+{{ count }}</button>
18   </div>
19   <br />
20 </template>
21 <style scoped></style>
侦听多个数据
侦听多个数据,第一个参数可以改写成数组的写法
 1 <script setup>
 2 import { ref, watch } from 'vue'
 3 // 原始数据, ref包裹的是基本类型数据
 4 const count1 = ref(0)
 5 // 修改原始数据的方法
 6 const addCount1 = () => {
 7   count1.value++
 8 }
 9
10 // 原始数据
11 const count2 = ref(0)
12 // 修改原始数据的方法
13 const addCount2 = () => {
14   count2.value++
15 }
16
17 // 侦听多个数据
18 watch([count1, count2], ([newValue1, newValue2], [oldValue1, oldValue2]) => {    // watch([count1, count2], (newValue, oldValue) => {  对应的回调参数1和参数2 都是数组 分别存储的是新值和旧值
19   console.log(
20     '新值1:' + newValue1,
21     '新值2:' + newValue2,
22     '旧值1:' + oldValue1,
23     '旧值2:' + oldValue2
24   )
25 })
26 </script>
27
28 <template>
29   <div class="box1">
30     <button @click="addCount1">+{{ count1 }}</button>
31   </div>
32   <br />
33   <div class="box1">
34     <button @click="addCount2">+{{ count2 }}</button>
35   </div>
36 </template>
37 <style scoped></style>
immediate
在侦听器创建时立即触发回调,响应式数据变化之后继续执行回调
 1 <script setup>
 2 import { ref, watch } from 'vue'
 3 // 原始数据
 4 const count = ref(0)
 5 // 修改原始数据的方法
 6 const addCount = () => {
 7   count.value++
 8 }
 9 // 侦听原始数据
10 watch(
11   count,
12   (newValue, oldValue) => {
13     console.log('新值:' + newValue, '旧值:' + oldValue)
14   },
15   {
16     immediate: true // 当侦听器创建的时候, 就立即触发回调
17   }
18 )
19 </script>
20
21 <template>
22   <div class="box1">
23     <button @click="addCount">+{{ count }}</button>
24   </div>
25   <br />
26 </template>
27 <style scoped></style>
deep
通过watch监听的ref对象默认是浅层侦听的,直接修改嵌套的对象属性不会触发回调执行,需要开启deep
watch默认可以对reactive生成的响应式对象进行深度监听,也就是在监听reactive生成的响应式对象的时候,可以不用加deep: true这个选项
 1 <script setup>
 2 import { ref, watch } from 'vue'
 3 // 原始数据, ref包裹的是对象
 4 const state = ref({ count: 0 })
 5 // 修改原始数据的方法
 6 const addCount = () => {
 7   state.value.count++
 8 }
 9 // 侦听原始数据
10 watch(
11   state,
12   (newValue, oldValue) => {
13     // 由于是通过ref包裹的返回的是响应式对象,所以此处拿到的新值和旧值里面的count都是一样的,因为引用的一个对象
14     console.log('新值:' + newValue.count, '旧值:' + oldValue.count)
15   },
16   {
17     deep: true // 深侦听, 当ref包裹对象时, 需要设置为true才会触发侦听
18   }
19 )
20 </script>
21
22 <template>
23   <div class="box1">
24     <button @click="addCount">+{{ state.count }}</button>
25   </div>
26   <br />
27 </template>
28 <style scoped></style>
reactive生成的响应式数据,watch是默认深度监听的
 1 <script setup>
 2 import { reactive, watch } from 'vue'
 3 // 原始数据, reactive生成的响应式数据
 4 const state = reactive({ count: 0 })
 5 // 修改原始数据的方法
 6 const addCount = () => {
 7   state.count++
 8 }
 9 // 侦听reactive生成的响应式数据, 不用加deep, 默认就是深度监听的
10 watch(state, (newValue, oldValue) => {
11   // 由于是通过ref包裹的返回的是响应式对象,所以此处拿到的新值和旧值里面的count都是一样的,因为引用的一个对象
12   console.log('新值:' + newValue.count, '旧值:' + oldValue.count)
13 })
14 </script>
15
16 <template>
17   <div class="box1">
18     <button @click="addCount">+{{ state.count }}</button>
19   </div>
20   <br />
21 </template>
22 <style scoped></style>
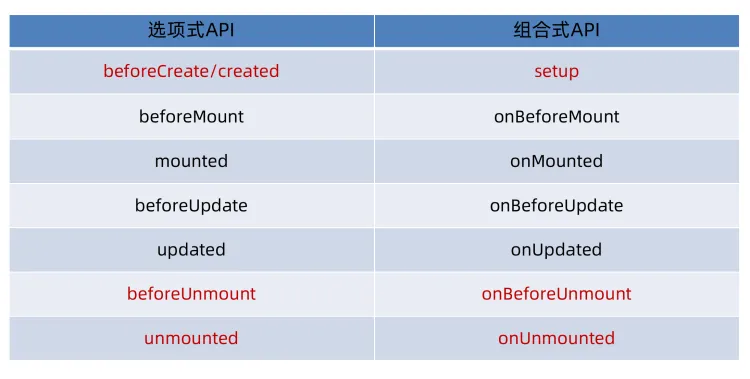
组合式API - 生命周期函数
选项式对比组合式
生命周期函数基本使用
- 导入生命周期函数
- 执行生命周期函数,传入回调
1 <scirpt setup>
2 import { onMounted } from 'vue'  // 先导入
3 onMounted(()=>{  // 再使用
4   // 自定义逻辑
5 })
6 </script>
执行多次
生命周期函数执行多次的时候,会按照顺序依次执行
 1 <scirpt setup>
 2 import { onMounted } from 'vue'
 3 onMounted(()=>{
 4   // 自定义逻辑
 5 })
 6
 7 onMounted(()=>{
 8   // 自定义逻辑
 9 })
10 </script>
组合式API - 父子通信
父传子
基本思想
- 父组件中给子组件绑定属性
- 子组件内部通过props选项接收数据
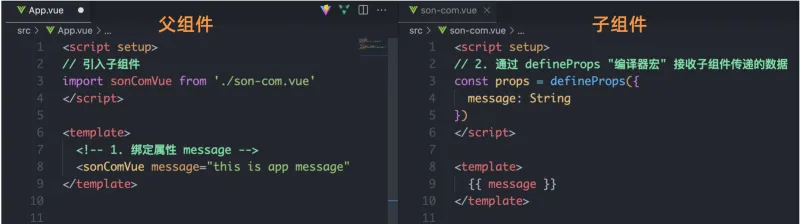
父组件App.vue
 1 <script setup>
 2 // 父传子
 3 // 第一步:导入子组件
 4 import SonCom from './components/SonCom.vue'
 5
 6 // 第三步:通过ref生成响应式的对象
 7 import { ref } from 'vue'
 8 const content = ref('父组件中的数据')
 9 const name = ref('张三')
10 </script>
11
12 <template>
13   <div class="box">
14     <h1>父组件</h1>
15     <!-- 第二步:直接使用子组件 -->
16     <!-- 第四步:通过自定义属性给子组件传值, 自定属性msg, 前面加: 表示v-bind可以使用变量 -->
17     <SonCom :msg="content" :name="name"></SonCom>
18   </div>
19 </template>
20
21 <style scoped>
22 .box {
23   height: 300px;
24   border: 1px solid lightcoral;
25 }
26 </style>
子组件SonCom.vue
 1 <script setup>
 2 // 子组件接收父组件传的值
 3 // 通过宏函数(不需要导入,直接使用) -> defineProps
 4
 5 // 方式1: 直接接收父组件的数据,不加校验
 6 // defineProps(['msg'])
 7 // defineProps(['msg', 'name']) // 同时接收多个值
 8
 9 // 方式2: 使用defineProps时,加类型校验,此时就需要改成对象写法
10 // defineProps({
11 //   msg: {
12 //     type: String, // 类型必须为String
13 //     required: true // 必传
14 //   }
15 // })
16
17 // 方式3: 如果希望接收的属性在js逻辑中使用,则需要声明一个变量接收defineProps的返回值
18 const props = defineProps(['msg', 'name'])
19 console.log(props.msg, props.name)
20 </script>
21
22 <template>
23   <div class="son">
24     <h2>子组件</h2>
25     <p>接收到父组件传的值为: {{ msg }}</p>
26     <p>接收到父组件传的值为: {{ name }}</p>
27   </div>
28 </template>
29
30 <style scoped>
31 .son {
32   height: 100px;
33   border: 1px solid lightblue;
34 }
35 </style>
子传父
基本思想
- 父组件中给子组件标签通过@绑定事件
- 子组件内部通过 emit 方法触发事件
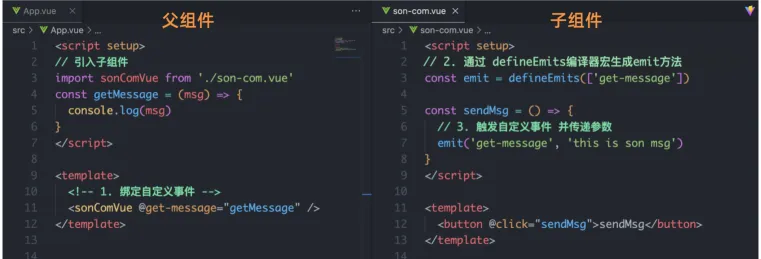
父组件App.vue
 1 <script setup>
 2 // 导入子组件
 3 import SonCom from './components/SonCom.vue'
 4
 5 // 父组件监听到send-msg事件之后,触发对应的回调函数
 6 const getMsg = val => {
 7   console.log(val)
 8 }
 9 </script>
10
11 <template>
12   <div class="box">
13     <h1>父组件</h1>
14     <!-- 第三步:父组件监听emit中触发的自定义事件 -->
15     <SonCom @send-msg="getMsg"></SonCom>
16   </div>
17 </template>
18
19 <style scoped>
20 .box {
21   height: 300px;
22   border: 1px solid lightcoral;
23 }
24 </style>
子组件SonCom.vue
 1 <script setup>
 2 // 子传父
 3
 4 // 第一步:使用宏函数 defineEmits 来生成emit函数, 事件的名称必须保持一致(定义时的、emit触发时的、父组件监听的都要是同一个)
 5 const emit = defineEmits(['send-msg'])
 6 // 第二步:使用emit函数来触发自定义事件
 7 const sendMsg = () => {
 8   emit('send-msg', '我是子组件传的数据')
 9 }
10 </script>
11
12 <template>
13   <div class="son">
14     <h2>子组件</h2>
15     <button @click="sendMsg"></button>
16   </div>
17 </template>
18
19 <style scoped>
20 .son {
21   height: 100px;
22   border: 1px solid lightblue;
23 }
24 .son button {
25   width: 20px;
26   height: 20px;
27 }
28 </style>
传递响应式数据,子组件
 1 <script setup>
 2 // 子传父
 3
 4 // 第一步:使用宏函数 defineEmits 来生成emit函数, 事件的名称必须保持一致(定义时的、emit触发时的、父组件监听的都要是同一个)
 5 const emit = defineEmits(['send-msg'])
 6 // 第二步:使用emit函数来触发自定义事件
 7 const sendMsg = val => {
 8   emit('send-msg', val)
 9 }
10
11 import { ref } from 'vue'
12 // 定义响应式数据
13 const count = ref(100)
14 </script>
15
16 <template>
17   <div class="son">
18     <h2>子组件</h2>
19     <!-- 子组件向父组件传递数据 -->
20     <button @click="sendMsg(count)"></button>
21   </div>
22 </template>
23
24 <style scoped>
25 .son {
26   height: 100px;
27   border: 1px solid lightblue;
28 }
29 .son button {
30   width: 20px;
31   height: 20px;
32 }
33 </style>
组合式API - 模版引用
概念:通过 ref标识 获取真实的 dom对象或者组件实例对象
基本使用
实现步骤:
- 调用ref函数生成一个ref对象
- 通过ref标识绑定ref对象到标签
 1 <script setup>
 2 import { ref, onMounted } from 'vue'
 3 // 定义一个响应式的空对象,等页面加载完,会将标签中ref属性值等于这个变量名的dom获取到赋值给这个变量
 4 const h1Ref = ref(null)
 5 onMounted(() => {
 6   // 打印dom的值
 7   console.log(h1Ref.value) // <h1>父组件</h1>
 8 })
 9 </script>
10
11 <template>
12   <div class="box">
13     <!-- 页面加载后会将该dom对象赋值给与ref的值相同的变量h1Ref -->
14     <h1 ref="h1Ref">父组件</h1>
15   </div>
16 </template>
17
18 <style scoped>
19 .box {
20   height: 300px;
21   border: 1px solid lightcoral;
22 }
23 </style>
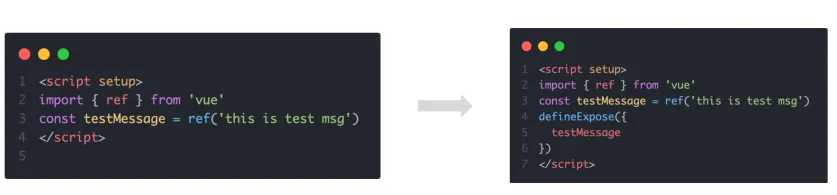
defineExpose
默认情况下在 <script setup>语法糖下组件内部的属性和方法是不开放给父组件访问的,可以通过defineExpose编译宏指定哪些属性和方法容许访问
说明:指定testMessage属性可以被访问到
父组件App.vue
 1 <script setup>
 2 // 父组件调用子组件中的属性和方法
 3 import SonCom from '@/components/SonCom.vue'
 4 import { ref } from 'vue'
 5 const sonCom = ref(null)
 6 const getSonFn = () => {
 7   // 获取子组件中的属性
 8   console.log(sonCom.value.msg) // 因为通过ref包裹了,所以在script中使用需要.value获取到子组件暴漏的真实对象
 9   // 调用子组件中的方法
10   sonCom.value.logMsg()
11 }
12 </script>
13
14 <template>
15   <div class="box">
16     <h1>父组件</h1>
17     <SonCom ref="sonCom"></SonCom>
18     <button @click="getSonFn">点击获取子组件内部的属性和方法</button>
19   </div>
20 </template>
21
22 <style scoped>
23 .box {
24   height: 300px;
25   border: 1px solid lightcoral;
26 }
27 </style>
子组件SonCom.vue
 1 <script setup>
 2 // Vue3中组合式Api 组件内部的属性和方法默认是不暴漏给父组件的
 3 // 如果想让父组件访问子组件内部的数据,必须通过defineExpose()向外暴漏
 4
 5 import { ref } from 'vue'
 6 // 子组件定义的响应式数据
 7 const msg = ref('子组件的数据')
 8 // 子组件定义的函数
 9 const logMsg = () => {
10   console.log(msg.value)
11 }
12
13 // 向外暴漏属性和方法
14 defineExpose({
15   msg,
16   logMsg
17 })
18 </script>
19
20 <template>
21   <div class="son">
22     <h2>子组件</h2>
23   </div>
24 </template>
25
26 <style scoped>
27 .son {
28   height: 100px;
29   border: 1px solid lightblue;
30 }
31 .son button {
32   width: 20px;
33   height: 20px;
34 }
35 </style>
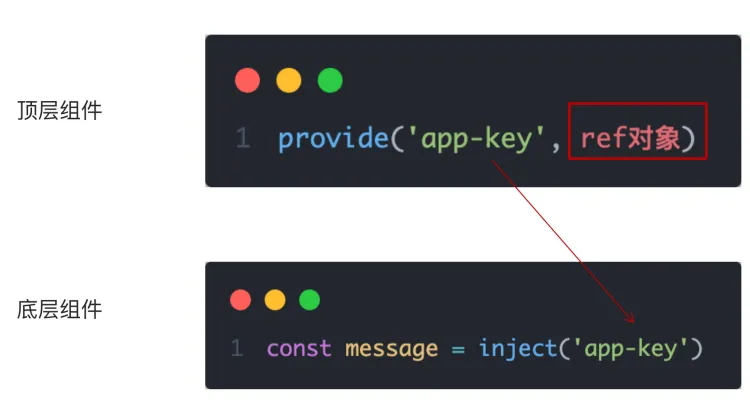
组合式API - provide和inject
作用和场景
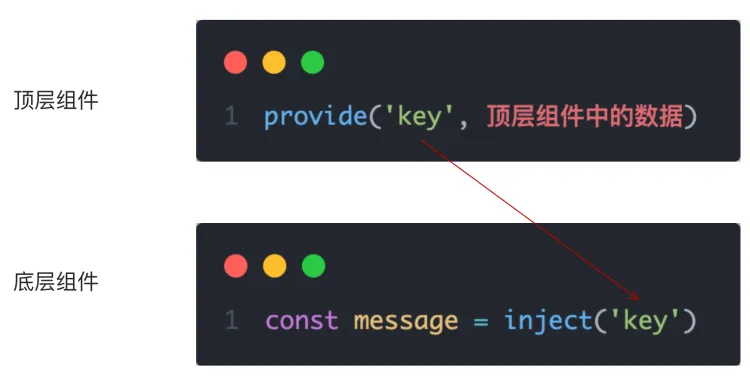
顶层组件向任意的底层组件传递数据和方法,实现跨层组件通信
跨层传递普通数据
实现步骤
- 顶层组件通过
provide函数提供数据- 底层组件通过
inject函数提供数据
跨层传递响应式数据
在调用provide函数时,第二个参数设置为ref对象
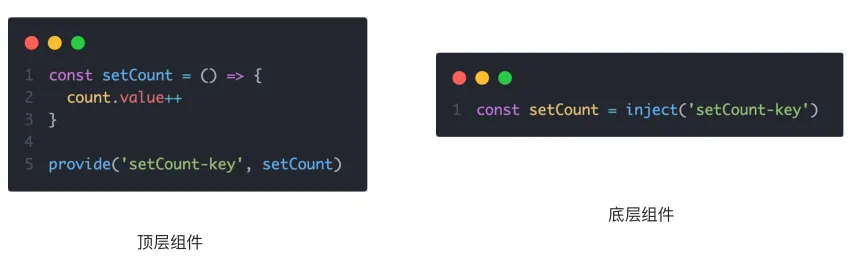
跨层传递方法
顶层组件可以向底层组件传递方法,底层组件调用方法修改顶层组件的数据
祖先组件App.vue
 1 <script setup>
 2 // 父组件调用子组件中的属性和方法
 3 import FatherCom from '@/components/FatherCom.vue'
 4 import { provide, ref } from 'vue'
 5
 6 // 1、传递普通类型数据
 7 provide('name1', '张三')
 8
 9 // 2、传递响应式数据
10 const name2 = ref('张三')
11 provide('name2', name2)
12
13 // 通过按钮点击修改响应式数据,来验证是否传递给子孙
14 const changeName2 = () => {
15   name2.value = '李四'
16 }
17 // 3、父组件传递修改响应式数据的方法给子组件
18 provide('changeName2', changeName2)
19 </script>
20
21 <template>
22   <div class="box">
23     <h1>祖先组件</h1>
24     <button @click="changeName2">change</button>
25     <FatherCom></FatherCom>
26   </div>
27 </template>
28
29 <style scoped>
30 .box {
31   padding: 30px;
32   border: 1px solid lightcoral;
33 }
34 </style>
父组件FatherCom.vue
 1 <script setup>
 2 import SonCom from '@/components/SonCom.vue'
 3 </script>
 4
 5 <template>
 6   <div class="father">
 7     <h2>父组件</h2>
 8     <SonCom ref="sonCom"></SonCom>
 9   </div>
10 </template>
11
12 <style scoped>
13 .father {
14   padding: 30px;
15   border: 1px solid lightblue;
16 }
17 </style>
子孙组件SonCom.vue
 1 <script setup>
 2 import { inject } from 'vue'
 3
 4 // 1、接收普通数据
 5 const result1 = inject('name1')
 6
 7 // 2、接收响应式数据
 8 const result2 = inject('name2')
 9
10 // 3、子组件通过获取祖先组件传递的方法来修改祖先组件中的响应式数据
11 const changeName = inject('changeName2')
12 const handle = () => {
13   // 调用祖先组件传过来的方法
14   changeName()
15 }
16 </script>
17
18 <template>
19   <div class="son">
20     <h2>子孙组件</h2>
21     <p>子孙组件接收到祖先组件的普通数据为:{{ result1 }}</p>
22     <p>子孙组件接收到祖先组件的响应式数据为:{{ result2 }}</p>
23     <button @click="handle"></button>
24   </div>
25 </template>
26
27 <style scoped>
28 .son {
29   padding: 30px;
30   border: 1px solid lightcoral;
31 }
32 .son button {
33   width: 20px;
34   height: 20px;
35 }
36 </style>
基于Vue3的大屏项目
项目参考文档:https://www.yuque.com/zj-risingsun/hgcc4c/da1594innanavft6
2D可视化部分
1、创建vue3项目
1 npm init vue@latest
2 npm i sass
2、移除多余模块
- 清空assets文件夹中的文件
- 删除整个components文件夹
- 删除views中的AboutView.vue
- 清空其他模块中的多余代码
main.js内容如下
 1 import { createApp } from 'vue'
 2 import App from './App.vue'
 3 import router from './router'
 4 import './styles/common.scss'
 5
 6 const app = createApp(App)
 7
 8 app.use(router)
 9
10 app.mount('#app')
App.vue内容如下
1 <script setup>
2 import { RouterView } from 'vue-router'
3 </script>
4 <template>
5   <RouterView />
6 </template>
7 <style scoped></style>
HomeView.vue内容如下
1 <script setup>
2 </script>
3
4 <template>
5   <main>
6     首页
7   </main>
8 </template>
router/index.js
 1 import {
 2   createRouter,
 3   createWebHistory
 4   // createWebHashHistory
 5 } from 'vue-router'
 6 import HomeView from '../views/HomeView.vue'
 7 import BigScreenView from '../views/BigScreenView.vue'
 8 // 通过createRouter函数创建Router对象
 9 const router = createRouter({
10   // 原来vue2配置模式方式
11   // mode: 'hash' 或者 mode: 'history'
12
13   // createWebHistory、createWebHashHistory   指定hash和history模式的两个函数
14   // history: createWebHashHistory()
15   history: createWebHistory(import.meta.env.BASE_URL),
16   routes: [
17     {
18       path: '/',
19       name: 'home',
20       redirect: '/big-screen',
21       component: HomeView
22     },
23     {
24       path: '/big-screen',
25       name: 'big-screen',
26       component: BigScreenView
27     }
28   ]
29 })
30
31 export default router
styles/common.scss
 1 html,
 2 body,
 3 #app {
 4   height: 100vh;
 5   overflow: hidden;
 6 }
 7
 8 * {
 9   margin: 0;
10   padding: 0;
11   box-sizing: border-box;
12 }
utils/cookie.js
1 npm i js-cookie
 1 import Cookies from 'js-cookie'
 2
 3 const KEY = 'token_key'
 4
 5 export function getCookie () {
 6   return Cookies.get(KEY)
 7 }
 8
 9 export function setCookie (value) {
10   Cookies.set(KEY, value)
11 }
12
13 export function removeCookie () {
14   Cookies.remove(KEY)
15 }
utils/request.js
1 npm i axios
 1 import axios from 'axios'
 2 import { getCookie } from './cookie'
 3 const service = axios.create({
 4   baseURL: 'https://api-hmzs.itheima.net/v1',
 5   timeout: 5000
 6 })
 7
 8 // 请求拦截器
 9 service.interceptors.request.use(
10   config => {
11     const token = getCookie()
12     if (token) {
13       config.headers.Authorization = token
14     }
15     return config
16   },
17   error => {
18     return Promise.reject(error)
19   }
20 )
21
22 // 响应拦截器
23 service.interceptors.response.use(
24   response => {
25     return response.data
26   },
27   error => {
28     return Promise.reject(error)
29   }
30 )
31
32 export default service
api/park.js
 1 // 获取园区信息
 2
 3 import request from '@/utils/request'
 4
 5 /**
 6  * 获取园区信息
 7  * @returns
 8  */
 9 export function getParkInfoAPI () {
10   return request({
11     url: '/park/statistics/info'
12   })
13 }
3、非组合式函数写法
views/BigScreenView.vue
  1 <script setup>
  2 import { onMounted } from 'vue'
  3 import { ref } from 'vue'
  4 import { getParkInfoAPI } from '@/api/park'
  5 import * as echarts from 'echarts'
  6
  7 const parkInfo = ref({})
  8 const getParkInfo = async () => {
  9   const res = await getParkInfoAPI()
 10   parkInfo.value = res.data
 11 }
 12
 13 const barChart = ref(null)
 14 // 渲染年度收入分析图表
 15 const initBarChart = () => {
 16   // 1. 解构图表数据
 17   const { parkIncome } = parkInfo.value
 18   parkIncome.yIncome = [
 19     100, 110, 90, 100, 110, 90, 100, 110, 90, 100, 110, 90
 20   ]
 21   // 2. 准备options数据
 22   const barOptions = {
 23     tooltip: {
 24       trigger: 'axis',
 25       axisPointer: {
 26         type: 'shadow'
 27       }
 28     },
 29     grid: {
 30       // 让图表占满容器
 31       top: '10px',
 32       left: '0px',
 33       right: '0px',
 34       bottom: '0px',
 35       containLabel: true
 36     },
 37     xAxis: [
 38       {
 39         type: 'category',
 40         axisTick: {
 41           alignWithLabel: true,
 42           show: false
 43         },
 44         data: parkIncome.xMonth
 45       }
 46     ],
 47     yAxis: [
 48       {
 49         type: 'value',
 50         splitLine: {
 51           show: false
 52         }
 53       }
 54     ],
 55     series: [
 56       {
 57         name: '园区年度收入',
 58         type: 'bar',
 59         barWidth: '10px',
 60         data: parkIncome.yIncome.map((item, index) => {
 61           const color =
 62             // 偶数下标的数据渲染颜色
 63             index % 2 === 0
 64               ? new echarts.graphic.LinearGradient(0, 0, 0, 1, [
 65                 { offset: 0.23, color: '#74c0f8' },
 66                 { offset: 1, color: 'rgba(116,192,248,0.00)' }
 67               ])
 68               : new echarts.graphic.LinearGradient(0, 0, 0, 1, [
 69                 { offset: 0.23, color: '#ff7152' },
 70                 { offset: 1, color: 'rgba(255,113,82,0.00)' }
 71               ])
 72           return { value: item, itemStyle: { color } }
 73         })
 74       }
 75     ],
 76     textStyle: {
 77       color: '#B4C0CC'
 78     }
 79   }
 80   // 3. 渲染图表
 81   const myBarChart = echarts.init(barChart.value)
 82   myBarChart.setOption(barOptions)
 83 }
 84
 85 // 渲染园区产业分布图表
 86 const pieChart = ref(null)
 87 const initPieChart = () => {
 88   const { parkIndustry } = parkInfo.value
 89   const pieOption = {
 90     color: ['#00B2FF', '#2CF2FF', '#892CFF', '#FF624D', '#FFCF54', '#86ECA2'],
 91     legend: {
 92       itemGap: 20,
 93       bottom: '0',
 94       icon: 'rect',
 95       itemHeight: 10, // 图例icon高度
 96       itemWidth: 10, // 图例icon宽度
 97       textStyle: {
 98         color: '#c6d1db'
 99       }
100     },
101     tooltip: {
102       trigger: 'item'
103     },
104     series: [
105       {
106         name: '园区产业分析',
107         type: 'pie',
108         radius: ['55%', '60%'], // 设置内圈与外圈的半径使其呈现为环形
109         center: ['50%', '40%'], // 圆心位置, 用于调整整个图的位置
110         tooltip: {
111           trigger: 'item',
112           formatter: params => {
113             return `${params.seriesName}</br><div style='display:flex;justify-content: space-between;'><div>${params.marker}${params.name}</div><div>${params.percent}%</div></div>`
114           }
115         },
116         label: {
117           show: false,
118           position: 'center'
119         },
120         data: parkIndustry
121       }
122     ]
123   }
124   const myPieChart = echarts.init(pieChart.value)
125   myPieChart.setOption(pieOption)
126 }
127
128
129
130 onMounted(async () => {
131   // 因为initBarChart方法中用到了getParkInfo方法的返回值数据, 需要等待getParkInfo执行完才能执行initBarChart
132   // 所以使用await
133   await getParkInfo()
134   initBarChart()
135   initPieChart()
136 })
137 </script>
138
139 <template>
140   <div class="all-charts">
141     <!-- 园区概况 -->
142     <div class="section-one">
143       <img class="img-header"
144         src="https://yjy-teach-oss.oss-cn-beijing.aliyuncs.com/smartPark/%E5%A4%A7%E5%B1%8F%E5%88%87%E5%9B%BE/%E5%9B%AD%E5%8C%BA%E6%A6%82%E5%86%B5%402x.png"
145         alt="" />
146       <div class="icons-container">
147         <div class="item">
148           <div class="icons-item building-icon">
149             <span class="number">
150               <!--
151                 首次渲染(后端数据没有返回)
152                 parkInfo - {} - {}.base -> undefined -> undefined.buidingTotal
153
154                 二次渲染(后端数据返回之后 响应式状态发生变化 再次引起模版渲染)
155
156                 场景:访问一个空对象多层次的属性
157                 解决办法:可选链?.   保证必须前面有值才会继续往后进行点运算
158                -->
159               <!-- 当parkInfo.base不为undefined时获取parkInfo.base中的buildingTotal -->
160               <!-- {{ parkInfo.base && parkInfo.base.buildingTotal }} -->
161               <!-- 简写方式 -->
162               {{ parkInfo.base?.buildingTotal }}
163             </span>
164           </div>
165           <span class="title">楼宇总数</span>
166           <span class="unity">(栋)</span>
167         </div>
168         <div class="item">
169           <div class="icons-item enterprise-icon">
170             <span class="number">
171               {{ parkInfo.base?.enterpriseTotal }}
172             </span>
173           </div>
174           <span class="title">入驻企业总数</span>
175           <span class="unity">(家)</span>
176         </div>
177         <div class="item">
178           <div class="icons-item car-icon">
179             <span class="number">
180               {{ parkInfo.base?.parkingTotal }}
181             </span>
182           </div>
183           <span class="title">车位总数</span>
184           <span class="unity">(个)</span>
185         </div>
186         <div class="item">
187           <div class="icons-item rod-icon">
188             <span class="number">
189               {{ parkInfo.base?.chargePoleTotal }}
190             </span>
191           </div>
192           <span class="title">一体杆总数</span>
193           <span class="unity">(个)</span>
194         </div>
195       </div>
196     </div>
197     <!-- 园区年度收入分析 -->
198     <div class="section-two">
199       <img class="img-header"
200         src="https://yjy-teach-oss.oss-cn-beijing.aliyuncs.com/smartPark/%E5%A4%A7%E5%B1%8F%E5%88%87%E5%9B%BE/%E5%9B%AD%E5%8C%BA%E5%B9%B4%E5%BA%A6%E6%94%B6%E5%85%A5%E5%88%86%E6%9E%90%402x.png"
201         alt="" />
202       <div class="bar-chart-titile">
203         <span>单位:元</span>
204         <div>
205           <span class="bar-icon blue-bar-icon"></span>
206           <span class="bar-icon red-bar-icon"></span>
207           收入情况
208         </div>
209       </div>
210       <div class="bar-chart" ref="barChart"></div>
211     </div>
212     <!-- 园区产业分布 -->
213     <div class="section-three">
214       <img class="img-header"
215         src="https://yjy-teach-oss.oss-cn-beijing.aliyuncs.com/smartPark/%E5%A4%A7%E5%B1%8F%E5%88%87%E5%9B%BE/%E5%9B%AD%E5%8C%BA%E4%BA%A7%E4%B8%9A%E5%88%86%E5%B8%83%402x.png"
216         alt="" />
217       <div class="pie-chart" ref="pieChart"></div>
218     </div>
219   </div>
220 </template>
221 <style lang="scss" scoped>
222 .all-charts {
223   position: absolute;
224   top: 0;
225   left: 0;
226   width: 480px;
227   height: 100vh;
228   padding: 20px;
229   display: flex;
230   flex-direction: column;
231   justify-content: space-between;
232   background: linear-gradient(to left, rgba(0, 6, 15, 0.00) 0%, rgba(0, 6, 15, 0.00) 20%, rgba(0, 0, 0, 0.40) 30%, rgba(0, 0, 0, 0.60) 40%, rgba(1, 4, 11, 1) 70%, #04070d 100%);
233
234   .img-header {
235     height: 30px;
236   }
237 }
238
239 .section-one {
240   flex-basis: 25%;
241
242   .icons-container {
243     display: flex;
244     justify-content: space-between;
245     padding: 20px 0;
246
247     .item {
248       text-align: center;
249       display: flex;
250       flex-direction: column;
251       flex: 1;
252
253       .icons-item {
254         height: 80px;
255         position: relative;
256
257         .number {
258           position: absolute;
259           left: 50%;
260           transform: translateX(-50%);
261           font-size: 18px;
262           font-family: FontquanXinYiGuanHeiTi, FontquanXinYiGuanHeiTi-Regular;
263           color: #ffffff;
264         }
265       }
266
267       .building-icon {
268         background: url('@/assets/building-icon.png') no-repeat 50% 0 / contain;
269       }
270
271       .enterprise-icon {
272         background: url('@/assets/enterprise-icon.png') no-repeat 50% 0 / contain;
273       }
274
275       .rod-icon {
276         background: url('@/assets/rod-icon.png') no-repeat 50% 0 / contain;
277       }
278
279       .car-icon {
280         background: url('@/assets/car-icon.png') no-repeat 50% 0 / contain;
281       }
282
283       .title,
284       .unity {
285         font-size: 14px;
286         color: #cdd7e1;
287       }
288
289       .title {
290         margin-top: 8px;
291       }
292     }
293   }
294 }
295
296 .section-two {
297   flex-basis: 35%;
298   margin-top: 50px;
299
300   .bar-chart {
301     width: 100%;
302     height: calc(100% - 90px);
303   }
304 }
305
306 .section-three {
307   flex-basis: 40%;
308
309   .pie-chart {
310     position: relative;
311     margin: 0 auto;
312     padding-bottom: 20px;
313     width: 80%;
314     height: calc(100% - 40px);
315   }
316 }
317 </style>
4、使用封装的组合式函数,基于逻辑拆分
使用组合式函数,为了复用,将一些js部分代码抽离,用到的地方直接导入使用
views/BigScreenView.vue
  1 <script setup>
  2 import { onMounted } from 'vue'
  3
  4 // 使用封装的组合式函数
  5 import { useGetParkInfo, useInitBarChart, userInitPieChart } from './composables/bigscreen'
  6
  7 const { parkInfo, getParkInfo } = useGetParkInfo()
  8 const { barChart, initBarChart } = useInitBarChart(parkInfo)
  9 const { pieChart, initPieChart } = userInitPieChart(parkInfo)
 10
 11 onMounted(async () => {
 12   // 因为initBarChart方法中用到了getParkInfo方法的返回值数据, 需要等待getParkInfo执行完才能执行initBarChart
 13   // 所以使用await
 14   await getParkInfo()
 15   initBarChart()
 16   initPieChart()
 17 })
 18 </script>
 19
 20 <template>
 21   <div class="all-charts">
 22     <!-- 园区概况 -->
 23     <div class="section-one">
 24       <img class="img-header"
 25         src="https://yjy-teach-oss.oss-cn-beijing.aliyuncs.com/smartPark/%E5%A4%A7%E5%B1%8F%E5%88%87%E5%9B%BE/%E5%9B%AD%E5%8C%BA%E6%A6%82%E5%86%B5%402x.png"
 26         alt="" />
 27       <div class="icons-container">
 28         <div class="item">
 29           <div class="icons-item building-icon">
 30             <span class="number">
 31               <!--
 32                 首次渲染(后端数据没有返回)
 33                 parkInfo - {} - {}.base -> undefined -> undefined.buidingTotal
 34
 35                 二次渲染(后端数据返回之后 响应式状态发生变化 再次引起模版渲染)
 36
 37                 场景:访问一个空对象多层次的属性
 38                 解决办法:可选链?.   保证必须前面有值才会继续往后进行点运算
 39                -->
 40               <!-- 当parkInfo.base不为undefined时获取parkInfo.base中的buildingTotal -->
 41               <!-- {{ parkInfo.base && parkInfo.base.buildingTotal }} -->
 42               <!-- 简写方式 -->
 43               {{ parkInfo.base?.buildingTotal }}
 44             </span>
 45           </div>
 46           <span class="title">楼宇总数</span>
 47           <span class="unity">(栋)</span>
 48         </div>
 49         <div class="item">
 50           <div class="icons-item enterprise-icon">
 51             <span class="number">
 52               {{ parkInfo.base?.enterpriseTotal }}
 53             </span>
 54           </div>
 55           <span class="title">入驻企业总数</span>
 56           <span class="unity">(家)</span>
 57         </div>
 58         <div class="item">
 59           <div class="icons-item car-icon">
 60             <span class="number">
 61               {{ parkInfo.base?.parkingTotal }}
 62             </span>
 63           </div>
 64           <span class="title">车位总数</span>
 65           <span class="unity">(个)</span>
 66         </div>
 67         <div class="item">
 68           <div class="icons-item rod-icon">
 69             <span class="number">
 70               {{ parkInfo.base?.chargePoleTotal }}
 71             </span>
 72           </div>
 73           <span class="title">一体杆总数</span>
 74           <span class="unity">(个)</span>
 75         </div>
 76       </div>
 77     </div>
 78     <!-- 园区年度收入分析 -->
 79     <div class="section-two">
 80       <img class="img-header"
 81         src="https://yjy-teach-oss.oss-cn-beijing.aliyuncs.com/smartPark/%E5%A4%A7%E5%B1%8F%E5%88%87%E5%9B%BE/%E5%9B%AD%E5%8C%BA%E5%B9%B4%E5%BA%A6%E6%94%B6%E5%85%A5%E5%88%86%E6%9E%90%402x.png"
 82         alt="" />
 83       <div class="bar-chart-titile">
 84         <span>单位:元</span>
 85         <div>
 86           <span class="bar-icon blue-bar-icon"></span>
 87           <span class="bar-icon red-bar-icon"></span>
 88           收入情况
 89         </div>
 90       </div>
 91       <div class="bar-chart" ref="barChart"></div>
 92     </div>
 93     <!-- 园区产业分布 -->
 94     <div class="section-three">
 95       <img class="img-header"
 96         src="https://yjy-teach-oss.oss-cn-beijing.aliyuncs.com/smartPark/%E5%A4%A7%E5%B1%8F%E5%88%87%E5%9B%BE/%E5%9B%AD%E5%8C%BA%E4%BA%A7%E4%B8%9A%E5%88%86%E5%B8%83%402x.png"
 97         alt="" />
 98       <div class="pie-chart" ref="pieChart"></div>
 99     </div>
100   </div>
101 </template>
102 <style lang="scss" scoped>
103 .all-charts {
104   position: absolute;
105   top: 0;
106   left: 0;
107   width: 480px;
108   height: 100vh;
109   padding: 20px;
110   display: flex;
111   flex-direction: column;
112   justify-content: space-between;
113   background: linear-gradient(to left, rgba(0, 6, 15, 0.00) 0%, rgba(0, 6, 15, 0.00) 20%, rgba(0, 0, 0, 0.40) 30%, rgba(0, 0, 0, 0.60) 40%, rgba(1, 4, 11, 1) 70%, #04070d 100%);
114
115   .img-header {
116     height: 30px;
117   }
118 }
119
120 .section-one {
121   flex-basis: 25%;
122
123   .icons-container {
124     display: flex;
125     justify-content: space-between;
126     padding: 20px 0;
127
128     .item {
129       text-align: center;
130       display: flex;
131       flex-direction: column;
132       flex: 1;
133
134       .icons-item {
135         height: 80px;
136         position: relative;
137
138         .number {
139           position: absolute;
140           left: 50%;
141           transform: translateX(-50%);
142           font-size: 18px;
143           font-family: FontquanXinYiGuanHeiTi, FontquanXinYiGuanHeiTi-Regular;
144           color: #ffffff;
145         }
146       }
147
148       .building-icon {
149         background: url('@/assets/building-icon.png') no-repeat 50% 0 / contain;
150       }
151
152       .enterprise-icon {
153         background: url('@/assets/enterprise-icon.png') no-repeat 50% 0 / contain;
154       }
155
156       .rod-icon {
157         background: url('@/assets/rod-icon.png') no-repeat 50% 0 / contain;
158       }
159
160       .car-icon {
161         background: url('@/assets/car-icon.png') no-repeat 50% 0 / contain;
162       }
163
164       .title,
165       .unity {
166         font-size: 14px;
167         color: #cdd7e1;
168       }
169
170       .title {
171         margin-top: 8px;
172       }
173     }
174   }
175 }
176
177 .section-two {
178   flex-basis: 35%;
179   margin-top: 50px;
180
181   .bar-chart {
182     width: 100%;
183     height: calc(100% - 90px);
184   }
185 }
186
187 .section-three {
188   flex-basis: 40%;
189
190   .pie-chart {
191     position: relative;
192     margin: 0 auto;
193     padding-bottom: 20px;
194     width: 80%;
195     height: calc(100% - 40px);
196   }
197 }
198 </style>
views/composables/bigscreen.js
组合式函数官方文档:https://cn.vuejs.org/guide/reusability/composables.html
封装组合式函数
  1 import { ref } from 'vue'
  2 import { getParkInfoAPI } from '@/api/park'
  3 import * as echarts from 'echarts'
  4 /**
  5  * 封装获取数据接口的组合式函数, 方法名必须以'use'开头
  6  */
  7 export function useGetParkInfo () {
  8   const parkInfo = ref({})
  9   const getParkInfo = async () => {
 10     const res = await getParkInfoAPI()
 11     parkInfo.value = res.data
 12   }
 13   // 函数内部的数据, 如果外部要使用, 则必须return
 14   return {
 15     parkInfo,
 16     getParkInfo
 17   }
 18 }
 19
 20 export function useInitBarChart (parkInfo) {
 21   const barChart = ref(null)
 22   // 渲染年度收入分析图表
 23   const initBarChart = () => {
 24     // 1. 解构图表数据
 25     const { parkIncome } = parkInfo.value
 26     parkIncome.yIncome = [
 27       100, 110, 90, 100, 110, 90, 100, 110, 90, 100, 110, 90
 28     ]
 29     // 2. 准备options数据
 30     const barOptions = {
 31       tooltip: {
 32         trigger: 'axis',
 33         axisPointer: {
 34           type: 'shadow'
 35         }
 36       },
 37       grid: {
 38         // 让图表占满容器
 39         top: '10px',
 40         left: '0px',
 41         right: '0px',
 42         bottom: '0px',
 43         containLabel: true
 44       },
 45       xAxis: [
 46         {
 47           type: 'category',
 48           axisTick: {
 49             alignWithLabel: true,
 50             show: false
 51           },
 52           data: parkIncome.xMonth
 53         }
 54       ],
 55       yAxis: [
 56         {
 57           type: 'value',
 58           splitLine: {
 59             show: false
 60           }
 61         }
 62       ],
 63       series: [
 64         {
 65           name: '园区年度收入',
 66           type: 'bar',
 67           barWidth: '10px',
 68           data: parkIncome.yIncome.map((item, index) => {
 69             const color =
 70               // 偶数下标的数据渲染颜色
 71               index % 2 === 0
 72                 ? new echarts.graphic.LinearGradient(0, 0, 0, 1, [
 73                     { offset: 0.23, color: '#74c0f8' },
 74                     { offset: 1, color: 'rgba(116,192,248,0.00)' }
 75                   ])
 76                 : new echarts.graphic.LinearGradient(0, 0, 0, 1, [
 77                     { offset: 0.23, color: '#ff7152' },
 78                     { offset: 1, color: 'rgba(255,113,82,0.00)' }
 79                   ])
 80             return { value: item, itemStyle: { color } }
 81           })
 82         }
 83       ],
 84       textStyle: {
 85         color: '#B4C0CC'
 86       }
 87     }
 88     // 3. 渲染图表
 89     const myBarChart = echarts.init(barChart.value)
 90     myBarChart.setOption(barOptions)
 91   }
 92   return {
 93     barChart,
 94     initBarChart
 95   }
 96 }
 97
 98 export function userInitPieChart (parkInfo) {
 99   // 渲染园区产业分布图表
100   const pieChart = ref(null)
101   const initPieChart = () => {
102     const { parkIndustry } = parkInfo.value
103     const pieOption = {
104       color: ['#00B2FF', '#2CF2FF', '#892CFF', '#FF624D', '#FFCF54', '#86ECA2'],
105       legend: {
106         itemGap: 20,
107         bottom: '0',
108         icon: 'rect',
109         itemHeight: 10, // 图例icon高度
110         itemWidth: 10, // 图例icon宽度
111         textStyle: {
112           color: '#c6d1db'
113         }
114       },
115       tooltip: {
116         trigger: 'item'
117       },
118       series: [
119         {
120           name: '园区产业分析',
121           type: 'pie',
122           radius: ['55%', '60%'], // 设置内圈与外圈的半径使其呈现为环形
123           center: ['50%', '40%'], // 圆心位置, 用于调整整个图的位置
124           tooltip: {
125             trigger: 'item',
126             formatter: params => {
127               return `${params.seriesName}</br><div style='display:flex;justify-content: space-between;'><div>${params.marker}${params.name}</div><div>${params.percent}%</div></div>`
128             }
129           },
130           label: {
131             show: false,
132             position: 'center'
133           },
134           data: parkIndustry
135         }
136       ]
137     }
138     const myPieChart = echarts.init(pieChart.value)
139     myPieChart.setOption(pieOption)
140   }
141   return {
142     pieChart,
143     initPieChart
144   }
145 }
使用mixins进行vue2中的逻辑拆分

通过将data、methods、created....抽取到一个js文件中,然后在组件中使用mixins进行混入,这样实现公共部分抽取
3D可视化部分
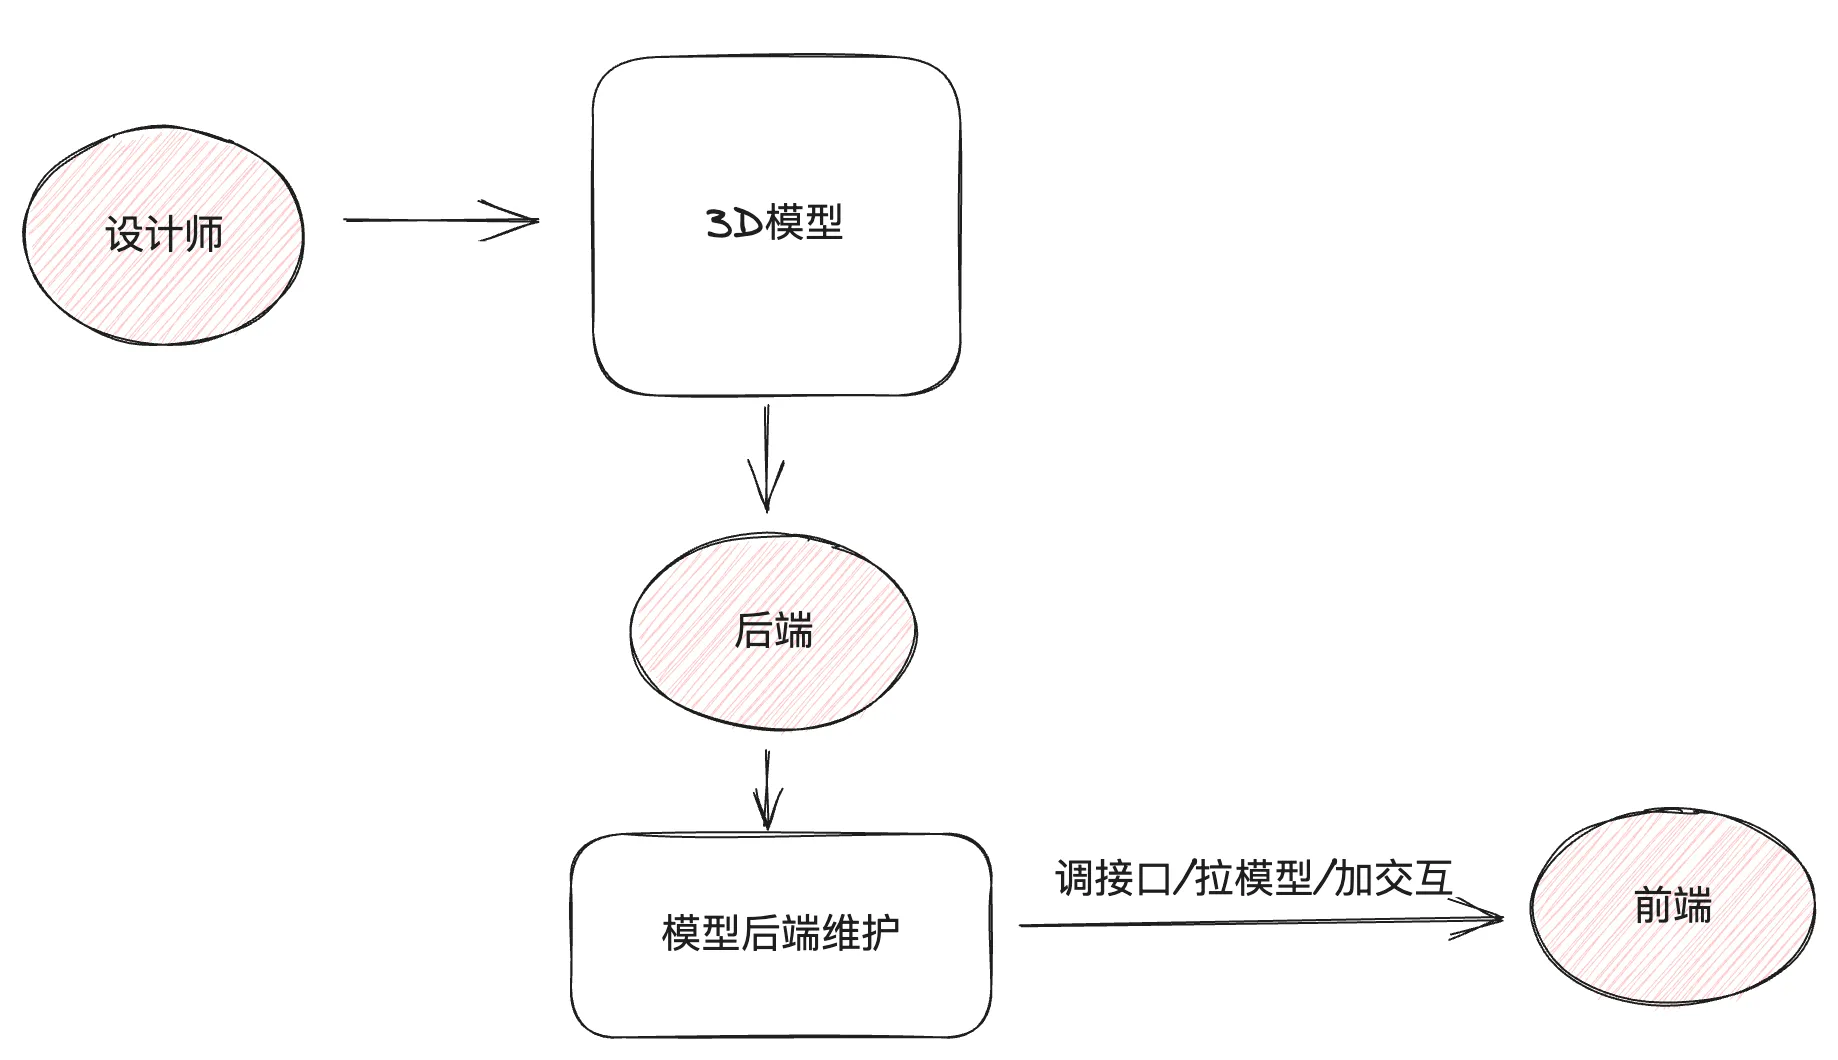
一般3D由3D建模师建好模,然后由后端提供模型的相关接口,前端通过建模师建模用到的框架,进行调用接口拉取模型渲染
1、根据建模师建模使用的建模包对应的解析包
1 npm i @splinetool/runtime // 说明:模型解析包和制作3D的软件是配套的
2、拉取模型并渲染
说明:spline实例既可以拉取模型同时拉取完毕之后会在canvas节点上渲染画布
 1 <script setup>
 2 // 导入模型解析构造函数
 3 import { Application } from '@splinetool/runtime'
 4 import { onMounted, ref } from 'vue'
 5
 6 // 初始化3d模型
 7 const ref3d = ref(null)
 8 const init3dModel = () => {
 9   // 实例化解析器实例
10   let spline = new Application(ref3d.value)
11   // 拉取模型
12   spline.load('https://fe-hmzs.itheima.net/scene.splinecode').then(() => {
13     console.log('3D模型加载并渲染完毕')
14   })
15 }
16 // dom节点渲染完毕再加载
17 onMounted(() => {
18   init3dModel()
19 })
20
21 </script>
22
23 <template>
24   <div class="model-container">
25     <!-- 准备3D渲染节点 -->
26     <canvas class="canvas-3d" ref="ref3d" />
27   </div>
28 </template>
29
30
31 <style scoped lang="scss">
32 .model-container {
33   height: 100%;
34   background-color: black;
35   width: 100%;
36   flex-shrink: 0;
37 }
38 </style>
3、完整的,2D部分和3D部分放一起
views/BigScreenView.vue
  1 <script setup>
  2 import { onMounted, ref } from 'vue'
  3 // 导入模型解析构造函数
  4 import { Application } from '@splinetool/runtime'
  5 // 使用封装的组合式函数
  6 import { useGetParkInfo, useInitBarChart, userInitPieChart } from './composables/bigscreen'
  7
  8 const { parkInfo, getParkInfo } = useGetParkInfo()
  9 const { barChart, initBarChart } = useInitBarChart(parkInfo)
 10 const { pieChart, initPieChart } = userInitPieChart(parkInfo)
 11
 12 // 初始化3d模型
 13 const ref3d = ref(null)
 14 const init3dModel = () => {
 15   // 实例化解析器实例
 16   let spline = new Application(ref3d.value)
 17   // 拉取模型
 18   spline.load('https://fe-hmzs.itheima.net/scene.splinecode').then(() => {
 19     console.log('3D模型加载并渲染完毕')
 20   })
 21 }
 22
 23 onMounted(async () => {
 24   // 因为initBarChart方法中用到了getParkInfo方法的返回值数据, 需要等待getParkInfo执行完才能执行initBarChart
 25   // 所以使用await
 26   await getParkInfo()
 27   initBarChart()
 28   initPieChart()
 29   init3dModel()
 30 })
 31 </script>
 32
 33 <template>
 34   <!-- 2D渲染区域 -->
 35   <div class="all-charts">
 36     <!-- 园区概况 -->
 37     <div class="section-one">
 38       <img class="img-header"
 39         src="https://yjy-teach-oss.oss-cn-beijing.aliyuncs.com/smartPark/%E5%A4%A7%E5%B1%8F%E5%88%87%E5%9B%BE/%E5%9B%AD%E5%8C%BA%E6%A6%82%E5%86%B5%402x.png"
 40         alt="" />
 41       <div class="icons-container">
 42         <div class="item">
 43           <div class="icons-item building-icon">
 44             <span class="number">
 45               <!--
 46                 首次渲染(后端数据没有返回)
 47                 parkInfo - {} - {}.base -> undefined -> undefined.buidingTotal
 48
 49                 二次渲染(后端数据返回之后 响应式状态发生变化 再次引起模版渲染)
 50
 51                 场景:访问一个空对象多层次的属性
 52                 解决办法:可选链?.   保证必须前面有值才会继续往后进行点运算
 53                -->
 54               <!-- 当parkInfo.base不为undefined时获取parkInfo.base中的buildingTotal -->
 55               <!-- {{ parkInfo.base && parkInfo.base.buildingTotal }} -->
 56               <!-- 简写方式 -->
 57               {{ parkInfo.base?.buildingTotal }}
 58             </span>
 59           </div>
 60           <span class="title">楼宇总数</span>
 61           <span class="unity">(栋)</span>
 62         </div>
 63         <div class="item">
 64           <div class="icons-item enterprise-icon">
 65             <span class="number">
 66               {{ parkInfo.base?.enterpriseTotal }}
 67             </span>
 68           </div>
 69           <span class="title">入驻企业总数</span>
 70           <span class="unity">(家)</span>
 71         </div>
 72         <div class="item">
 73           <div class="icons-item car-icon">
 74             <span class="number">
 75               {{ parkInfo.base?.parkingTotal }}
 76             </span>
 77           </div>
 78           <span class="title">车位总数</span>
 79           <span class="unity">(个)</span>
 80         </div>
 81         <div class="item">
 82           <div class="icons-item rod-icon">
 83             <span class="number">
 84               {{ parkInfo.base?.chargePoleTotal }}
 85             </span>
 86           </div>
 87           <span class="title">一体杆总数</span>
 88           <span class="unity">(个)</span>
 89         </div>
 90       </div>
 91     </div>
 92     <!-- 园区年度收入分析 -->
 93     <div class="section-two">
 94       <img class="img-header"
 95         src="https://yjy-teach-oss.oss-cn-beijing.aliyuncs.com/smartPark/%E5%A4%A7%E5%B1%8F%E5%88%87%E5%9B%BE/%E5%9B%AD%E5%8C%BA%E5%B9%B4%E5%BA%A6%E6%94%B6%E5%85%A5%E5%88%86%E6%9E%90%402x.png"
 96         alt="" />
 97       <div class="bar-chart-titile">
 98         <span>单位:元</span>
 99         <div>
100           <span class="bar-icon blue-bar-icon"></span>
101           <span class="bar-icon red-bar-icon"></span>
102           收入情况
103         </div>
104       </div>
105       <div class="bar-chart" ref="barChart"></div>
106     </div>
107     <!-- 园区产业分布 -->
108     <div class="section-three">
109       <img class="img-header"
110         src="https://yjy-teach-oss.oss-cn-beijing.aliyuncs.com/smartPark/%E5%A4%A7%E5%B1%8F%E5%88%87%E5%9B%BE/%E5%9B%AD%E5%8C%BA%E4%BA%A7%E4%B8%9A%E5%88%86%E5%B8%83%402x.png"
111         alt="" />
112       <div class="pie-chart" ref="pieChart"></div>
113     </div>
114   </div>
115   <!-- 3D渲染区域 -->
116   <div class="model-container">
117     <!-- 准备3D渲染节点 -->
118     <canvas class="canvas-3d" ref="ref3d" />
119   </div>
120 </template>
121 <style lang="scss" scoped>
122 .all-charts {
123   position: absolute;
124   top: 0;
125   left: 0;
126   width: 480px;
127   height: 100vh;
128   padding: 20px;
129   display: flex;
130   flex-direction: column;
131   justify-content: space-between;
132   background: linear-gradient(to left, rgba(0, 6, 15, 0.00) 0%, rgba(0, 6, 15, 0.00) 20%, rgba(0, 0, 0, 0.40) 30%, rgba(0, 0, 0, 0.60) 40%, rgba(1, 4, 11, 1) 70%, #04070d 100%);
133
134   .img-header {
135     height: 30px;
136   }
137 }
138
139 // 园区概况
140 .section-one {
141   flex-basis: 25%;
142
143   .icons-container {
144     display: flex;
145     justify-content: space-between;
146     padding: 20px 0;
147
148     .item {
149       text-align: center;
150       display: flex;
151       flex-direction: column;
152       flex: 1;
153
154       .icons-item {
155         height: 80px;
156         position: relative;
157
158         .number {
159           position: absolute;
160           left: 50%;
161           transform: translateX(-50%);
162           font-size: 18px;
163           font-family: FontquanXinYiGuanHeiTi, FontquanXinYiGuanHeiTi-Regular;
164           color: #ffffff;
165         }
166       }
167
168       .building-icon {
169         background: url('@/assets/building-icon.png') no-repeat 50% 0 / contain;
170       }
171
172       .enterprise-icon {
173         background: url('@/assets/enterprise-icon.png') no-repeat 50% 0 / contain;
174       }
175
176       .rod-icon {
177         background: url('@/assets/rod-icon.png') no-repeat 50% 0 / contain;
178       }
179
180       .car-icon {
181         background: url('@/assets/car-icon.png') no-repeat 50% 0 / contain;
182       }
183
184       .title,
185       .unity {
186         font-size: 14px;
187         color: #cdd7e1;
188       }
189
190       .title {
191         margin-top: 8px;
192       }
193     }
194   }
195 }
196
197 // 园区年度收入分析
198 .section-two {
199   flex-basis: 35%;
200   margin-top: 50px;
201
202   .bar-chart {
203     width: 100%;
204     height: calc(100% - 90px);
205   }
206 }
207
208 // 园区产业分布
209 .section-three {
210   flex-basis: 40%;
211
212   .pie-chart {
213     position: relative;
214     margin: 0 auto;
215     padding-bottom: 20px;
216     width: 80%;
217     height: calc(100% - 40px);
218   }
219 }
220
221 // 3D渲染区域
222 .model-container {
223   height: 100%;
224   background-color: black;
225   width: 100%;
226   flex-shrink: 0;
227 }
228 </style>
4、由于3D渲染的比较慢,通过添加loading
纯展示类组件,只需要设计一个参数,显示隐藏
loading prop true 显示 false 隐藏
封装loading组件
components/LoadingComponent.vue
 1 <script setup>
 2 // 接收父组件传值
 3 defineProps({
 4   loading: {
 5     type: Boolean, // 类型为Boolean
 6     default: false // 默认值为false
 7   }
 8 })
 9 </script>
10
11 <template>
12   <div v-if="loading" class="loading">
13     <p class="text">园区资源加载中…</p>
14     <div class="loading-process">
15       <div class="process-wrapper"></div>
16     </div>
17   </div>
18 </template>
19
20 <style lang="scss">
21 .loading {
22   position: absolute;
23   left: 66%;
24   top: 40%;
25   transform: translateX(-50%);
26   text-align: center;
27
28   .text {
29     font-size: 14px;
30     color: #909399;
31     margin-bottom: 16px;
32   }
33
34   .loading-process {
35     width: 280px;
36     height: 4px;
37     background: rgba(255, 255, 255, 0.16);
38     border-radius: 20px;
39     overflow: hidden;
40   }
41
42   .process-wrapper {
43     height: 100%;
44     width: 5%;
45     background: linear-gradient(90deg, #48ffff 0%, #3656ff 100%);
46     animation-duration: 1000s;
47     animation-name: loading;
48   }
49
50   @keyframes loading {
51     0% {
52       transform: scaleX(1);
53     }
54
55     1% {
56       transform: scaleX(38);
57     }
58
59     100% {
60       transform: scaleX(40);
61     }
62   }
63 }
64 </style>
父组件
views/BigScreenView.vue
  1 <script setup>
  2 import { onMounted, ref } from 'vue'
  3 // 导入模型解析构造函数
  4 import { Application } from '@splinetool/runtime'
  5 // 导入loading组件
  6 import LoadingComponent from '@/components/LoadingComponent.vue'
  7 // 使用封装的组合式函数
  8 import { useGetParkInfo, useInitBarChart, userInitPieChart } from './composables/bigscreen'
  9
 10 const { parkInfo, getParkInfo } = useGetParkInfo()
 11 const { barChart, initBarChart } = useInitBarChart(parkInfo)
 12 const { pieChart, initPieChart } = userInitPieChart(parkInfo)
 13
 14 // 调用接口拉取3d模型 渲染视图中
 15 const publisPath = 'https://fe-hmzs.itheima.net'
 16 const ref3d = ref(null)
 17 const showLoading = ref(false)
 18 const init3dModel = () => {
 19   // 开启loading
 20   showLoading.value = true
 21   // 1. 实例解析器对象(传入模型将来渲染的节点对象)
 22   const spline = new Application(ref3d.value)
 23   // 2. 使用对象load方法去拉取3大模型资源
 24   spline.load(`${publisPath}/scene.splinecode`).then(() => {
 25     showLoading.value = false
 26     // 模型渲染完毕之后后续的逻辑操作
 27     // 3. 拉取资源之后.then方法中可以做后续的逻辑操作
 28   })
 29 }
 30
 31
 32 onMounted(async () => {
 33   // 因为initBarChart方法中用到了getParkInfo方法的返回值数据, 需要等待getParkInfo执行完才能执行initBarChart
 34   // 所以使用await
 35   await getParkInfo()
 36   initBarChart()
 37   initPieChart()
 38   init3dModel()
 39 })
 40 </script>
 41
 42 <template>
 43   <!-- 2D渲染区域 -->
 44   <div class="all-charts">
 45     <!-- 园区概况 -->
 46     <div class="section-one">
 47       <img class="img-header"
 48         src="https://yjy-teach-oss.oss-cn-beijing.aliyuncs.com/smartPark/%E5%A4%A7%E5%B1%8F%E5%88%87%E5%9B%BE/%E5%9B%AD%E5%8C%BA%E6%A6%82%E5%86%B5%402x.png"
 49         alt="" />
 50       <div class="icons-container">
 51         <div class="item">
 52           <div class="icons-item building-icon">
 53             <span class="number">
 54               <!--
 55                 首次渲染(后端数据没有返回)
 56                 parkInfo - {} - {}.base -> undefined -> undefined.buidingTotal
 57
 58                 二次渲染(后端数据返回之后 响应式状态发生变化 再次引起模版渲染)
 59
 60                 场景:访问一个空对象多层次的属性
 61                 解决办法:可选链?.   保证必须前面有值才会继续往后进行点运算
 62                -->
 63               <!-- 当parkInfo.base不为undefined时获取parkInfo.base中的buildingTotal -->
 64               <!-- {{ parkInfo.base && parkInfo.base.buildingTotal }} -->
 65               <!-- 简写方式 -->
 66               {{ parkInfo.base?.buildingTotal }}
 67             </span>
 68           </div>
 69           <span class="title">楼宇总数</span>
 70           <span class="unity">(栋)</span>
 71         </div>
 72         <div class="item">
 73           <div class="icons-item enterprise-icon">
 74             <span class="number">
 75               {{ parkInfo.base?.enterpriseTotal }}
 76             </span>
 77           </div>
 78           <span class="title">入驻企业总数</span>
 79           <span class="unity">(家)</span>
 80         </div>
 81         <div class="item">
 82           <div class="icons-item car-icon">
 83             <span class="number">
 84               {{ parkInfo.base?.parkingTotal }}
 85             </span>
 86           </div>
 87           <span class="title">车位总数</span>
 88           <span class="unity">(个)</span>
 89         </div>
 90         <div class="item">
 91           <div class="icons-item rod-icon">
 92             <span class="number">
 93               {{ parkInfo.base?.chargePoleTotal }}
 94             </span>
 95           </div>
 96           <span class="title">一体杆总数</span>
 97           <span class="unity">(个)</span>
 98         </div>
 99       </div>
100     </div>
101     <!-- 园区年度收入分析 -->
102     <div class="section-two">
103       <img class="img-header"
104         src="https://yjy-teach-oss.oss-cn-beijing.aliyuncs.com/smartPark/%E5%A4%A7%E5%B1%8F%E5%88%87%E5%9B%BE/%E5%9B%AD%E5%8C%BA%E5%B9%B4%E5%BA%A6%E6%94%B6%E5%85%A5%E5%88%86%E6%9E%90%402x.png"
105         alt="" />
106       <div class="bar-chart-titile">
107         <span>单位:元</span>
108         <div>
109           <span class="bar-icon blue-bar-icon"></span>
110           <span class="bar-icon red-bar-icon"></span>
111           收入情况
112         </div>
113       </div>
114       <div class="bar-chart" ref="barChart"></div>
115     </div>
116     <!-- 园区产业分布 -->
117     <div class="section-three">
118       <img class="img-header"
119         src="https://yjy-teach-oss.oss-cn-beijing.aliyuncs.com/smartPark/%E5%A4%A7%E5%B1%8F%E5%88%87%E5%9B%BE/%E5%9B%AD%E5%8C%BA%E4%BA%A7%E4%B8%9A%E5%88%86%E5%B8%83%402x.png"
120         alt="" />
121       <div class="pie-chart" ref="pieChart"></div>
122     </div>
123   </div>
124   <!-- 3D渲染区域 -->
125   <div class="model-container">
126     <!-- 添加进度条组件 -->
127     <LoadingComponent :loading="showLoading" />
128     <!-- 准备3D渲染节点 -->
129     <canvas class="canvas-3d" ref="ref3d" />
130   </div>
131 </template>
132 <style lang="scss" scoped>
133 .all-charts {
134   position: absolute;
135   top: 0;
136   left: 0;
137   width: 480px;
138   height: 100vh;
139   padding: 20px;
140   display: flex;
141   flex-direction: column;
142   justify-content: space-between;
143   background: linear-gradient(to left, rgba(0, 6, 15, 0.00) 0%, rgba(0, 6, 15, 0.00) 20%, rgba(0, 0, 0, 0.40) 30%, rgba(0, 0, 0, 0.60) 40%, rgba(1, 4, 11, 1) 70%, #04070d 100%);
144
145   .img-header {
146     height: 30px;
147   }
148 }
149
150 // 园区概况
151 .section-one {
152   flex-basis: 25%;
153
154   .icons-container {
155     display: flex;
156     justify-content: space-between;
157     padding: 20px 0;
158
159     .item {
160       text-align: center;
161       display: flex;
162       flex-direction: column;
163       flex: 1;
164
165       .icons-item {
166         height: 80px;
167         position: relative;
168
169         .number {
170           position: absolute;
171           left: 50%;
172           transform: translateX(-50%);
173           font-size: 18px;
174           font-family: FontquanXinYiGuanHeiTi, FontquanXinYiGuanHeiTi-Regular;
175           color: #ffffff;
176         }
177       }
178
179       .building-icon {
180         background: url('@/assets/building-icon.png') no-repeat 50% 0 / contain;
181       }
182
183       .enterprise-icon {
184         background: url('@/assets/enterprise-icon.png') no-repeat 50% 0 / contain;
185       }
186
187       .rod-icon {
188         background: url('@/assets/rod-icon.png') no-repeat 50% 0 / contain;
189       }
190
191       .car-icon {
192         background: url('@/assets/car-icon.png') no-repeat 50% 0 / contain;
193       }
194
195       .title,
196       .unity {
197         font-size: 14px;
198         color: #cdd7e1;
199       }
200
201       .title {
202         margin-top: 8px;
203       }
204     }
205   }
206 }
207
208 // 园区年度收入分析
209 .section-two {
210   flex-basis: 35%;
211   margin-top: 50px;
212
213   .bar-chart {
214     width: 100%;
215     height: calc(100% - 90px);
216   }
217 }
218
219 // 园区产业分布
220 .section-three {
221   flex-basis: 40%;
222
223   .pie-chart {
224     position: relative;
225     margin: 0 auto;
226     padding-bottom: 20px;
227     width: 80%;
228     height: calc(100% - 40px);
229   }
230 }
231
232 // 3D渲染区域
233 .model-container {
234   height: 100%;
235   background-color: black;
236   width: 100%;
237   flex-shrink: 0;
238 }
239 </style>
大屏适配
需求: 适配几个固定的设备 要求在一个主屏上完美适配最贴合UI设计稿,其它少量的设备上,保证正常的浏览显示没有问题
缩放方案:接入难度非常小 效果中上
1、安装组件
1 npm i v-scale-screen
2、使用组件并指定高亮
注:以 1920 * 1080 为标准尺寸比
1 <v-scale-screen width="1920" height="1080">
2    主体内容盒子
3 </v-scale-screen>
3、组件中使用
views/BigScreenView.vue
  1 <script setup>
  2 import { onMounted, ref } from 'vue'
  3 // 导入大屏自适应组件
  4 import VScaleScreen from 'v-scale-screen'   // 在setup中, 可以省略注册的过程
  5 // 导入模型解析构造函数
  6 import { Application } from '@splinetool/runtime'
  7 // 导入loading组件
  8 import LoadingComponent from '@/components/LoadingComponent.vue'
  9 // 使用封装的组合式函数
 10 import { useGetParkInfo, useInitBarChart, userInitPieChart } from './composables/bigscreen'
 11
 12 const { parkInfo, getParkInfo } = useGetParkInfo()
 13 const { barChart, initBarChart } = useInitBarChart(parkInfo)
 14 const { pieChart, initPieChart } = userInitPieChart(parkInfo)
 15
 16 // 调用接口拉取3d模型 渲染视图中
 17 const publisPath = 'https://fe-hmzs.itheima.net'
 18 const ref3d = ref(null)
 19 const showLoading = ref(false)
 20 const init3dModel = () => {
 21   // 开启loading
 22   showLoading.value = true
 23   // 1. 实例解析器对象(传入模型将来渲染的节点对象)
 24   const spline = new Application(ref3d.value)
 25   // 2. 使用对象load方法去拉取3大模型资源
 26   spline.load(`${publisPath}/scene.splinecode`).then(() => {
 27     showLoading.value = false
 28     // 模型渲染完毕之后后续的逻辑操作
 29     // 3. 拉取资源之后.then方法中可以做后续的逻辑操作
 30   })
 31 }
 32
 33 onMounted(async () => {
 34   // 因为initBarChart方法中用到了getParkInfo方法的返回值数据, 需要等待getParkInfo执行完才能执行initBarChart
 35   // 所以使用await
 36   await getParkInfo()
 37   initBarChart()
 38   initPieChart()
 39   init3dModel()
 40 })
 41 </script>
 42
 43 <template>
 44   <v-scale-screen width="1920" height="1080" fullScreen="true">
 45     <!-- 2D渲染区域 -->
 46     <div class="all-charts">
 47       <!-- 园区概况 -->
 48       <div class="section-one">
 49         <img class="img-header"
 50           src="https://yjy-teach-oss.oss-cn-beijing.aliyuncs.com/smartPark/%E5%A4%A7%E5%B1%8F%E5%88%87%E5%9B%BE/%E5%9B%AD%E5%8C%BA%E6%A6%82%E5%86%B5%402x.png"
 51           alt="" />
 52         <div class="icons-container">
 53           <div class="item">
 54             <div class="icons-item building-icon">
 55               <span class="number">
 56                 <!--
 57                 首次渲染(后端数据没有返回)
 58                 parkInfo - {} - {}.base -> undefined -> undefined.buidingTotal
 59
 60                 二次渲染(后端数据返回之后 响应式状态发生变化 再次引起模版渲染)
 61
 62                 场景:访问一个空对象多层次的属性
 63                 解决办法:可选链?.   保证必须前面有值才会继续往后进行点运算
 64                -->
 65                 <!-- 当parkInfo.base不为undefined时获取parkInfo.base中的buildingTotal -->
 66                 <!-- {{ parkInfo.base && parkInfo.base.buildingTotal }} -->
 67                 <!-- 简写方式 -->
 68                 {{ parkInfo.base?.buildingTotal }}
 69               </span>
 70             </div>
 71             <span class="title">楼宇总数</span>
 72             <span class="unity">(栋)</span>
 73           </div>
 74           <div class="item">
 75             <div class="icons-item enterprise-icon">
 76               <span class="number">
 77                 {{ parkInfo.base?.enterpriseTotal }}
 78               </span>
 79             </div>
 80             <span class="title">入驻企业总数</span>
 81             <span class="unity">(家)</span>
 82           </div>
 83           <div class="item">
 84             <div class="icons-item car-icon">
 85               <span class="number">
 86                 {{ parkInfo.base?.parkingTotal }}
 87               </span>
 88             </div>
 89             <span class="title">车位总数</span>
 90             <span class="unity">(个)</span>
 91           </div>
 92           <div class="item">
 93             <div class="icons-item rod-icon">
 94               <span class="number">
 95                 {{ parkInfo.base?.chargePoleTotal }}
 96               </span>
 97             </div>
 98             <span class="title">一体杆总数</span>
 99             <span class="unity">(个)</span>
100           </div>
101         </div>
102       </div>
103       <!-- 园区年度收入分析 -->
104       <div class="section-two">
105         <img class="img-header"
106           src="https://yjy-teach-oss.oss-cn-beijing.aliyuncs.com/smartPark/%E5%A4%A7%E5%B1%8F%E5%88%87%E5%9B%BE/%E5%9B%AD%E5%8C%BA%E5%B9%B4%E5%BA%A6%E6%94%B6%E5%85%A5%E5%88%86%E6%9E%90%402x.png"
107           alt="" />
108         <div class="bar-chart-titile">
109           <span>单位:元</span>
110           <div>
111             <span class="bar-icon blue-bar-icon"></span>
112             <span class="bar-icon red-bar-icon"></span>
113             收入情况
114           </div>
115         </div>
116         <div class="bar-chart" ref="barChart"></div>
117       </div>
118       <!-- 园区产业分布 -->
119       <div class="section-three">
120         <img class="img-header"
121           src="https://yjy-teach-oss.oss-cn-beijing.aliyuncs.com/smartPark/%E5%A4%A7%E5%B1%8F%E5%88%87%E5%9B%BE/%E5%9B%AD%E5%8C%BA%E4%BA%A7%E4%B8%9A%E5%88%86%E5%B8%83%402x.png"
122           alt="" />
123         <div class="pie-chart" ref="pieChart"></div>
124       </div>
125     </div>
126     <!-- 3D渲染区域 -->
127     <div class="model-container">
128       <!-- 添加进度条组件 -->
129       <LoadingComponent :loading="showLoading" />
130       <!-- 准备3D渲染节点 -->
131       <canvas class="canvas-3d" ref="ref3d" />
132     </div>
133   </v-scale-screen>
134 </template>
135 <style lang="scss" scoped>
136 .all-charts {
137   position: absolute;
138   top: 0;
139   left: 0;
140   width: 480px;
141   height: 100vh;
142   padding: 20px;
143   display: flex;
144   flex-direction: column;
145   justify-content: space-between;
146   background: linear-gradient(to left, rgba(0, 6, 15, 0.00) 0%, rgba(0, 6, 15, 0.00) 20%, rgba(0, 0, 0, 0.40) 30%, rgba(0, 0, 0, 0.60) 40%, rgba(1, 4, 11, 1) 70%, #04070d 100%);
147
148   .img-header {
149     height: 30px;
150   }
151
152   // 园区概况
153   .section-one {
154     flex-basis: 25%;
155
156     .icons-container {
157       display: flex;
158       justify-content: space-between;
159       padding: 20px 0;
160
161       .item {
162         text-align: center;
163         display: flex;
164         flex-direction: column;
165         flex: 1;
166
167         .icons-item {
168           height: 80px;
169           position: relative;
170
171           .number {
172             position: absolute;
173             left: 50%;
174             transform: translateX(-50%);
175             font-size: 18px;
176             font-family: FontquanXinYiGuanHeiTi, FontquanXinYiGuanHeiTi-Regular;
177             color: #ffffff;
178           }
179         }
180
181         .building-icon {
182           background: url('@/assets/building-icon.png') no-repeat 50% 0 / contain;
183         }
184
185         .enterprise-icon {
186           background: url('@/assets/enterprise-icon.png') no-repeat 50% 0 / contain;
187         }
188
189         .rod-icon {
190           background: url('@/assets/rod-icon.png') no-repeat 50% 0 / contain;
191         }
192
193         .car-icon {
194           background: url('@/assets/car-icon.png') no-repeat 50% 0 / contain;
195         }
196
197         .title,
198         .unity {
199           font-size: 14px;
200           color: #cdd7e1;
201         }
202
203         .title {
204           margin-top: 8px;
205         }
206       }
207     }
208   }
209
210   // 园区年度收入分析
211   .section-two {
212     flex-basis: 35%;
213     margin-top: 50px;
214
215     .bar-chart {
216       width: 100%;
217       height: calc(100% - 90px);
218     }
219   }
220
221   // 园区产业分布
222   .section-three {
223     flex-basis: 40%;
224
225     .pie-chart {
226       position: relative;
227       margin: 0 auto;
228       padding-bottom: 20px;
229       width: 80%;
230       height: calc(100% - 40px);
231     }
232   }
233 }
234
235
236 // 3D渲染区域
237 .model-container {
238   height: 100%;
239   background-color: black;
240   width: 100%;
241   flex-shrink: 0;
242 }
243 </style>
微前端-乾坤
官方地址:https://qiankun.umijs.org/zh/guide/getting-started
在主应用中配置接入其他前端技术栈的项目,实现微前端,应用的拆分,多技术栈应用的整合
1、安装qiankun
1 // npm方式安装
2 npm i qiankun -S
3 // yarn 方式安装
4 yarn add qiankun
2、在主应用中添加qiankun的配置文件
src/registerMicroApp.js
 1 // 注册子应用
 2 import { registerMicroApps, start } from 'qiankun'
 3
 4 // 适配子应用在开发和上线两套环境下的加载地址
 5 const isDev = process.env.NODE_ENV === 'development'
 6
 7 registerMicroApps([
 8   {
 9     name: 'big-screen', // 子应用的名字 可以随便取
10     entry: `${isDev ? '//localhost:5173' : '//localhost:8089'}`, // 子项目启动之后的访问地址[地址中没有写协议表示跟当前项目的协议保持一致]
11     container: '#bigContainer', // 子应用渲染到哪个dom结构中
12     activeRule: '/big-screen'
13     // 激活路由 url访问哪个路由地址 去加载子应用  和原本子应用的路由path保持一致
14   }
15 ])
16
17 start()
3、在main.js中导入
1 // 导入乾坤配置-微前端配置
2 import './registerMicroApp'
4、在根组件App.vue中添加挂载点
 1 <template>
 2   <div id="app">
 3     <!-- 一级路由渲染出来 -->
 4     <router-view />
 5     <!-- 为微应用准备一个挂载子应用的节点 -->
 6     <div id="bigContainer"></div>
 7   </div>
 8 </template>
 9
10 <script>
11 export default {
12   name: 'App'
13 }
14 </script>
5、在子应用大屏项目中增加配置
说明: qiankun默认不支持vite项目作为子应用,需要借助
vite-qiankun插件进行支持
下载依赖
1 npm i vite-plugin-qiankun -D
修改vite.config.js
 1 import { fileURLToPath, URL } from 'node:url'
 2 import { defineConfig } from 'vite'
 3 import vue from '@vitejs/plugin-vue'
 4 // 1、导入qiankun
 5 import qiankun from 'vite-plugin-qiankun'
 6
 7 // 2、配置qiankun
 8 export default defineConfig({
 9   plugins: [
10     vue(),
11     qiankun(
12       // 参数1: 子应用的名字, 需要和主应用配置的名字保持一致
13       'big-screen',
14       {
15         useDevMode: true
16       }
17     )
18   ],
19   server: {
20     // 子应用中assets中存在很多静态资源, 如果不配置origin, 那么加载静态资源的时候, 会以主应用的域名和端口来加载
21     // 防止开发阶段的assets静态资源加载问题
22     origin: '//localhost:5173'
23   },
24   resolve: {
25     alias: {
26       '@': fileURLToPath(new URL('./src', import.meta.url))
27     }
28   }
29 })
修改main.js
使用qiankun相关的函数来渲染和包裹vue实例的创建
 1 import { createApp } from 'vue'
 2 import App from './App.vue'
 3 import router from './router'
 4 // 1、导入vite-plugin-qiankun相关函数
 5 import {
 6   renderWithQiankun,
 7   qiankunWindow
 8 } from 'vite-plugin-qiankun/dist/helper'
 9
10 // 导入公共样式
11 import './styles/common.scss'
12
13 // 2、去掉默认创建方式
14 // const app = createApp(App)
15 // app.use(router)
16 // app.mount('#app')
17
18 // 3、使用乾坤渲染
19 renderWithQiankun({
20   // 挂载时的生命周期钩子函数
21   mount (props) {
22     console.log('mount')
23     render(props)
24   },
25   bootstrap () {
26     console.log('bootstrap')
27   },
28   unmount (props) {
29     console.log('unmount', props)
30   }
31 })
32
33 if (!qiankunWindow.__POWERED_BY_QIANKUN__) {
34   render({})
35 }
36
37 function render (props = {}) {
38   const { container } = props
39   const app = createApp(App)
40   app.use(router)
41   app.mount(container ? container.querySelector('#app') : '#app')
42 }
微前端-无界
无界微前端方案基于 WebComponent 容器 + iframe 沙箱
能够完善的解决适配成本、样式隔离、运行性能、页面白屏、子应用通信、子应用保活、多应用激活、vite 框架支持、应用共享等
1、安装组件,vue2
1 npm i wujie-vue2 // 主应用是vue2 所以下载vue2组件
2、注册
在main.js中添加如下内容
1 import WujieVue from 'wujie-vue2'
2
3 Vue.use(WujieVue)
3、在主应用中配置 主应用配置(Vue2后台管理)
思路:
- WujieVue组件通过url地址对子应用进行载入,url直接配置子应用的地址
- 设计一个路由地址,以当前路由地址作为判断条件,如果当前路由为
big-screen就让WujieVue开始渲染
 1 <template>
 2   <div id="app">
 3     <router-view v-if="!showMicroApp" />
 4     <!-- 子应用挂载节点 -->
 5     <WujieVue v-else width="100%" height="100%" name="bigscreen" :url="url" />
 6   </div>
 7 </template>
 8
 9 <script>
10 export default {
11   name: 'App',
12   data() {
13     return {
14       url: 'http://localhost:5173/big-screen' // 子应用服务地址
15     }
16   },
17   computed: {
18     showMicroApp() {
19       return this.$route.path === '/big-screen'
20     }
21   }
22 }
23 </script>
4、子应用中vite.config.js配置如下 子应用配置(Vue3大屏项目)
 1 import { fileURLToPath, URL } from 'node:url'
 2
 3 import { defineConfig } from 'vite'
 4 import vue from '@vitejs/plugin-vue'
 5
 6 // https://vitejs.dev/config/
 7 export default defineConfig({
 8   plugins: [vue()],
 9   server: {
10     // 防止开发阶段的assets 静态资源加载问题
11     origin: '//localhost:5173'
12   },
13   resolve: {
14     alias: {
15       '@': fileURLToPath(new URL('./src', import.meta.url))
16     }
17   }
18 })

 浙公网安备 33010602011771号