设置系统网络代理
前言
一直对charles这种代理工具的怎么实现代理挺好奇,于是查了一下怎么给操作系统设置代理
设置mac的网络代理服务器
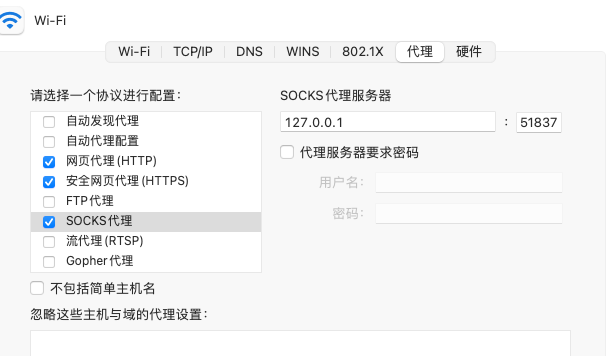
下面是设置Wi-Fi网络服务的代理服务器,分别设置网页代理、安全网页代理、socks代理。使用nodejs调用系统命令networksetup来设置。
const { exec } = require("child_process");

// // 设置代理服务器和端口
const proxyServer = "127.0.0.1";
const proxyPort = "8689";

// 设置 HTTP 代理
exec(
  `networksetup -setwebproxy Wi-Fi ${proxyServer} ${proxyPort}`,
  (error, stdout, stderr) => {
    if (error) {
      console.error(`Error setting HTTP proxy: ${error}`);
    } else {
      console.log("HTTP proxy set successfully");
    }
  }
);

// 设置 HTTPS 代理
exec(
  `networksetup -setsecurewebproxy Wi-Fi ${proxyServer} ${proxyPort}`,
  (error, stdout, stderr) => {
    if (error) {
      console.error(`Error setting HTTPS proxy: ${error}`);
    } else {
      console.log("HTTPS proxy set successfully");
    }
  }
);

exec(
  `networksetup -setsocksfirewallproxy Wi-Fi ${proxyServer} 51837`,
  (error, stdout, stderr) => {
    if (error) {
      console.error(`Error setting SOCKS proxy: ${error}`);
    } else {
      console.log("SOCKS proxy set successfully");
    }
  }
);

// 启用 SOCKS 代理
exec(
  `networksetup -setsocksfirewallproxystate Wi-Fi off`,
  (error, stdout, stderr) => {
    if (error) {
      console.error(`Error enabling SOCKS proxy: ${error}`);
    } else {
      console.log("SOCKS proxy enabled successfully");
    }
  }
);
设置完之后,mac网络中的配置会变成如下:

设置windows的网络代理服务器
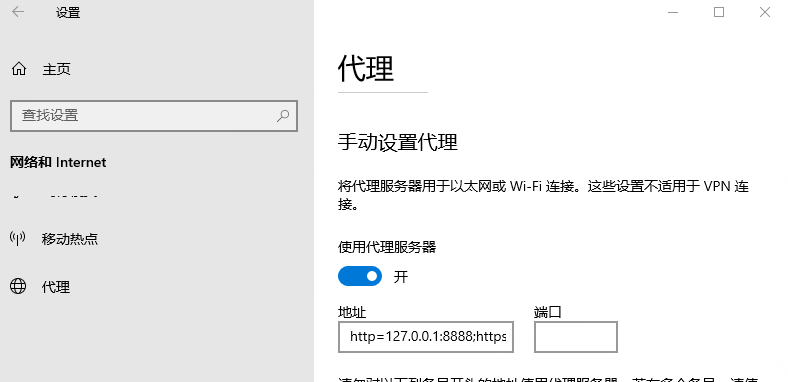
目前找到的方案是:修改注册表。在windows中使用bat文件修改注册表。
@echo off
title 自动清空代理服务器

echo 正在清空代理服务器设置……
reg add "HKCU\Software\Microsoft\Windows\CurrentVersion\Internet Settings" /v ProxyEnable /t REG_DWORD /d 0 /f
reg add "HKCU\Software\Microsoft\Windows\CurrentVersion\Internet Settings" /v ProxyServer /d "" /f
echo 代理服务器设置已经清空

echo 设置完毕
@echo off
title 自动设置代理服务器

echo 正在设置代理服务器……
reg add "HKCU\Software\Microsoft\Windows\CurrentVersion\Internet Settings" /v ProxyEnable /t REG_DWORD /d 1 /f
reg add "HKCU\Software\Microsoft\Windows\CurrentVersion\Internet Settings" /v ProxyServer /d "192.168.1.1:8080" /f

echo 设置完毕
设置完之后,HKEY_CURRENT_USER\SOFTWARE\Microsoft\Windows\CurrentVersion\Internet Settings下会多两个配置ProxyEnable ProxyServer
同时网络代理设置里会增加代理配置

linux设置代理
比较简单,只需要修改两个环境变量即可
export http_proxy=http://proxy.example.com:8080
export https_proxy=http://proxy.example.com:8080

// 如果需要认证
export http_proxy=http://username:password@proxy.example.com:8080
export https_proxy=http://username:password@proxy.example.com:8080

// 并且如果已经设置,可以通过下面的命令来查看
echo $http_proxy
echo $https_proxy


 浙公网安备 33010602011771号