
week3-第三周作业keepalived
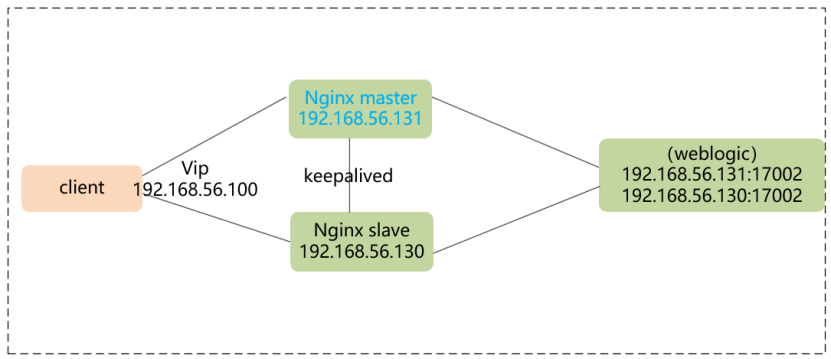
1. 环境及拓扑
1.1环境
虚拟机中最小化安装centos6.5 x64,网络选择桥接本地网卡。环境如下:
|
软件 |
版本 |
用途 |
|
Linux操作系统 |
CentOS release 6.5(Final)64bit |
操作系统 |
|
Weblogic中间件 |
Weblogic10.3.6 |
应用中间件 |
|
Nginx反向代理服务器 |
nginx-1.16.0.tar.gz |
反向代理 |
|
pcre |
pcre-8.43.tar.gz |
支持Nginx地址重写 |
|
keepalived |
Keepalived-1.2.7 |
故障转移 |
|
gzip |
zlib-1.2.11.tar.gz |
页面压缩 |
|
openssl |
openssl-1.0.1c.tar.gz |
https安全支持组件 |
1.2 拓扑
拓扑结构如下图所示:
2 Nginx安装配置
2.1创建用户组和用户
groupadd nginx
useradd -g nginx -m nginx
echo Wuzi@123|passwd nginx --stdin
2.2pcre安装
tar -zxvf pcre-8.43.tar.gz
cd pcre-8.43
./configure
make
make install
2.3zlib安装
tar -zxvf zlib-1.2.11.tar.gz
cd zlib-1.2.11
./configure
make
make install
2.4openssl 安装
tar –zxvf openssl-1.0.1c.tar.gz
cd openssl-1.0.1c
./config
make
make install
3.nginx编译安装
[root@hdp-02 local]# tar -zxvf nginx-1.16.0.tar.gz
[root@hdp-02 local]# cd nginx-1.16.0
[root@hdp-02 nginx-1.16.0]# ./configure --prefix=/usr/local/nginx \
--user=nginx \
--group=nginx \
--with-zlib=/data/zlib-1.2.11 \
--with-pcre=/data/pcre-8.43 \
--with-http_stub_status_module \
--with-http_ssl_module
[root@hdp-02 nginx-1.16.0]#make
[root@hdp-02 nginx-1.16.0]#make install
make[1]: Leaving directory `/usr/local/nginx-1.16.0'
[root@hdp-02 nginx-1.16.0]#
启动nginx是否正常:
[root@hdp-02 sbin]# cd /usr/local/nginx/sbin/
[root@hdp-02 sbin]# ./nginx
[root@hdp-02 sbin]# ps -ef|grep nginx
root 15995 1 0 02:21 ? 00:00:00 nginx: master process ./nginx
nginx 15996 15995 0 02:21 ? 00:00:00 nginx: worker process
root 15998 9447 0 02:21 pts/1 00:00:00 grep nginx
在2台虚拟机上均安装nginx 和keepalived。
4 keepalived安装
[root@hdp-03 data]# tar -zxvf keepalived-1.2.7.tar.gz
[root@hdp-03 data]# cd keepalived-1.2.7
[root@hdp-03 keepalived-1.2.7]# ./configure --prefix=/usr/local/keepalived
遇到错误提示:configure: error: Popt libraries is required
这个错误是因为没有安装popt的开发包导致的,解决方法也很简单,只要yum install popt-devel 就可以安装好popt的开发包了。
重新./configure
[root@master sbin]#make && make install
cp /usr/local/keepalived/sbin/keepalived /usr/sbin/
#复制keepalived启动文件到默认路径,也可以通过设置环境变量的path实现
cp /usr/local/keepalived/etc/rc.d/init.d/keepalived /etc/init.d/
#复制服务启动脚本到,以便可以通过service控制keepalived服务
cp /usr/local/keepalived/etc/sysconfig/keepalived /etc/sysconfig/
#复制keepalived服务脚本到默认的地址,也通过修改init.d/keepalived文件中的相应配置实现
mkdir -p /etc/keepalived/
cp /usr/local/keepalived/etc/keepalived/keepalived.conf /etc/keepalived/
测试启动keepalived:
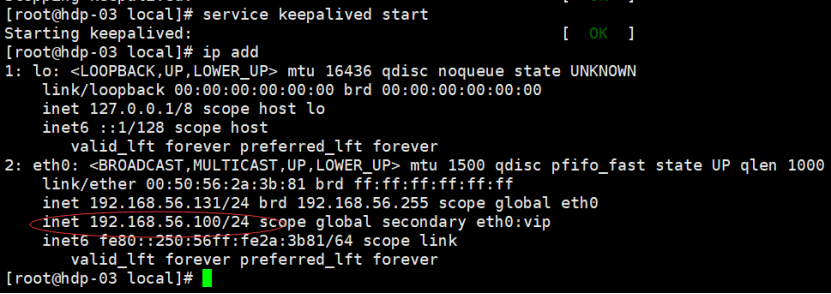
[root@hdp-02 keepalived-1.2.7]# service keepalived start
Starting keepalived: [ OK ]
[root@hdp-02 keepalived-1.2.7]# service keepalived stop
Stopping keepalived: [ OK ]
5.master服务器keepalived配置
[root@master keepalived-1.2.7]# vi /etc/keepalived/keepalived.conf
! Configuration File for keepalived
global_defs {
notification_email {
acassen@firewall.loc
failover@firewall.loc
sysadmin@firewall.loc
}
notification_email_from Alexandre.Cassen@firewall.loc
smtp_server 192.168.200.1
smtp_connect_timeout 30
router_id node1 ##节点名称
}
##监控nginx脚本
vrrp_script chk_nginx{
script "/usr/local/keepalived/nginx.sh"
interval 3
weight 2
}
vrrp_instance VI_1 {
state MASTER ##主节点
interface eth0 ##keepalived通信接口
virtual_router_id 51 ##路由标示
priority 100 ##优先级
advert_int 1 ##通知间隔
authentication {
auth_type PASS
auth_pass 1111 ##验证密码
}
track_script { ##执行监控脚本
chk_nginx
}
virtual_ipaddress {
192.168.56.100/24 dev eth0 label eth0:vip ##VIP可设多个
}
}
nginx监控脚本:
[root@master keepalived-1.2.7]# cd /usr/local/keepalived/
[root@master keepalived]# cat nginx.sh
#!/bin/bash
A=`ps -C nginx --no-header |wc -l`
if [ $A -eq 0 ];then
/usr/local/nginx/sbin/nginx
sleep 3
if [ `ps -C nginx --no-header |wc -l` -eq 0 ];then
killall keepalived
fi
fi
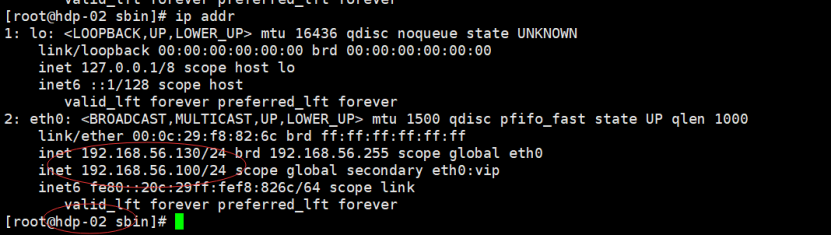
检测验证VIP 192.168.56.100/24 已经绑定到master 的eth0
6 slave服务器keepalived配置
[root@slave keepalived]# cat keepalived.conf
! Configuration File for keepalived
global_defs {
notification_email {
acassen@firewall.loc
failover@firewall.loc
sysadmin@firewall.loc
}
notification_email_from Alexandre.Cassen@firewall.loc
smtp_server 192.168.200.1
smtp_connect_timeout 30
router_id node2 ##节点名称
}
vrrp_script chk_nginx
{ ###监控nginx的脚本
script "/usr/local/keepalived/nginx.sh"
interval 3
weight 2
}
vrrp_instance VI_1 {
state BACKUP ###备用节点
interface eth0 ##同master
virtual_router_id 51 ##同master
priority 80 ##优先级小于master
advert_int 1 ##同master
authentication {
auth_type PASS
auth_pass 1111 ###同master
}
track_script { ##监控脚本执行
chk_nginx
}
virtual_ipaddress { ##VIP同master
192.168.56.100/24 dev eth0 label eth0:vip
}
}
7.master服务器nginx配置
[root@hdp-03 sbin]# cat /usr/local/nginx/conf/nginx.conf|grep -v '#'|grep -v '^$'
worker_processes 1;
events {
worker_connections 1024;
}
http {
include mime.types;
default_type application/octet-stream;
sendfile on;
keepalive_timeout 65;
server {
listen 80;
server_name 192.168.56.100;
location /TestWas {
proxy_redirect off;
proxy_set_header Host $host;
proxy_set_header X-Real-IP $remote_addr;
proxy_set_header X-Forwarded-For $proxy_add_x_forwarded_for;
proxy_pass http://test;
}
error_page 500 502 503 504 /50x.html;
location = /50x.html {
root html;
}
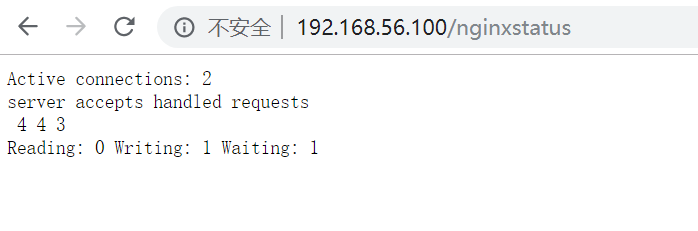
location /nginxstatus {
stub_status on;
access_log on;
auth_basic "NginxStatus";
}
}
upstream test
{
Ip_hash;
server 192.168.56.131:17002;
server 192.168.56.130:17002;
}
}
[root@hdp-03 sbin]#
监听vip 192.168.56.100的80 端口,通过location 的上下文 TestWas,代理到后端的upstream里的realserver。
8.salve服务器nginx配置
[root@hdp-02 sbin]# cat /usr/local/nginx/conf/nginx.conf|grep -v '#'|grep -v '^$'
worker_processes 1;
events {
worker_connections 1024;
}
http {
include mime.types;
default_type application/octet-stream;
sendfile on;
keepalive_timeout 65;
server {
listen 80;
server_name 192.168.56.100;
location /TestWas
{
proxy_redirect off;
proxy_set_header Host $host;
proxy_set_header X-Real-IP $remote_addr;
proxy_set_header X-Forwarded-For $proxy_add_x_forwarded_for;
proxy_pass http://test;
}
error_page 500 502 503 504 /50x.html;
location = /50x.html {
root html;
}
location /nginxstatus {
stub_status on;
access_log on;
auth_basic "NginxStatus";
}
}
upstream test
{
server 192.168.56.131:17002;
server 192.168.56.130:17002;
}
}
[root@hdp-02 sbin]#
9 测试
分别启动master和slave上的nginx和keepalived服务,以及weblogic服务。
通过vip 192.168.56.100和nginx里配置的nginx状态检测的上下文nginxstatus检测nginx 状态。

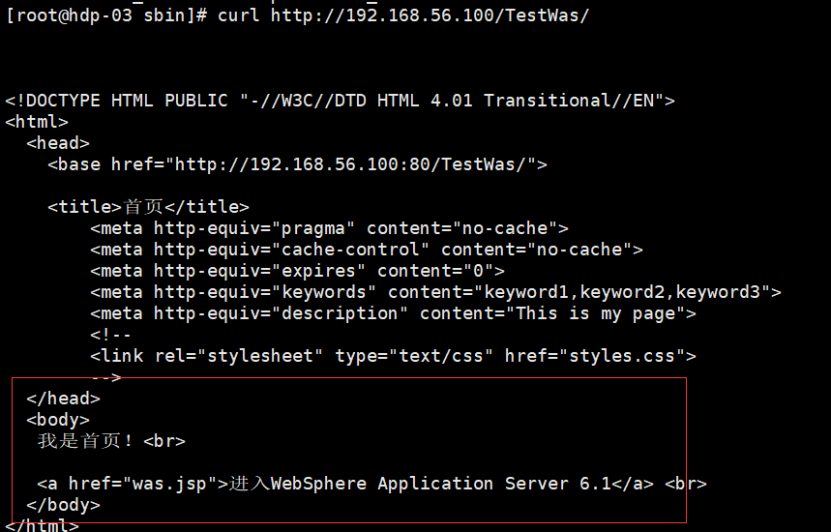
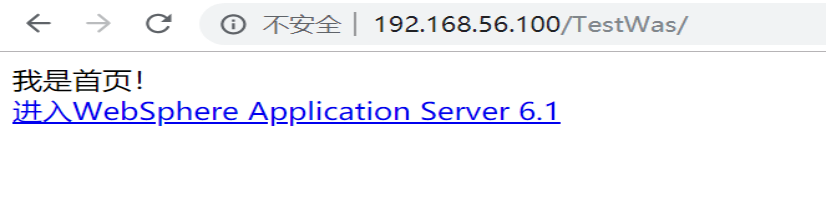
在客户端通过VIP进行访问http://192.168.56.100/TestWas,能够正常访问

将master的keepalived停掉在测试访问http://192.168.56.100/TestWas 是否正常访问。
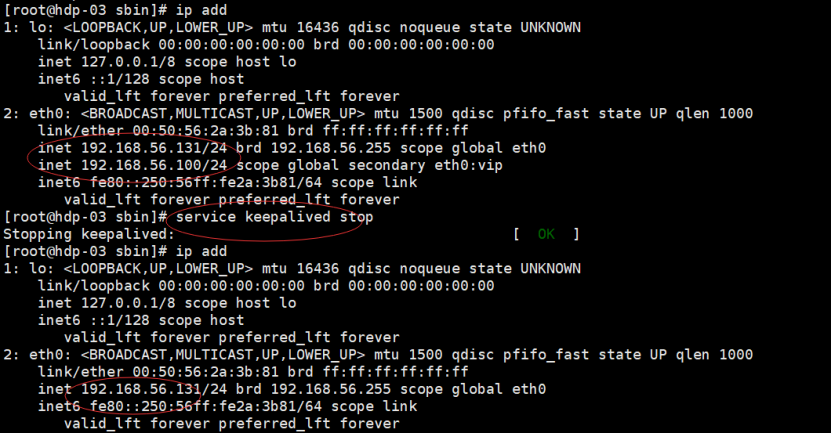
此时slave服务器接管nginx服务,此时VIP飘移到slave服务器上
验证VIP能否正常访问页面:
再将master服务器上的keepalived重启,测试访问http://192.168.56.100/ TestWas

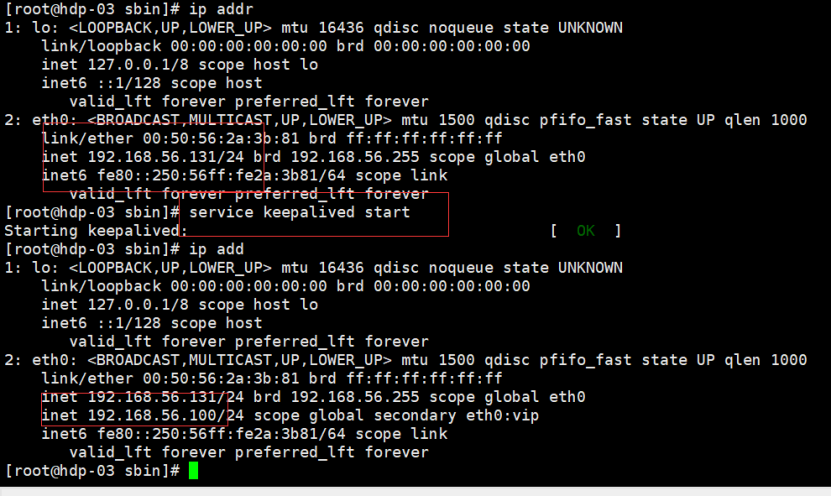
此时的VIP又重新回到master服务器上,因为master 上的keepalived 权重100,slave 上的keepalived 权重80。


【推荐】国内首个AI IDE,深度理解中文开发场景,立即下载体验Trae
【推荐】编程新体验,更懂你的AI,立即体验豆包MarsCode编程助手
【推荐】抖音旗下AI助手豆包,你的智能百科全书,全免费不限次数
【推荐】轻量又高性能的 SSH 工具 IShell:AI 加持,快人一步
· 25岁的心里话
· 闲置电脑爆改个人服务器(超详细) #公网映射 #Vmware虚拟网络编辑器
· 零经验选手,Compose 一天开发一款小游戏!
· 因为Apifox不支持离线,我果断选择了Apipost!
· 通过 API 将Deepseek响应流式内容输出到前端