接口自动化(一) Pytest单元测试框架基础
一、pytest简介
1.pytest是一个韭常成熟的python的单元测试框絮,比unittest更灵活,容易上手。
2.pytest可以和selenium,requests,appium结合实现web自动化,接囗自动化,app自动化。
3.pytest可以实现测试用例的跳过以及reruns失败用例重试。
4.pytest可以和allure生成非常美观的测试报告。
5.pytest可以和Jenkins持续集成。
6.pytest有很多插件,并且这些插件能够实现很多的实用的操作。
pytest-html 生成html格式的自动化测试报告
pytest-xdist 测试用例分布式执行,多CPU分发
pytest-ordering 用于改变测试用例的执行顺序
pytest-rerunfailures 用例失败后重跑
allure-pytest 用于生成美观的测试报告
#安装相关python模块:pip install pytest pytest-html pytest-xdist pytest-ordering pytest-rerunfailures allure-pytest
二、pytest默认的测试用例规则以及基础应用
1.模块名必须以test_开头或者_test结尾
2.测试类必须以Test开头,并且不能有init方法(构造函数)
3.测试方法必须以test开头
三、pytest测试用例的运行方式
1.主函数模式
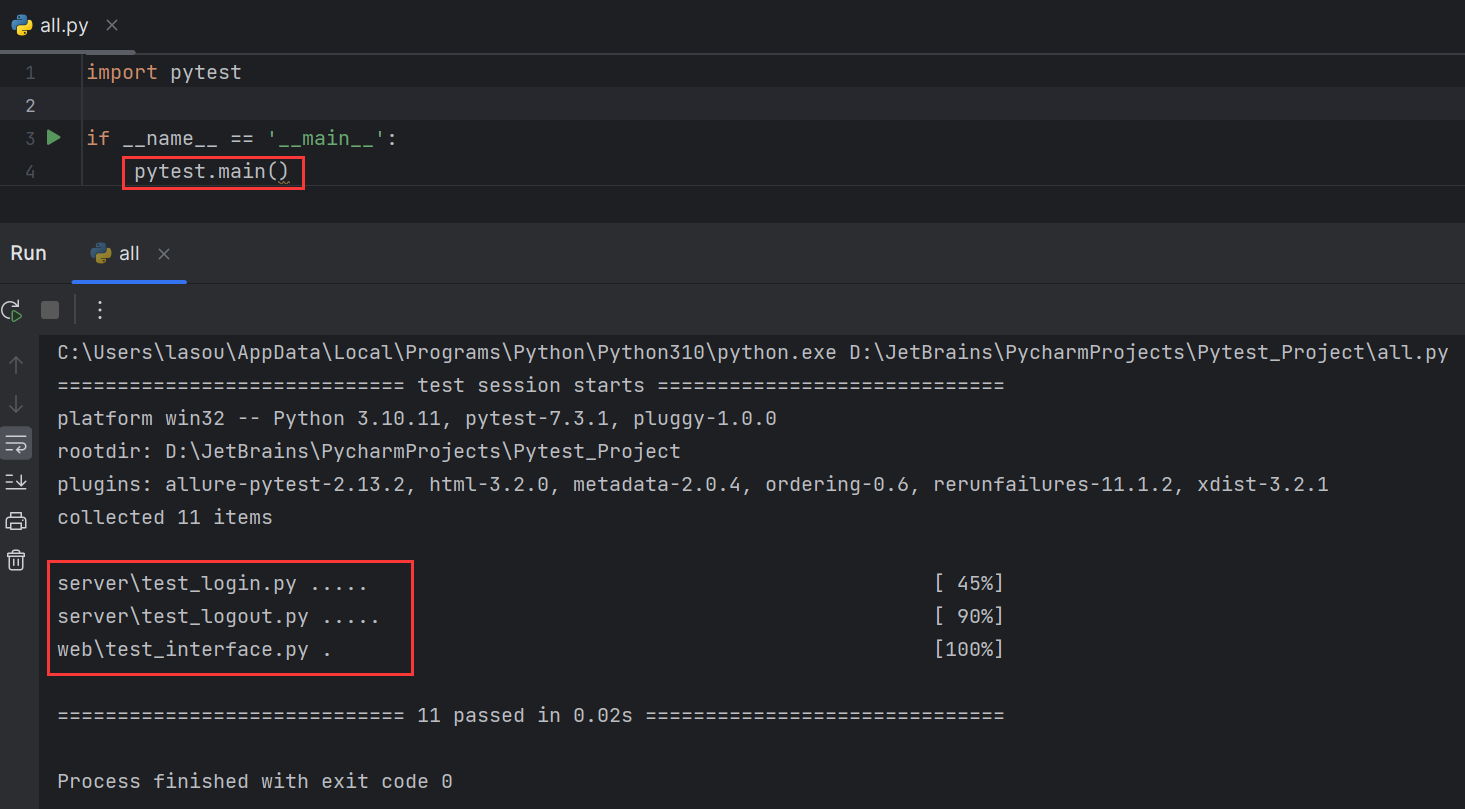
(1)运行所有:pytest.main()
(2)指定模块:pytest.main(['-vs','test_login.py']) #-vs表示输出详细信息和调试信息,包括print打印的信息
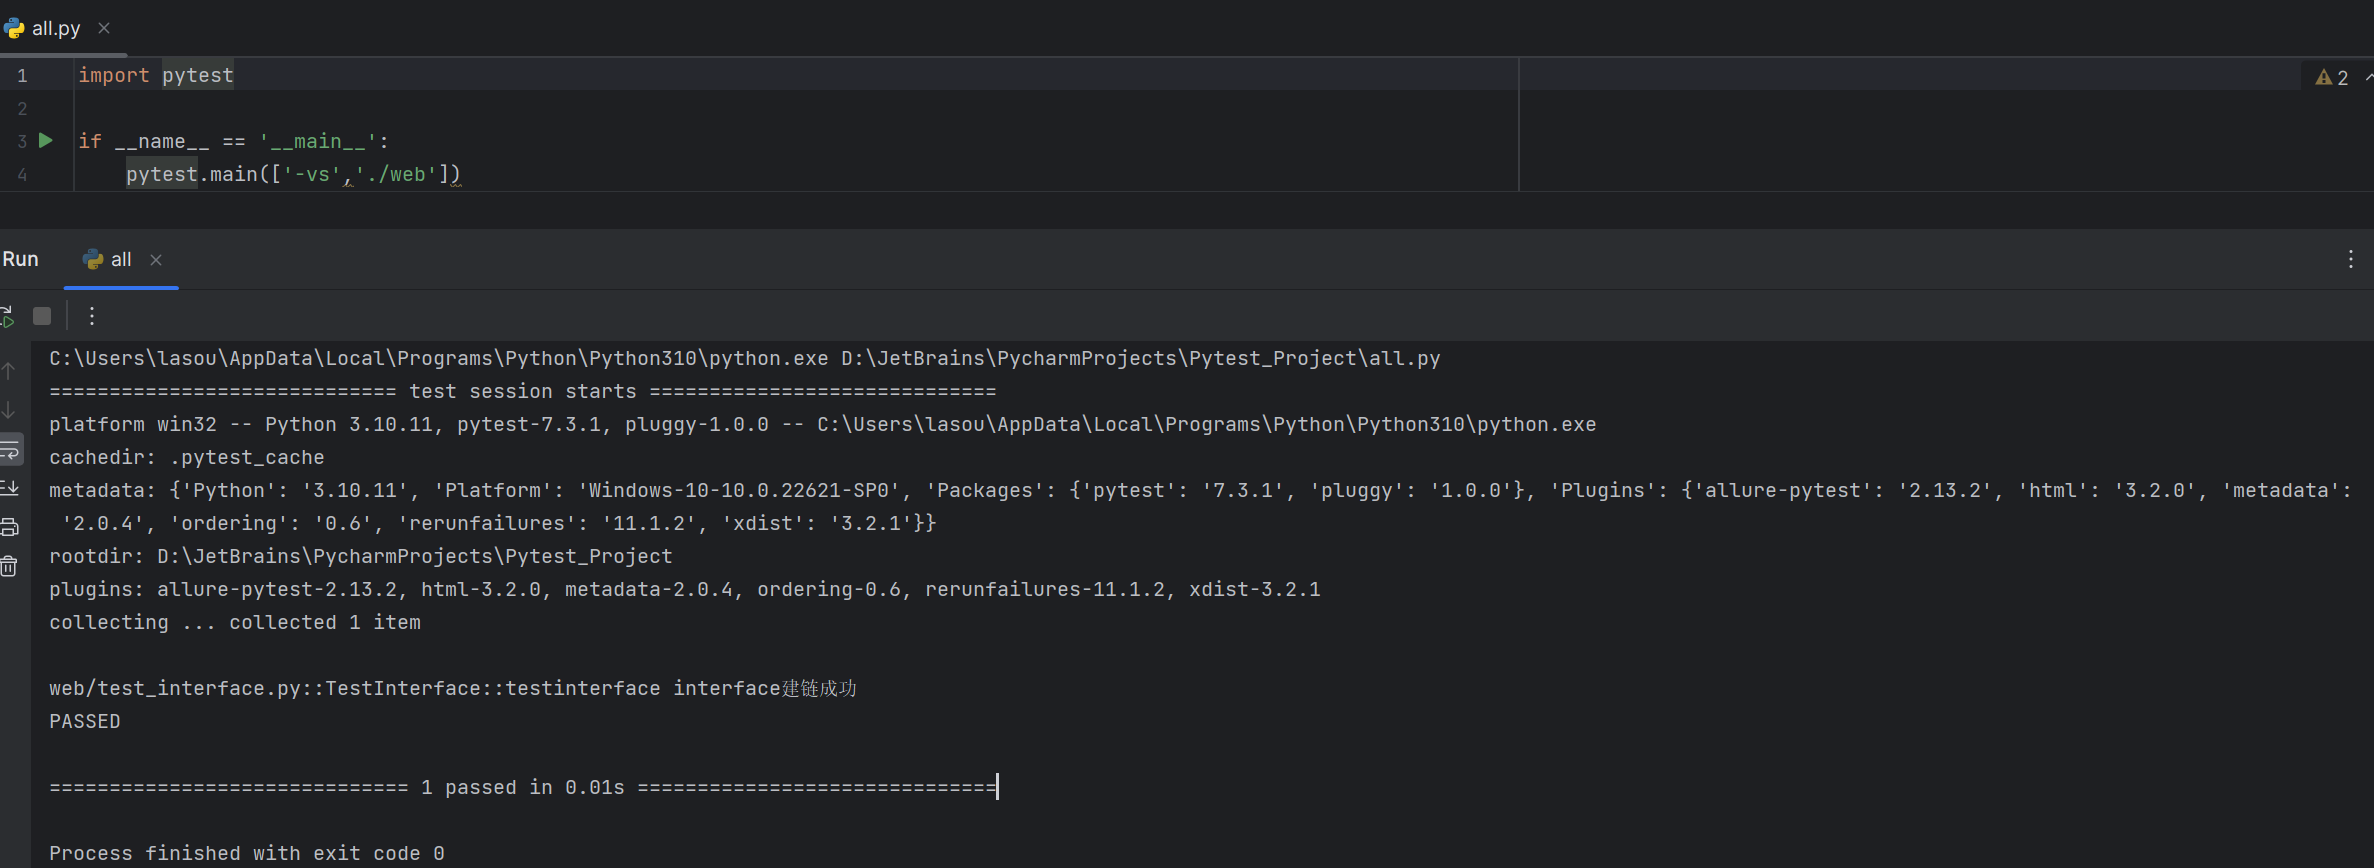
(3)指定目录:pytest.main(['-vs' ,'./web'])
(4)通过nodeid指定用例运行:nodeid由模块名,分隔符(::),类名,方法名,函数名组成。
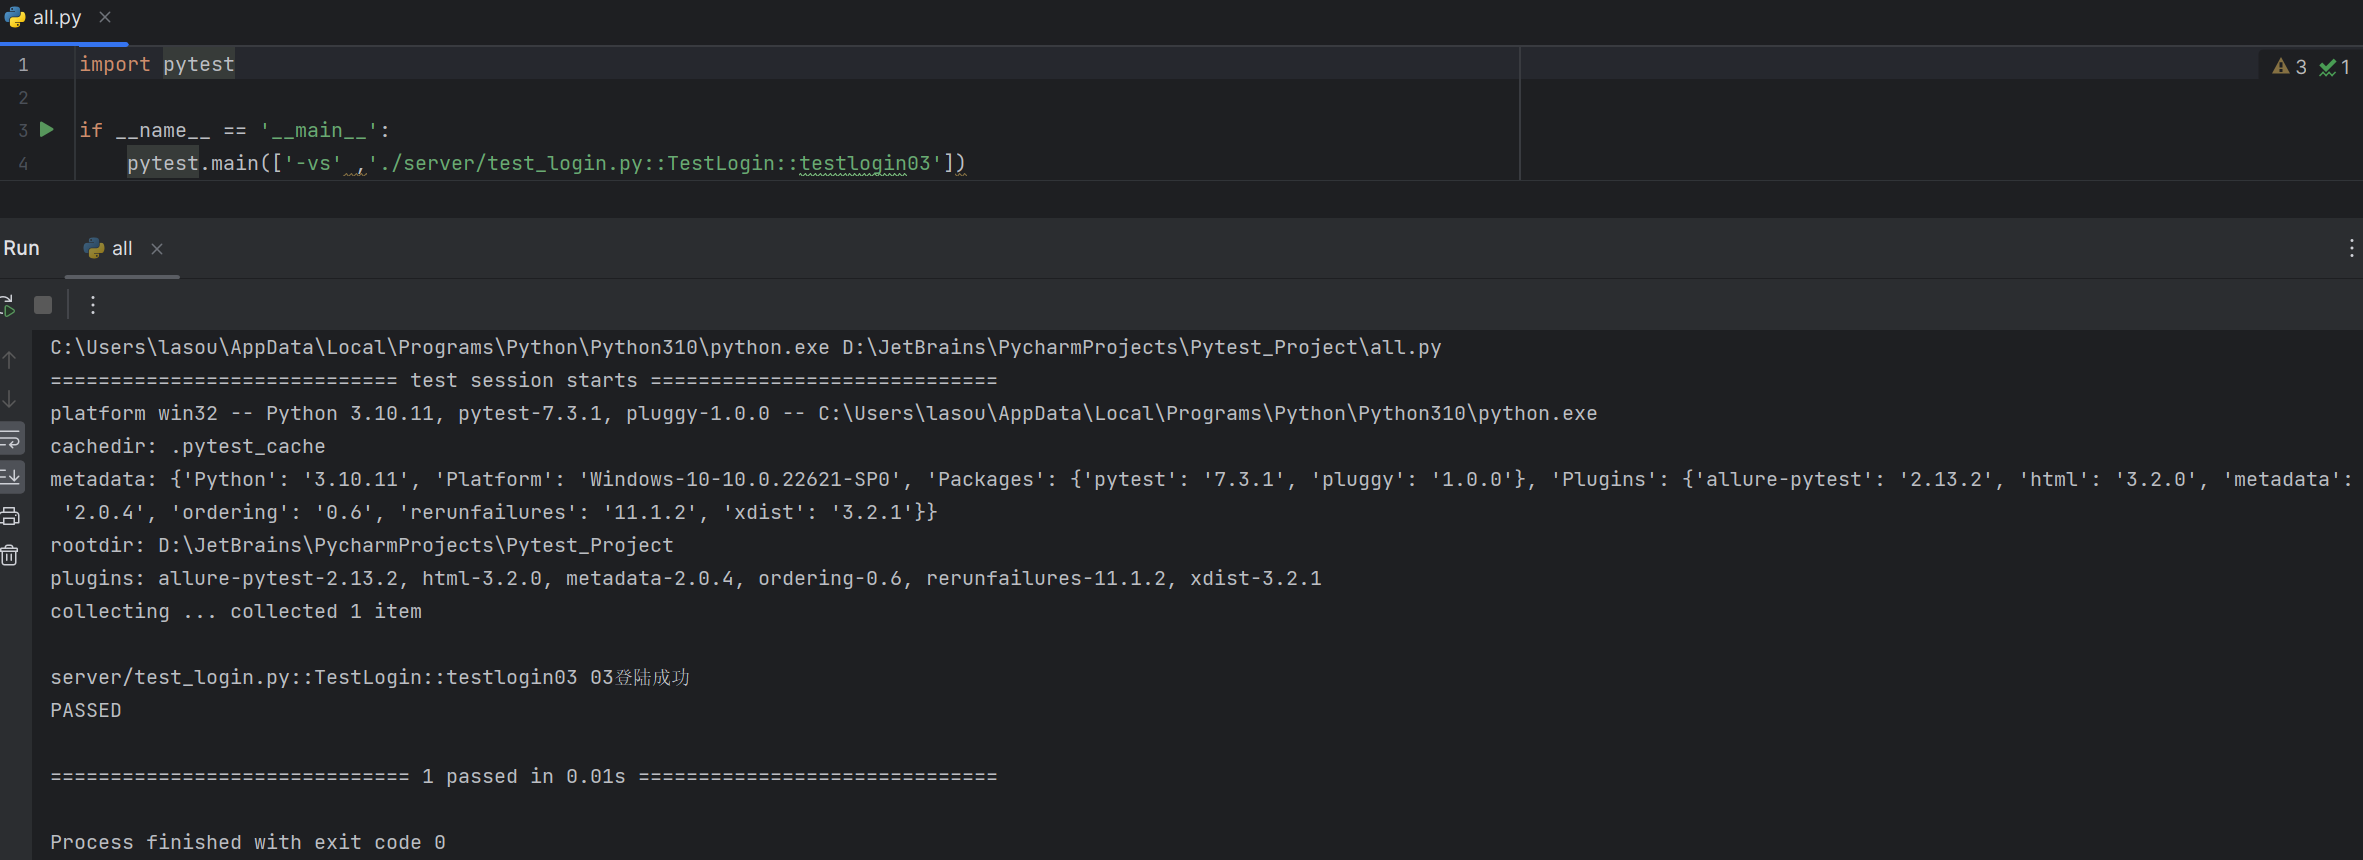
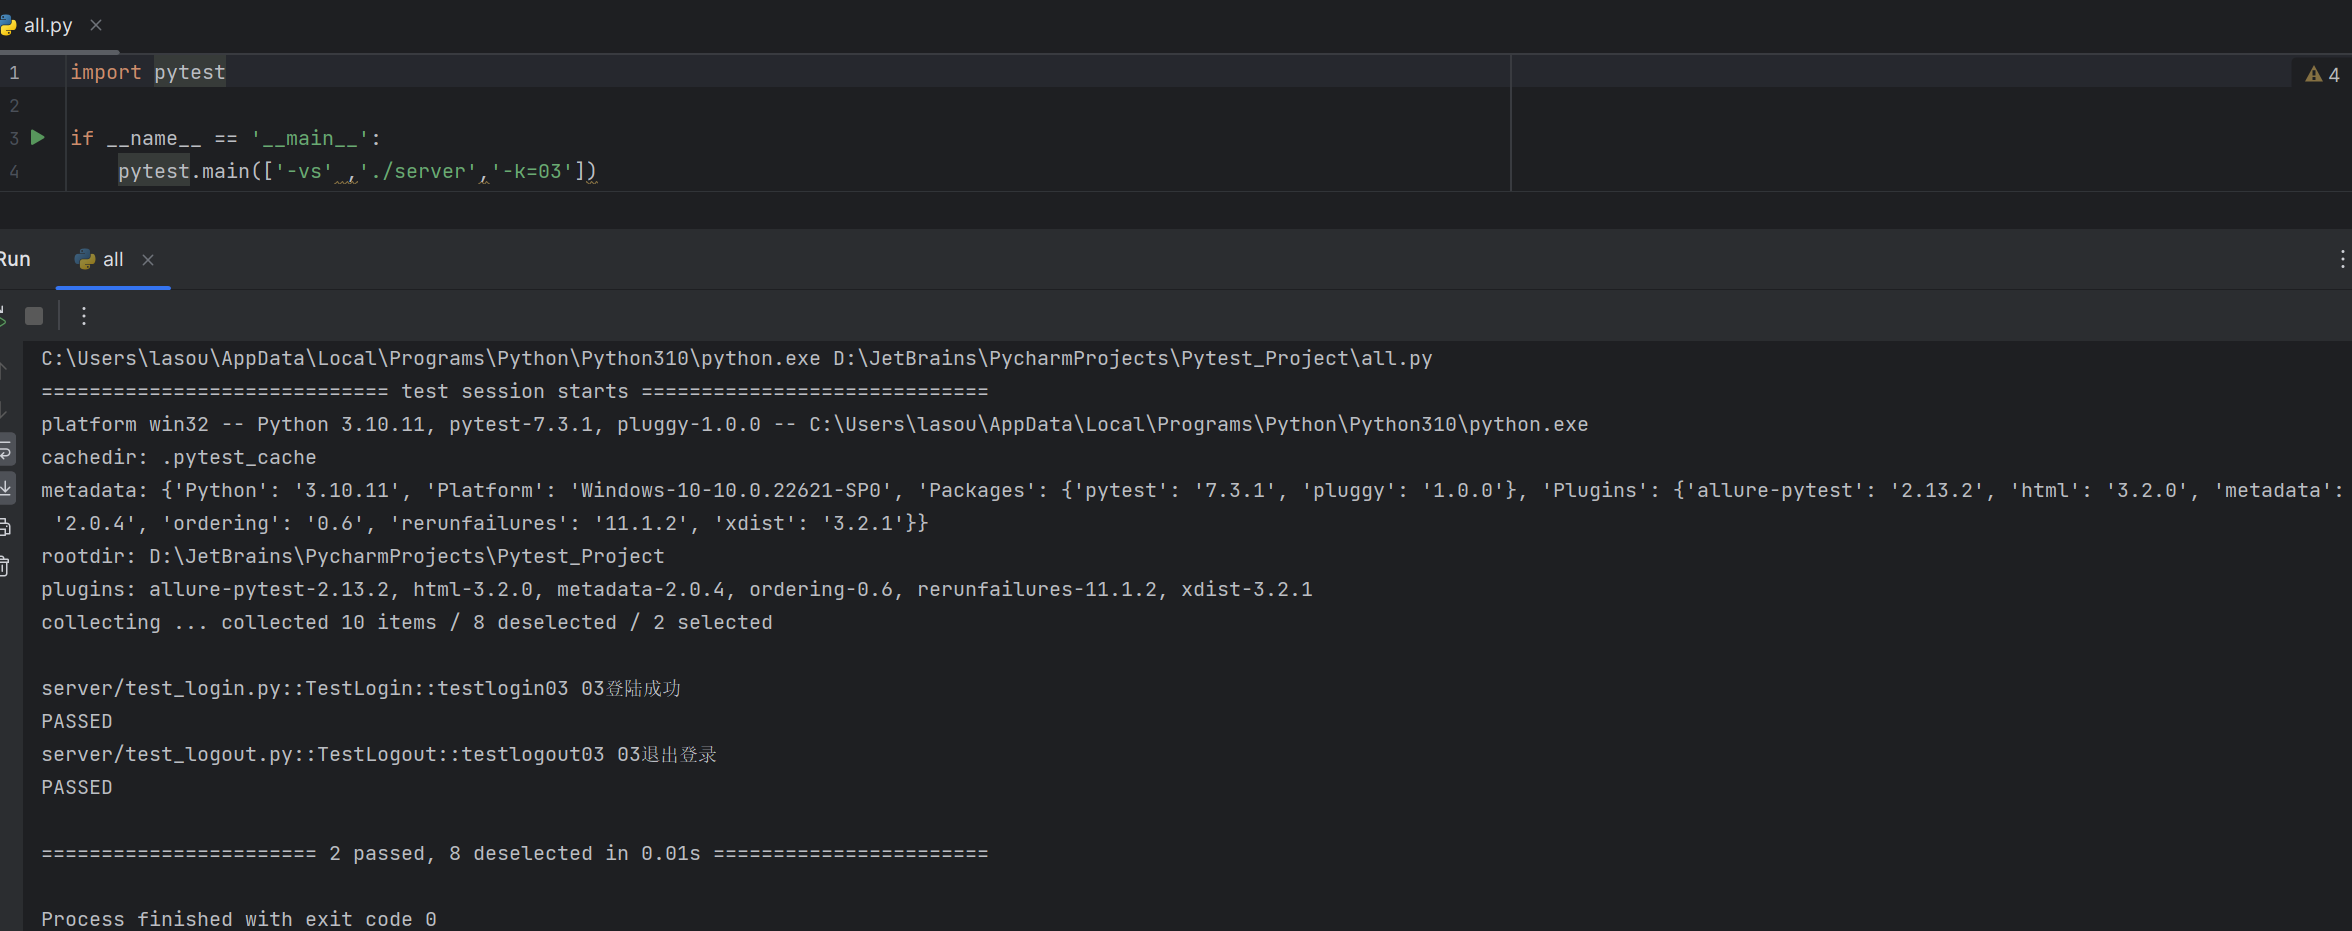
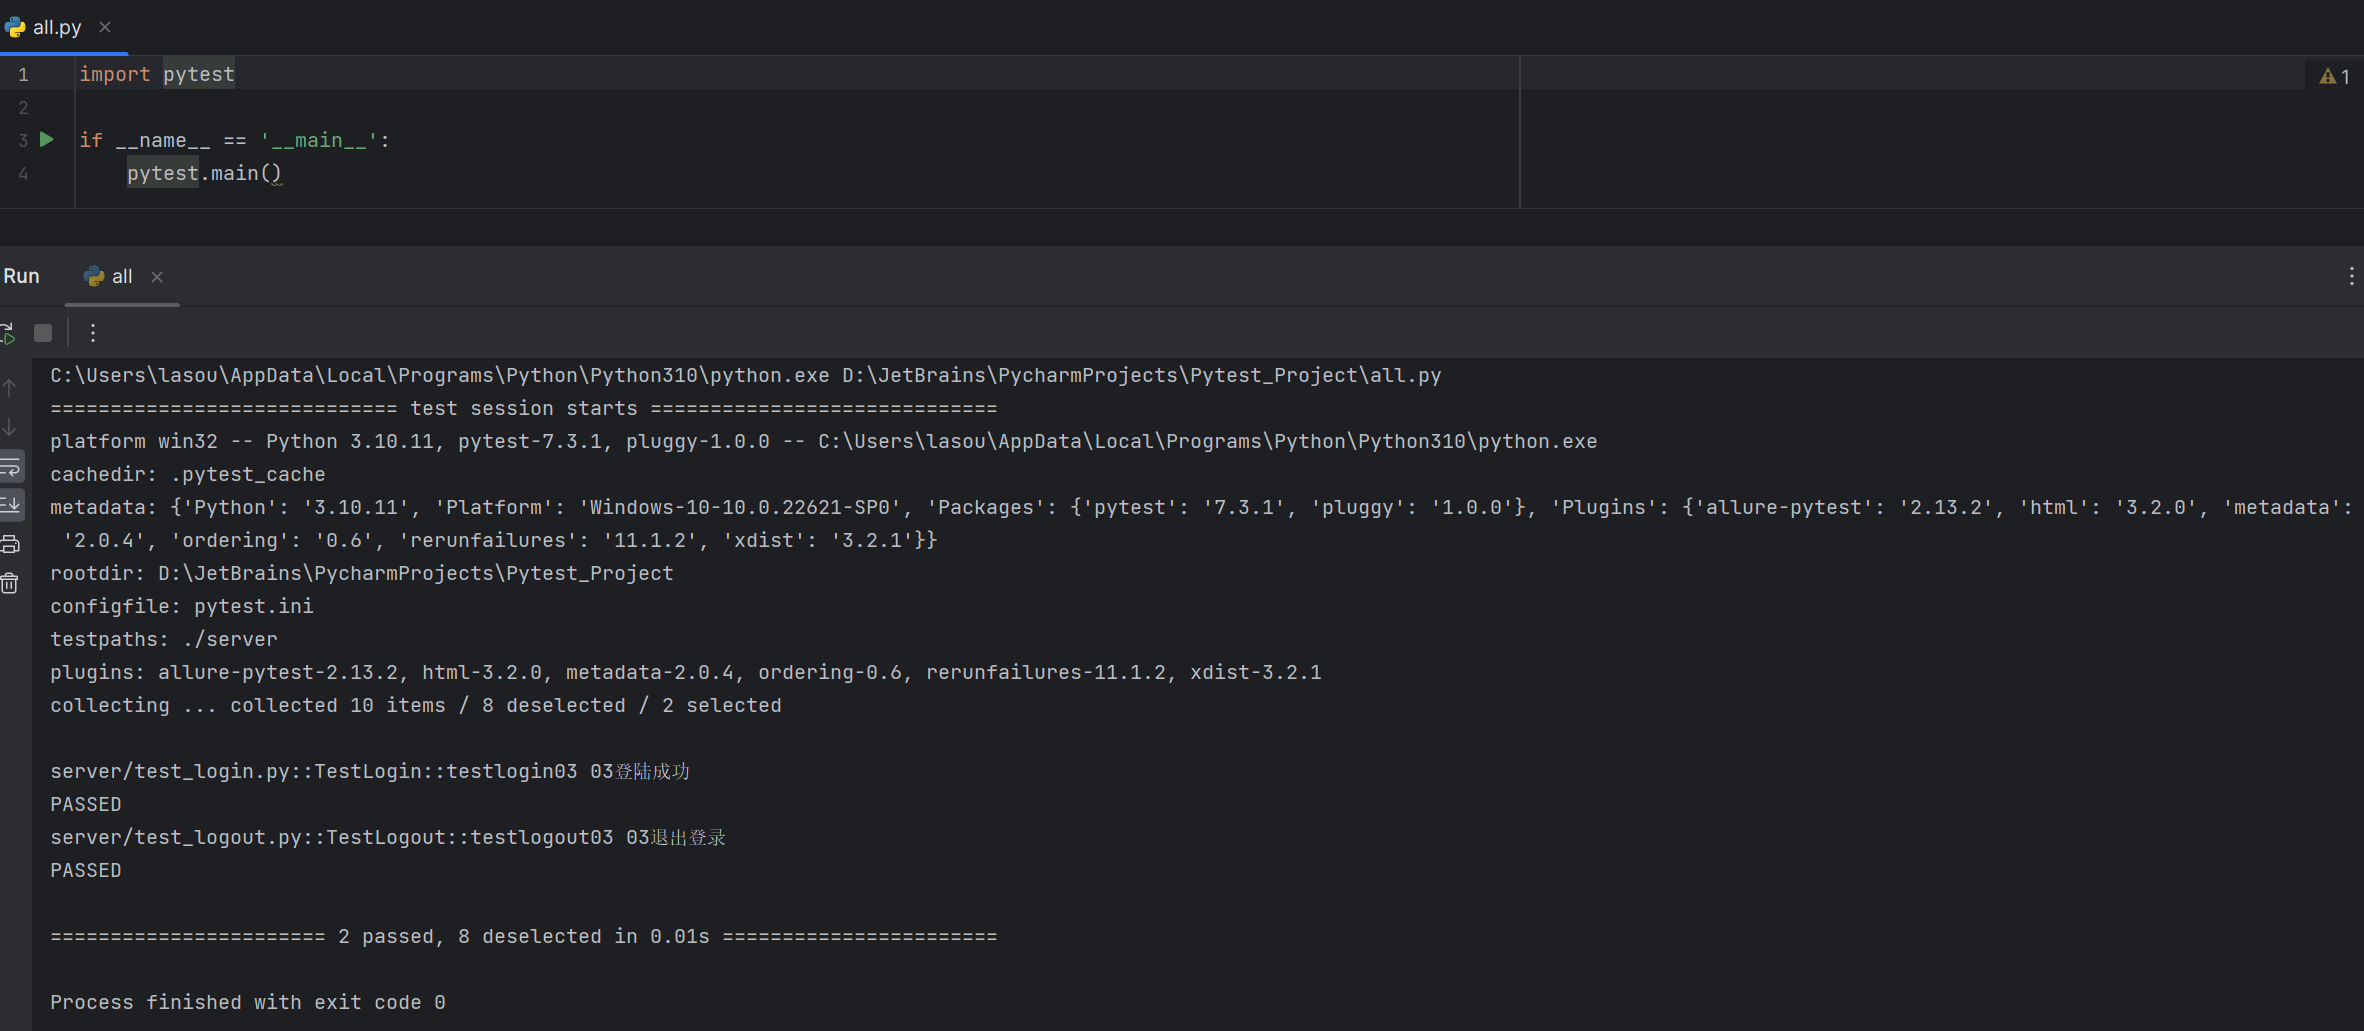
pytest.main(['-vs' ,'./server/test_login.py::TestLogin::testlogin03'])
2.命令行模式
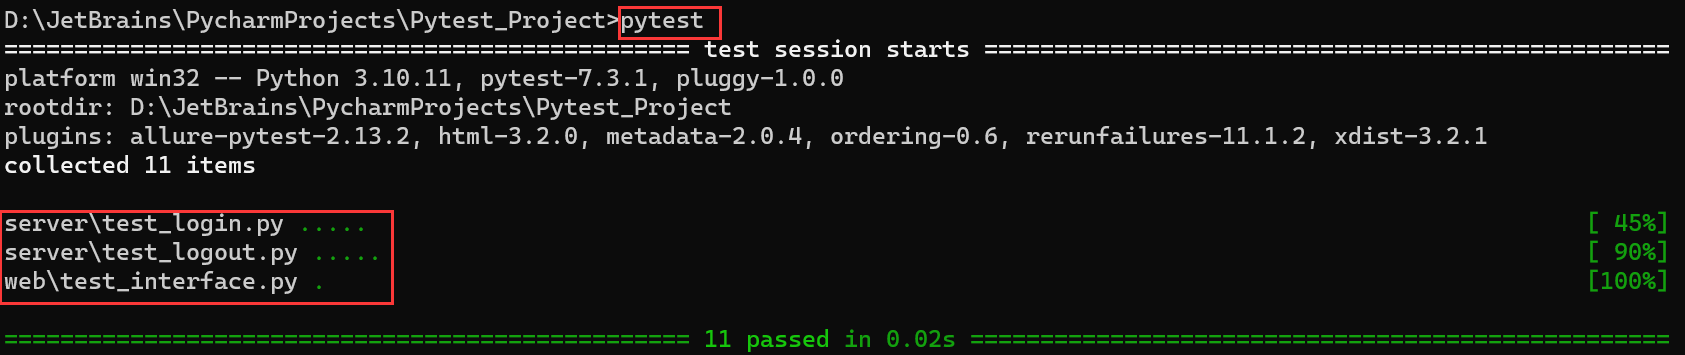
(1)运行所有:pytest
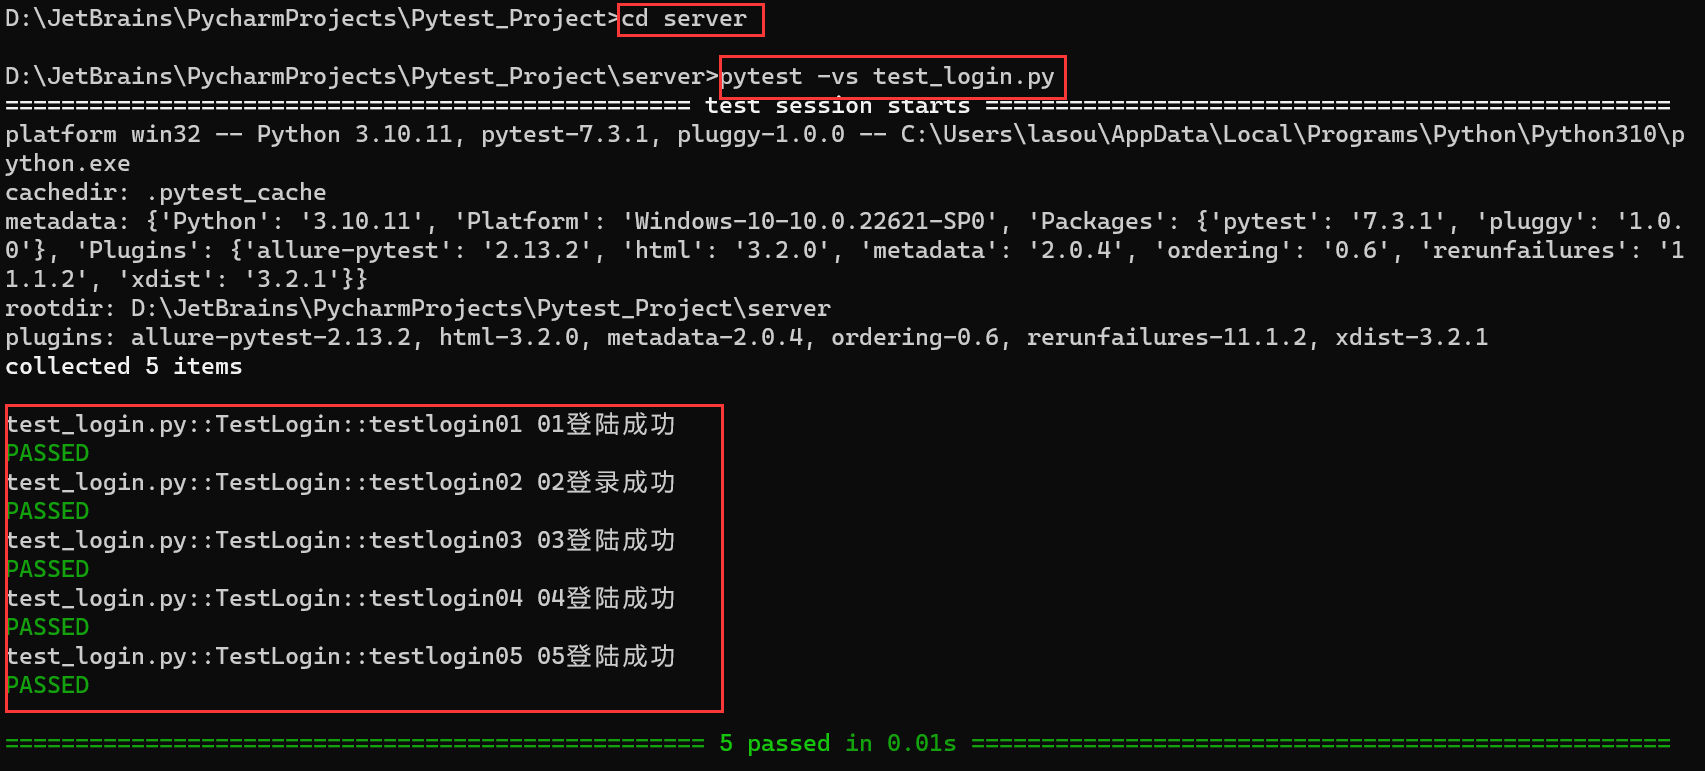
(2)指定模块∶pytest -vs test_login.py
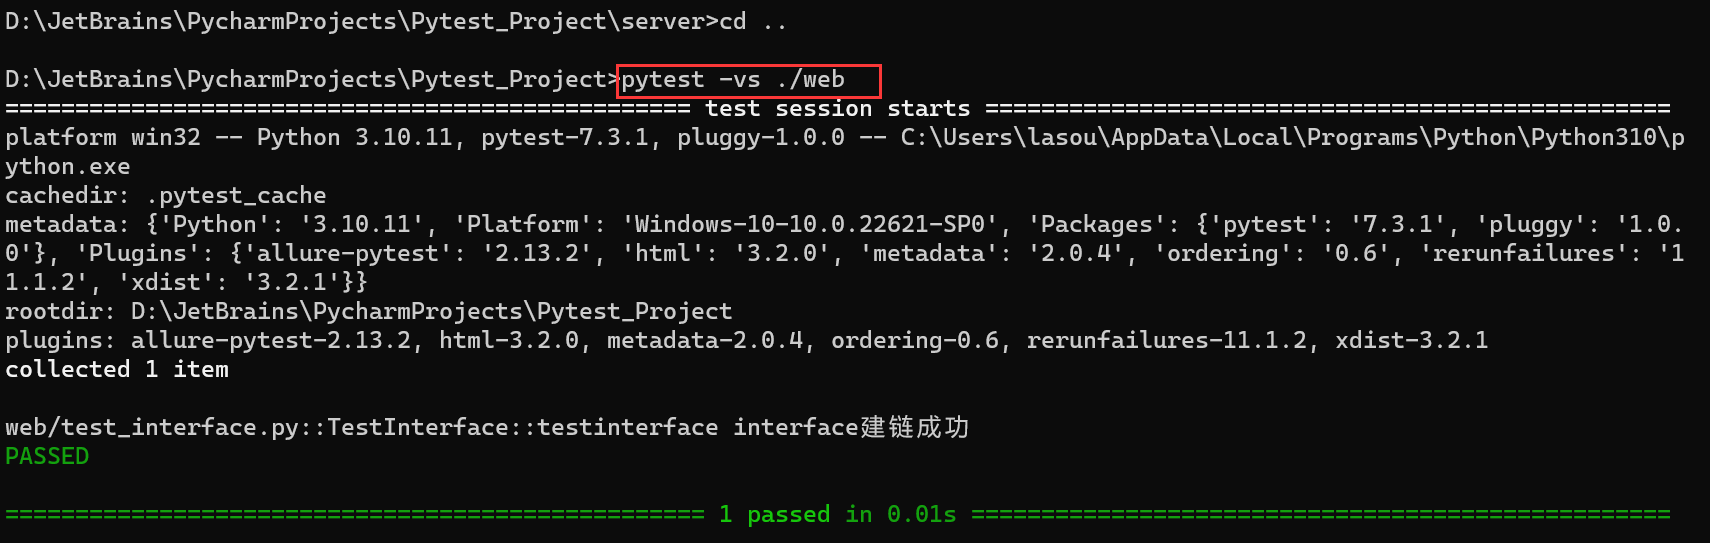
(3)指定目录:pytest -vs ./web
(4)通过nodeid指定用例运行:nodeid由模块名,分隔符(::),类名,方法名,函数名组成。
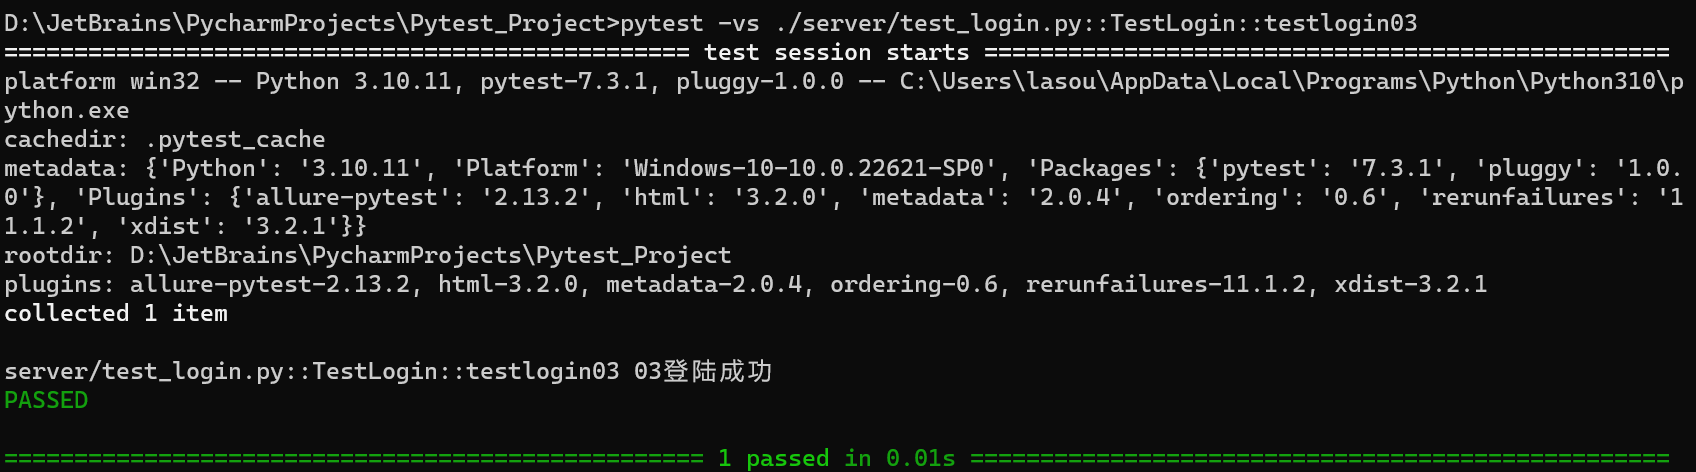
pytest -vs ./server/test_login.py::TestLogin::testlogin03
#演示:
目录结构:
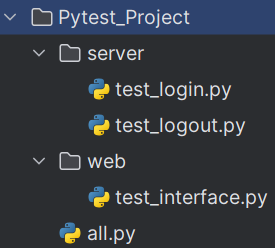
文件内容:
test_login.py
 class TestLogin():
    def testlogin01(self):
        print('01登陆成功')
    def testlogin02(self):
        print('02登录成功')
    def testlogin03(self):
        print('03登陆成功')
    def testlogin04(self):
        print('04登陆成功')
    def testlogin05(self):
        print('05登陆成功')
test_logout.py
 class TestLogout():
    def testlogout01(self):
        print('01退出登录')
    def testlogout02(self):
        print('02退出登录')
    def testlogout03(self):
        print('03退出登录')
    def testlogout04(self):
        print('04退出登录')
    def testlogout05(self):
        print('05退出登录')
test_interface.py
class TestInterface():
    def testinterface(self):
        print('interface建链成功')
运行结果:
(1)运行所有
(2)指定模块
(3)指定目录
(4)通过nodeid指定用例运行
参数详解∶
-s :表示输出调试信息,包括print打印的信息
-v:显示更详细的信息
-vs :这两个参数可以一起用
-n:支持多线程或者分布式运行测试用例,如果目录下有2个模块,当n=2时会产生2个线程同时执行两个测试模块内容 如: pytest.main ( [ '一vs', './server' , '-n=2 ']) ; pytest -vs ./server -n 2
--reruns num:失败用例重跑,num为重跑次数,如果某个用例失败再跑num次,其他用例正常执行 如:pytest.main ( [ '一vs', './server' , '--reruns=2 ']) ; pytest -vs ./server --reruns 2
-x:表示只要有一个用例报错,那么测试停止
--maxfail=2 表示如果出现两个用例报错,测试就停止
-k:根据测试用例的部分字符串指定测试用例 如:如: pytest.main(['-vs','./server','-k=03']) ; pytest -vs ./server -k "03" #只执行测试用例名称中包含"03"字符串的测试用例

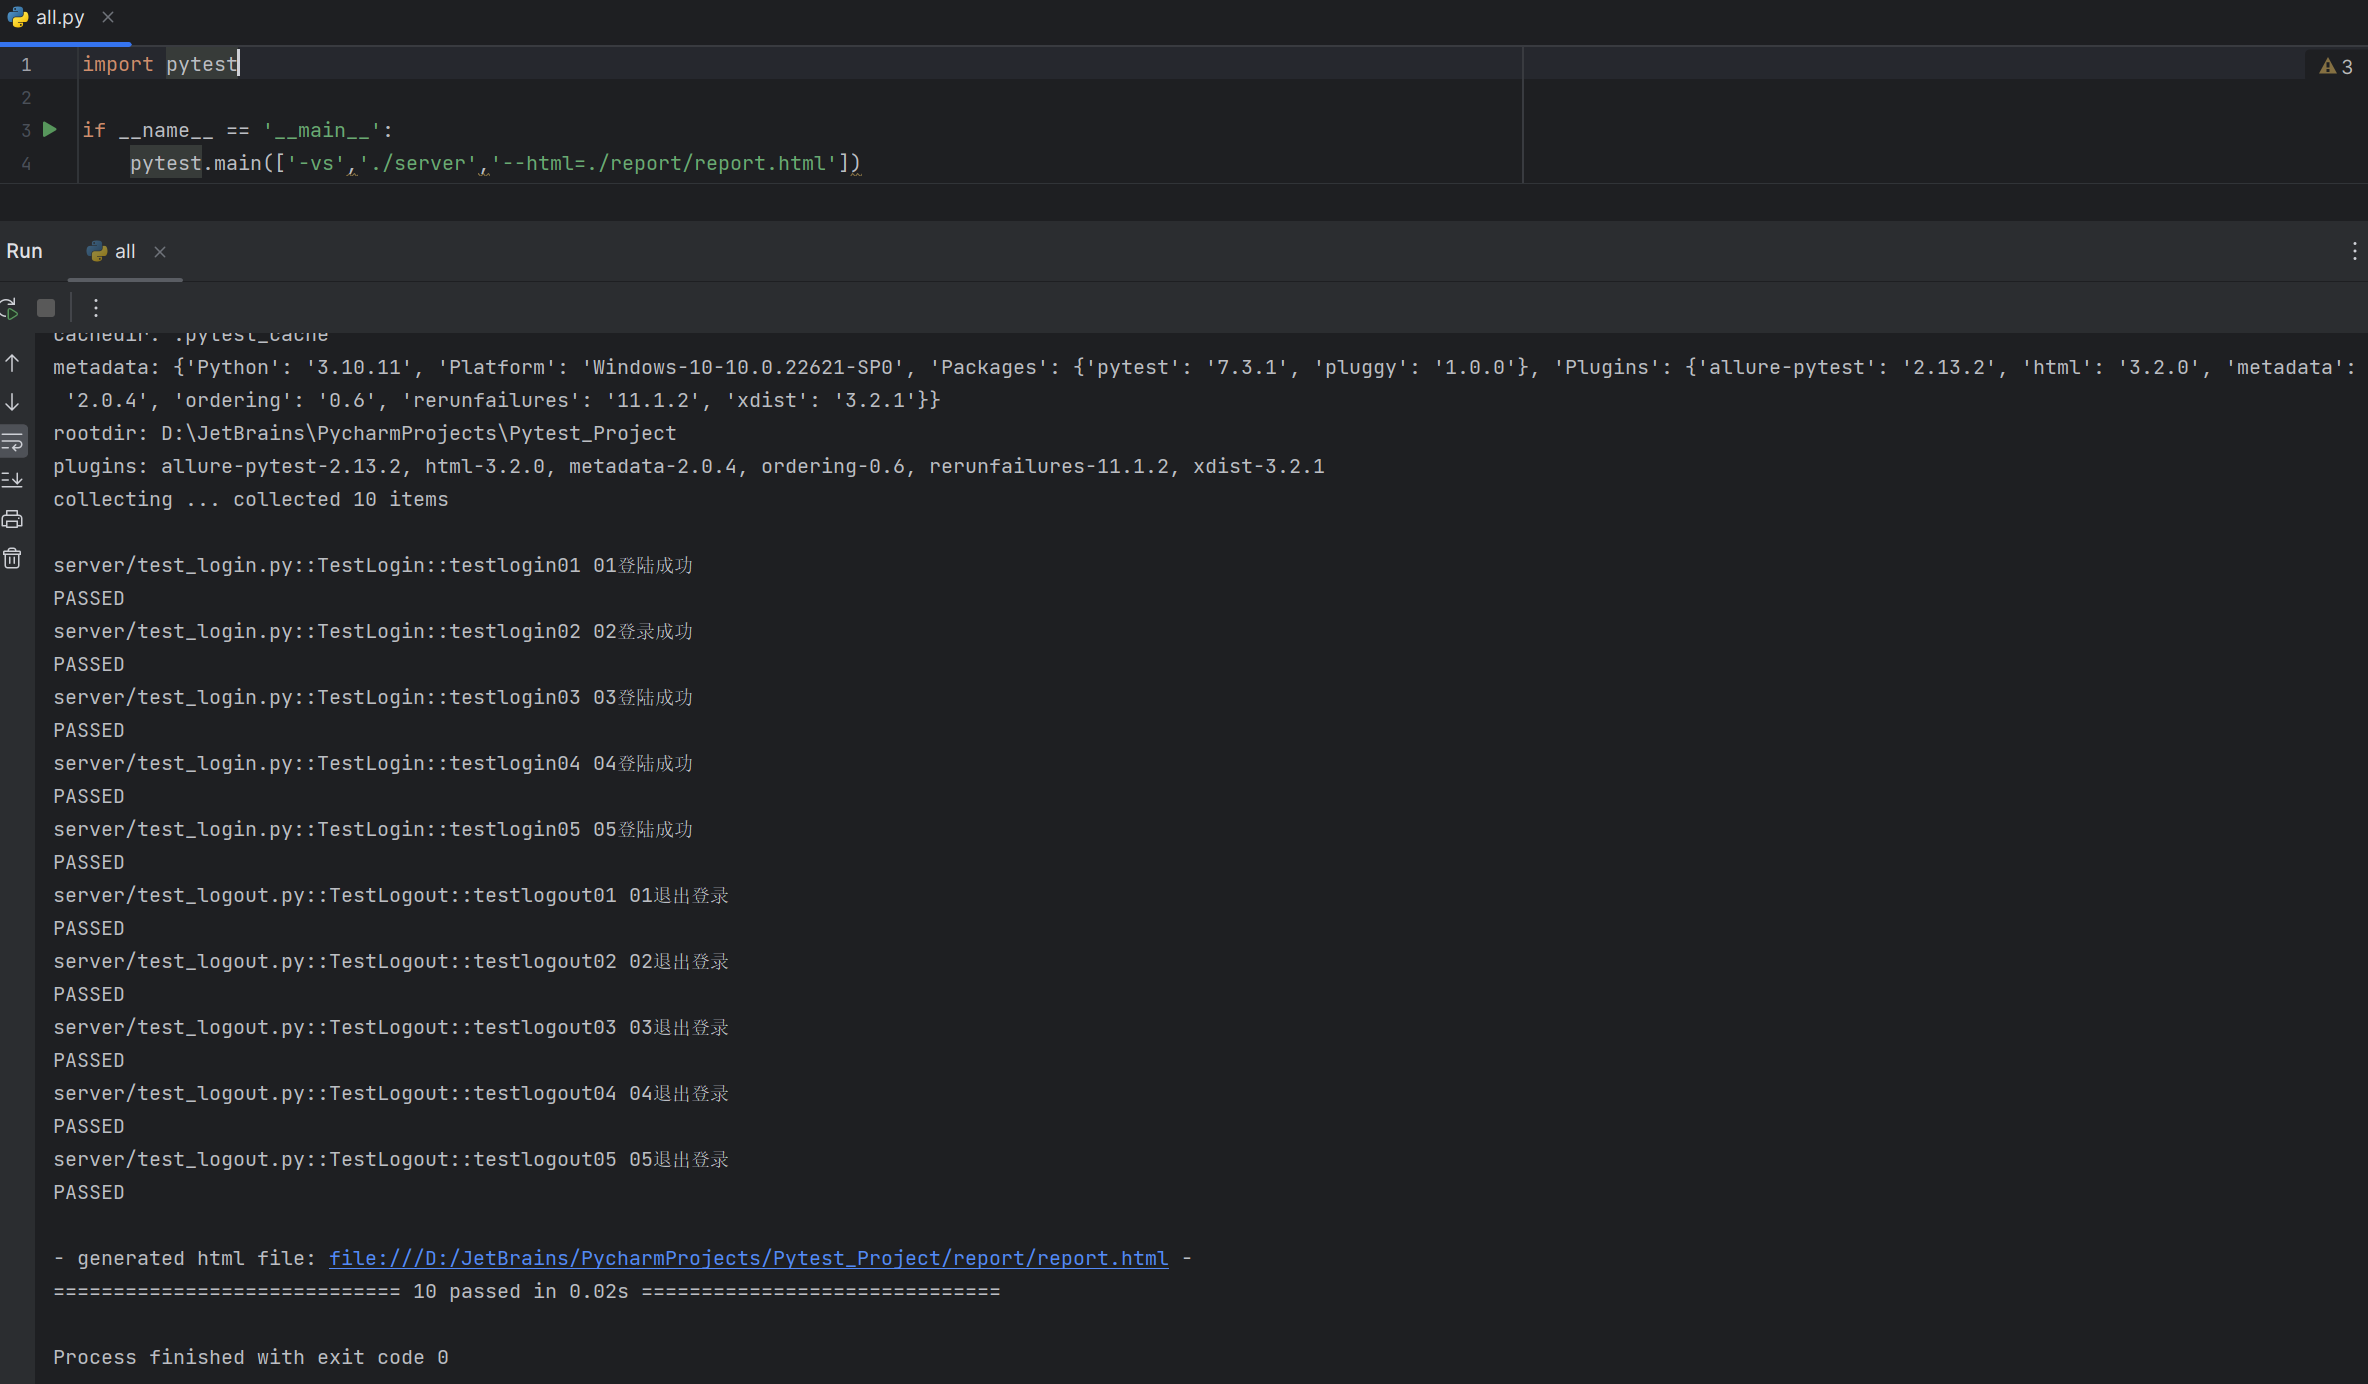
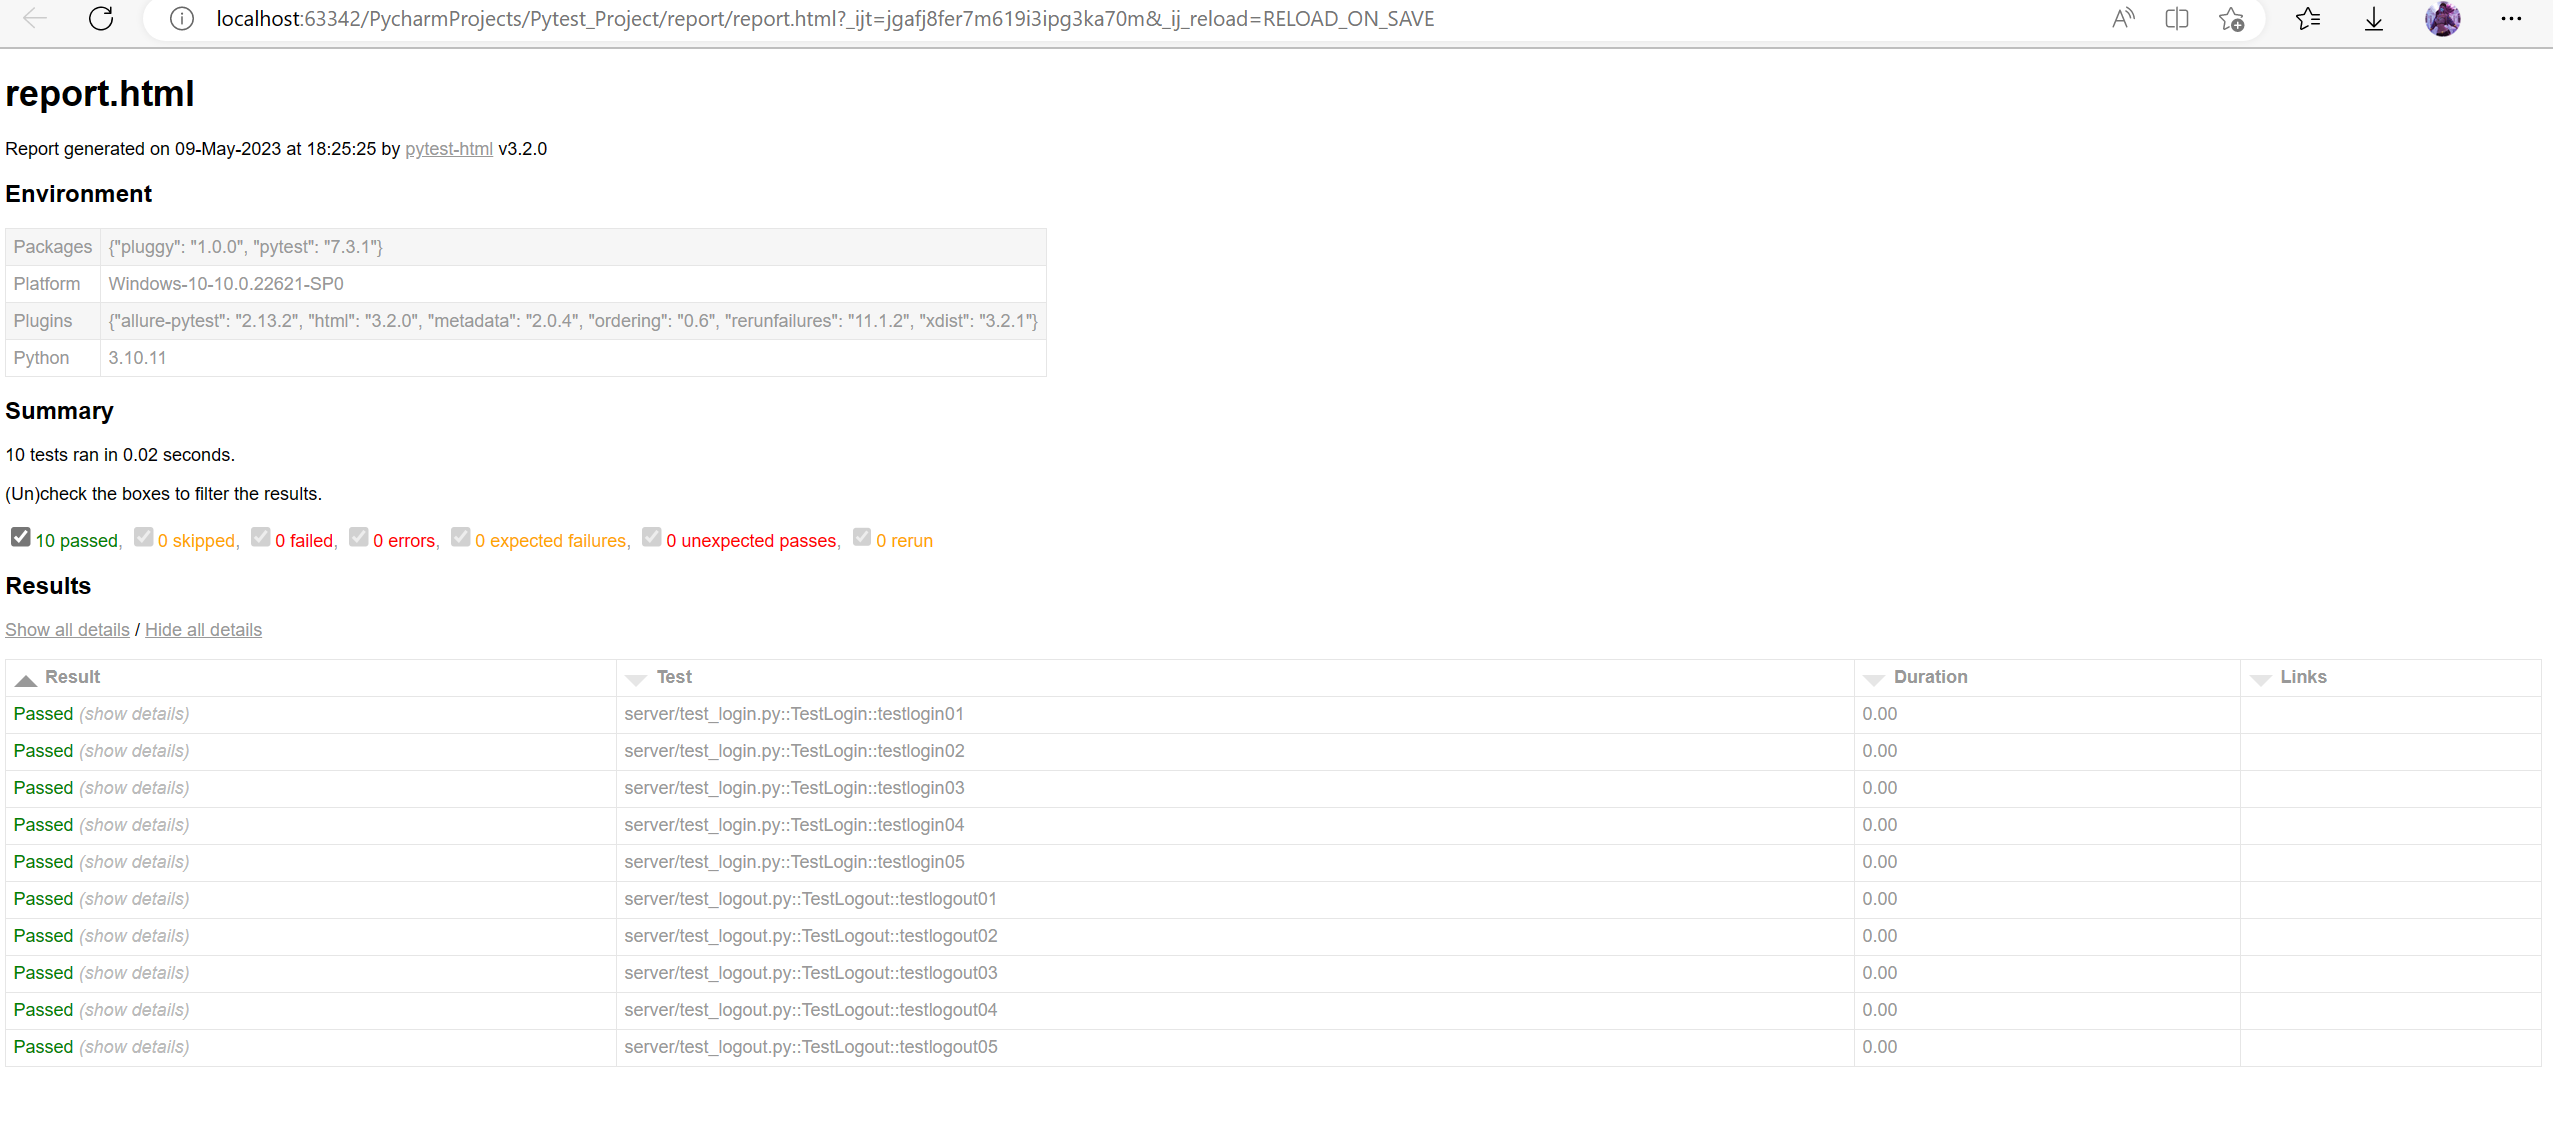
--html ./report/report.html :生成html的测试报告 如pytest.main(['-vs','./server','--html=./report/report.html']) ; pytest -vs ./server --html ./report/report.html
3.通过读取pytest.ini配置文件运行
pytest.ini这个文件它是pytest单元测试框架的核心配置文件。
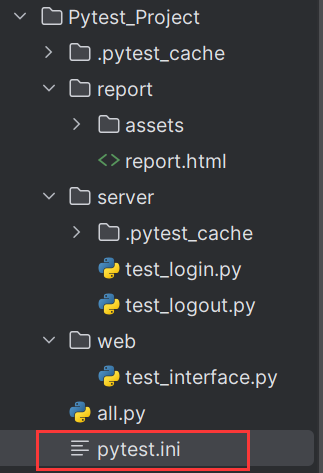
(1)位置:一般放在项目的根目录。
(2)编码:必须是ANSI,可以使用notpad++修改编码格式,并且文件中不可以有中文。
(3)作用:改变pytest默认的行为。
(4)运行的规则:不管是主函数的模式运行,命令行模式运行,都会去读取这个配置文件。
文件内容:
[pytest]
addopts = -vs  #命令行的参数,用空格分隔
testpaths = ./testcase  #测试用例的路径
python_files = test_*.py  #模块名的规则
python_classes = Test*  #类名的规则
python_functions = test  #方法名的规则
#演示:
目录结构:增加pytest.ini文件,并用notpad++转换为ANSI编码格式
文件内容:
[pytest]
addopts = -vs -k=03
testpaths = ./server
python_files = test_*.py
python_classes = Test*
python_functions = test
执行结果:pytest.main()不用加任何参数,直接读取pytest.ini中的-vs -k和./web等参数
四、pytest执行测试用例的顺序
unittest:默认根据ascll码的大小来决定用例的执行顺序
pytest:默认从上到下执行测试用例
改变默认的执行顺序∶使用mark装饰器标记
@pytest.mark.run (order=1) #order=1,2,3...定义执行优先级
修改test_login.py文件:
import pytest  #导入pytest模块
class TestLogin():
    def testlogin01(self):
        print('01登陆成功')
    def testlogin02(self):
        print('02登录成功')
    @pytest.mark.run(order=2)  #设置执行的优先级为2
    def testlogin03(self):
        print('03登陆成功')
    @pytest.mark.run(order=1)  #设置执行的优先级为1
    def testlogin04(self):
        print('04登陆成功')
    def testlogin05(self):
        print('05登陆成功')
修改pytest.ini文件:
[pytest]
addopts = -vs  #只保留vs参数
testpaths = ./server/test_login.py  #测试用例路径选择server下的test_login模块
python_files = test_*.py
python_classes = Test*
python_functions = test
执行结果:
D:\JetBrains\PycharmProjects\Pytest_Project>pytest

server/test_login.py::TestLogin::testlogin04 04登陆成功
PASSED
server/test_login.py::TestLogin::testlogin03 03登陆成功
PASSED
server/test_login.py::TestLogin::testlogin01 01登陆成功
PASSED
server/test_login.py::TestLogin::testlogin02 02登录成功
PASSED
server/test_login.py::TestLogin::testlogin05 05登陆成功
PASSED

================================================== 5 passed in 0.01s ==================================================
五、如何分组执行(冒烟,分模块执行,分接口和web执行)
smoke :冒烟用例,分布在各个模块里面
#smoke、usermanage、productmanage名称可自定义
@pytest.mark.smoke
@pytest.mark.usermanage
@pytest.mark.productmanage
需要先将以上三个模块“注册”到pytest.ini文件中再去使用,否则会有告警
[pytest]
addopts = -vs
testpaths = ./
python_files = test_*.py
python_classes = Test*
python_functions = test
markers =
	smoke
	usermanage
	productmanage
#演示:
文件内容:
test_login.py
import pytest

class TestLogin():

    def testlogin01(self):
        print('01登陆成功')

    def testlogin02(self):
        print('02登录成功')

    @pytest.mark.run(order=2)
    @pytest.mark.smoke  #标记为smoke冒烟测试用例
    def testlogin03(self):
        print('03登陆成功')

    @pytest.mark.run(order=1)
    def testlogin04(self):
        print('04登陆成功')

    @pytest.mark.smoke  #标记为smoke冒烟测试用例
    def testlogin05(self):
        print('05登陆成功')
test_logout.py
import pytest

class TestLogout():

    def testlogout01(self):
        print('01退出登录')

    def testlogout02(self):
        print('02退出登录')

    def testlogout03(self):
        print('03退出登录')

    @pytest.mark.usermanage  #标记为usermanage冒烟测试用例
    def testlogout04(self):
        print('04退出登录')

    def testlogout05(self):
        print('05退出登录')
test_interface.py
import pytest

class TestInterface():

    @pytest.mark.productmanage  #标记为productmanage冒烟测试用例
    def testinterface(self):
        print('interface建链成功')
执行结果:
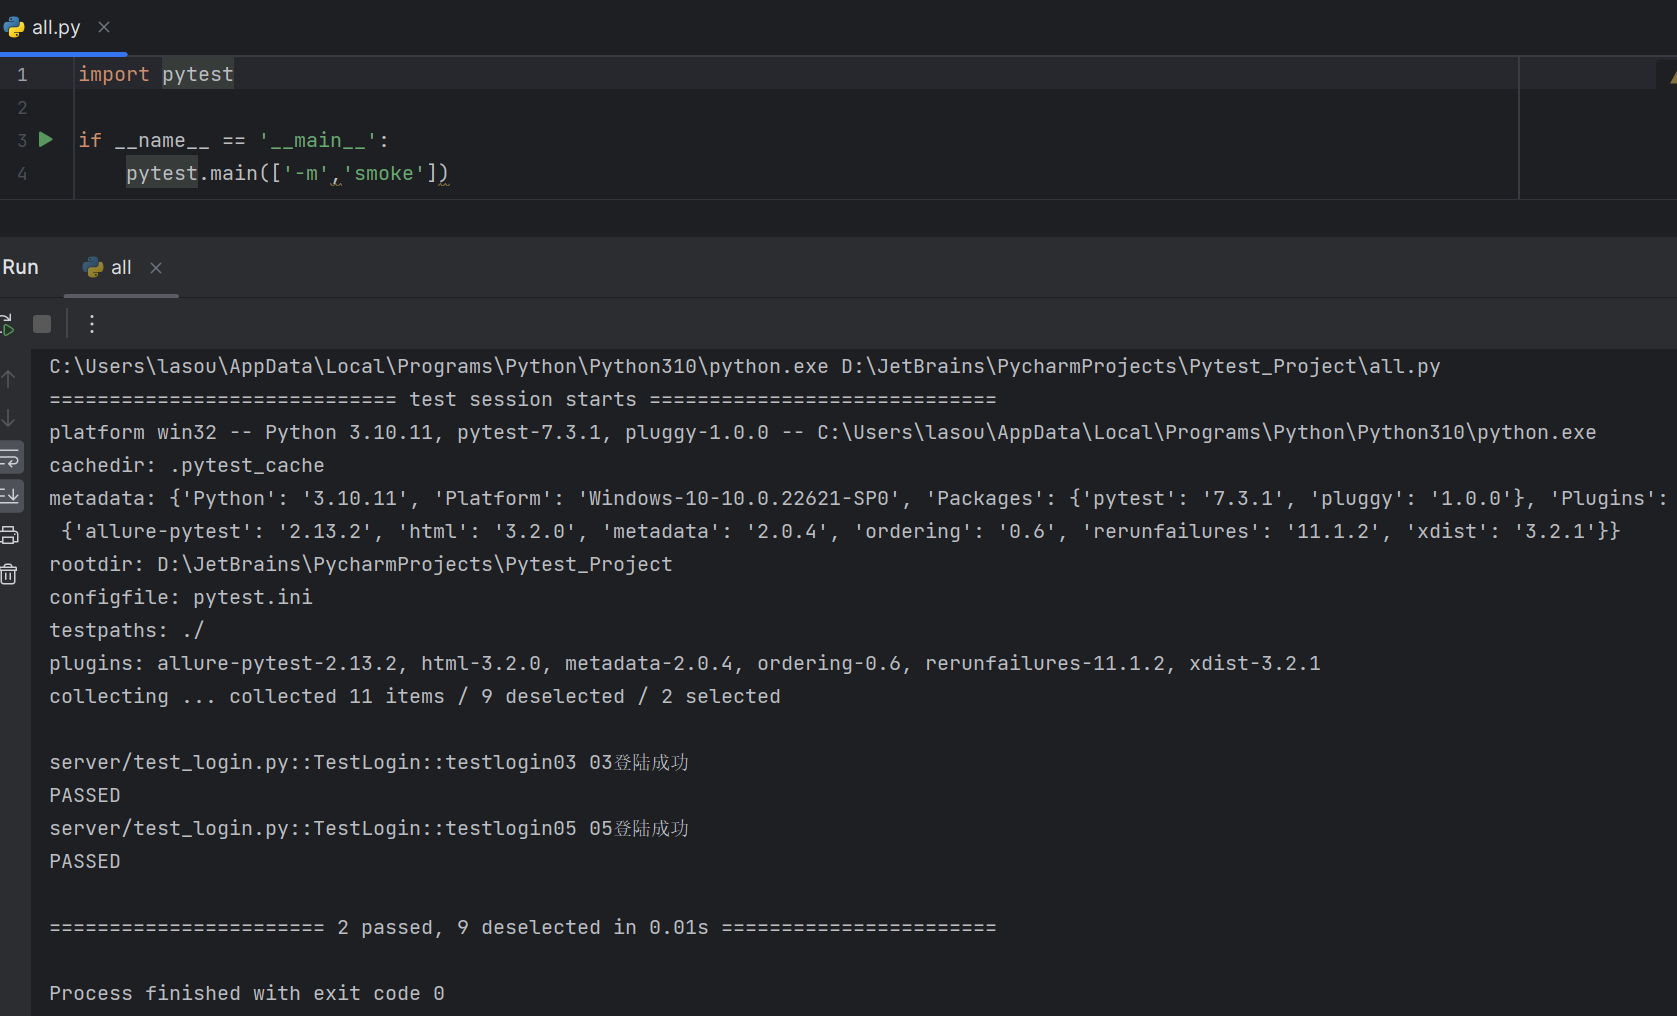
也可以执行有smoke或者usermanage标记的冒烟测试用例
D:\JetBrains\PycharmProjects\Pytest_Project>pytest -m "smoke or usermanage"

server/test_login.py::TestLogin::testlogin03 03登陆成功
PASSED
server/test_login.py::TestLogin::testlogin05 05登陆成功
PASSED
server/test_logout.py::TestLogout::testlogout04 04退出登录
PASSED

=========================================== 3 passed, 8 deselected in 0.02s ===========================================
还可以执行非smoke标记的测试用例
D:\JetBrains\PycharmProjects\Pytest_Project>pytest -m "not smoke"

server/test_login.py::TestLogin::testlogin04 04登陆成功
PASSED
server/test_login.py::TestLogin::testlogin01 01登陆成功
PASSED
server/test_login.py::TestLogin::testlogin02 02登录成功
PASSED
server/test_logout.py::TestLogout::testlogout01 01退出登录
PASSED
server/test_logout.py::TestLogout::testlogout02 02退出登录
PASSED
server/test_logout.py::TestLogout::testlogout03 03退出登录
PASSED
server/test_logout.py::TestLogout::testlogout04 04退出登录
PASSED
server/test_logout.py::TestLogout::testlogout05 05退出登录
PASSED
web/test_interface.py::TestInterface::testinterface interface建链成功
PASSED

=========================================== 9 passed, 2 deselected in 0.02s ===========================================
如果要使用pytest.ini配置文件方式执行冒烟测试,则需要这么写:
[pytest]
addopts = -vs -m "smoke"
testpaths = ./
python_files = test_*.py
python_classes = Test*
python_functions = test
markers =
	smoke
	usermanage
	productmanage
六、 pytest跳过测试用例
(1)无条件跳过
@pytest.mark.skip ( reason="只因你太美")
(2)有条件跳过
@pytest.mark.skipif(age>=18, reason='已成年')
#演示:
文件内容:
test_login.py
import pytest

@pytest.mark.skip(reason='跳过TestLogin类')  #无条件跳过TestLogin类,包括其中的每个方法(测试用例)
class TestLogin():

    def testlogin01(self):
        print('01登陆成功')

    def testlogin02(self):
        print('02登录成功')

    @pytest.mark.run(order=2)
    @pytest.mark.smoke
    def testlogin03(self):
        print('03登陆成功')

    @pytest.mark.run(order=1)
    def testlogin04(self):
        print('04登陆成功')

    @pytest.mark.smoke
    def testlogin05(self):
        print('05登陆成功')
test_logout.py
import pytest

class TestLogout():

    def testlogout01(self):
        print('01退出登录')

    @pytest.mark.skipif(1 == 1,reason='跳过测试testlogout02测试用例')  #如果出现1==1,则跳过testlogout02测试用例
    def testlogout02(self):
        print('02退出登录')
        assert 1 == 1  #增加一个断言,使1 == 1

    def testlogout03(self):
        print('03退出登录')

    @pytest.mark.usermanage
    @pytest.mark.skip(reason='跳过testlogout04测试用例')  #无条件跳过testlogout04测试用例
    def testlogout04(self):
        print('04退出登录')

    def testlogout05(self):
        print('05退出登录')
test_interface.py
import pytest

class TestInterface():

    @pytest.mark.productmanage
    def testinterface(self):
        print('interface建链成功')
pytest.ini
[pytest]
addopts = -vs
testpaths = ./
python_files = test_*.py
python_classes = Test*
python_functions = test
markers =
	smoke
	usermanage
	productmanage
all.py
import pytest

if __name__ == '__main__':
    pytest.main()
执行结果:
server/test_login.py::TestLogin::testlogin04 SKIPPED (跳过Test类)
server/test_login.py::TestLogin::testlogin03 SKIPPED (跳过Test类)
server/test_login.py::TestLogin::testlogin01 SKIPPED (跳过Test类)
server/test_login.py::TestLogin::testlogin02 SKIPPED (跳过Test类)
server/test_login.py::TestLogin::testlogin05 SKIPPED (跳过Test类)
server/test_logout.py::TestLogout::testlogout01 01退出登录
PASSED
server/test_logout.py::TestLogout::testlogout02 SKIPPED (跳过测试tes...)
server/test_logout.py::TestLogout::testlogout03 03退出登录
PASSED
server/test_logout.py::TestLogout::testlogout04 SKIPPED (跳过testlog...)
server/test_logout.py::TestLogout::testlogout05 05退出登录
PASSED
web/test_interface.py::TestInterface::testinterface interface建链成功
PASSED

======================== 4 passed, 7 skipped in 0.02s =========================


 浙公网安备 33010602011771号