OAuth2 密码模式
# OAuth2 密码模式
1 回顾
前面说了一些OAuth2的概念和一些OAuth2流程,现在根据之前的流程,用代码简单的实现下这个过程
不过下面的代码有些是有关SpringSecurity相关的知识,如果想补充这部分知识,请移步江南一点雨关于SpringSecurity的文章,后续文章会写到这些SpringSecurity的知识。
简单回顾一下密码模式的流程:
客户端带着用户名 密码 还有client_id client_secret等。授权服务器校验客户端信息和用户信息,校验通过后返回token,客户端带着这个token请求资源服务器,资源服务器校验通过后返回资源
话不多说,开始上代码

2 引入相关依赖
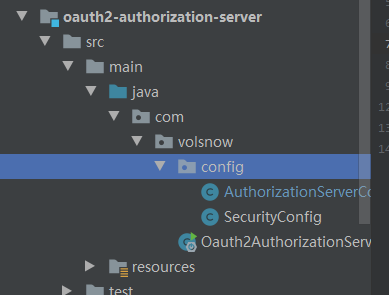
首先现在准备一个授权服务器
springcloud 已经集成了oauth2和springsecurity,那就用这个吧
<properties>
        <java.version>1.8</java.version>
        <spring-cloud.version>Hoxton.SR3</spring-cloud.version>
    </properties>
<dependency>
            <groupId>org.springframework.boot</groupId>
            <artifactId>spring-boot-starter</artifactId>
        </dependency>
        <dependency>
            <groupId>org.springframework.boot</groupId>
            <artifactId>spring-boot-starter-web</artifactId>
        </dependency>
        <dependency>
            <groupId>org.springframework.boot</groupId>
            <artifactId>spring-boot-starter-test</artifactId>
            <scope>test</scope>
        </dependency>

        <dependency>
            <groupId>org.springframework.cloud</groupId>
            <artifactId>spring-cloud-starter-oauth2</artifactId>
        </dependency>

        <dependency>
            <groupId>org.springframework.cloud</groupId>
            <artifactId>spring-cloud-starter-security</artifactId>
        </dependency>
        <dependency>
            <groupId>org.projectlombok</groupId>
            <artifactId>lombok</artifactId>
            <version>1.18.16</version>
            <scope>compile</scope>
        </dependency>
        <dependencyManagement>
        <dependencies>
            <dependency>
                <groupId>org.springframework.cloud</groupId>
                <artifactId>spring-cloud-dependencies</artifactId>
                <version>${spring-cloud.version}</version>
                <type>pom</type>
                <scope>import</scope>
            </dependency>
        </dependencies>
    </dependencyManagement>
3 SpringSecurity配置
@Configuration
public class SecurityConfig extends WebSecurityConfigurerAdapter {

    //密码管理器,可以认为是时间戳+盐 加密的一种方式
    @Bean
    public PasswordEncoder passwordEncoder() {
        return new BCryptPasswordEncoder();
    }

    @Bean
    public AuthenticationManager authenticationManager() throws Exception {
        return super.authenticationManager();
    }

    /**
     * 配置authenticationManager->providerManager->authenticationProvider->UserdetailServices->userDetails(存放的是用户信息)-》最终设置到
     * SpringSecurityContextHolder
     * 所以我们可以通过UserDetailService来得到用户信息,也可以将用信息存储在内存中,
     * 像下面这样:可以在这里配置一些用户名和密码,以及用户所对应的权限
     *
     * @param auth
     * @throws Exception
     */
    @Override
    protected void configure(AuthenticationManagerBuilder auth) throws Exception {
        auth.inMemoryAuthentication().
                withUser("hxx").
                password(passwordEncoder().encode("123456")).authorities(Collections.emptyList())
                .and().
                withUser("wm").
                password(passwordEncoder().encode("123456")).
                authorities(new ArrayList<>(0));
    }

    //配置http
    @Override
    protected void configure(HttpSecurity http) throws Exception {
        //任何请求都需要验证
        http.authorizeRequests().anyRequest().authenticated();
    }

    //配置web资源
    @Override
    public void configure(WebSecurity web) throws Exception {
        super.configure(web);
    }
}
用户名和密码暂时也是存在了内存中
4 授权服务器的配置
授权服务器需要继承AuthorizationServerConfigurerAdapter。并且开启授权服务
@Configuration
@EnableAuthorizationServer //开启授权服务
public class AuthorizationServerConfig extends AuthorizationServerConfigurerAdapter {

    @Autowired
    private AuthenticationManager authenticationManager;


    @Autowired
    private PasswordEncoder passwordEncoder;

    //配置客户端
    @Override
    public void configure(ClientDetailsServiceConfigurer clients) throws Exception {
        clients.inMemory().
                withClient("client1").
                secret(passwordEncoder.encode("client_secret"))
                .authorizedGrantTypes("password").
                scopes("read_scope");
    }

    //配置安全约束
    @Override
    public void configure(AuthorizationServerSecurityConfigurer security) throws Exception {
        security.allowFormAuthenticationForClients().checkTokenAccess("isAuthenticated()");
//                .tokenKeyAccess("permitAll()");
    }

	@Override
    public void configure(AuthorizationServerEndpointsConfigurer endpoints) throws Exception {
        super.configure(endpoints);
    }


}
授权服务器主要有如下的配置:
- configure(ClientDetailsServiceConfigurer clients)配置客户端详细信息 client_id client_secret grant_type(上面这些信息是放到内存中的)
- configure(AuthorizationServerSecurityConfigurer security) 配置端点安全约束
- configure(AuthorizationServerEndpointsConfigurer endpoints)配置访问令牌的端点和令牌服务
- oauth2中开放的几个重要的端点:
- 访问令牌token的端点:/oauth/token
- 校验令牌的端点:/oauth/check_token
- 授权端点:/oauth/authorize
现在说这些是也不太直观,待会说
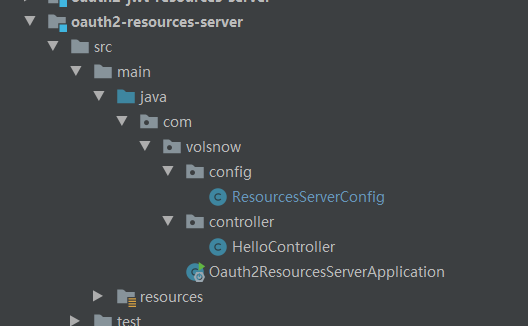
5 配置资源服务器配置
准备一个资源服务
资源服务配置文件
@EnableResourceServer
@Configuration
public class ResourcesServerConfig extends ResourceServerConfigurerAdapter {


    @Bean
    public RemoteTokenServices remoteTokenServices(){
        final RemoteTokenServices remoteTokenServices = new RemoteTokenServices();
        remoteTokenServices.setCheckTokenEndpointUrl("http://localhost:8081/oauth/check_token");
        remoteTokenServices.setClientId("client1");
        remoteTokenServices.setClientSecret("client_secret");
        return remoteTokenServices;
    }

    @Override
    public void configure(HttpSecurity http) throws Exception {
        http.authorizeRequests().
//                antMatchers("/getUser").hasRole("admin").
                anyRequest().authenticated();
    }

    @Override
    public void configure(ResourceServerSecurityConfigurer   resources) throws Exception {
        resources.tokenServices(remoteTokenServices());
    }
}
配置资源服务器:
- 这里主要配置了一个remoteTokenServices,主要是用来进行远程调用/oauth/check_token端点进行校验前端传递的access_token
- 然后配置了一下资源拦截,和SpringSecurity的配置一样
写个接口进行测试
@RestController
public class HelloController {

    @GetMapping("/getUser")
    public String getUser(){
        return "hello  me";
    }
}
6 开始测试
首先启动资源服务和授权服务
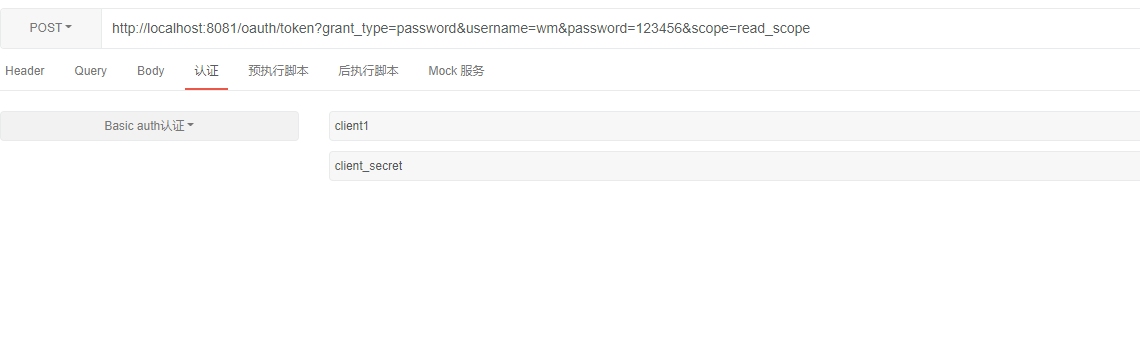
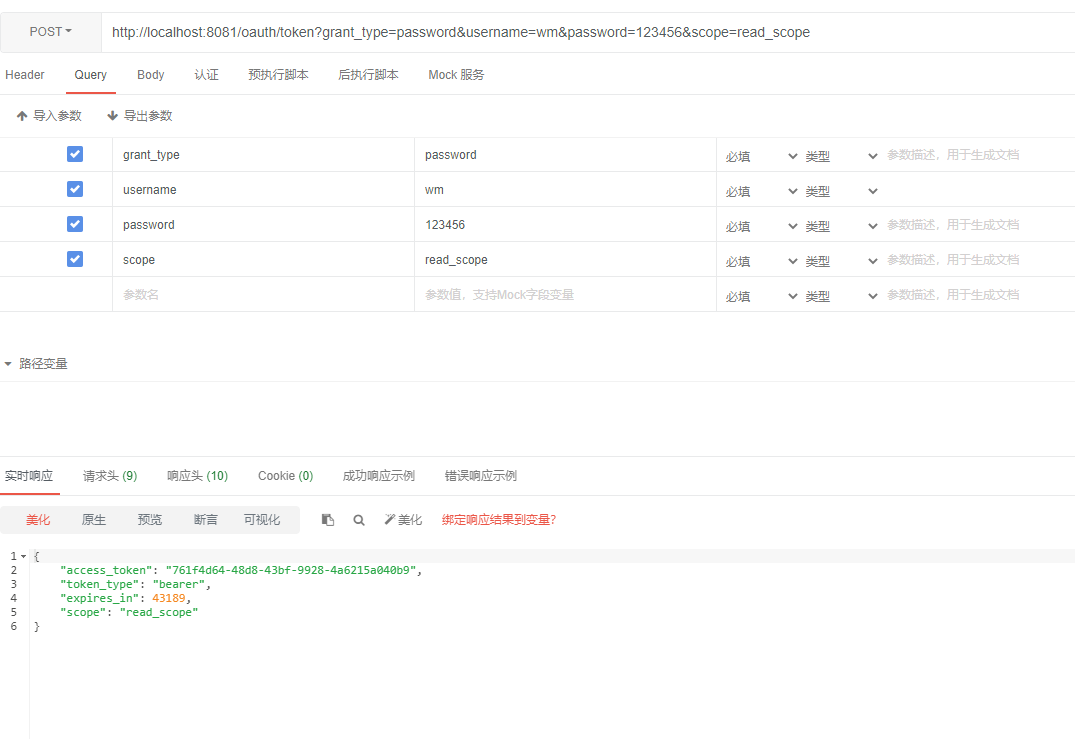
6.1 访问/oauth/token端点
通过用户名和密码 client_id client_secret grant_type访问获取token的端点:/oauth/token
得到如下的结果:
再看后台日志:

以下是源码分析
6.1.1 源码分析
意思是访问oauth/token端点的时候,请求到了TokenEndpoint的postAccessToken方法
@FrameworkEndpoint
public class TokenEndpoint extends AbstractEndpoint {

	private OAuth2RequestValidator oAuth2RequestValidator = new DefaultOAuth2RequestValidator();

	private Set<HttpMethod> allowedRequestMethods = new HashSet<HttpMethod>(Arrays.asList(HttpMethod.POST));

...//省略

	@RequestMapping(value = "/oauth/token", method=RequestMethod.POST)
	public ResponseEntity<OAuth2AccessToken> postAccessToken(Principal principal, @RequestParam
	Map<String, String> parameters) throws HttpRequestMethodNotSupportedException {

		if (!(principal instanceof Authentication)) {
			throw new InsufficientAuthenticationException(
					"There is no client authentication. Try adding an appropriate authentication filter.");
		}

		String clientId = getClientId(principal);
		ClientDetails authenticatedClient = getClientDetailsService().loadClientByClientId(clientId);

		TokenRequest tokenRequest = getOAuth2RequestFactory().createTokenRequest(parameters, authenticatedClient);

		if (clientId != null && !clientId.equals("")) {
			// Only validate the client details if a client authenticated during this
			// request.
			if (!clientId.equals(tokenRequest.getClientId())) {
				// double check to make sure that the client ID in the token request is the same as that in the
				// authenticated client
				throw new InvalidClientException("Given client ID does not match authenticated client");
			}
		}
		...//省略
      OAuth2AccessToken token = getTokenGranter().grant(tokenRequest.getGrantType(), tokenRequest);
		if (token == null) {
			throw new UnsupportedGrantTypeException("Unsupported grant type: " + tokenRequest.getGrantType());
		}

		return getResponse(token);

	}
    ...//省略
}
下面开始分析端点/oauth/token 是如何通过用户名密码client信息等来换取令牌端点的
可以看到:
- 首先从clientDetailsService里面获取客户端信息clientDetails ,然后进行校验前端传递的clientId client_secret是否匹配,检查grant_type scope。然后通过getTokenGranter().grant(tokenRequest.getGrantType(), tokenRequest)授权,这个授权主要是先校验信息的正确性

- 在AuthorizationServerEndPointsConfigurer里面的tokenGranter 里面的授权grant方法
private TokenGranter tokenGranter() {
        if (this.tokenGranter == null) {
            this.tokenGranter = new TokenGranter() {
                private CompositeTokenGranter delegate;

                public OAuth2AccessToken grant(String grantType, TokenRequest tokenRequest) {
                    if (this.delegate == null) {
                        this.delegate = new CompositeTokenGranter(AuthorizationServerEndpointsConfigurer.this.getDefaultTokenGranters());
                    }

                    return this.delegate.grant(grantType, tokenRequest);
                }
            };
        }

        return this.tokenGranter;
    }
- 走到CompositeTokenGranter的grant方法,通过一个个tokenGranter去授权
public OAuth2AccessToken grant(String grantType, TokenRequest tokenRequest) {
		for (TokenGranter granter : tokenGranters) {
			OAuth2AccessToken grant = granter.grant(grantType, tokenRequest);
			if (grant!=null) {
				return grant;
			}
		}
		return null;
	}
- 再通过AbstractTokenGranter,获取AccessToken
public OAuth2AccessToken grant(String grantType, TokenRequest tokenRequest) {

		if (!this.grantType.equals(grantType)) {
			return null;
		}

		String clientId = tokenRequest.getClientId();
		ClientDetails client = clientDetailsService.loadClientByClientId(clientId);
		validateGrantType(grantType, client);

		if (logger.isDebugEnabled()) {
			logger.debug("Getting access token for: " + clientId);
		}

		return getAccessToken(client, tokenRequest);

	}
protected OAuth2AccessToken getAccessToken(ClientDetails client, TokenRequest tokenRequest) {
		return tokenServices.createAccessToken(getOAuth2Authentication(client, tokenRequest));
	}
- 再看getOAuth2Authentication方法,这个方法是用来校验用户名和密码的正确性,正确就返回authentication:
找到ResourceOwnerPasswordTokenGranter#getOAuth2Authentication,里面就是通过SpringSecurity的流程去校验username 和password(用户名和密码)了,校验通过后就会返回一个OAuth2Authentication。
@Override
	protected OAuth2Authentication getOAuth2Authentication(ClientDetails client, TokenRequest tokenRequest) {

		Map<String, String> parameters = new LinkedHashMap<String, String>(tokenRequest.getRequestParameters());
		String username = parameters.get("username");
		String password = parameters.get("password");
		// Protect from downstream leaks of password
		parameters.remove("password");

		Authentication userAuth = new UsernamePasswordAuthenticationToken(username, password);
		((AbstractAuthenticationToken) userAuth).setDetails(parameters);
		try {
			userAuth = authenticationManager.authenticate(userAuth);
		}
		catch (AccountStatusException ase) {
			//covers expired, locked, disabled cases (mentioned in section 5.2, draft 31)
			throw new InvalidGrantException(ase.getMessage());
		}
		catch (BadCredentialsException e) {
			// If the username/password are wrong the spec says we should send 400/invalid grant
			throw new InvalidGrantException(e.getMessage());
		}
		if (userAuth == null || !userAuth.isAuthenticated()) {
			throw new InvalidGrantException("Could not authenticate user: " + username);
		}

		OAuth2Request storedOAuth2Request = getRequestFactory().createOAuth2Request(client, tokenRequest);
		return new OAuth2Authentication(storedOAuth2Request, userAuth);
	}
- 校验通过后,然后通过默认的tokenService 利用上面返回的authentication,生成一个access_token相关信息的类OAuth2AccessToken
private OAuth2AccessToken createAccessToken(OAuth2Authentication authentication, OAuth2RefreshToken refreshToken) {
		DefaultOAuth2AccessToken token = new DefaultOAuth2AccessToken(UUID.randomUUID().toString());
		int validitySeconds = getAccessTokenValiditySeconds(authentication.getOAuth2Request());
		if (validitySeconds > 0) {
			token.setExpiration(new Date(System.currentTimeMillis() + (validitySeconds * 1000L)));
		}
		token.setRefreshToken(refreshToken);
		token.setScope(authentication.getOAuth2Request().getScope());

		return accessTokenEnhancer != null ? accessTokenEnhancer.enhance(token, authentication) : token;
	}
这样通过访问/oauth/token端点得到access_token就结束了。
总结:
密码模式下,就是通过用户名和密码还有客户端信息访问令牌端点得到access_token,在请求授权服务器令牌端点时候,授权服务器会去校验用户名和密码是否匹配,客户端id和客户端secret是否匹配等。校验通过后,就会通过默认的tokenService生成一个Auth2AccessToken对象,返回access_token相关信息
6.2 通过access_token访问资源
访问/getUser ,在header头部里面添加Authorization ->Bearer "access_token",返回了hello me
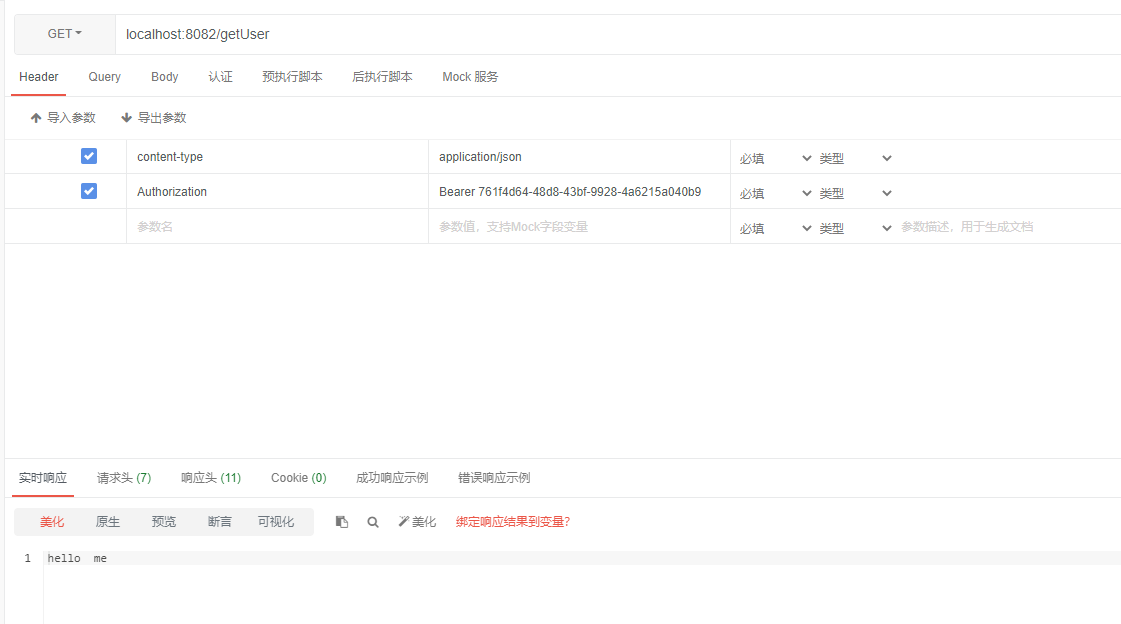
资源服务器里面的接口
@RestController
public class HelloController {

    @GetMapping("/getUser")
    public String getUser(){
        return "hello  me";
    }
}
6.2.1 源码分析
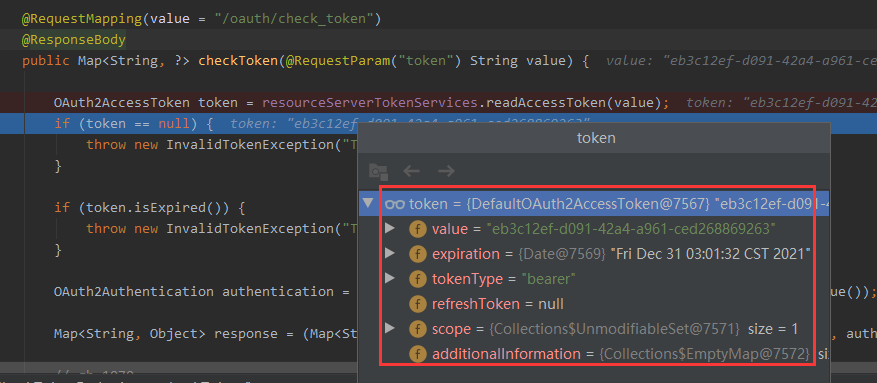
浏览器带着access_token 请求资源服务器,资源服务器的首先会校验是否已授权,由上面资源服务器的配置可知,它是通过远程调用授权服务器的/oauth/check_token端点来进行校验的,来看下这个端点,可知,这个端点是在CheckTokenEndpoint#checkToken(String)下面
找到CheckTokenEndpoint
@FrameworkEndpoint
public class CheckTokenEndpoint {

	private ResourceServerTokenServices resourceServerTokenServices;

	private AccessTokenConverter accessTokenConverter = new DefaultAccessTokenConverter();

	...//省略

	@RequestMapping(value = "/oauth/check_token")
	@ResponseBody
	public Map<String, ?> checkToken(@RequestParam("token") String value) {

		OAuth2AccessToken token = resourceServerTokenServices.readAccessToken(value);
		if (token == null) {
			throw new InvalidTokenException("Token was not recognised");
		}

		if (token.isExpired()) {
			throw new InvalidTokenException("Token has expired");
		}

		OAuth2Authentication authentication = resourceServerTokenServices.loadAuthentication(token.getValue());

		Map<String, Object> response = (Map<String, Object>)accessTokenConverter.convertAccessToken(token, authentication);

		// gh-1070
		response.put("active", true);	// Always true if token exists and not expired

		return response;
	}
	...//省略
}
打个断点可以知道,resourceServerTokenServices.readAccessToken(value);实际上是通过默认的tokenServices方法来获取accessToken的,默认的TokenService又通过InMemoryTokenStore去读取access_token

从内存TokenStore中获取得到的access_token相关的信息
然后封装成authentication返回,至此,/oauth/check_token断点在经过FilterSecurityInterceptor这层过滤器拦截通过之后,此时请求资源服务器/getUser得到了相应的资源

 浙公网安备 33010602011771号