[Spring框架]AOP
一、AOP概述
1. 什么是AOP?#
AOP: Aspect Oriented Programming,面向切面编程
它将重复的代码抽取出来,使用动态代理技术,在不修改源码的基础上对已有的方法进行增强
动态代理是在程序运行期间执行,静态代理是在程序编译期间执行。
优势:
- 减少重复代码
- 提高开发效率
- 维护方便
2. AOP具体应用#
我们使用了connection对象的setAutoCommit(true),这样会导致一些问题,比如在向数据库插入数据的时候,出现异常不会回滚,依然会成功插入。
此时可以通过业务层控制事务的提交和回滚
之前是通过connectionUtils类获取当前线程绑定的连接,返回线程连接。
再通过MyTransactionManager类,处理事务提交、回滚等。
但是这样会导致业务层方法和事务控制方法耦合
于是我们使用AOP,通过配置的方式实现动态代理。
相关术语#
joinpoint连接点:能被拦截到的点,即方法
pointcut切入点:指对哪些joinpoint进行拦截
aspect切面:通知和切入点的结合
weaving织入:把切面应用到目标对象来创建新的代理对象
introduction引入:不修改类代码的前提下,动态地添加一些方法或field
学习AOP要明确的事:#
a.开发阶段
编写核心业务代码 -> 抽取公用代码,制作成通知 -> 配置文件中声明切入点与通知间的关系
b.运行阶段
spring框架监控切入点方法的执行,一旦监控到,则使用代理机制,动态创建目标对象的代理对象,根据通知类别在代理对象对应位置织入相应的功能
3. 基于XML的AOP配置#
1. 在pom.xml中引入相关依赖#
<!--aop切面相关的包-->
<dependency>
    <groupId>org.springframework</groupId>
    <artifactId>spring-aspects</artifactId>
    <version>5.3.18</version>
</dependency>
<!--事务包-->
<dependency>
    <groupId>org.springframework</groupId>
    <artifactId>spring-tx</artifactId>
    <version>5.3.18</version>
</dependency>
2. 创建spring配置文件并导入约束#
<?xml version="1.0" encoding="UTF-8"?>
<beans xmlns="http://www.springframework.org/schema/beans"
       xmlns:p="http://www.springframework.org/schema/p"
       xmlns:context="http://www.springframework.org/schema/context"
       xmlns:aop="http://www.springframework.org/schema/aop"

       xmlns:xsi="http://www.w3.org/2001/XMLSchema-instance"
       xsi:schemaLocation="http://www.springframework.org/schema/beans http://www.springframework.org/schema/beans/spring-beans.xsd
                           http://www.springframework.org/schema/context http://www.springframework.org/schema/context/spring-context.xsd
                           http://www.springframework.org/schema/aop http://www.springframework.org/schema/aop/spring-aop.xsd">
3. 配置文件applicationContext.xml#
4. 抽取公共代码制作成通知#
1. 把通知类用bean标签配置起来#
用@Component注解创建了MyTransactionManager对象
2. aop:config声明aop配置#
使用<aop:config></aop:config>标签声明开始aop的配置
3. 使用aop:aspect配置切面#
使用aop:aspect配置切面
id:切面的唯一标识
ref:引用通知类bean的id
<aop:aspect ref="myTransactionManager" id="txAdvice"></aop:aspect>
4. 使用aop:pointcut配置切入点表达式#
aop:pointcut: 用于配置切入点表达式
id:切入点表达式的唯一标识
expression:定义切入点表达式
<aop:pointcut id="pointcut1" expression="execution(* com.w.service.impl.*.*(..))" />
5. 使用aop:xxx配置对应的通知类型#
method:指定通知中方法的名称
pointcut-ref:切入点表达式的引用
前置通知:<aop:before method="" pointcut-ref="" />
后置通知:<aop:after-returning method="" pointcut-ref="" />
异常通知:<aop:after-throwing method="" pointcut-ref="" />
最终通知:<aop:after method="" pointcut-ref="" />
环绕通知:<aop:around method="" pointcut-ref="" />
4. 基于注解的AOP配置#
1. 把通知类也使用注解配置#
我们参考一下xml中的配置
    <aop:config>
        <!-- 配置的代码都写在此处 -->
        <!--        拦截Controller中的方法-->
        <aop:pointcut id="pointcutController" expression="execution(* com.w.controller.*.*(..))"/>
        <!--        拦截Service中的方法-->
        <aop:pointcut id="pointcutService" expression="execution(* com.w.service.impl.*.*(..))"/>
        <aop:aspect ref="myLog">
            <!--            前置通知-->
            <aop:before method="log" pointcut-ref="pointcutController"></aop:before>
        </aop:aspect>

        <aop:aspect ref="jisuanTime">
            <!--            环绕通知-->
            <aop:around method="runTime" pointcut-ref="pointcutService"></aop:around>
        </aop:aspect>
    </aop:config>
首先需要把通知类丢到spring容器中去,所以我们需要使用@Component注解
2. 在通知类上使用@Aspect注解声明为切面#
3. 在增强的方法上配置通知#
如下段java代码,配置前置通知
@Component
@Aspect
public class Mylog {
    @Before("execution(* com.w.controller.*.*(..))")
    public void log(JoinPoint joinpoint) {
        System.out.println(joinpoint);
        System.out.println(LocalDateTime.now() + ":被调用了");
    }
}
4. 在spring配置文件中开启spring对注解aop的支持#
<aop:aspectj-autoproxy />
5. spring中的事务控制#
根据J2EE体系,事务处理位于业务层
spring的事务控制是基于AOP的
1. 相关API#
1. PlatformTransactionManager#
该接口是spring的事务管理器,提供了常用的操作事务的方法
真正管理事务的对象
- org.springframework.jdbc.datasource.DataSourceTransactionManager
JDBC 或 iBatis 进行持久化数据时使用 - org.springframework.orm.hibernate5.HibernateTransactionManager
Hibernate 版本进行持久化数据时使用
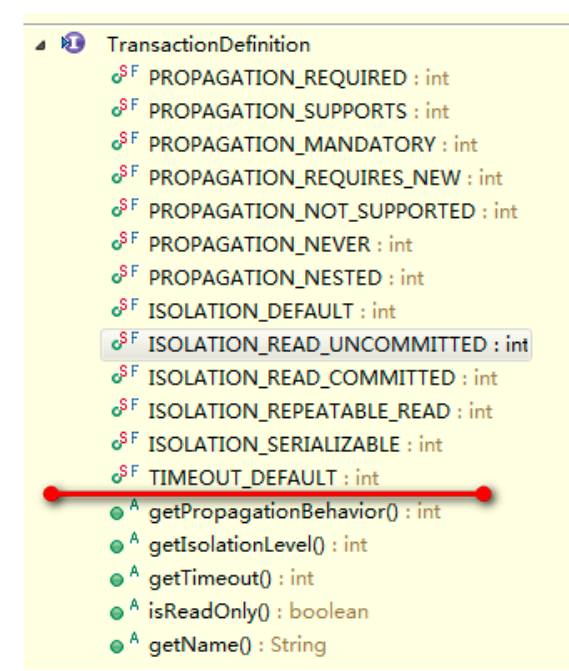
2.TransactionDefinition#
3.事务的隔离级别#
-
READ_UNCOMMITTED
读未提交,就是能够读到未提交的数据
不可解决脏读、不可重复读、幻读中的任何一种 -
READ_COMMITED[Oracle默认]
读已提交,就是能够读到那些已提交的数据
不可解决不可重复读、幻读 -
REPEATABLE_READ[MySQL默认]
重复读取,即在数据读出来之后加锁
不可解决幻读 -
SERLALIZABLE
串行化,挨个运行完一个事务的所有子事务之后才可以执行另外一个事务里面的所有子事务
4.事务的传播行为#
- REQUIRED: 如果当前没有事务,就新建事务,如果已存在事务,就加入该事务
- SUPPORTS:如果当前没有事务,那就没有事务
- MANDATORY:使用当前的事务,如果当前没有事务,就抛出异常
- REQUERS_NEW:新建事务,如果当前在事务中,把当前事务挂起
- NOT_SUPPORTED:以非事务方式执行操作,如果当前存在事务,就把当前事务挂起
- NEVER:以非事务方式运行,如果当前存在事务,抛出异常
- NESTED:如果当前存在事务,则在嵌套事务内执行。如果当前没有事务,则执行 REQUIRED 类似的操作
超时时间
默认值是-1,没有超时限制。如果有,以秒为单位进行设置。
5.基于 XML 的声明式事务控制(配置方式)重点#
- 引入事务jar包
<!--事务包-->
<dependency>
    <groupId>org.springframework</groupId>
    <artifactId>spring-tx</artifactId>
    <version>5.3.18</version>
</dependency>
- 引入事务命名空间
xmlns:tx="http://www.springframework.org/schema/tx"

xsi:schemaLocation="
http://www.springframework.org/schema/tx http://www.springframework.org/schema/tx/spring-tx.xsd"
配置步骤
- 第一步:配置事务管理器
<!-- 配置一个事务管理器 -->
<bean id="transactionManager" class="org.springframework.jdbc.datasource.DataSourceTransactionManager">
    <property name="dataSource" ref="dataSource" />
</bean>
- 第二步:配置事务的通知引用事务管理器
<tx:advice>
  <tx:attributes>
    <tx:method name=""/>
  </tx:attributes>
</tx:advice>
- 第三步:配置事务的属性
指定事务的method 传播行为propagation 事务回滚rollback-for
<tx:advice>
  <tx:attributes>
    <tx:method name="insert*" propagation="REQUIRED" rollback-for="Exception"/>
  </tx:attributes>
</tx:advice>
- 第四步:配置AOP 切入点表达式
<aop:config>
 <aop:pointcut id="pointcut1" expression="execution(* com.w.service.*.*(..))" />
</aop:config>
- 第五步:配置切入点表达式和事务通知的对应关系
<aop:config>
 <aop:pointcut id="pointcut1" expression="execution(* com.w.service.*.*(..))" />
  <aop:advisor advice-ref="txAdvice" pointcut-ref="pointcut1" />
</aop:config>
6.配置类配置整个项目#
1. 新建springconfig配置类
- 在类上加@configuration, 标注该类为配置类
- 在类上加@ComponentScan("com.w"),标注扫描包
- 在类上加@EnableAspectJAutoProxy和@EnableTransactionManagement,开启AOP注解支持和事务支持
2. 新建DbProperties 读取资源文件类
- 在类上加@Component,将其对象丢到spring容器中
- 在类上加@PropertySource("classpath:jdbc.properties"),创建该类的对象并纳入spring容器管理
- 在类中声明driver、url、username、password变量
- 在类上加@Data注解,在变量上加@Value("${jdbc.driver}")等注解
相当于把DbProperty类new了一个对象丢到spring容器中,读完配置文件再通过EL表达式读到值
3. 配置数据源
    @Bean
    public DataSource createDateSource(DbProperty dbProperty) {
        DruidDataSource dataSource = new DruidDataSource();
        dataSource.setDriverClassName(dbProperty.getDriver());
        dataSource.setUrl(dbProperty.getUrl());
        dataSource.setUsername(dbProperty.getUsername());
        dataSource.setPassword(dbProperty.getPassword());
        return dataSource;
    }
4. 配置sqlSessionFactory
其中需要配置dataSource、typeAliases、日志框架、拦截器(用于分页)
    @Bean("sessionFactory")
    public SqlSessionFactoryBean createSqlSessionFactoryBean(DataSource dataSource) {
        SqlSessionFactoryBean sqlSessionFactoryBean = new SqlSessionFactoryBean();
        // dataSource
        sqlSessionFactoryBean.setDataSource(dataSource);
        // typeAliases
        sqlSessionFactoryBean.setTypeAliasesPackage("com.w.entity");

        // 日志框架
        org.apache.ibatis.session.Configuration configuration = new org.apache.ibatis.session.Configuration();
        configuration.setLogImpl(org.apache.ibatis.logging.log4j2.Log4j2Impl.class);
        sqlSessionFactoryBean.setConfiguration(configuration);

        // 拦截器
        Interceptor[] interceptorArr = new Interceptor[1];
        PageInterceptor pageInterceptor = new PageInterceptor();

        Properties properties = new Properties();
        properties.setProperty("helperDialect", "mysql");
        properties.setProperty("reasonable", "true");
        pageInterceptor.setProperties(properties);

        interceptorArr[0] = pageInterceptor;
        sqlSessionFactoryBean.setPlugins(interceptorArr);
        return sqlSessionFactoryBean;
    }
5. 配置扫描Dao接口包目录
    @Bean
    public MapperScannerConfigurer createMapperScannerConfigurer() {
        MapperScannerConfigurer mapperScannerConfigurer = new MapperScannerConfigurer();
        mapperScannerConfigurer.setSqlSessionFactoryBeanName("sessionFactory");
        mapperScannerConfigurer.setBasePackage("com.w.mapper");
        return mapperScannerConfigurer;
    }
6. 配置事务管理器
    @Bean
    public DataSourceTransactionManager createDataSourceTransactionManager(DataSource dataSource) {
        DataSourceTransactionManager dataSourceTransactionManager = new DataSourceTransactionManager();
        dataSourceTransactionManager.setDataSource(dataSource);
        return dataSourceTransactionManager;
    }
7. 配置通知
    @Bean("transactionInterceptor")
    public TransactionInterceptor createTransactionInterceptor(DataSourceTransactionManager dataSourceTransactionManager) {
        TransactionInterceptor transactionInterceptor = new TransactionInterceptor();
        transactionInterceptor.setTransactionManager(dataSourceTransactionManager);

        //设置 readOnly 规则
        RuleBasedTransactionAttribute readOnlyTx = new RuleBasedTransactionAttribute();
        readOnlyTx.setReadOnly(true);
        readOnlyTx.setPropagationBehavior(TransactionDefinition.PROPAGATION_SUPPORTS);
        //设置 required 规则
        RuleBasedTransactionAttribute requiredTx = new RuleBasedTransactionAttribute();
        requiredTx.setRollbackRules(Collections.singletonList(new RollbackRuleAttribute(Exception.class)));
        requiredTx.setPropagationBehavior(TransactionDefinition.PROPAGATION_REQUIRED);

        //绑定规则
        NameMatchTransactionAttributeSource source = new NameMatchTransactionAttributeSource();
        Map<String, TransactionAttribute> txMap = new HashMap<>();
        txMap.put("save*", requiredTx);
        txMap.put("add*", requiredTx);
        txMap.put("insert*", requiredTx);

        txMap.put("delete*", requiredTx);
        txMap.put("del*", requiredTx);
        txMap.put("remove*", requiredTx);

        txMap.put("update*", requiredTx);
        txMap.put("change*", requiredTx);
        txMap.put("modify*", requiredTx);

        txMap.put("find*", readOnlyTx);
        txMap.put("get*", readOnlyTx);
        txMap.put("select*", readOnlyTx);
        txMap.put("query*", readOnlyTx);
        txMap.put("list*", readOnlyTx);
        txMap.put("search*", readOnlyTx);
        source.setNameMap(txMap);

        transactionInterceptor.setTransactionAttributeSource(source);

        return transactionInterceptor;
    }
8. 配置顾问
    @Bean
    public Advisor getAdvisor(TransactionInterceptor transactionInterceptor) {
        AspectJExpressionPointcut pointcut = new AspectJExpressionPointcut();
        pointcut.setExpression("execution(* com.w.service.impl.*.*(..))");

        return new DefaultPointcutAdvisor(pointcut, transactionInterceptor);
    }
6. spring新注解配置#
1. @Configuration#
作用:spring 的配置类,相当于 bean.xml 文件
属性: value:用于指定配置类的字节码
2. @ComponentScan#
作用:指定spring 在初始化容器时要扫描的包,相当于<context:component-scan base-package="com "/>
属性: basePackages:用于指定要扫描的包
3. @Bean#
作用:写在方法上,表明此方法创建一个对象放入spring容器中
属性:name:给该方法创建的对象指定一个名称,即bean id
4. @PropertySource#
作用:指定properties文件中的配置
属性:value[]:用于指定 properties 文件位置。如果是在类路径下,需要写上 classpath


【推荐】国内首个AI IDE,深度理解中文开发场景,立即下载体验Trae
【推荐】编程新体验,更懂你的AI,立即体验豆包MarsCode编程助手
【推荐】抖音旗下AI助手豆包,你的智能百科全书,全免费不限次数
【推荐】轻量又高性能的 SSH 工具 IShell:AI 加持,快人一步
· 分享一个免费、快速、无限量使用的满血 DeepSeek R1 模型,支持深度思考和联网搜索!
· 基于 Docker 搭建 FRP 内网穿透开源项目(很简单哒)
· ollama系列01:轻松3步本地部署deepseek,普通电脑可用
· 按钮权限的设计及实现
· 25岁的心里话