ElementUI 源码简析——源码结构篇
转自:https://www.cnblogs.com/karthuslorin/p/11202209.html
目录结构解析

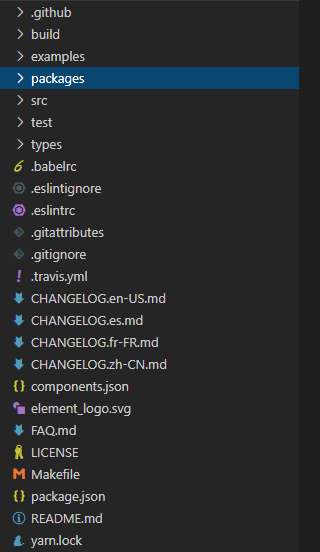
首先,我们先来看看 ElementUI 的目录结构,总体来说,ElementUI 的目录结构与 vue-cli2 相差不大:
-
- .github:存放贡献指南以及 issue、PR 模板,这些是一个成熟的开源项目必须具备的。
- build:毫无疑问,看文件夹名称就知道是存放打包工具的配置文件。
- examples:存放 ElementUI 组件示例。
- packages:存放组件源码,也是之后源码分析的主要目标。
- src:存放入口文件以及各种辅助文件。
src/directives:放置自定义指令。src/locale:放置语言的配置文件。src/mixins:放置组件用的混合文件。src/transitions:放置动画配置文件。src/utils:放置用到工具函数文件。src/index.js:组件注册的入口文件。
- test:存放单元测试文件,合格的单元测试也是一个成熟的开源项目必备的。
- types:存放声明文件,方便引入 typescript 写的项目中,需要在
package.json中指定 typing 字段的值为 声明的入口文件才能生效。
说完了文件夹目录,抛开那些常见的 .babelrc、.eslintc 等文件,我们来看看根目录下的几个看起来比较奇怪的文件:
-
- .travis.yml:持续集成(CI)的配置文件,它的作用就是在代码提交时,根据该文件执行对应脚本,成熟的开源项目必备之一。
- CHANGELOG:更新日志,土豪的 ElementUI 准备了 4 个不同语言版本的更新日志。
- components.json:配置文件,标注了组件的文件路径,方便 webpack 打包时获取组件的文件路径。
- element_logo.svg:ElementUI 的图标,使用了 svg 格式,合理使用 svg 文件,可以大大减少图片大小。
- FAQ.md:ElementUI 开发者对常见问题的解答。
- LICENSE:开源许可证,ElementUI 使用的是 MIT 协议,使用 ElementUI 进行二次开发的开发者建议注意该文件。
- Makefile:在 .github 文件夹下的贡献指南中提到过,组件开发规范中的第一条:通过
make new创建组件目录结构,包含测试代码、入口文件、文档。其中make new就是make命令中的一种。make命令是一个工程化编译工具,而 Makefile 定义了一系列的规则来制定文件变异操作,常常使用 Linux 的同学应该不会对 Makefile 感到陌生。
入口文件解析
接下来,我们来看看项目的入口文件。正如前面所说的,入口文件就是 src/index.js :
/* Automatically generated by './build/bin/build-entry.js' */

import Pagination from '../packages/pagination/index.js';
// ...
// 引入组件

const components = [
  Pagination,
  Dialog,
  // ...
  // 组件名称
];

const install = function(Vue, opts = {}) {
  // 国际化配置
  locale.use(opts.locale);
  locale.i18n(opts.i18n);

  // 批量全局注册组件
  components.forEach(component => {
    Vue.component(component.name, component);
  });

  // 全局注册指令
  Vue.use(InfiniteScroll);
  Vue.use(Loading.directive);

  // 全局设置尺寸
  Vue.prototype.$ELEMENT = {
    size: opts.size || '',
    zIndex: opts.zIndex || 2000
  };

  // 在 Vue 原型上挂载方法
  Vue.prototype.$loading = Loading.service;
  Vue.prototype.$msgbox = MessageBox;
  Vue.prototype.$alert = MessageBox.alert;
  Vue.prototype.$confirm = MessageBox.confirm;
  Vue.prototype.$prompt = MessageBox.prompt;
  Vue.prototype.$notify = Notification;
  Vue.prototype.$message = Message;

};

/* istanbul ignore if */
if (typeof window !== 'undefined' && window.Vue) {
  install(window.Vue);
}

export default {
  version: '2.9.1',
  locale: locale.use,
  i18n: locale.i18n,
  install,
  CollapseTransition,
  // 导出组件
};
总体来说,入口文件十分简单易懂。由于使用 Vue.use 方法调用插件时,会自动调用 install 函数,所以只需要在 install 函数中批量全局注册各种指令、组件,挂载全局方法即可。
ElementUI 的入口文件有两点十分值得我们学习:
- 初始化时,提供选项用于配置全局属性,大大方便了组件的使用。
- 自动化生成入口文件
自动化生成入口文件
我们先来看看入口文件的第一句话:

这句话告诉我们,该文件是由 build/bin/build-entry.js 生成的,所以我们来到该文件:
var Components = require('../../components.json');
var fs = require('fs');
var render = require('json-templater/string');
var uppercamelcase = require('uppercamelcase');
var path = require('path');
var endOfLine = require('os').EOL;

// 输出地址
var OUTPUT_PATH = path.join(__dirname, '../../src/index.js');
// 导入模板
var IMPORT_TEMPLATE = 'import {{name}} from \'../packages/{{package}}/index.js\';';
// 安装组件模板
var INSTALL_COMPONENT_TEMPLATE = '  {{name}}';
// 模板
var MAIN_TEMPLATE = `/* Automatically generated by './build/bin/build-entry.js' */

{{include}}
import locale from 'element-ui/src/locale';
import CollapseTransition from 'element-ui/src/transitions/collapse-transition';

const components = [
{{install}},
  CollapseTransition
];

const install = function(Vue, opts = {}) {
  locale.use(opts.locale);
  locale.i18n(opts.i18n);

  components.forEach(component => {
    Vue.component(component.name, component);
  });

  Vue.use(InfiniteScroll);
  Vue.use(Loading.directive);

  Vue.prototype.$ELEMENT = {
    size: opts.size || '',
    zIndex: opts.zIndex || 2000
  };

  Vue.prototype.$loading = Loading.service;
  Vue.prototype.$msgbox = MessageBox;
  Vue.prototype.$alert = MessageBox.alert;
  Vue.prototype.$confirm = MessageBox.confirm;
  Vue.prototype.$prompt = MessageBox.prompt;
  Vue.prototype.$notify = Notification;
  Vue.prototype.$message = Message;

};

/* istanbul ignore if */
if (typeof window !== 'undefined' && window.Vue) {
  install(window.Vue);
}

export default {
  version: '{{version}}',
  locale: locale.use,
  i18n: locale.i18n,
  install,
  CollapseTransition,
  Loading,
{{list}}
};
`;

delete Components.font;

var ComponentNames = Object.keys(Components);

var includeComponentTemplate = [];
var installTemplate = [];
var listTemplate = [];

// 根据 components.json 文件批量生成模板所需的参数
ComponentNames.forEach(name => {
  var componentName = uppercamelcase(name);

  includeComponentTemplate.push(render(IMPORT_TEMPLATE, {
    name: componentName,
    package: name
  }));

  if (['Loading', 'MessageBox', 'Notification', 'Message', 'InfiniteScroll'].indexOf(componentName) === -1) {
    installTemplate.push(render(INSTALL_COMPONENT_TEMPLATE, {
      name: componentName,
      component: name
    }));
  }

  if (componentName !== 'Loading') listTemplate.push(`  ${componentName}`);
});

// 传入模板参数
var template = render(MAIN_TEMPLATE, {
  include: includeComponentTemplate.join(endOfLine),
  install: installTemplate.join(',' + endOfLine),
  version: process.env.VERSION || require('../../package.json').version,
  list: listTemplate.join(',' + endOfLine)
});

// 生成入口文件
fs.writeFileSync(OUTPUT_PATH, template);
console.log('[build entry] DONE:', OUTPUT_PATH);
build-entry.js 使用了 json-templater 来生成了入口文件。在这里,我们不关注 json-templater 的用法,仅仅研究这个文件的思想。
它通过引入 components.json 这个我们前面提到过的静态文件,批量生成了组件引入、注册的代码。这样做的好处是什么?我们不再需要每添加或删除一个组件,就在入口文件中进行多处修改,使用自动化生成入口文件之后,我们只需要修改一处即可。


