

1、react在进行props的祥细配置
react在进行props祥细配置的时候,可以配置默认值,参数的类型,以及是否是一定要传
import {Component} from 'react'
import reactDom from 'react-dom'
import PropTypes from 'prop-types'  //该库是react默认引入的

class Counter extends Component {
    static defaultProps = {        //配置参数
        name: 'bill'
    }
    static propTypes = {          //配置参数的类型以及是否必要
        name: PropTypes.string.isRequired,
        age: PropTypes.number.isRequired
    }
    render() {
        return <div>{this.props.name}{this.props.age}</div>
    }
}

reactDom.render(<Counter name='this is title' age={12}/>, window.root)  //注意:该写法,那么就是number类型的数据,如果用的是{'12'}则是字符串类型的数据
PropTypes的祥细类型配置
Son.propTypes = {
     optionalArray: PropTypes.array,//检测数组类型
     optionalBool: PropTypes.bool,//检测布尔类型
     optionalFunc: PropTypes.func,//检测函数(Function类型)
     optionalNumber: PropTypes.number,//检测数字
     optionalObject: PropTypes.object,//检测对象
     optionalString: PropTypes.string,//检测字符串
     optionalSymbol: PropTypes.symbol,//ES6新增的symbol类型
}
propTypes其他类型配置示例
import {Component} from 'react'
import reactDom from 'react-dom'
import PropTypes from 'prop-types'  //该库是react默认引入的

class Counter extends Component {
    static defaultProps = {        //配置参数
        name: 'bill'
    }
    static propTypes = {          //配置参数的类型以及是否必要
        name: PropTypes.string.isRequired,
        age: PropTypes.number,
        str: PropTypes.oneOfType([PropTypes.number, PropTypes.bool]).isRequired,  //表示这个是这两种类型里的任何一种都可以
        num: PropTypes.oneOf([1,2]), //这个表示是指定数组里的一个值
        arr: PropTypes.arrayOf(PropTypes.number), //表示这个是一个数组,并且是由数字组成的一个数组,如果是['1', 2]就会报错
        obj: PropTypes.shape({  //这个表示指定一个对象里面的类型, 这个时候,如果下面传的是{'name': 'bill', age: '12'}就会报类型错误
            name: PropTypes.string,
            age: PropTypes.number
        }).isRequired
    }
    render() {
        return <div>{this.props.name}{this.props.age}</div>
    }
}

reactDom.render(<Counter name='this is title' str={12} obj={{'name': 'bill', age: 12}}/>, window.root)
函数式组件的默认props的写法
import React, {Component} from 'react';
import ReactDom from 'react-dom'

class Index extends Component {
    state = {
        name: 'yfbill'
    }
    render() {
        return (
            <div>
                <Counter name={this.state.name}/>
            </div>
        );
    }
}
const Counter = props => {
    let {name, age=10, list=['aaa', 'bbb']} = props //函数式组件中props中进行解构默认值的写法
    return <div>
        <h2>{name}{age}</h2>
        {list.map(val => <span>{val}</span>)}
    </div>
}
ReactDom.render(<Index/>, window.root)
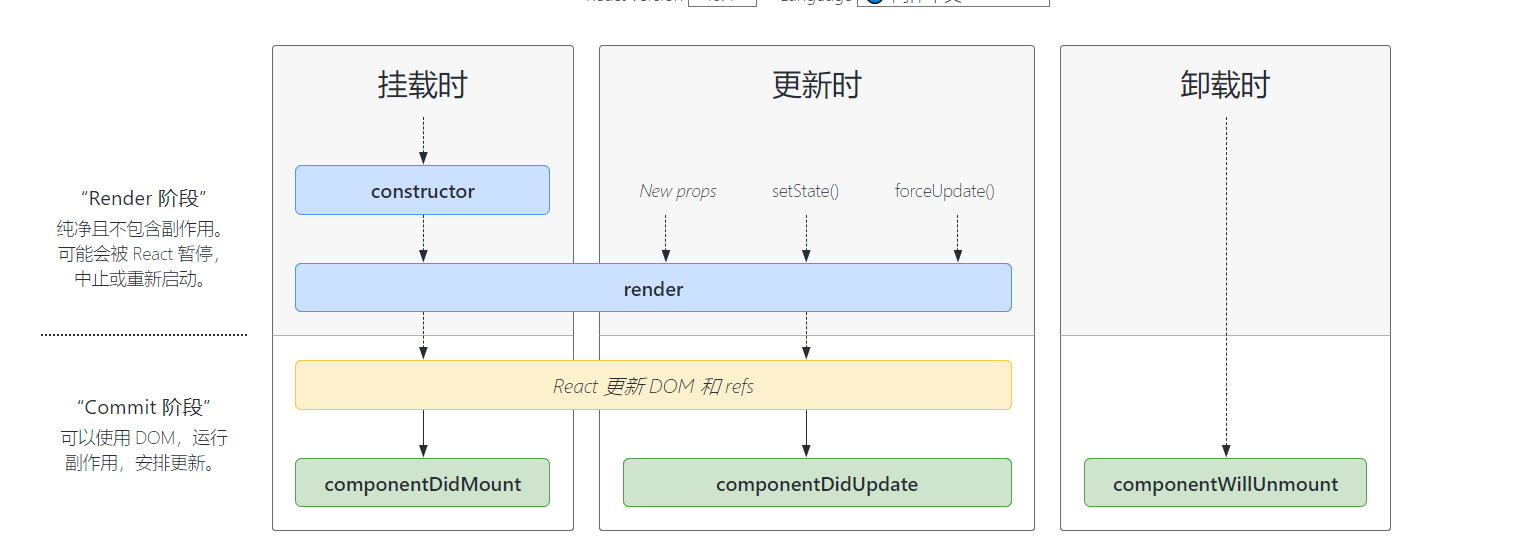
2、react的生命周期函数
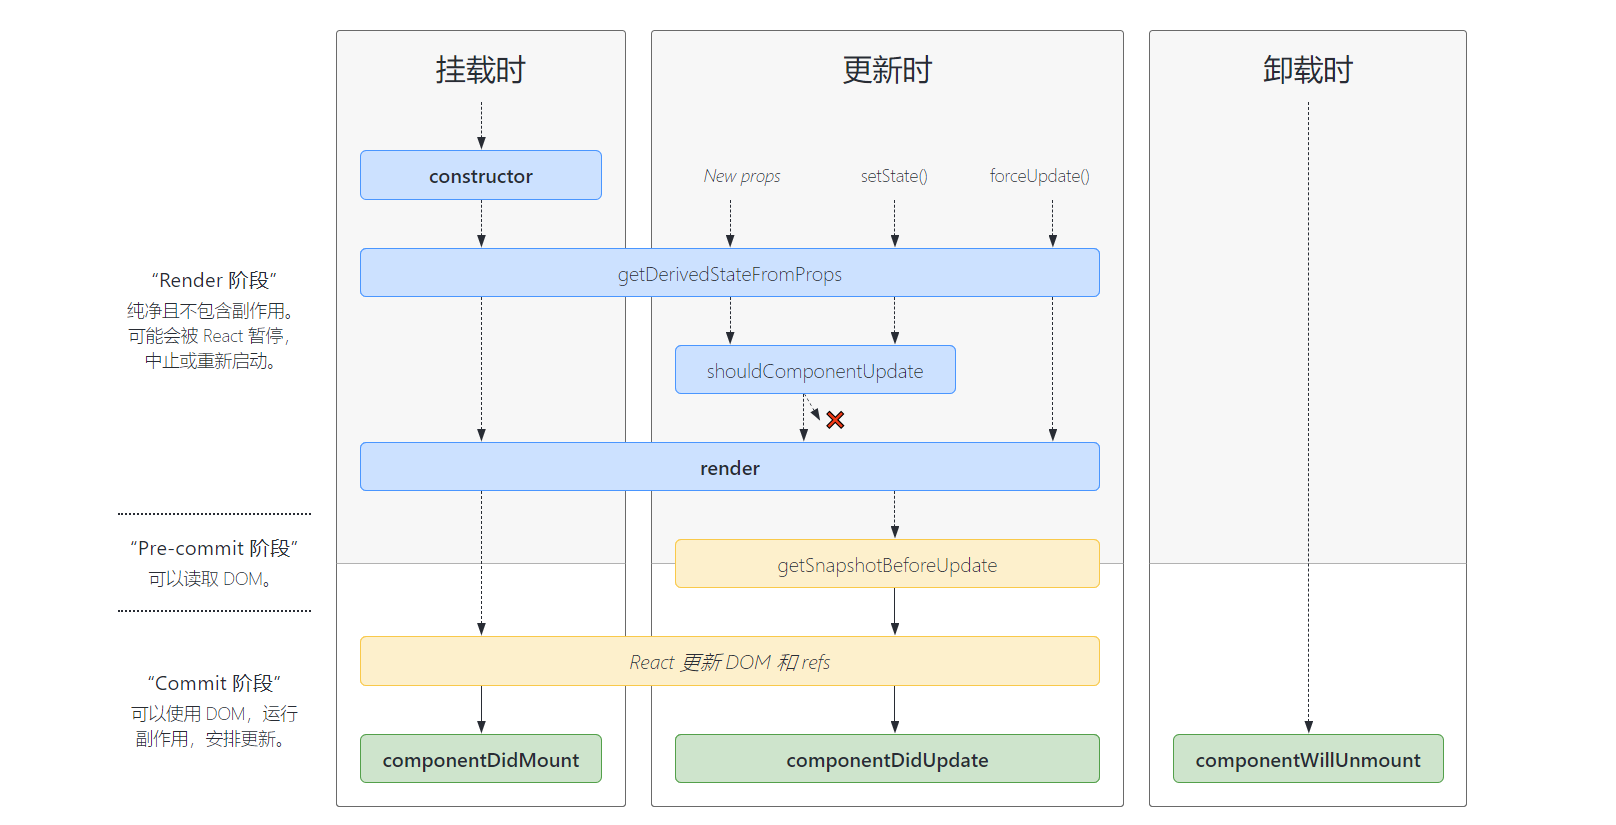
常用的生命周期函数
getDerivedStateFromProps 钩子
根据新的属性对象派生状态对象,也就表示在这个函数里面会接收两个参数,一个是传入的Props对象,一个是当前的state对象,并且该函数会返回一个对象或者null, 并且这个对象会被系统默认拿去更新当前的state,并且会触发页面的刷新
import React, {Component} from 'react';
import ReactDom from 'react-dom'

class Counter extends Component {
    constructor() {
        super();
        this.state = {
            num: 0
        }
    }
    clickEvent = () => {
        this.setState(state => ({num: state.num + 1}))
    }
    render() {
        return (
            <div>
                <h2>当前的数字是{this.state.num}</h2>
                <button onClick={this.clickEvent}>按钮</button>
                <Item num={this.state.num}/>
            </div>
        );
    }
}

class Item extends Component {
    constructor(props) {
        super(props)
        this.state = {
            count: 0
        }
    }
    static getDerivedStateFromProps(currentProps, preState) {   //注意:这个方法是静态方法
        console.log(currentProps, preState)
        return {
            num: currentProps.num * 2  //该属性会被更新到state上,供使用
        }
    }
    render() {
        return <div>这个是子类的属性{this.state.count}, 传进来的值是{this.state.num}</div>
    }
}

ReactDom.render(<Counter/>, window.root)
getSnapshotBeforeUpdate 钩子
表示在更新前获取指定的状态,并且传入componentDidUpdate中的第三个参数以备调用,可以达到在组件更新的时候保持指定的状态
import React, {Component} from 'react';
import ReactDom from 'react-dom'

class Counter extends Component {
    constructor(props) {
        super(props)
        this.wraper = React.createRef();
        this.state = { messages: [] }
    }

    componentDidMount() {
        setInterval(() => {
            this.setState({messages: [this.state.messages.length, ...this.state.messages]})
        }, 1000)
    }

    getSnapshotBeforeUpdate(prevProps, prevState) {
        return this.wraper.current.scrollHeight
    }

    componentDidUpdate(prevProps, prevState, snapshot) {
        this.wraper.current.scrollTop = this.wraper.current.scrollTop + (this.wraper.current.scrollHeight - snapshot)
    }

    render () {
        let style = {
            height: '100px',
            width: '200px',
            border: '1px solid red',
            overflow: 'auto'
        }
        return <ul style={style} ref={this.wraper}>
            {
                this.state.messages.map((val, ind) => <li key={ind}>{val}</li>)
            }
        </ul>
    }
}
ReactDom.render(<Counter/>, window.root)
componentDidUpdate 钩子
表示组件更新后立即调用该方法,但是组件在初次渲染的时候不会调用该方法
接收三个参数, prevProps, prevState, snapshot, 前面两个分别是更新前的props对象,更新前的state对象,以及getSnapshotBeforeUpdate返回的结果,该方法可以用于监听指定属性的变化 ,但是需要作个条件限制以防走入死循环
componentDidMount 钩子
componentWillUnmount 钩子
componentDidCatch 捕获错误的钩子
render
注意:在旧版的react中通常来讲react在获取数据的时候会把获取数据这个操作放在componentDidMount里面进行操作,不放在constructor是因为,如果请求报错,会导致整个react组件崩溃,不放在componentWillMount是因为在SSR(服务端渲染)componentWillMount会执行两次,一次在服务端, 一次在客户端并且在react16后采用了Fiber架构,componentWillMount有可能被执行多次,而componentDidMount则永远只执行一次
3、react中的context
在某些场景下,你想在整个组件树中传递数据, 但却不想手动地在每一层传递属性, 你可以直接在React中使用强大的context Api解决上述问题
在老版本(17版本以前)的用法
import React, {Component} from 'react';
import ReactDom from 'react-dom'
import PropTypes from 'prop-types';

class Father extends Component {
    static childContextTypes = {        //定义父级需要传递的context值的类型
        mark: PropTypes.string,
        app: PropTypes.instanceOf(Father)
    }
    getChildContext() {     //实现当前context传值的实例
        return {
            mark: this.props.mark,
            app: this
        }
    }
    render() {
        return (
            <div>
                <h1>this is father</h1>
                <Son/>
            </div>
        );
    }
}

class Son extends Component {
    // constructor(props, context){  //第二参数是表示传递的上下文,这里的context相当于props如果没有写明constructor,那么默认是this.context
    //     super(props, context)
    // }
    static contextTypes = {   //子类接收父级传递过来的context上下文,如果没有接收,那么就拿不到对应的值
        mark: PropTypes.string,
        app: PropTypes.instanceOf(Father)
    }
    render(){
        console.log(this.context.app)
        return <div>{this.context.mark}</div>
    }
}

ReactDom.render(<Father mark='yfbill' />, window.root)
新版本context的使用
import React, {Component} from 'react';
import ReactDom from 'react-dom'
import MyContext from './context'

//注意:这里用MyContext.Provider来包所对应需要引入context的子组件
class Father extends Component {
    render() {
        return (
            <div>
                <h1>this is father</h1>
                <MyContext.Provider value={{'name': 'yfbill', age: 20, app: this}}><Son/></MyContext.Provider>
            </div>
        );
    }
}

class Son extends Component {
    static contextType = MyContext  //固定写法用contextType来接收context
    render(){
        console.log(this.context)
        return <div>{this.context.name}</div>
    }
}

ReactDom.render(<Father mark='yfbill' />, window.root)
注意:
//如果是函数式组件,那么接收context用的是useContext来接收
const Son = () => {
    const context = useContext(MyContext) //注意:这里的useContext需要从react中引入
    console.log(context)
    return <div>{context.name}</div>
}
context文件
import React from 'react'

export default React.createContext()
如果在类组件中,那么不能使用useContext,但可以用以下方法,并且以下方法也可以使用在函数组件中
import styled from '@emotion/styled'
import MyContext from './context'

const StyleWrap = styled.div`
  color: red;
  background: #eee;
`;
const Item = () => {
    return <MyContext.Consumer>
        {value => {
            return <StyleWrap>{/*注意这里的样式组件也接收参数,用法与常规组件一样*/}
                <h2>this is item---{value.name}</h2>
                <span>this is sub item---{value.age}</span>
            </StyleWrap>
        }}
    </MyContext.Consumer>
}

export default Item
使用useContext代码如下
import { FC, ReactElement, useContext } from 'react';
import { userInfoContext } from '../context/context';

const Content: FC = (): ReactElement => {
  const userInfo = useContext<{ name: string; age: number }>(userInfoContext);

  console.log(userInfo);

  return <div>this is content</div>;
};

export default Content;
注意:在react中进行跨层级的通信,或者是平行组件之前的通信,可以使用 hy-event-store 这个库来完成
import { HYEventBus } from 'hy-event-store'

const eventBus = new HYEventBus()

export default eventBus

// 对外暴露 on emit off三个方法进行调用
4、react中表单元素的使用举例
import { PureComponent, ReactElement, ChangeEvent, MouseEvent } from 'react';

interface IAppState {
  username: string;
  password: string;
  checkList: Array<{ label: string; value: string; checked: boolean }>;
  radioList: Array<{ label: string; value: string }>;
  radioValue: string;
  singleOptions: Array<{ label: string; value: string }>;
  singleValue: string;
  multipleValue: string[];
}

class App extends PureComponent<{}, IAppState> {
  public state: IAppState = {
    username: '',
    password: '',
    checkList: [
      { label: '语文', value: '1', checked: false },
      { label: '数学', value: '2', checked: false },
      { label: '电脑', value: '3', checked: false },
      { label: '英语', value: '4', checked: false },
    ],
    radioList: [
      { label: '今天', value: '0' },
      { label: '昨天', value: '1' },
      { label: '明天', value: '2' },
    ],
    radioValue: '',
    singleOptions: [
      { label: 'javascript', value: 'js' },
      { label: 'php', value: 'php' },
      { label: 'node', value: 'node' },
      { label: 'python', value: 'python' },
      { label: 'shell', value: 'shell' },
    ],
    singleValue: 'js',
    multipleValue: [],
  };

  // 受控组件input的做法
  public inputChangeEvent(e: ChangeEvent<HTMLInputElement>): void {
    const { value, name } = e.target;

    this.setState({ [name]: value } as Pick<
      IAppState,
      'username' | 'password'
    >);
  }

  // 受控组件checkbox的做法
  public checkSelectEvent(e: ChangeEvent<HTMLInputElement>): void {
    const { value, checked } = e.target;
    const target = this.state.checkList.find((item) => item.value === value);

    if (target) target.checked = checked;

    this.setState({
      checkList: [...this.state.checkList],
    });
  }

  // 受控组件radio的做法
  public radioSelectEvent(e: ChangeEvent<HTMLInputElement>): void {
    this.setState({
      radioValue: e.target.value,
    });
  }

  // 受控组件select的单项做法
  public optionSelectEvent(e: ChangeEvent<HTMLSelectElement>): void {
    this.setState({
      singleValue: e.target.value,
    });
  }

  // 受控组件的多项选择
  public muliOptionEvent(e: ChangeEvent<HTMLSelectElement>): void {
    const list = Array.from(e.target.selectedOptions).map((item) => item.value);
    this.setState({
      multipleValue: list,
    });
  }

  // 提交按钮
  public submitEvent(e: MouseEvent<HTMLButtonElement>): void {
    e.preventDefault();
    e.stopPropagation();

    console.log(this.state);
  }

  public render(): ReactElement {
    const {
      username,
      password,
      checkList,
      radioList,
      radioValue,
      singleValue,
      singleOptions,
      multipleValue,
    } = this.state;
    return (
      <div>
        <form>
          <label htmlFor="username">用户名:</label>
          <input
            type="text"
            id="username"
            name="username"
            value={username}
            onChange={(e) => this.inputChangeEvent(e)}
          />
          <label htmlFor="password">密码:</label>
          <input
            type="password"
            id="password"
            name="password"
            value={password}
            autoComplete="off"
            onChange={(e) => this.inputChangeEvent(e)}
          />
          {/* 多项选择 */}
          <div>
            {checkList.map((item) => (
              <label key={'check' + item.value} htmlFor={'check' + item.value}>
                {item.label}
                <input
                  type="checkbox"
                  id={'check' + item.value}
                  value={item.value}
                  checked={item.checked}
                  onChange={(e) => this.checkSelectEvent(e)}
                />
              </label>
            ))}
          </div>
          {/* 单项选择 */}
          <div>
            {radioList.map((item) => (
              <label key={'radio' + item.value} htmlFor={'radio' + item.value}>
                {item.label}
                <input
                  type="radio"
                  id={'radio' + item.value}
                  value={item.value}
                  checked={radioValue === item.value}
                  name="day"
                  onChange={(e) => this.radioSelectEvent(e)}
                />
              </label>
            ))}
          </div>
          {/* 单项选择框 */}
          <select
            value={singleValue}
            onChange={(e) => this.optionSelectEvent(e)}
          >
            {singleOptions.map((item) => (
              <option key={'option' + item.value} value={item.value}>
                {item.label}
              </option>
            ))}
          </select>
          {/* 多项选择框 */}
          <select
            multiple
            value={multipleValue}
            onChange={(e) => this.muliOptionEvent(e)}
          >
            {singleOptions.map((item) => (
              <option key={'mulOption' + item.value} value={item.value}>
                {item.label}
              </option>
            ))}
          </select>
          {/* 点击提交按钮 */}
          <div>
            <button onClick={(e) => this.submitEvent(e)}>提交</button>
          </div>
        </form>
      </div>
    );
  }
}

export default App;

 浙公网安备 33010602011771号