

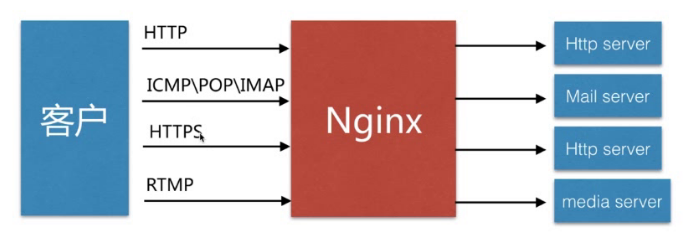
1、nginx的应用场景
静态资源服务器 反向代理服务 API接口服务(LUA& JAVASCRIPT)
2、nginx的优势
高并发高性能 可扩展性好 高可靠性 热布署 开源许可证
3、nginx的安装
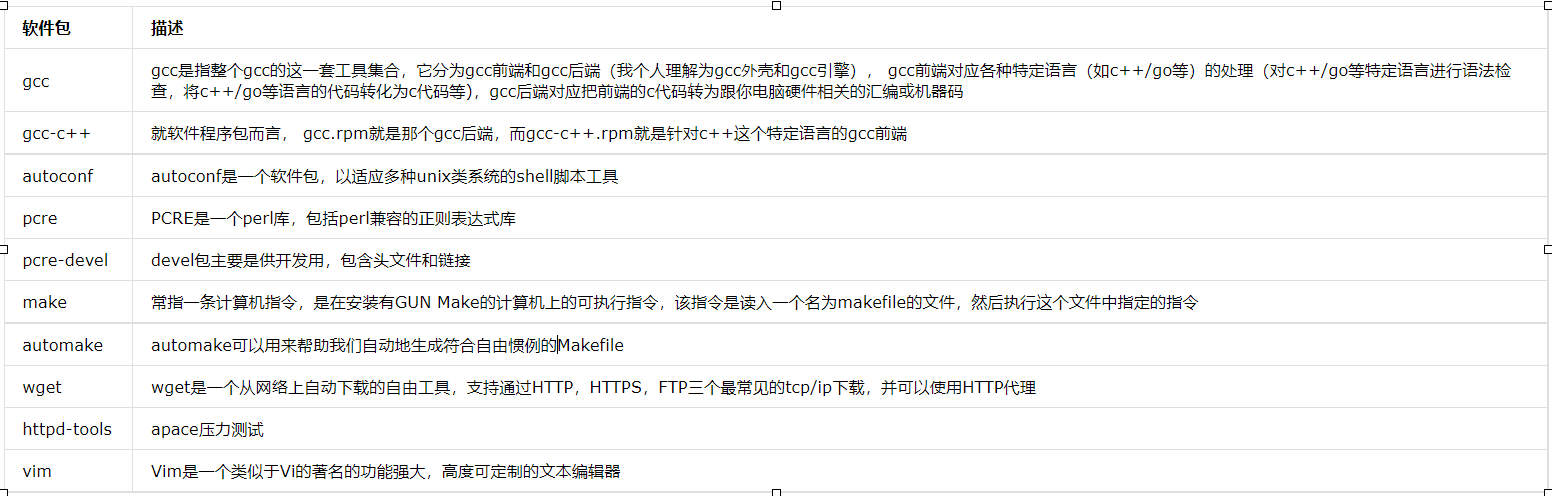
安装依赖
yum -y install gcc gcc-c++ autoconf pcre pcre-devel make automake
yum -y install wget httpd-tools vim
nginx在官方网站里的download中分成三个版本
a、mainLine version ---供学习与研究
b、stable version ---稳定版本,供项目布局
c、legacy version ---历史版本
安装流程


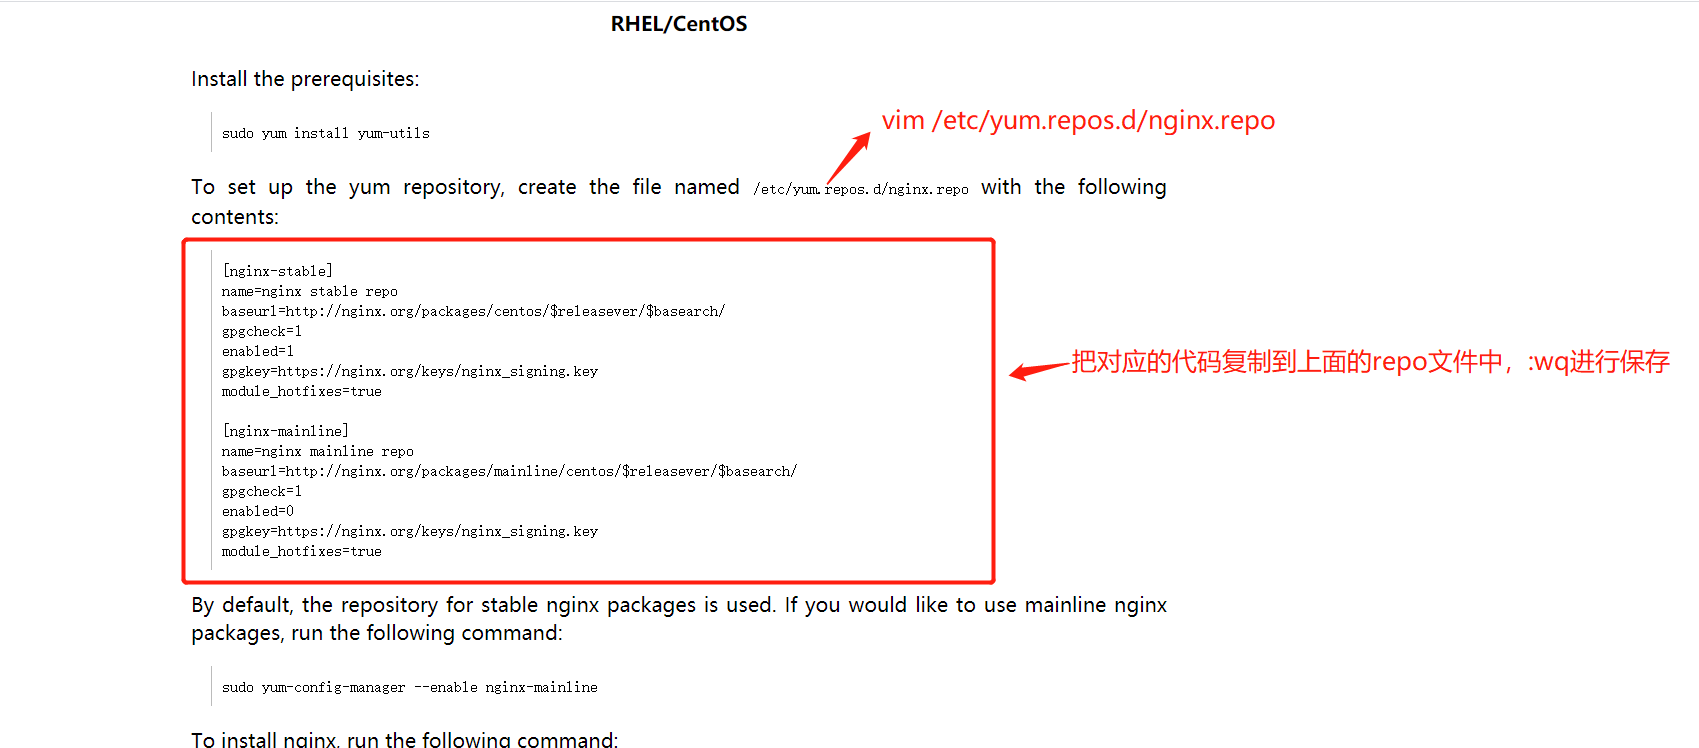
查看安装包 yum list | grep nginx
最后安装 nginx yum install nginx -y
按以上进行安装nginx,输入nginx -v能输出版本,nginx -V可输出对应的配置信息,说明已经安装成功。
查看安装目录 rpm -ql nginx
systemctl start nginx.service 启动nginx服务
systemctl restart nginx.service 重启nginx服务
systemctl stop nginx.service 停止nginx服务
systemctl status nginx.service 查看nginx服务状态
systemctl reload nginx.service 重新加载nginx服务
检测是否配置成功用 nginx -t -c /etc/nginx/nginx.conf
重启nginx服务配置 nginx -s reload -c /etc/nginx/nginx.conf
注意:这其实是nginx的欢迎页面(每个版本的nginx各不相同),这并不代表nginx没有正常启动, 有的版本的访问页面是centos的页面
4、nginx的配置
/etc/nginx/nginx.conf 核心配置文件
/etc/nginx/conf.d/default.conf 默认http服务器配置文件
注意:在nignx中#表示注释 $表示变量
nginx的配置文件有:nginx.conf(主配置文件)
user nginx;   //设置运行此nginx用户名, root的权限比较高,如果有遇到权限问题,可以把nginx改成root

worker_processes auto;  //工作进程数,一般与电脑几核的一致,也可以配置成倍数, 可以使用 ps -ef | grep nginx查询进程数

error_log /var/log/nginx/error.log; // 指定错误日志的路径  如果有指定warn是表示日志的格式

pid /run/nginx.pid;  // 这是一个文件,里面放的是当前nginx的进程号

events {
    worker_connections 1024;  //表示每个子进程的连接数 nginx当前的并发量  worker_processes * worker_connections
}

http {

   include             /etc/nginx/mine.types;  // 表示引入文件扩展名与文件类型映射表, 通常该文件放在与nginx.conf同级目录下

   default_type        application/octet-stream;  // 默认以流的形式解析

    log_format  main  '$remote_addr - $remote_user [$time_local] "$request" '
                      '$status $body_bytes_sent "$http_referer" '
                      '"$http_user_agent" "$http_x_forwarded_for"';  //这里定义一个日志格式,叫main,在access_log处引用

    access_log  /var/log/nginx/access.log  main; // 指定访问日志的存放位置,格式为main即上面定义的

    sendfile            on;  // 零拷贝模式

    tcp_nopush          on;  // tcp 不推 有一定的缓存, 即接收到后不立马返回,进行一定缓存后再返回

    tcp_nodelay         on;

    keepalive_timeout   65;  // 活动链接的超时时间

    types_hash_max_size 4096;

    include             /etc/nginx/mime.types;  // 包含内容和文件名后缀的对应关系,这里面存放的都是文件类型的声明
    default_type        application/octet-stream; // 默认的文件类型,即在 mime.types里面找不到时,则默认以字节流的方式

    include /etc/nginx/conf.d/*.conf; // 包含其他文件 系统默认下是default.conf
}
注意:nginx的访问日志就是里面的access_log tail -f /var/log/nginx/access.log 就可以查看最新的访问情况
http {  // http下可以包含多个server服务
    ...
    server { //每一个server对应一个网站
        listen       80;  // server监听的端口
        server_name  localhost;  //服务所对应的地址,默认是localhost, 也可以放自己的公网IP, 多个时用空格隔开

        location / {  // 表示访问路径以/开头的, 即匹配所有路径
            root   /usr/share/nginx/html; //表示项目的静态文件根目录
            index  index.html index.htm;  //指定默认的文件类型, 即索引文件
        }

        error_page   500 502 503 504  /50x.html;  // 配置默认的访问码,并且配置重定项的地址
        location = /50x.html {  //重定向的地址页面配置
            root   /usr/share/nginx/html; //对应的文件路径
        }

        #location ~ \.php$ {  // 如果访问的文件名是.php结尾的话,会把此请求转发给http://127.0.0.1
        #    proxy_pass: http://127.0.0.1;
        #}

     #location ~ \.php$ {  // 如果访问的文件名是.php结尾的话,会把些请求转发给http://127.0.0.1:9000,相对于上面则不需要再经过apach, 目前常用php配置
     #   root: html;
     #   fastcgi_pass: 127.0.0.1:9000;
        #   fastcgi_index: index.php;
     #  fastcgi_param  SCRIPT_FILENAME / scripts$fastcgi_script_name;
     #  include: fastcgi_params
     #}
    }
}
注意: 在nginx中每一行的结尾是以分号(;)来结尾的,当location后面有 ~ 时表示后面跟着的是正则表达式
5、nginx核心模块
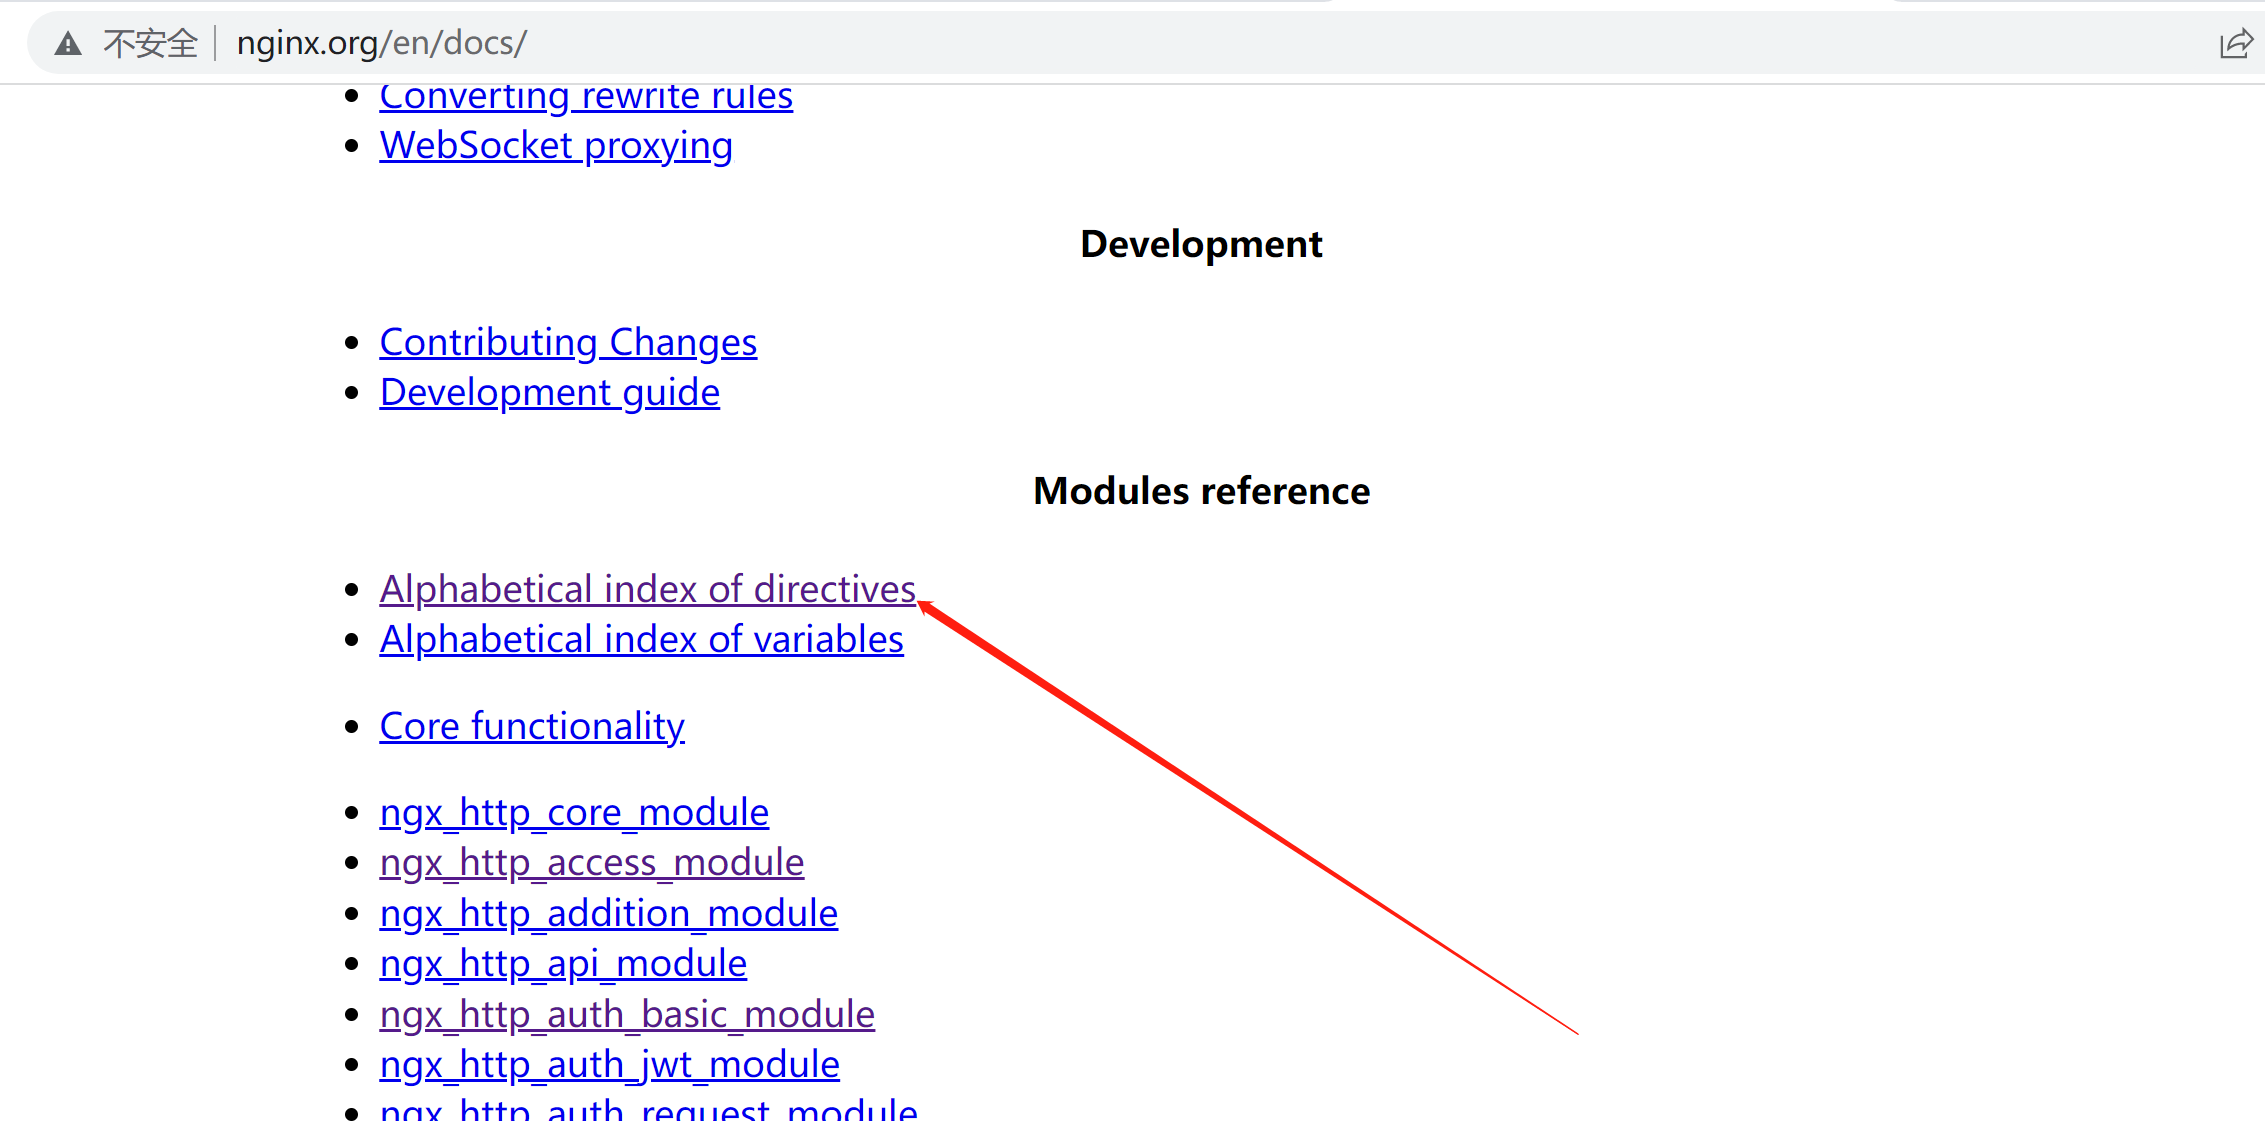
nginx查看文档
在nginx网站下的document下面,点击 Alphabetical index of directives 便可以用属性名进行查找对应的配置
客户端缓存
告知浏览器获取的信息在某个区间时间段是有效的
官方文档: http://nginx.org/en/docs/http/ngx_http_headers_module.html#expires
Syntax:    expires [modified] time;
expires epoch | max | off;
Default:
expires off;
Context:    http, server, location, if in location
单位参数: d day 天 | H hour 小时 | M 分 参考配置: expires 1h
示例
location ~ \.(js|css)${
     expires 1h;    # 如果不希望被缓存,那么就可设置为 -1
}
基于IP的访问控制
基于 ngx_http_access_module模块, 默认可使用
官方文档: http://nginx.org/en/docs/http/ngx_http_access_module.html
Syntax: allow address | CIDR | unix: | all;
Default: -
Context: http, server, location, limit_except


Syntax: deny address | CIDR | unix: | all;
Default: -
Context: http, server, location, limit_except

// allow 允许的字段
// deny 拒绝的字段
// address ip地址
// CIDR 网段的方式
// unix:  socket方式
// all 全部
示例
server {
    listen       80;
    server_name  localhost;

    #charset koi8-r;
    #access_log  /var/log/nginx/host.access.log  main;


    location / {
        root   /usr/share/nginx/html;
        index  index.html index.htm;
    }

    //注意要把个别的放在上面
    //允许个别,拒绝全部
    location ~ ^/admin.html {     //注意:这里的 ~后面算是正则表达式,并非 ^~这个模式
        root   /opt/app;
        allow 180.88.88.253;          //如果是一个网段的模式,就是 180.88.88.0/300;
        deny all;
        index  index.html index.htm;
    }

    //允许全部,拒绝个别
    location ~ ^/admin.html {
        root   /opt/app;
        deny 180.88.88.253;
        allow all;
        index  index.html index.htm;
    }
基于用户的访问控制
Syntax: auth_basic string|off;
Default: auth_basic off;
Context: http, server, location, limit_except

Syntax: auth_basic_user_file file;
Default: -
Context: http, server, location, limit_except
示例
htpasswd -c /etc/nginx/.passwd user(用户名) #可使用 yum -y install httpd-tools进行安装
server {
    listen       80;
    server_name  localhost;

    #charset koi8-r;
    #access_log  /var/log/nginx/host.access.log  main;


    location / {
        root   /usr/share/nginx/html;
        index  index.html index.htm;
    }


    location ~ ^/admin.html {
        root   /opt/app;
       auth_basic "input you password";
       auth_basic_user_file /etc/nginx/.passwd;
        index  index.html index.htm;
    }
以上的方法也有局限性,就是增加对文件的依赖,以及对于密码等的管理,不方便,对此,可以采用nginx与脚本相结合的方式来解决, 也可以使用nginx_auth_ldap模块来解决。
目录列表显示
显示文件列表, 或者需要做一下下载列表
官方文档: http://nginx.org/en/docs/http/ngx_http_autoindex_module.html#autoindex
autoindex on
注意:如果遇到乱码的情况,用chartset utf-8就可以实现不乱码, 如果需要列表自动美化,可以上网查询一下autoindex美化途径
nginx的代理服务
常见于代理后端服务器
官方文档: http://nginx.org/en/docs/http/ngx_http_proxy_module.html
nginx的代理分为正向代理和反向代理,两者的区别在于:代理的对象不一样,正向代理的对象是客户端,反向代理的对象是服务端。这里的对象是指服务对象:比如vpn代理的是正向代理,而反向代理发送请求后,由服务端进行各种代理后返回结果给客户端,用的是反向代理。
正反向代理的配置:(代理服务端的不同商品用80端口访问,可以用nginx反向代理的方式一对外开放访问)
Syntax: proxy_pass URL;
Default: -;
Context: location, if in location, limit_except
 location ~ ^/simpleWeather/query$ {
    proxy_pass http://apis.juhe.cn;
 }
注意:原本请求地址是 http://apis.juhe.cn/simpleWeather/query 但是在location的后面使用了正则表达式,那么在下面的proxy_pass后面的地址中就要把后缀去除,所以就变成上面的配置
nginx的正向代理
location = / {
    proxy_pass http://$http_host$request_uri;
}
这个时候可以借助工具SwitchSharp来做代理访问配置如下:
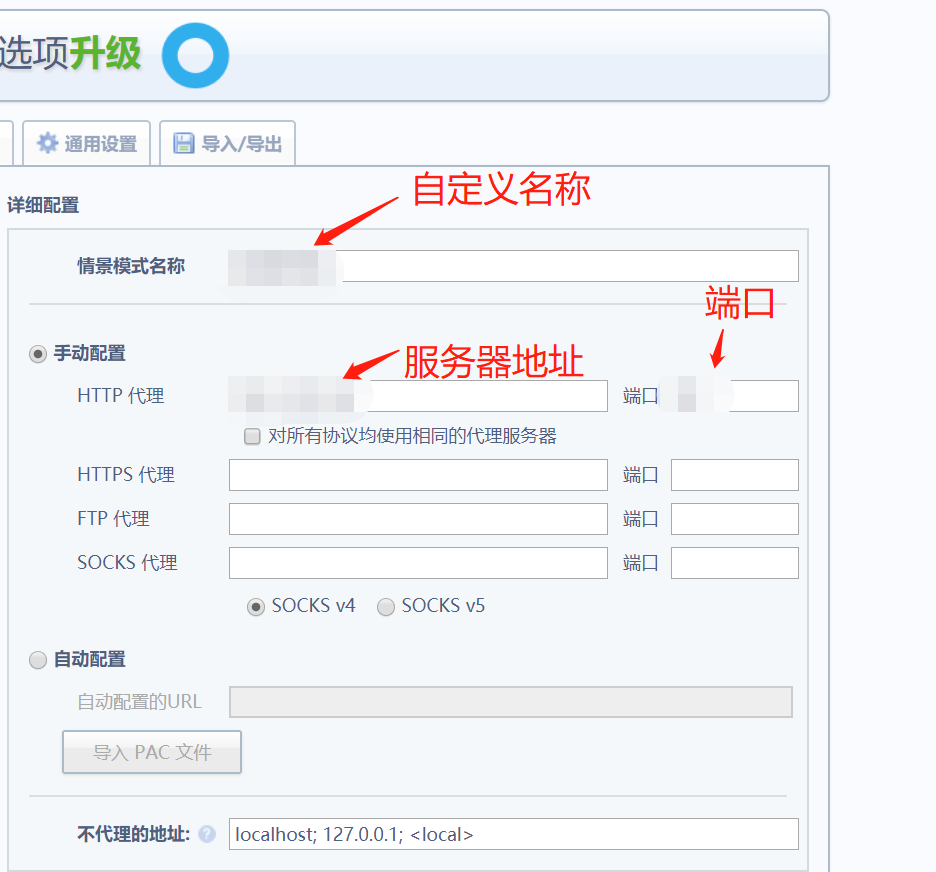
在进行chatgpt转发的时候,因为是post请求,所以会导致404的报错,那么就需要改一成如下配置即可
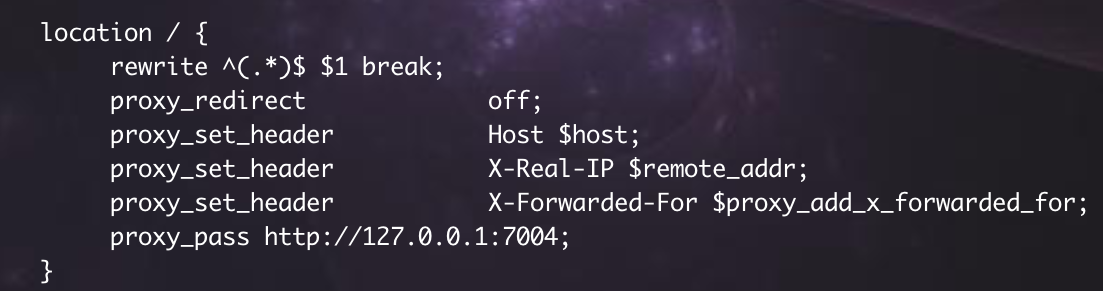
location ^~ /v1 {
    rewrite ^(.*)$ $1 break;
    proxy_pass                       https://api.openai.com;
    proxy_redirect                   off;
    proxy_set_header    Host         api.openai.com;
    proxy_set_header X-NginX-Proxy   true;
    proxy_set_header    X-Real-IP    $remote_addr;
    proxy_set_header X-Forwarded-For $proxy_add_x_forwarded_for;
    proxy_ssl_server_name on
}
nginx代理服务的其他配置
缓冲区配置
Syntax: proxy_buffering on | off;
Default: proxy_buffering on
Context: http, server, location
代理的头信息配置 => 当nginx作为中间层时,返回给后端的头信息是不准确的,这就需要设置头信息
Syntax: proxy_set_header field value;
Default: proxy_set_header Host $proxy_host  proxy_set_header Connection close;
Context: http, server location
配置超时 => 后端服务器连接的时时间, 发起扬等候响应超时时间
Syntax: proxy_connect_timeout time;
Default: proxy_connect_timeout 60s;
context: http, server, location
注意: 扩展 proxy_read_timeout, proxy_send_timeout;
企业中常用的代理的配置
server
{
    listen 80;
    server_name XXX.com;

    proxy_buffering on;
    proxy_buffer_size 32k;
    proxy_buffers 4 128k;
    proxy_busy_buffers_size 256k;
    proxy_max_temp_file_size 20M;

    location /
    {
        proxy_pass      http://127.0.0.1:8080/;  //代理的网址
        proxy_set_header Host   $host;
        proxy_set_header X-Real-IP      $remote_addr;
        proxy_set_header X-Forwarded-For $proxy_add_x_forwarded_for;
    }
}
也可以把上面加粗部份写到一个文件中共用,放到nginx目录下如下:
location = / {
    proxy_pass http://127.0.0.1:80
    include proxy_param;    //注意proxy_param这个文件是放在nginx这个文件夹下
}
server {
    listen       80;
    server_name  #####.com;

    #access_log  /var/log/nginx/host.access.log  main;


    location ~ ^/assets {
        root                             /home/edu-assets-server;
        add_header       Cache-Control   no-cache;

    proxy_buffers                    8 4k;
    proxy_buffer_size           4k;
    proxy_busy_buffers_size          16k;
    proxy_max_temp_file_size      0;
    proxy_temp_file_write_size     1024m;
    }


    location / {
        proxy_pass                  http://127.0.0.1:3000;
        proxy_redirect                  off;
        proxy_set_header      Host         $host;
        proxy_set_header    X-Real-IP    $remote_addr;
        proxy_set_header X-Forwarded-For $proxy_add_x_forwarded_for;
        client_max_body_size          2000m;

        gzip                 on;
        gzip_comp_level             5;
        gzip_types             application/json;

    }
}
注意:
proxy_pass后的url最后加上 / 就是绝对路径,location 中匹配的路径部份不走代理,也就是说会被替换掉
location /a/ {
    proxy_pass http://127.0.0.1/b/;
}

# 请求http://example.com/a/test.html 会被代理到 http://127.0.0.1/b/test.html
proxy_pass后的url最后没有 / 就是相对路径,location 中匹配的路径部份会走代理,也就是说会保留
location /a/ {
    proxy_pass http://127.0.0.1;
}

# 请求http://example/a/test.html  会被代理到 http: //127.0.0.1/a/test.html
proxy_pass 一般不与rewrite进行混合使用
请求限制
limit_req_zone => 表示定义空间
Syntax: limit_req_zone key zone-name:size rate=rate;  //通常来讲限制关键字为ip地址
Default: -;
Context: http
limit_req => 表示使用空间
Syntax: limit_req zone=name [burst=number] [nodelay];
Default: -;
Context: http, server, location
案例
limit_req_zone $binary_remote_addr zone=one:3m rate=1r/s;
limit_req_zone $binary_remote_addr $uri zone=two:3m rate=1r/s;               # $uri:不带客户端请求参数
limit_req_zone $binary_remote_addr $request_uri zone=thre:3m rate=1r/s;      # $request_uri:带客户端请求参数
limit_req_zone  $binary_remote_addr  zone=req_zone:10m rate=1r/s

server{
     location  / {
           limit_req req_zone;(或者下面的用法,两者选其一)
           # 缓存区队列burst = 3个, 不延期, 即每秒最多可处理rate+burst个, 同时处理rate个
           limit_req  zone=req_zone  burst=5 nodelay;

     }
}
$binary_remote_addr: 表示远程的IP地址
zone=req_zone:10m : 表示一个内存区域大小为10m,即会话状态的存储空间并且设定了名称为req_zone
rate=1r/s: 表求请求的速率是1秒1个请求
zone=req_zone: 表示这个参数对应的全局设置就是req_zone的那个内存区域
burst=5:表示请求队列的长度
nodelay: 表示不延时
利用ab进行测试 ab -n 40 -c 20 http://localhost/
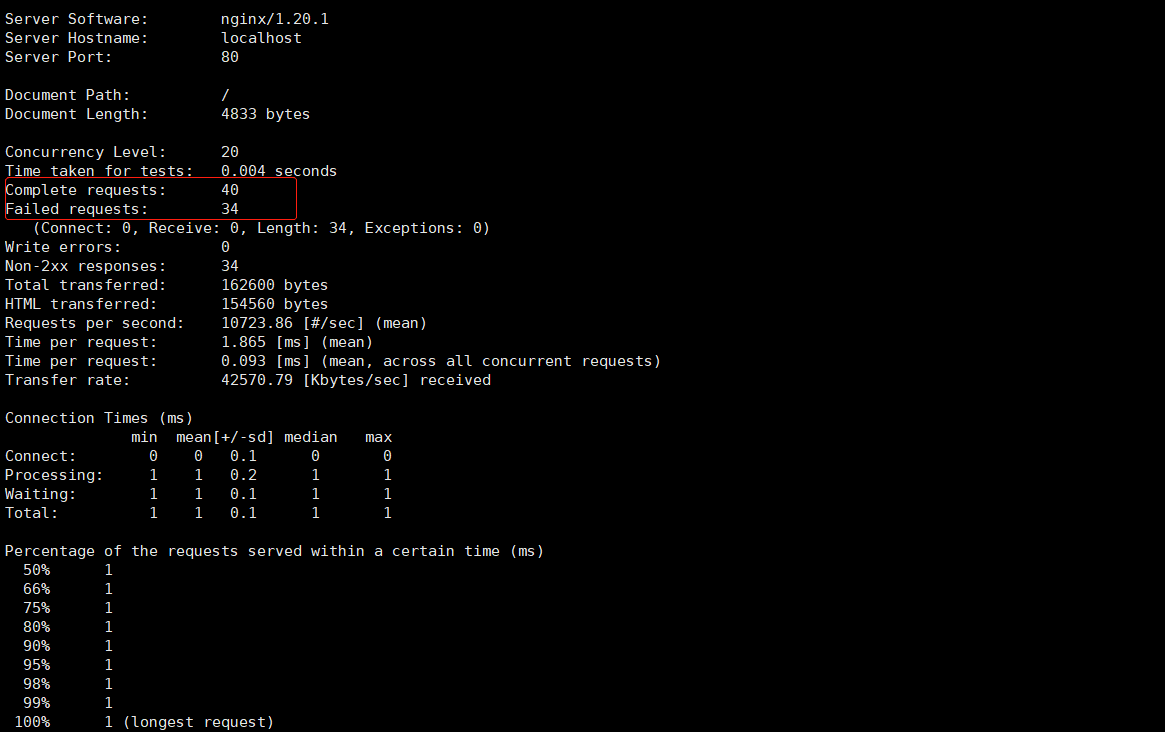
使用单个IP在并发送了20个请求,只有6个成功,立即处理的有1个请求,5个请求放在队列中执行其余的被拒绝
连接限制
Syntax: limit_conn_zone key zone=name:size; // key表示请求关键字, 可以是IP也可以是其他
Detault: -
Context: http
limit_conn => 表示使用空间
Syntax: limit_conn zone number;
Detault: -
Context: http, server, location
配置案例
limit_req_zone $binary_remote_addr zone=req_zone:10m rate=5r/s;
limit_conn_zone $binary_remote_addr zone=addr:10m;

server {
    listen       80;
    listen       [::]:80;
    server_name  localhost;
    root         /usr/share/nginx/html;

    location / {
        index  index.html  index.htm;
        limit_req zone=req_zone burst=5 nodelay;
        limit_conn addr 3;
    }

    error_page 404 /404.html;
    location = /404.html {

    }

    error_page 500 502 503 504 /50x.html;
    location = /50x.html {

    }
}
监控客户端状态
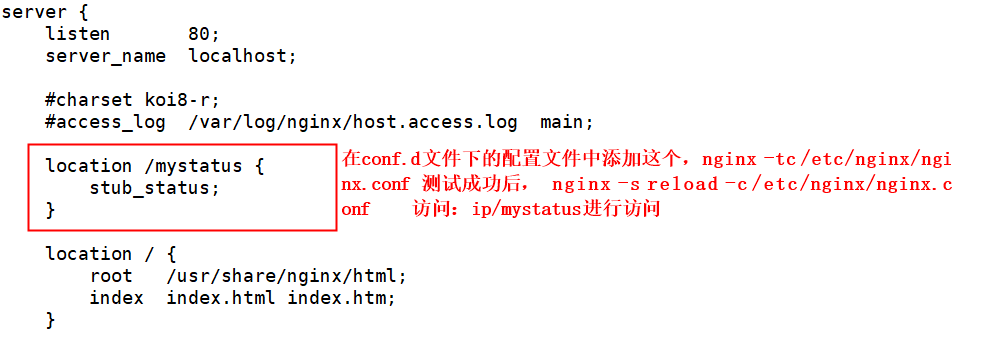
http_stub_status_module => Nginx的客户端状态 (主要用展示nginx当前用于连接的状态 用于监控nginx当前连接的信息)
Syntax: stub_status;   //配置语法
Detault: -             //默认值
Context: server, location  //表示要居于servers或location下进行配置
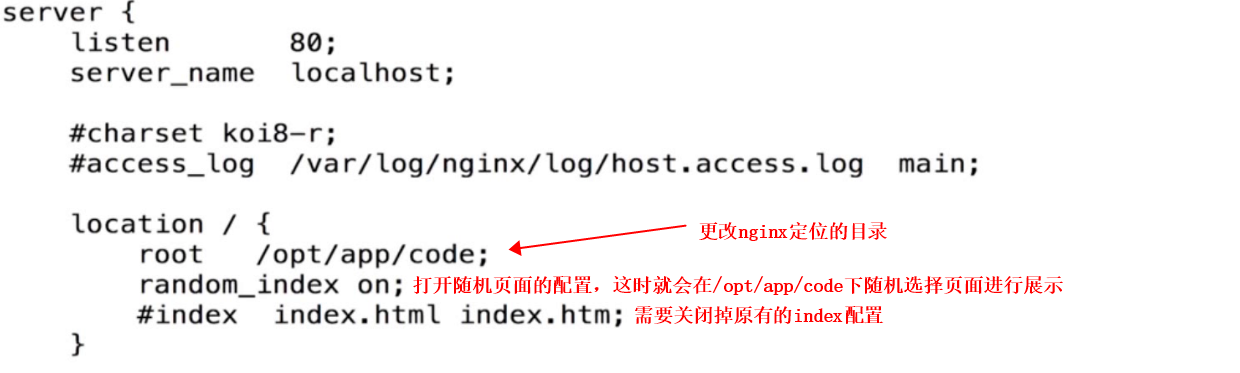
http_random_index_module => 目录中选择一个随机主页(如果有多个主页,那么用户访问的时候,可以随机访问到其中的一个主页这个功能就可以设置)
Syntax: random_index on|off;  // nginx随机页面是否开启
Default: random_index off;      // 默认是关闭的
Context: location; //该配置是放在location下
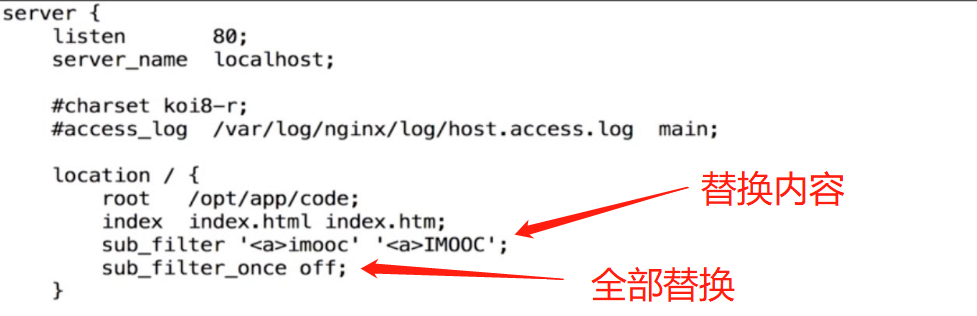
http_sub_module => HTTP内容替换
Syntax: sub_filter string replacement;  //替换内容的配置, string原字符串,replacement表示替换后的字符串
Default: -
Context: server, location

Syntax: sub_filter_once on|off;  // 表示是否只替换一次
Detault: sub_filter_once on;
context: http, server, location
ab 命令 => 模拟多线程并发请求,测试服务器压力, 也可以测试nginx lighthttp IIS等其他Web服务器的压力
ab -n 40 -c 20 http: //120.0.0.1
注意: -n 总共的请求数 -c 并发的请求数
访问日志
官方文档: http://nginx.org/en/docs/http/ngx_http_log_module.html
#默认日志的存放地址

/var/log/nginx
# 配置在http模块中
#定义日志格式   格式命名   祥细格式参数
log_format     main  '$remote_addr - $remote_user [$time_local] "$request" '
                      '$status $body_bytes_sent "$http_referer" '
                      '"$http_user_agent" "$http_x_forwarded_for"';
日志按ip地址进行切割
#注意后面的main对应的是http中定义的格式命名
access_log  /var/log/nginx/***.com.access.log  main;
location的匹配规则
location仅匹配URI, 忽略参数
a、精确匹配
location = /{
     # 规则
}

# 匹配于 http://www.example.com/这种请求
b、~ 大小写敏感 (区分大小写)
location ~ /Example/ {
     # 规则
}


#请求示例
http://www.examle.com/Example  [成功]
http://www.examle.com/example  [失败]
c、~* 忽略大小写 (不区分大小写)
location ~* /Example/ {
    # 规则
}


#请求示例
http://www.example.com/Example/   [成功]
http://www.example.com/example/   [成功]
d、^~ 只匹配以uri开头
location  ^~ /img/ {
    # 规则
}


#请求示例
http://www.example/img/a.jpe  [成功]
http://www.example/img/b.mp4  [成功]
http://www.example/bimg/b.mp4  [失败]
http://www.example/Img/a.jpe  [失败]
e、/ 匹配 表示其他的匹配都不成功,那么就走这条匹配
location / {
    # 规则
}
location的匹配优先级
(location =) > (location 完整路径) > (location ^~ 路径) > (location ~, ~* 正则顺序) > (location 部份起始路径) > (/)

一般来讲,如果两者都匹配上了,那么最终会匹配到长的地址上
location  = / {
  # 只匹配"/".
  [ configuration A ]
}

location  / {
  # 匹配任何请求,因为所有请求都是以"/"开始
  # 但是更长字符匹配或者正则表达式匹配会优先匹配
  [ configuration B ]
}

location ^~ /images/ {
  # 匹配任何以 /images/ 开始的请求,并停止匹配 其它location
  [ configuration C ]
}

location ~* \.(gif|jpg|jpeg)$ {
  # 匹配以 gif, jpg, or jpeg结尾的请求.
  # 但是所有 /images/ 目录的请求将由 [Configuration C]处理.
  [ configuration D ]
}

# 以上的location的优先级便是从 1> 3 > 4 > 2
location匹配内部跳转
@+name
location /img/ {
    # 表示如果状态码是404, 就指定404的页面为什么
    error_page  404 = @img_err;
}

location @img_err {
    # 规则
    return 503;
}
Url重写(rewrite)
a、return
该指令用于结束规则的执行,并返回状态码给客户端
# 推荐配置在location中
location /img/ {
    return 403;
}
b、rewrite
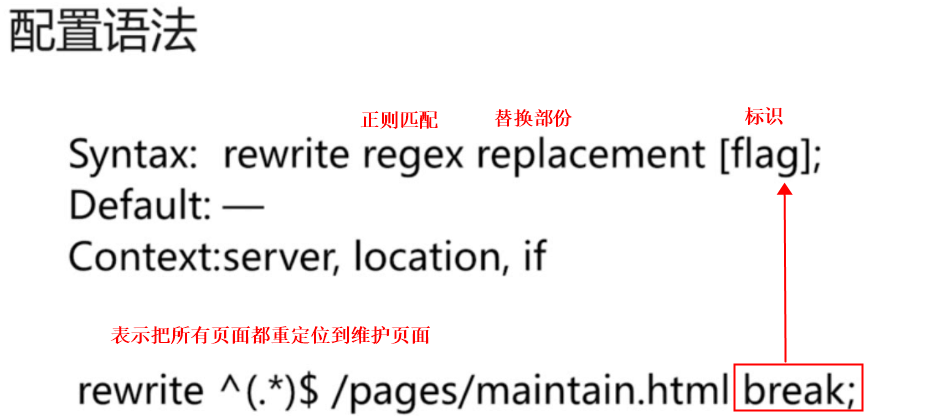
rewrite 匹配到请求URI, 重写到新的URI
语法 rewrite 匹配内部 替代内容 标记
syntax: rewrite regex replacement [flag]
default: -
context: server, location , if

# regex正则表达式指的是要被改写的路径
# replacement 目标要替换成哪个URL
# flag标识
如果正则表达式(regex)匹配到了请求的URI(request URI), 这个URI会被后面的replacement替换
rewrite 的定向会根据他们的配置文件中出现的顺序依次执行
通过使用 flag 可以终止定向进行一步的处理
c、flag标识符
last: 先匹配自己的location, 然后通过rewrite规则新建一个请求,再次请求服务端
break: 先匹配自己的location, 然后生命周期会在当前的location结束, 不再进行后续的匹配
redirect: 返回302再重定向, 以后还会请求这个服务器
permanent: 返回301永久重定向, 以后会直接请求永久重定向后的域名
匹配顺序: 多条rewrite, 从上到下匹配, 匹配到之后就不在匹配其他的rewrite规则
// 资源重定向实现, url为index.html, 而实际访问的是index.php, 对外被认为是html静态页面 也叫seo 伪静态

可以写在server下或者location下
rewrite  index.html index.php  last;

// 域名重定向, 把test.com的请求全部重定向到新域名www.abc.com下面
rewrite  /  http://www.abc.com permanent;
location ^~ /api {
    rewrite ^/api(.*)$ /test$1 last;  // 把api重写为test后再进行匹配
}

location ^~ /test {
    rewrite ^/test(.*)$ $1 break;  // 删除前缀test
    root /usr/share/nginx/html;
}
nginx防盗链配置
防止网站资源被盗用, 保证信息安全,防止流量过量
Syntax: valid_referers none | blocked | server_names | string ...;
Default: -;
Context: server, location

// none 表示没有referer   即直接访问图片
// blocked 表示有referer但是被防火墙或者是代理去除了
// server_name 表示ip地址 如 192.168.8.1, 或者访问的网站名,多的时候可以用空格隔开
// string或者正则表达式用来匹配referer
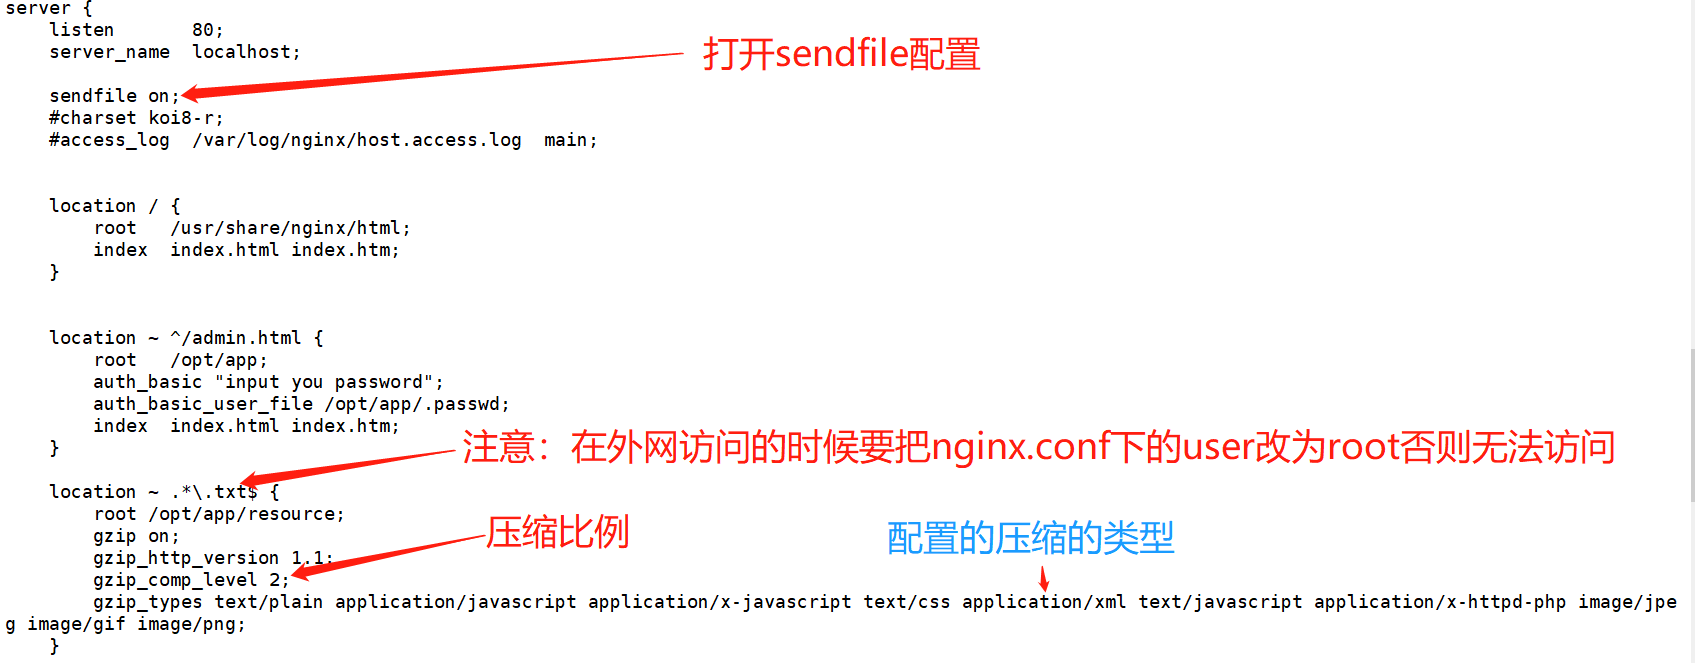
location ~* .*\.(png|jpg|jpeg|gif)$ {
    root /opt/app/resource/image;
    gzip on;
    gzip_http_version 1.1;
    gzip_comp_level 2;
    gzip_types text/plain text/css application/xml text/javascript application/x-httpd-php image/jpeg image/gif image/png;
    valid_referers none blocked 106.11.98.100 www.xxx.com  ~/google\./;      //防盗链配置,最后一个是正则的匹配
    valid_referers www.xxx.com  // 表示直接允许指定的网站,其他的一律过滤
    if ($invalid_referer) {
       return 403;
    }
}
server {
  listen       80;
  server_name  *.sherlocked93.club;

  # 图片防盗链
  location ~* \.(gif|jpg|jpeg|png|bmp|swf)$ {
    valid_referers none blocked 106.11.98.100 ~\.google\. ~\.baidu\. *.qq.com;  # 只允许本机 IP 外链引用,将百度和谷歌也加入白名单
    if ($invalid_referer){
      return 403;
    }
  }
}
nginx的版本隐藏
server_tokens off;
配置ssl证书,以腾讯云服务为例
在腾讯云网站申请相关的ssl证书
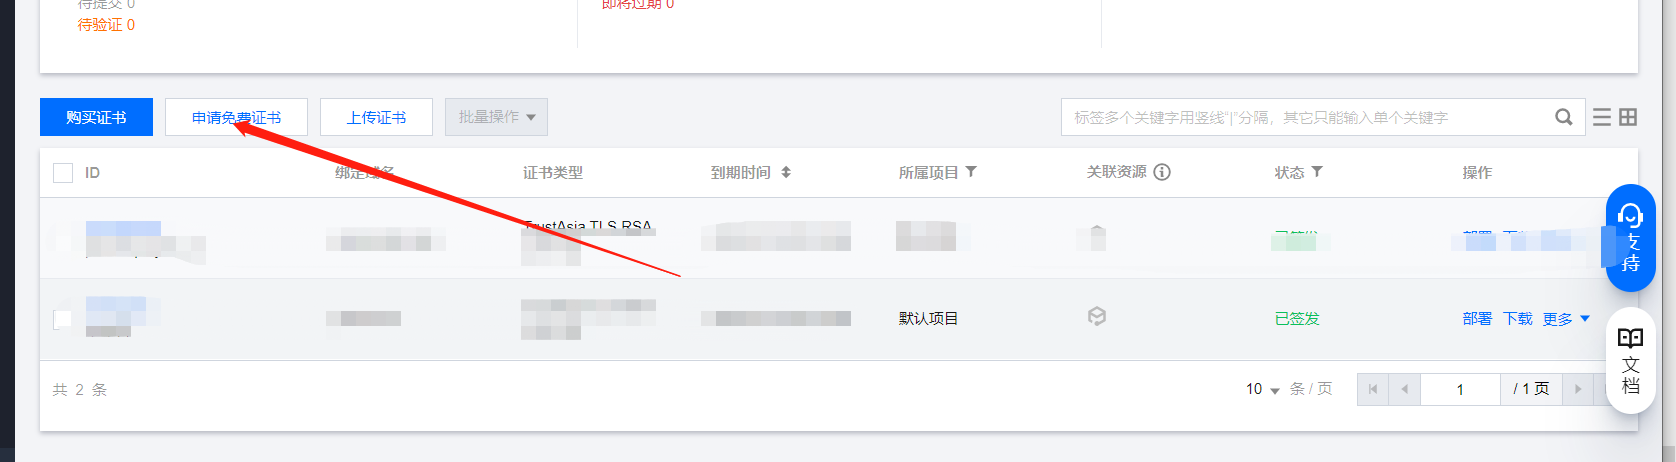
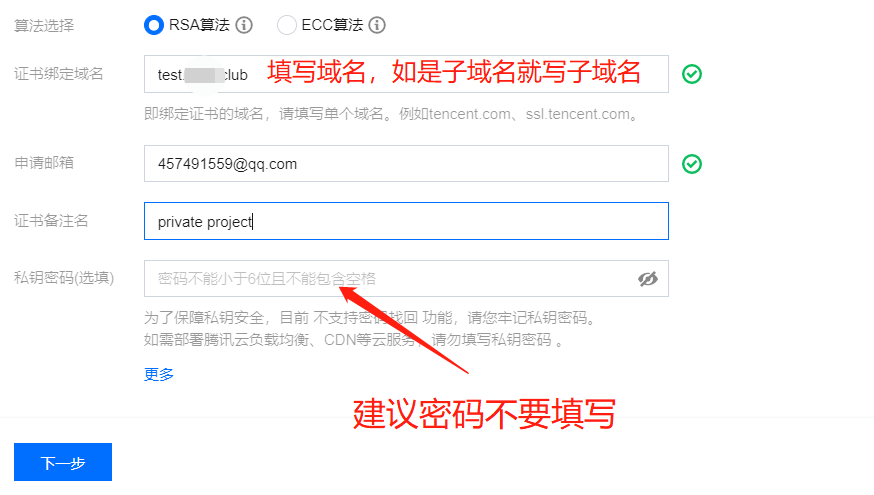
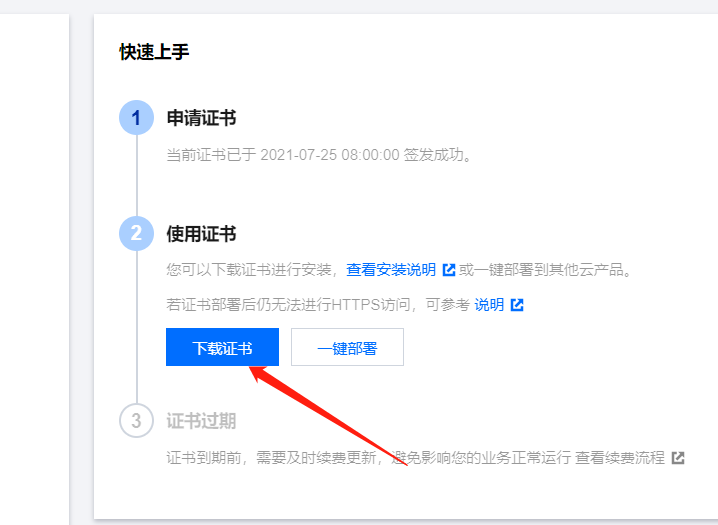
下载相关证书到本地
在nginx服务器上配置:需要用到的文件有
- 文件夹名称:Nginx
- 文件夹内容:
1_cloud.tencent.com_bundle.crt证书文件2_cloud.tencent.com.key私钥文件
- CSR 文件内容:
cloud.tencent.com.csr文件
把这三个文件上传到nginx的安装目录下 /etc/nginx/ssl下
更改nginx配置
server {
    listen       80;
    server_name  test.***.club;
    root         /usr/share/nginx/html;

    #SSL 访问端口号为 443
    listen 443 ssl;
    #证书文件名称
    ssl_certificate ssl/1_test.***.club_bundle.crt;  //需要改成所对应的目录
    #私钥文件名称
    ssl_certificate_key ssl/2_static_***.club.key;  //需要改成所对应的目录
    ssl_session_timeout 5m;
    #请按照以下协议配置
    ssl_protocols TLSv1 TLSv1.1 TLSv1.2;
    #请按照以下套件配置,配置加密套件,写法遵循 openssl 标准。
    ssl_ciphers ECDHE-RSA-AES128-GCM-SHA256:HIGH:!aNULL:!MD5:!RC4:!DHE;
    ssl_prefer_server_ciphers on;


    limit_req zone=req_zone burst=6 nodelay;
    limit_conn addr 5;

    gzip  on;
    gzip_comp_level  4;
    gzip_types  text/plain text/css text/xml application/json image/gif image/png image/jpeg;
    gzip_min_length  1k;

    location / {
        index  index.html  index.htm;
    }

    error_page 404 /404.html;
    location = /404.html {

    }

    error_page 500 502 503 504 /50x.html;
    location = /50x.html {

    }
}
重新加载nginx配置就完成配置了
如果原来的http需要重定向到https上,那么就可以使用以下的配置
server{
         listen 80;
         server_name   test.***.club;
         rewrite ^(.*)$ https://test.***.club$1 permanent;

}
server {
        listen 443 ssl;
        server_name dev-ice.cocos.org;
        client_max_body_size 0;

        ssl_certificate   /etc/nginx/ssl/***;
        ssl_certificate_key  /etc/nginx/ssl/***;
        ssl_session_timeout 5m;
        ssl_ciphers ***
        ssl_protocols ***;
        ssl_prefer_server_ciphers on;
        access_log /var/log/nginx/test.access.log;
        error_log  /var/log/nginx/test.error.log;
        location / {
                proxy_set_header X-Real-IP $remote_addr;
                proxy_set_header X-Forwarded-For $proxy_add_x_forwarded_for;
                proxy_set_header X-NginX-Proxy true;
                proxy_set_header Host $http_host;
                proxy_pass http://*****;
        }
}
静态资源web服务的配置
非服务器动态运行生成的文件:浏览器端渲染(html, css, js等),图片(jpg, png, jpeg等),视频(flv, mpeg),文件(TXT等文件)
web服务文件读取的配置:
开启高效文件传输模式
Syntax: sendfile on|off;
Default: sendfile off;
Context: http, server, location, if in location
tcp_nopush 在sendfile开启的情况下,提高网络包的传输效率 =>当有数据时,先别着急发送, 确保数据包已经装满数据, 避免了网络拥塞
Syntax: tcp_nopush on | off;
Default: tcp_nopush off;
Context: http, server, location
ctp_nodelay 在keepalive即常连接下,提高网络包的传输实时性 => 要抓紧发货, 确保数据尽快发送, 提高可数据传输效率
Syntax: tcp_nodelay on|off;
Default: tcp_nodelay on;
Context: http, server, location
gzip配置
gzip 配置压缩 => 与以下的配置压缩比,压缩版本是配置使用的
Syntax: gzip on | off;
Default: gzip off;
Context: http, server, location, if in location
配置压缩比 => 配置压缩比,即可以把文件往小的压缩, 体积越小, 速度越快, 但是就越耗服务端的性能,值是1~9, 建议使用4
Syntax: gzip_comp_level level;
Default: grip_comp_level 1;
Context: http, server, location
配置gzip的版本, 默认是1.1,主要考虑到浏览器端是否支持gzip
Syntax: gzip_http_version 1.0|1.1;
Default: gzip_http_version 1.1;
Context: http, server, location
配置例子:
gzip的配置
# /etc/nginx/conf.d/gzip.conf

gzip on; # 默认off,是否开启gzip
gzip_types text/plain text/css application/json application/x-javascript text/xml application/xml application/xml+rss text/javascript;

# 上面两个开启基本就能跑起了,下面的愿意折腾就了解一下
gzip_static on;  //如果有对应的gzip文件,那以就直接用gzip文件,就不再压缩
gzip_proxied any;
gzip_vary on;
gzip_comp_level 6;
gzip_buffers 16 8k;
# gzip_min_length 1k;  // 表示1k以下才启用gzip
gzip_http_version 1.1;
稍微解释一下:
-
gzip_types:要采用 gzip 压缩的 MIME 文件类型,其中 text/html 被系统强制启用;
-
gzip_static:默认 off,该模块启用后,Nginx 首先检查是否存在请求静态文件的 gz 结尾的文件,如果有则直接返回该
.gz文件内容; -
gzip_proxied:默认 off,nginx做为反向代理时启用,用于设置启用或禁用从代理服务器上收到相应内容 gzip 压缩;
-
gzip_vary:用于在响应消息头中添加
Vary:Accept-Encoding,使代理服务器根据请求头中的Accept-Encoding识别是否启用 gzip 压缩; -
gzip_comp_level:gzip 压缩比,压缩级别是 1-9,1 压缩级别最低,9 最高,级别越高压缩率越大,压缩时间越长,建议 4-6;
-
gzip_buffers:获取多少内存用于缓存压缩结果,16 8k 表示以 8k*16 为单位获得;
-
gzip_min_length:允许压缩的页面最小字节数,页面字节数从header头中的
Content-Length中进行获取。默认值是 0,不管页面多大都压缩。建议设置成大于 1k 的字节数,小于 1k 可能会越压越大; -
gzip_http_version:默认 1.1,启用 gzip 所需的 HTTP 最低版本;
常见的几种文件类型 可以参看mine.types文件
浏览器的跨站访问
浏览器禁止跨站访问原因是因为不安全,容易出现csrf(跨站式)攻击;
Syntax: add_header name value [always];
Default:-
Context: http, server, location, if in location


//里面的name   Access-Control-Allow-Origin  Access-Control-Allow-Methods

nginx负载均衡
Syntax: upstream name {...}
Default: -
Context: http
注意:upstream这个配置必需在http这个层级目录下, server层以外。
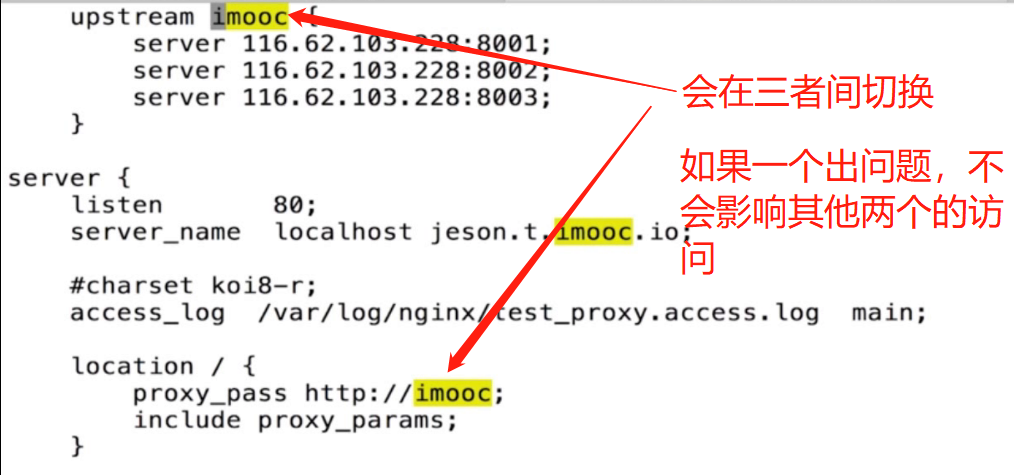
负载均衡添加配置参数
upstream imooc {
    server116.62.103.228:8901 weight=5;    //这里的weight表示权重,权重越大,表示分配给该服务器的访问越多,当有7个表求时,5个会在这个
    server116.62.103.228:8002 backup; //表示备份节点,当没有服务在工作时会工作
    server 116. 62.103.228: 8003 max_fails=1 fail timeout=10s //允许失败请求次数及,暂停时间
}
常用的配置参数有:

nginx 的调度算法
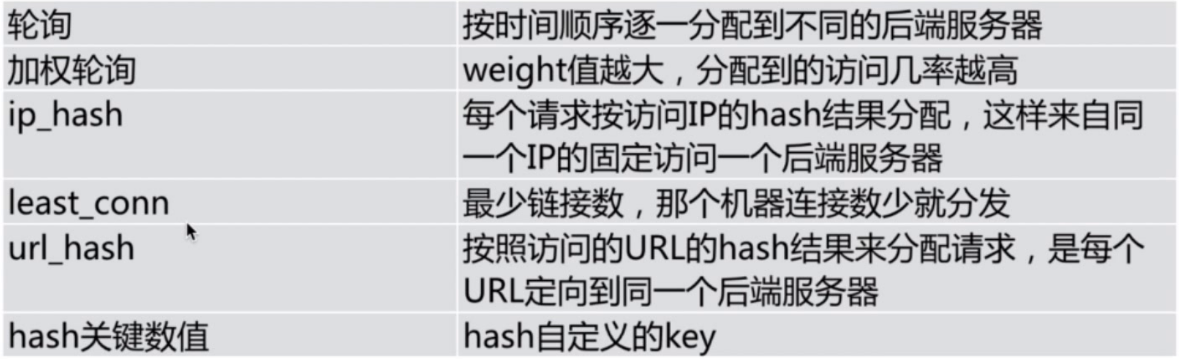
ip_hash的做法
upstream check {
    ip_hash;      //有个缺点,就是中间如果隔个服务器,那么取到的用户的ip就不是真实的ip,就无法根据真实的IP进行定位
    server 116.62.103.228:8901;
    server 116.62.103.228:8002;
    server 116.62.103.228:8003;
}
url_hash的配置语法
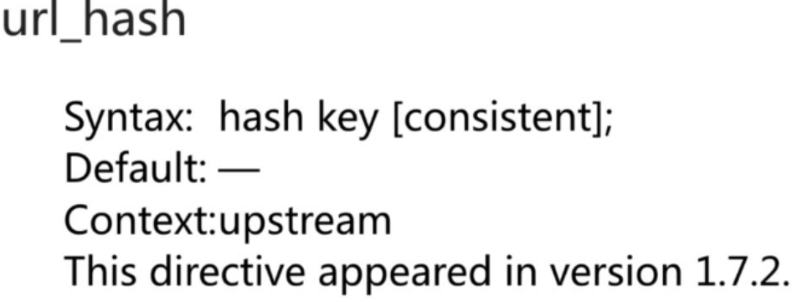
upstream check {
    hash $request_uri;
    server 116.62.193.228:8001;
    server 116.62.103.228:8902;
    server 116.62.103.228:8903;
}
![]()
在location那需要配置上这个语法,当发生错误的时候,需要跳过该服务器去访问其他服务器。
nginx的深度学习篇
rewrite规则
应用场景: URL访问跳转,支持开发设计;SEO优化;维护; 安全管理
flag配置项

last 和break的区别是,break后不到去查找rewrite后的url而last会再重新去匹配改变后的URL跳转;如下示例:
redirect:返回302临时重定向,地址栏会显示跳转后的地址, 但如果是permanent:返回301永久重定向,地址栏会显示跳转后的地址;即表示如果客户端不清理浏览器缓存,那么返回的结果将永久保存在客户端浏览器中了。
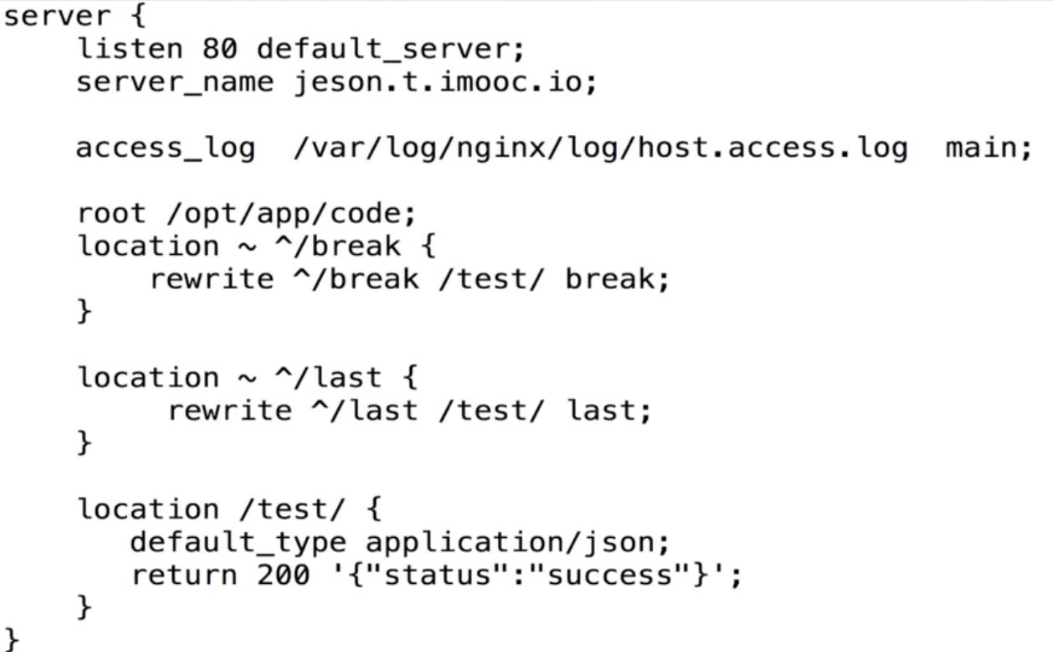
server {
    listen       80;
    server_name  localhost;

    #charset koi8-r;
    #access_log  /var/log/nginx/host.access.log  main;
    root /opt;      //需要配置这个,不然会自动定位到默认的/usr/share/nginx/html目录下

    location / {
        root   /usr/share/nginx/html;
        index  index.html index.htm;
    }

    location ~ ^/app1 {
        root /opt;
        rewrite ^/(app)(\d*)/(.*)$ /$1/$3 last;
    }

    location ~ /json {
        default_type application/json;
        return 200 '{"status": "success"}';
    }
$args               #这个变量等于请求行中的参数,同$query_string;
$content_length     #请求头中的Content-length字段;
$content_type       #请求头中的Content-Type字段;
$document_root      #当前请求在root指令中指定的值,如:root /var/www/html;
$host               #请求主机头字段,否则为服务器名称;
$http_user_agent    #客户端agent信息;
$http_cookie        #客户端cookie信息;
$limit_rate         #这个变量可以限制连接速率;
$request_method     #客户端请求的动作,通常为GET或POST;
$remote_addr        #客户端的IP地址;
$remote_port        #客户端的端口;
$remote_user        #已经经过Auth Basic Module验证的用户名;
$request_filename   #当前请求的文件路径,由root或alias指令与URI请求生成;
$scheme             #HTTP方法(如http,https);
$server_protocol    #请求使用的协议,通常是HTTP/1.0或HTTP/1.1;
$server_addr        #服务器地址,在完成一次系统调用后可以确定这个值;
$server_name        #服务器名称;
$server_port        #请求到达服务器的端口号;
$request_uri        #包含请求参数的原始URI,不包含主机名,如:”/foo/bar.php?arg=baz”;
$uri                #不带请求参数的当前URI,$uri不包含主机名,如”/foo/bar.html”;
$document_uri       #与$uri相同,例:http://localhost:88/test1/test2/test.php;
判断如果是手机端,那么就实现网址的跳转;
server {
        listen 80;
        server_name xxx.com;

        location / {
                proxy_pass http://localhost:3000;
                proxy_set_header Host $host;
                proxy_set_header X-Real-IP $remote_addr;
                proxy_set_header X-Forwarded-For $proxy_add_x_forwarded_for;
                if ($http_user_agent ~* "(mobile|nokia|iphone|ipad|android|samsung|htc|blackberry)") {   //判断是否为移动设备访问
                    rewrite  ^/(.*)$  http://m.xxx.com$uri redirect;    // 跳转到m.xxx.com
                }
        }
}
注意:rewrite优先级 server或http块的rewrite => location块的rewrite
server下的rewrite示例
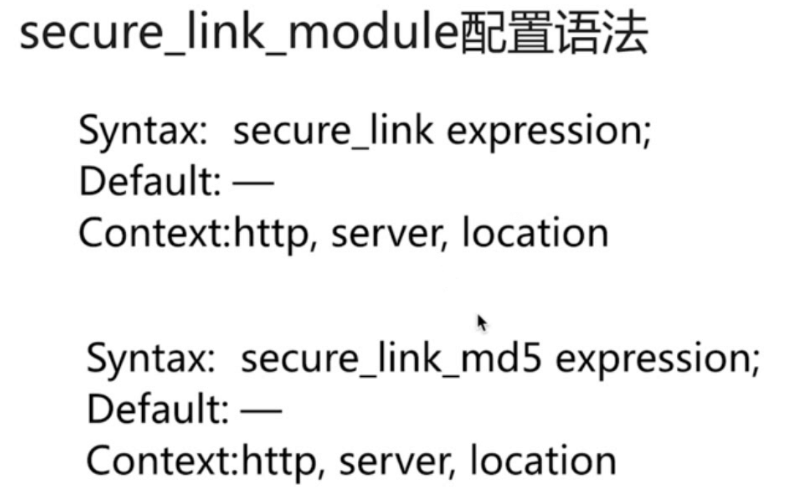
secure_link_module模块
作用如下:
1、制定并允许检査请求的链接的真实性以及保护资源免遭未经授权的访问(即防盗链)
2、限制链接生效周期(防止频繁登陆导致的资源被下载)
6、常用技巧:
请求过滤
# 非指定请求全返回 403
if ( $request_method !~ ^(GET|POST|HEAD)$ ) {
  return 403;
}

location / {
  # IP访问限制(只允许IP是 192.168.0.2 机器访问)
  allow 192.168.0.2;
  deny all;

  root   html;
  index  index.html index.htm;
}
单页面项目 history 路由配置
server {
  listen       80;
  server_name  fe.sherlocked93.club;

  location / {
    root       /usr/share/nginx/html/dist;  # vue 打包后的文件夹
    index      index.html index.htm;
    try_files  $uri $uri/ /index.html @rewrites;

    expires -1;                          # 首页一般没有强制缓存
    add_header Cache-Control no-cache;
  }

  # 接口转发,如果需要的话
  #location ~ ^/api {
  #  proxy_pass http://be.sherlocked93.club;
  #}

  location @rewrites {
    rewrite ^(.+)$ /index.html break;
  }
}
HTTP 请求转发到 HTTPS
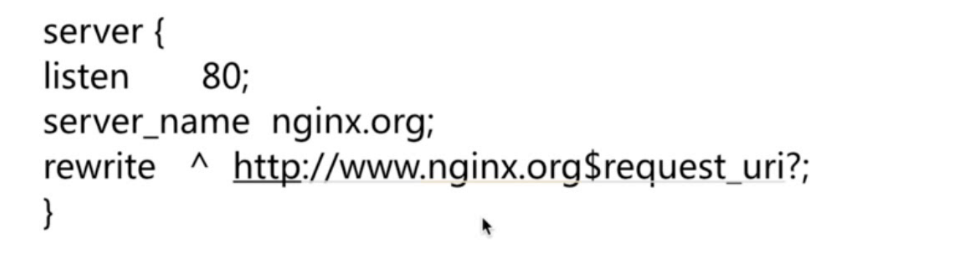
配置完 HTTPS 后,浏览器还是可以访问 HTTP 的地址 http://sherlocked93.club/ 的,可以做一个 301 跳转,把对应域名的 HTTP 请求重定向到 HTTPS 上
server {
    listen      80;
    server_name www.sherlocked93.club;

    # 单域名重定向
    if ($host = 'www.sherlocked93.club'){
        return 301 https://www.sherlocked93.club$request_uri;
    }
    # 全局非 https 协议时重定向
    if ($scheme != 'https') {
        return 301 https://$server_name$request_uri;
    }

    # 或者全部重定向
    return 301 https://$server_name$request_uri;

    # 以上配置选择自己需要的即可,不用全部加
}
反向代理特殊配置
80端口服务器
server {
    listen       80;
    server_name  localhost;

    #charset koi8-r;
    #access_log  /var/log/nginx/host.access.log  main;

    location / {
        root   /usr/share/nginx/html;
        index  index.html index.htm;
    }


    location ^~ /api {
      rewrite ^(.*)$ $1 break;
      proxy_pass http://127.0.0.1:9002;
    }
}
9002端口
server {
    listen       9002;
    server_name  localhost;

    #charset koi8-r;
    #access_log  /var/log/nginx/host.access.log  main;

    location / {
        root   /usr/share/nginx/html/bill;
        index  index.html index.htm;
       rewrite ^/api/(.*)$ /$1 break;
    }
}
这样就可以去除api这个字段了, 如果在api中不需要任何字段,那么就可以用 / 来替代如下:
location / {
    rewrite ^/api/(.*)$ / break;
    proxy_pass http://www.baidu.com;
}
注意,在window下面的配置,要从盘根起设置

如果重定向到本机的其他商品时,需要注意,root的配置,举例:要去除上面的 /api部份的配置
在用wnmp进行配置yii框架的时候需要重新配置一下如下的配置:
location ~ \.php$ {
    try_files $uri =404;
    fastcgi_pass   php_processes;
    fastcgi_index  index.php;
    fastcgi_param SCRIPT_FILENAME $document_root$fastcgi_script_name;
    include fastcgi_params;
}
前后端分离的nginx配置示例
# For more information on configuration, see:
#   * Official English Documentation: http://nginx.org/en/docs/
#   * Official Russian Documentation: http://nginx.org/ru/docs/

user nginx;
worker_processes auto; #启动进程
error_log /var/log/nginx/error.log; #全局错误日志
pid /run/nginx.pid; #PID文件

# Load dynamic modules. See /usr/share/nginx/README.dynamic.
include /usr/share/nginx/modules/*.conf;

events {
    worker_connections 1024; #单个后台worker process进程的最大并发链接数
}

http {
    gzip on; #开启gzip压缩
    gzip_min_length 1k; #设置对数据启用压缩的最少字节数
    gzip_buffers    4 16k;
    gzip_http_version 1.0;
    gzip_comp_level 6; #设置数据的压缩等级,等级为1-9,压缩比从小到大
    gzip_types text/plain text/css text/javascript application/json application/javascript application/x-javascript application/xml; #设置需要压缩的数据格式
    gzip_vary on;

    #虚拟主机配置
    server {
        listen       80;
        server_name  mark.binlive.cn;
        root /home/spa-project/dist; #定义服务器的默认网站根目录位置
        index index.html; #定义index页面
        error_page    404         /index.html; #将404错误页面重定向到index.html可以解决history模式访问不到页面问题
        location ^~ /api/{
            proxy_pass http://127.0.0.1:7000;
            proxy_send_timeout 1800;
            proxy_read_timeout 1800;
            proxy_connect_timeout 1800;
            client_max_body_size 2048m;
            proxy_http_version 1.1;
            proxy_set_header Upgrade $http_upgrade;
            proxy_set_header Connection "Upgrade";
            proxy_set_header  Host              $http_host;   # required for docker client's sake
            proxy_set_header  X-Real-IP         $remote_addr; # pass on real client's IP
            proxy_set_header  X-Forwarded-For   $proxy_add_x_forwarded_for;
            proxy_set_header  X-Forwarded-Proto $scheme;
        }
        location ^~ /auth/{
            proxy_pass http://127.0.0.1:7000;
            proxy_send_timeout 1800;
            proxy_read_timeout 1800;
            proxy_connect_timeout 1800;
            client_max_body_size 2048m;
            proxy_http_version 1.1;
            proxy_set_header Upgrade $http_upgrade;
            proxy_set_header Connection "Upgrade";
            proxy_set_header  Host              $http_host;   # required for docker client's sake
            proxy_set_header  X-Real-IP         $remote_addr; # pass on real client's IP
            proxy_set_header  X-Forwarded-For   $proxy_add_x_forwarded_for;
            proxy_set_header  X-Forwarded-Proto $scheme;
        }
    }
}
7、域名的查询与选购
域名的查询网站 => 爱名网 https://www.22.cn/
域名的管理网站 => DNSPOD https://console.dnspod.cn/domain
8、常见主机选择
- 阿里云
- 腾讯云
- 百度云
- 青云
- UCloud
9、域名解析
在把域名解析到服务器的时候,可以对一个域名配置多个子域名如下图
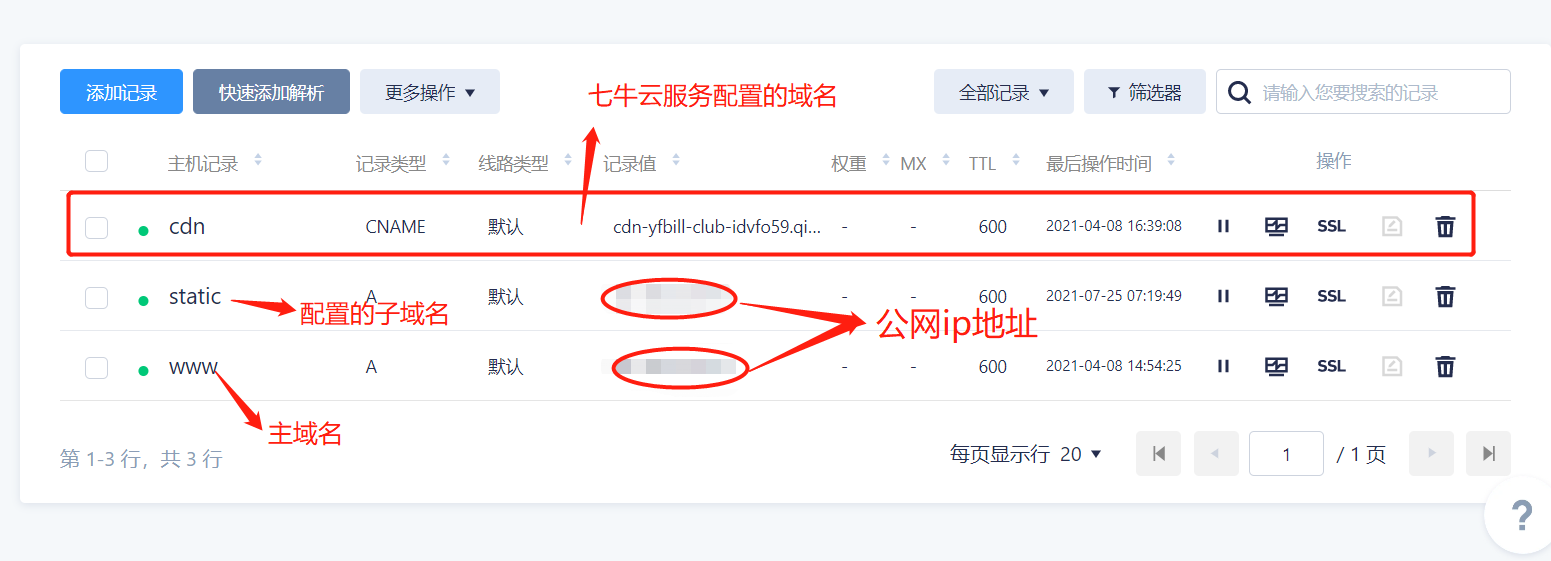
针对上面的服务在配置nginx的时候就可以配置主域名与子域名的服务了
limit_req_zone $binary_remote_addr zone=req_zone:10m rate=3r/s;
limit_conn_zone $binary_remote_addr zone=addr:10m;

server {
    listen       80;
    server_name  www.***.club;  //主域名地址
    root         /usr/share/nginx/html; //主域名目录

    limit_req zone=req_zone burst=6 nodelay;
    limit_conn addr 5;

    gzip  on;
    gzip_comp_level  4;
    gzip_types  text/plain text/css text/xml application/json image/gif image/png image/jpeg;
    gzip_min_length  1k;

    location / {
        index  index.html  index.htm;
    }

    error_page 404 /404.html;
    location = /404.html {

    }

    error_page 500 502 503 504 /50x.html;
    location = /50x.html {

    }
}
子域名服务
server {
    listen       80;
    server_name  static.***.club;  // 子域名地址
    root         /usr/share/nginx/static;  //子域名项目目录

    limit_req zone=req_zone burst=6 nodelay;
    limit_conn addr 5;

    gzip  on;
    gzip_comp_level  4;
    gzip_types  text/plain text/css text/xml application/json image/gif image/png image/jpeg;
    gzip_min_length  1k;

    location / {
        index  index.html  index.htm;
    }

    error_page 404 /404.html;
    location = /404.html {

    }

    error_page 500 502 503 504 /50x.html;
    location = /50x.html {

    }
}

 浙公网安备 33010602011771号