
记一次archlinux+dwm的安装
记一次Archlinux+dwm简单安装
联网
rfkill unblock all
dhcpcd
ping www.baidu.com -n
同步时间
timedatectl set-ntp true
换源
vim /etc/pacman.d/mirrorlist
Server = https://mirrors.ustc.edu.cn/archlinux/$repo/os/$arch
pacman -Syy
磁盘分区
mkfs.ext4 /dev/nvme0n1p2
mkswap /dev/nvme0n1p3
mkdir /mnt/boot

mount /dev/nvme0n1p2 /mnt
mount /dev/nvme0n1p1 /mnt/boot
swapon /dev/nvme0n1p3
安装基础包
pacman -Sy archlinux-keyring
pacstrap /mnt base base-devel linux linux-firmware vim dhcpcd sudo iwd bash bash-completions ntfs-3g
制作grub引导
genfstab -U /mnt >> /mnt/etc/fstab
arch-chroot /mnt
配置archcn 安装yay等
vim /etc/pacman.conf 尾部添加

[archlinuxcn]
SigLevel = Never
Server = https://mirrors.ustc.edu.cn/$repo/$arch

顺便开启
[multilib]
Include = /etc/pacman.d/mirrorlist

sudo pacman -Syyu
sudo pacman -S yay
安装基本包
pacman -S dhcpcd iwd vim sudo bash bash-completions ntfs-3g gvfs-mtp networkmanager neofetch yay zsh udisks2 udiskie
# 设置开机自启动
systemctl enable dhcpcd
systemctl enable iwd
systemctl enable NetworkManager
systemctl enable udisks2
同步时区
ln -sf /usr/share/zoneinfo/Asia/Shanghai /etc/localtime
同步硬件时钟
hwclock --systohc
本地化
编辑vim /etc/locale.gen,然后去掉 en_US.UTF-8 UTF-8 以及 zh_CN.UTF-8 UTF-8
# 更新locale
locale-gen
创建 locale.conf 文件,并编辑设定 LANG 变量
vim /etc/locale.conf
LANG=en_US.UTF-8
echo "ArchLinux" >> /etc/hostname
vim /etc/hosts
127.0.0.1   localhost
::1         localhost
127.0.1.1   ArchLinux.localdomain   ArchLinux
passwd root
制作grub引导
pacman -S intel-ucode grub efibootmgr efivar os-prober
grub-install --target=x86_64-efi --efi-directory=/boot --bootloader-id=Arch --recheck
事后可设置 vim /etc/default/grub 中 可提升启动速度
GRUB_CMDLINE_LINUX_DEFAULT="loglevel=3 nowatchdog"
GRUB_DISABLE_OS_PROBER=false
生成引导配置文件
grub-mkconfig -o /boot/grub/grub.cfg
创建用户并设置用户密码
<username> 为你自己的用户名,登录用,注意用户名必须全小写

useradd -m -G wheel -s /bin/bash <username>
passwd <username>
EDITOR=vim visudo
#把前面的注释符号 # 去掉
%wheel ALL=(ALL) ALL
systemctl enable dhcpcd
systemctl enable iwd
systemctl enable NetworkManager
pacman -S xorg-server xorg-apps xorg-xinit xorg-xclock xterm

pacman -S wqy-microhei wqy-microhei-lite wqy-bitmapfont wqy-zenhei ttf-arphic-ukai adobe-source-han-sans-cn-fonts adobe-source-han-serif-cn-fonts
yay -S ttf-fira-code
此时已可以重启正常进入系统tty了
英文字体
pacman -S ttf-dejavu
文泉驿正黑矢量字体
pacman -S wqy-zenhei
pacman -S wqy-microhei
Emoji 字体
pacman -S noto-fonts-emoji

pacman -S bluez bluez-utils
sudo systemctl enable bluetooth.service
sudo systemctl start bluetooth.service
安装git和xorg和字体并安装dwm
yay -S git
yay -S xorg
yay -S wqy-microhei
yay -S wps-office-mui-zh-cn
yay -S ttf-wps-fonts
yay -S nerd-fonts-jetbrains-mono
yay -S ttf-material-design-icons
yay -S ttf-joypixels
yay -S ttf-dejavu
sudo pacman -S xorg-server xorg-apps xorg-xinit xorg-xclock xterm
mkdir ~/workspace
cd ~/workspace
git clone https://github.com/yaocccc/dwm
git clone https://github.com/yaocccc/st
cd dwm && sudo make install clean
cd st && sudo make install clean

cp /etc/X11/xinit/xinitrc .xinitrc
echo exec dwm > ~/.xinitrc
startx # 进入系统
https://blog.csdn.net/weixin_44335269/article/details/117886927
https://www.cnblogs.com/Likfees/p/15656828.html
https://zhuanlan.zhihu.com/p/358338062
https://blog.csdn.net/lanuage/article/details/121568320
https://blog.csdn.net/weixin_44335269/article/details/117930190
https://blog.csdn.net/qq_45933858/article/details/124553077
https://zhuanlan.zhihu.com/p/112536524
https://yaocc.cc/archinstall/
https://github.com/yaocccc/picom
https://www.zhihu.com/people/MiraculousMoon/posts
https://jiuaidu.com/jianzhan/1096333/
https://yaocc.cc/page/3/#board
中文输入法
sudo pacman -S fcitx5-rime fcitx5-im fcitx5-chinese-addons fcitx5-pinyin-moegirl fcitx5-pinyin-zhwiki fcitx5-material-color
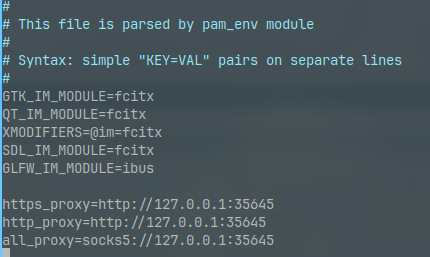
vim /etc/environment
GTK_IM_MODULE=fcitx
QT_IM_MODULE=fcitx
XMODIFIERS=@im=fcitx
SDL_IM_MODULE=fcitx
GLFW_IM_MODULE=ibus
蓝牙
Ssudo pacman -S bluez bluez-utils
sudo systemctl enable bluetooth.service
sudo systemctl start bluetooth.service
# 安装蓝牙音频
sudo pacman -S pulseaudio-bluetooth
# 蓝牙图形化管理工具安装
sudo pacman -S bluedevil
sudo pacman -S pipewire-pulse
sudo pacman -S pavucontrol

sudo vim /etc/bluetooth/main.conf
FastConnectable=true
AutoEnable=true
必备软件
pacman -S flameshot acpi xfce4-power-manager volume pcmanfm meson cmake libev uthash libconfig feh rofi gimp nodejs npm i3lock-color screenkey
yay -S baidunetdisk-electron adwaita-blue-icon-theme-git
nvim
https://github.com/yaocccc/nvim
配置系统锁屏和关机时间
vim /etc/X11/xorg.conf.d/10-monitor.conf
Section "ServerLayout"
    Identifier "ServerLayout0"
    Option "BlankTime"  "10" 	  # 自动锁屏
    Option "StandbyTime" "20"   # 关闭屏幕
    Option "SuspendTime" "30"   # 挂起
    Option "OffTime" "60"       # 关机
EndSection
触控板轻触
yay -S xf86-input-synaptics      # 触控板

vim /etc/X11/xorg.conf.d/30-touchpad.conf

Section "InputClass"
    Identifier "touchpad"
    Driver "libinput"
    MatchIsTouchpad "on"
    Option "Tapping" "on"
    Option "TappingButtonMap" "lrm"
EndSection
tty免登录
vim /etc/systemd/system/getty.target.wants/getty@tty1.service
update
  ExecStart=-/sbin/agetty -o '-p -f [用户名]' -n -a chenyc --noclear %I $TERM

sudo免密 加到 visudo 添加到尾部
[用户名] ALL=(ALL:ALL) NOPASSWD: ALL

用户提权
yay -S polkit
vim ~/.bashrc
#
# ~/.bashrc
#

# If not running interactively, don't do anything
[[ $- != *i* ]] && return
alias ls='ls --color=auto'
alias grep='grep --color=auto'
PS1='[\u@\h \W]\$ '
#auto startx
if [ -z "${DISPLAY}" ] && [ "${XDG_VTNR}" -eq 1 ]; then
	exec startx
fi


[ -f ~/.fzf.bash ] && source ~/.fzf.bash
vim ~/.zshrc
# Created by newuser for 5.9
#
[ $(tty) = "/dev/tty1" ] && cd ~ && startx

source ~/.config/omz/omz.zsh

[ -f ~/.fzf.zsh ] && source ~/.fzf.zsh
永久去除蜂鸣器声音
sudo su
mkdir -p /etc/rc.d
echo "rmmod pcspkr" >> /etc/rc.d/rc.local
chmod  +x /etc/rc.d/rc.local
日常软件
yay -S lxappearance              # gui设置
yay -S paper-gtk-theme-git       # gtk主题
yay -S pavucontrol               # 音频设置
yay -S breeze-icons              # 图标
yay -S rofi                      # 菜单
yay -S flameshot                 # 截图软件
yay -S google-chrome wyeb-git    # 浏览器
yay -S byzanz                    # gif截图依赖
yay -S wps-office-cn             # wps
yay -S libnotify dunst           # 通知 可使用 dunst -b 命令 启动通知服务
yay -S xorg-xsetroot             # dwm设置状态栏
yay -S xf86-input-synaptics      # 触控板
yay -S network-manager-applet    # 网络托盘
yay -S amf-amdgpu-pro            # amd gpu 驱动
yay -S obs-studio-amf            # obs for amd_gpu
yay -S mpc mpd ncmpcpp           # tui music player
微信安装
我现在是这么用的,


下载这个版本的包 https://github.com/vufa/deepin-wine-wechat-arch/releases/download/v3.8.1.26-1/deepin-wine-wechat-3.8.1.26-1-x86_64.pkg.tar.zst
sudo pacman -U deepin-wine-wechat-3.8.1.26-1-x86_64.pkg.tar.zst
yay -S deepin-wine5
yay -S wqy-microhei

sudo vim /opt/apps/com.qq.weixin.deepin/files/run.sh
手动把
export APPRUN_CMD="deepin-wine6-stable"
改成
export APPRUN_CMD="deepin-wine5"

启动命令 /opt/apps/com.qq.weixin.deepin/files/run.sh
***-for-windows安装
yay -S ***-for-windows-bin
在rofi中输入cfw,即可打开***-for-windows-bin
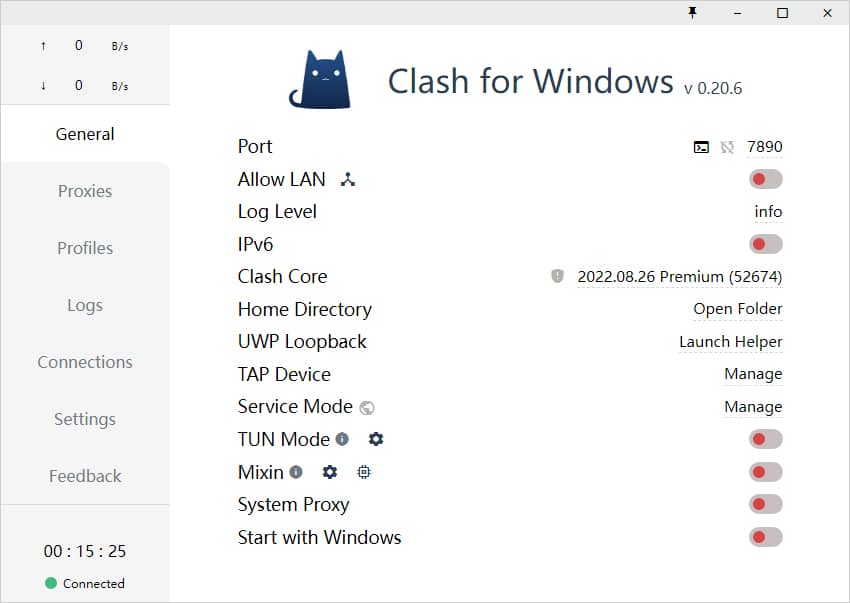
界面简介
- General(常规):
- Port、Socks Port;分别为 HTTP、SOCKS 代理端口,点击终端图案可以打开一个配置了代理的命令行窗口,点击端口数字可以复制该命令;
- Allow LAN:启用局域网共享代理功能;
- Log Level:日志等级;
- Home Directory:点击下方路径直达 C:\Users\用户名.config\*** 文件夹;
- GeoIP Database:点击下方日期可更新 GeoIP 数据库;
- UWP Loopback :可以用来使 UWP 应用解除回环代理限制;
- Tap Device :安装 cfw-tap 网卡,可用于处理不遵循系统代理的软件(实际启动 tap 模式需要更改配置文件);
- General YML:编辑 config.yml 文件,可用于配置部分 General 页面内容;
- Dark Theme:控制暗色模式;
- System Proxy:启用系统代理;
- Start with Windows:设置开机自启;
- Proxies(代理):选择代理方式(Global – 全局、Rule – 规则、Direct – 直连)及策略组节点选择;
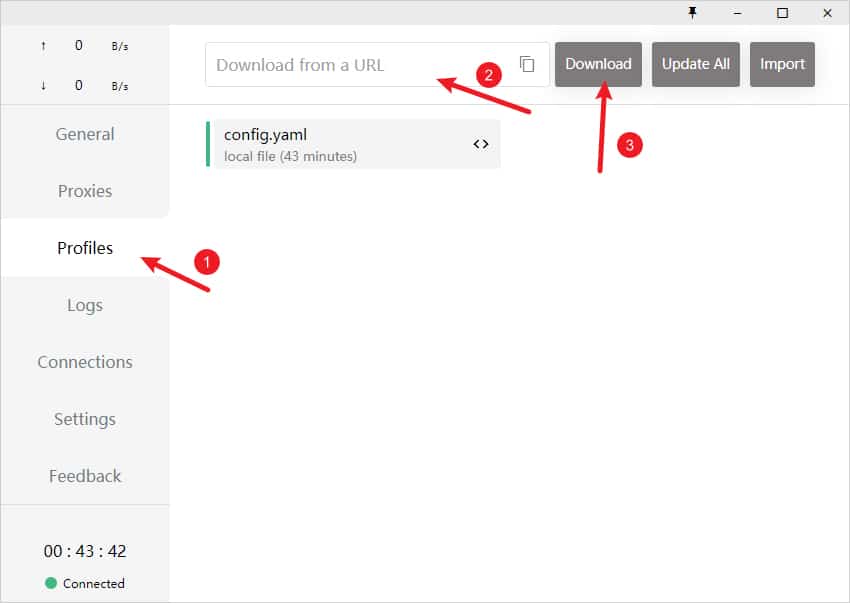
- Profiles(配置管理):
- 用来下载远端配置文件和创建本地副本,且可在多个配置文件间切换;
- 对配置进行节点、策略组和规则的管理(添加节点、策略组和规则在各自编辑界面选择 Add, 调整策略组顺序、节点顺序及策略组节点使用拖拽的方式);
- Logs(日志):显示当前请求命中规则类型和策略;
- Connections (连接): 显示当前的 TCP 连接,可对某个具体连接执行关闭操作;
- Settings(设置):软件详细设置;
- Feedback(反馈):显示软件、作者相关信息。
使用教程
添加配置文件
添加配置文件一般有如下两种方式:
- 远程订阅地址
- 本地配置文件
一般情况下,远程订阅地址(URL导入)及本地配置文件(本地文件拖拽导入)都由节点服务商提供。
远程订阅地址
远程订阅地址即通过 URL 链接导入,点击界面左侧菜单 Profiles,在顶部输入框填入 URL 连接地址并点击 Download 即可,下载完成后点击对应的配置文件即可添加配置文件,如下图所示。
将这行代码去除export后,复制到etc/environment后面
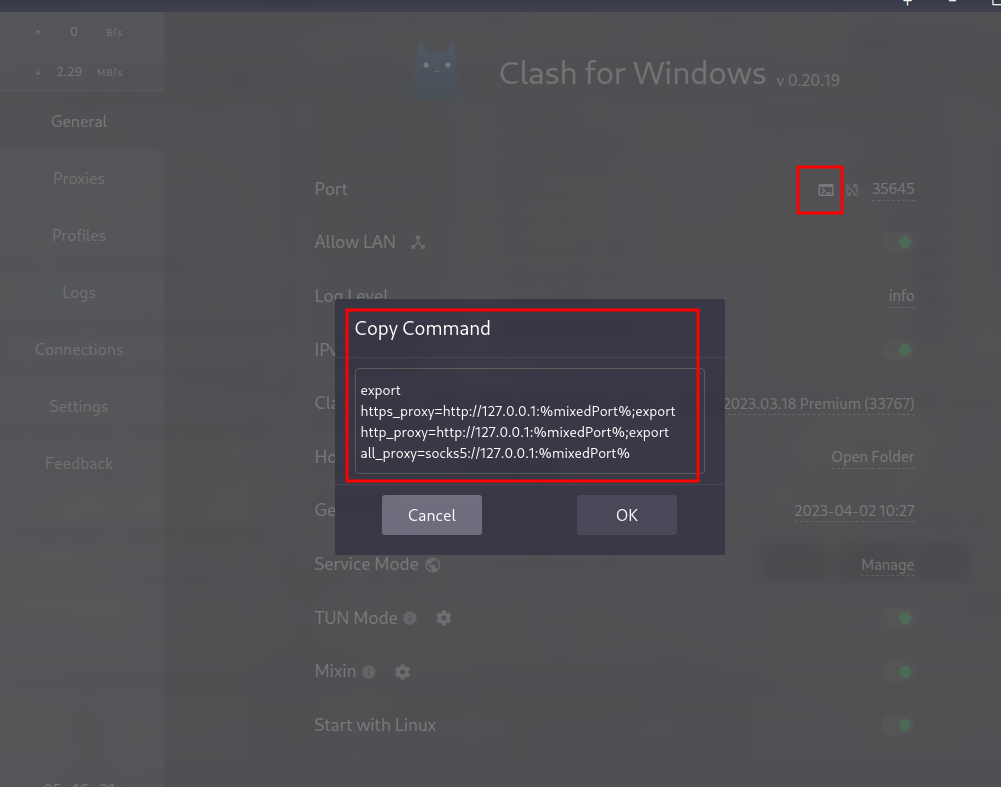
例如我这样:
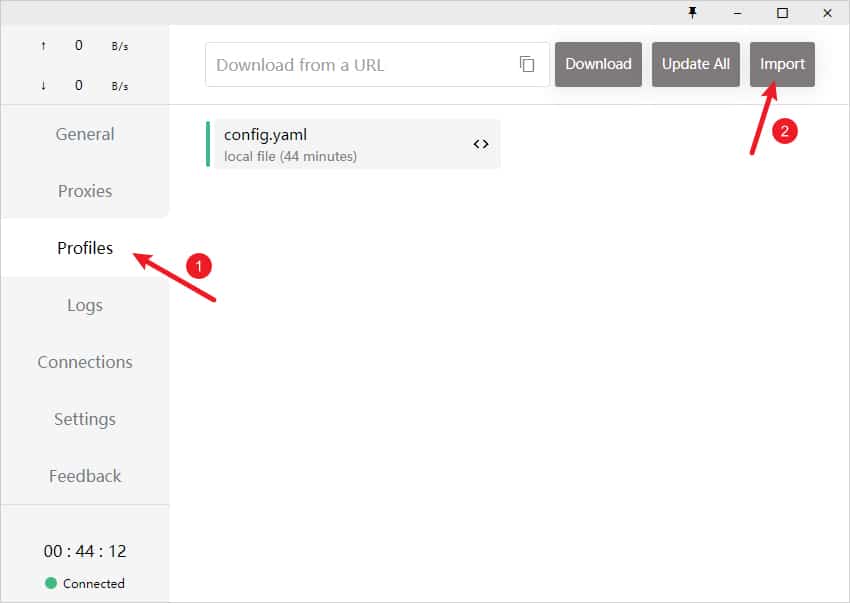
本地配置文件
本地配置文件即通过本地文件拖拽导入,一般为无法通过远程订阅地址导入的情况下使用,可尝试在浏览器中下载配置文件后直接通过拖拽方式导入或点击 Import 导入,如下图所示。
启用代理
启用代理,需要点击界面左侧菜单 Profiles 选项卡,找到 System Proxy 并开启开关即可,开启状态下按钮状态为绿色,如下图所示为开启状态。

设置开机自启动,需要点击界面左侧菜单 Profiles 选项卡,找到 Start with Windows 并开启开关即可,开启状态下按钮状态为绿色。
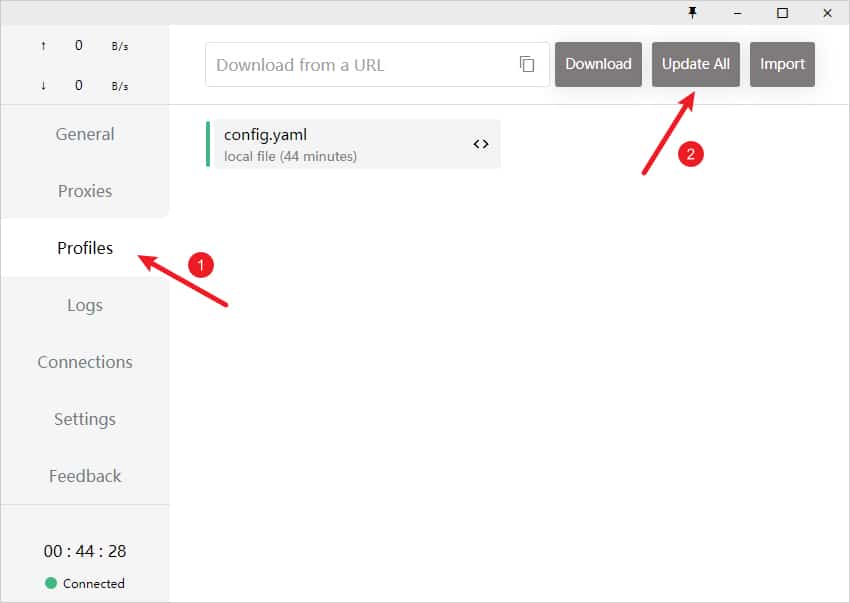
*** for Windows 更新配置文件
更新配置文件

 浙公网安备 33010602011771号