如何使用.NET开发全版本支持的Outlook插件产品(三)——全面控制
插件项目所有代码都已经上传至
https://github.com/VanPan/TestOutlookAdding
进阶基础——COM查看
首先,对于Outlook对象模型,MSDN早就有非常详细的介绍,请直接查阅下面的链接:
http://msdn.microsoft.com/zh-cn/library/ms268893(VS.80).aspx
但是,对于我们在开发过程中,仅仅靠这个模型概念是完全不够的,因为如果真的开始调试,当我们获取到COM组件对象时,我们通过调试会发现所有的COM对象的类型都是“System.__ComObject”。根本无法知道这个对象的实际类型,也无从得知其中的属性和方法了。
幸好,我们有下面的这个工具类
using System;
using System.Runtime.InteropServices;

namespace TestOutlookAddin
{
    public class ComHelper
    {
        /// <summary>
        /// Returns a string value representing the type name of the specified COM object.
        /// </summary>
        /// <param name="comObj">A COM object the type name of which to return.</param>
        /// <returns>A string containing the type name.</returns>
        public static string GetTypeName(object comObj)
        {

            if (comObj == null)
                return String.Empty;

            if (!Marshal.IsComObject(comObj))
                //The specified object is not a COM object
                return String.Empty;

            IDispatch dispatch = comObj as IDispatch;
            if (dispatch == null)
                //The specified COM object doesn't support getting type information
                return String.Empty;

            System.Runtime.InteropServices.ComTypes.ITypeInfo typeInfo = null;
            try
            {
                try
                {
                    // obtain the ITypeInfo interface from the object
                    dispatch.GetTypeInfo(0, 0, out typeInfo);
                }
                catch (Exception ex)
                {
                    //Cannot get the ITypeInfo interface for the specified COM object
                    return String.Empty;
                }

                string typeName = "";
                string documentation, helpFile;
                int helpContext = -1;

                try
                {
                    //retrieves the documentation string for the specified type description
                    typeInfo.GetDocumentation(-1, out typeName, out documentation,
                        out helpContext, out helpFile);
                }
                catch (Exception ex)
                {
                    // Cannot extract ITypeInfo information
                    return String.Empty;
                }
                return typeName;
            }
            catch (Exception ex)
            {
                // Unexpected error
                return String.Empty;
            }
            finally
            {
                if (typeInfo != null) Marshal.ReleaseComObject(typeInfo);
            }
        }
    }

    /// <summary>
    /// Exposes objects, methods and properties to programming tools and other
    /// applications that support Automation.
    /// </summary>
    [ComImport()]
    [Guid("00020400-0000-0000-C000-000000000046")]
    [InterfaceType(ComInterfaceType.InterfaceIsIUnknown)]
    interface IDispatch
    {
        [PreserveSig]
        int GetTypeInfoCount(out int Count);

        [PreserveSig]
        int GetTypeInfo(
            [MarshalAs(UnmanagedType.U4)] int iTInfo,
            [MarshalAs(UnmanagedType.U4)] int lcid,
            out System.Runtime.InteropServices.ComTypes.ITypeInfo typeInfo);

        [PreserveSig]
        int GetIDsOfNames(
            ref Guid riid,
            [MarshalAs(UnmanagedType.LPArray, ArraySubType = UnmanagedType.LPWStr)]
            string[] rgsNames,
            int cNames,
            int lcid,
            [MarshalAs(UnmanagedType.LPArray)] int[] rgDispId);

        [PreserveSig]
        int Invoke(
            int dispIdMember,
            ref Guid riid,
            uint lcid,
            ushort wFlags,
            ref System.Runtime.InteropServices.ComTypes.DISPPARAMS pDispParams,
            out object pVarResult,
            ref System.Runtime.InteropServices.ComTypes.EXCEPINFO pExcepInfo,
            IntPtr[] pArgErr);
    }
}
使用的时候,只需要如下调用,就可以得到真实类型的string了,对于调试和确定真实类型时非常方便。
object selection = ExcelApp.Selection;
   if (selection != null)
   {
        string typeName = ComHelper.GetTypeName(selection);
        Debug.Print(typeName);
        Marshal.ReleaseComObject(selection);
   }
全面控制——嵌入
我们现在已经成功把Ribbon和经典工具栏嵌入到各个版本的Outlook中了,那我们还能用插件做些什么工作呢?
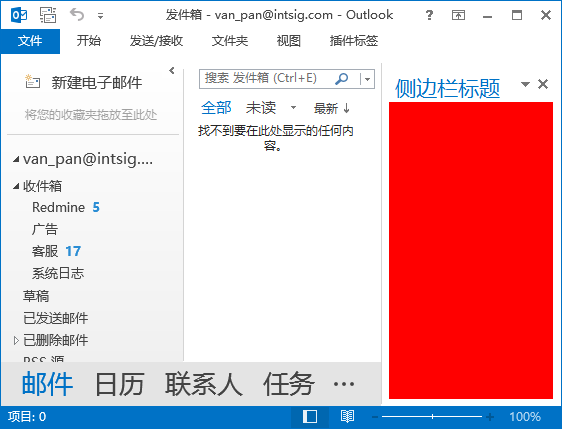
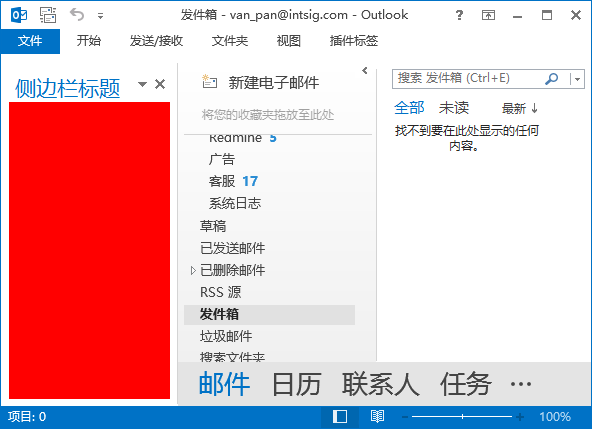
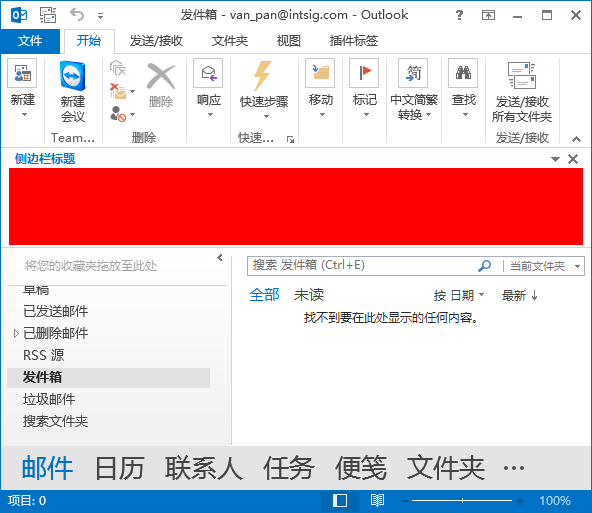
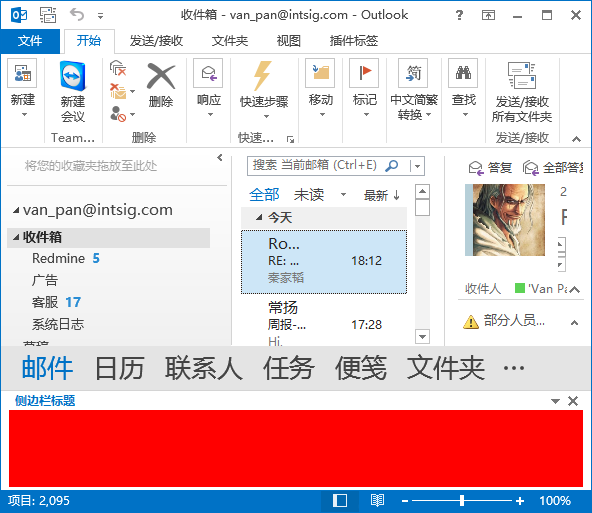
看看下面的截图
所有截图中的红色区域,都是可以由插件注入的,区域有上下左右以及浮动一共5种,这些区域称为TaskPanes。
需要注意的是:TaskPanes是从Office 2007版本才开始支持的,Office 2003是没有这种区域注入的。2003有一套自己的解决方案,但是可惜的是NetOffice不支持这种技术。但是我们可以针对2003用另外一个方案解决,比如弹出一个和侧边栏类似的窗体,虽然不能完全嵌入在Outlook里面,但是总可以解决2003用户的需求,毕竟现在还用2003版本的用户数量总是越来越少了,没必要为了一个过气旧版本花这么多精力。
好了,我们来看看代码吧
private void Addin_OnConnection(object app, ext_ConnectMode ConnectMode, object AddInInst, ref Array custom)
        {
            try
            {
                _outlookApplication = new OutLook.Application(null, app);
                TaskPanes.Add(typeof(TaskPaneContainerControl), "侧边栏标题");
                TaskPanes[0].DockPosition = MsoCTPDockPosition.msoCTPDockPositionBottom;
                TaskPanes[0].DockPositionRestrict = MsoCTPDockPositionRestrict.msoCTPDockPositionRestrictNoChange;
                TaskPanes[0].Height = 100;
                TaskPanes[0].Visible = true;
                TaskPanes[0].Arguments = new object[] { this };
            }
            catch (Exception exception)
            {
                // 处理
            }
        }
非常简单,对OnConnection事件订阅处理,并且加入以上逻辑,即可加入一个侧边栏。
对于侧边栏的代码,还是有些小技巧,因为侧边栏只支持WinForm版本,也就是.NET 2.0版本的UserControl。可是现如今我们都在用WPF,不得不说,WPF做UI真是非常高效快捷,如果还在用Winform的各位,我很诚恳得推荐大家开始转入WPF的阵营。
回到正题,我们现在添加的是TaskPaneContainerControl,这是一个.NET 2.0的UserControl,但是内部我们可以这样做
public TaskPaneContainerControl()
        {
            InitializeComponent();
            Controls.Add(new ElementHost { Child = new UserControlWpf(), Dock = DockStyle.Fill });
        }
用ElementHost,我们就可以在其中塞入一个WPF的UserControl了。
添加了侧边栏以后,大家可以看到侧边栏是可以关闭的,Outlook是不会提供打开按钮的,所以我们需要在工具栏中加入一些按钮来重新打开侧边栏,这点不再赘述。
写在Outlook插件开发的最后
写到这儿,我想我们已经进入Outlook插件开发的一些核心区域了。之前的一些进入门槛的方法,也就已经全部涵盖了。我的功能也就涉及到这些区域,其它的,出于种种原因,都无法再详细描述,大家完全可以去查阅MSDN,对各种Outlook的对象进行更多的了解和开发。但是我可以提前告诉大家,以我现在所知的范围,Outlook插件最起码可以做以下功能:
- 获取当前选中的Outlook Item的所有信息,包括:邮件、联系人、日历项、活动、会议等等
- 当Outlook Item被激活时触发的事件监听
- 修改Outlook Item各项窗体,在其中注入自定义区域
- 添加、修改、删除各项Outlook Item,包括:文件夹、邮件、联系人、日历项、活动、会议等等
下面,我很迫不及待得想要向大家介绍近段时间做了大量工作,并且有完整的、非常稳定的、甚至商业可用的打包框架Wix的进阶使用场景。
我们将从安装这个Outlook插件开始,到如何打包部署一个完整的.NET商业应用程序。


