three.js 自制骨骼动画(一)
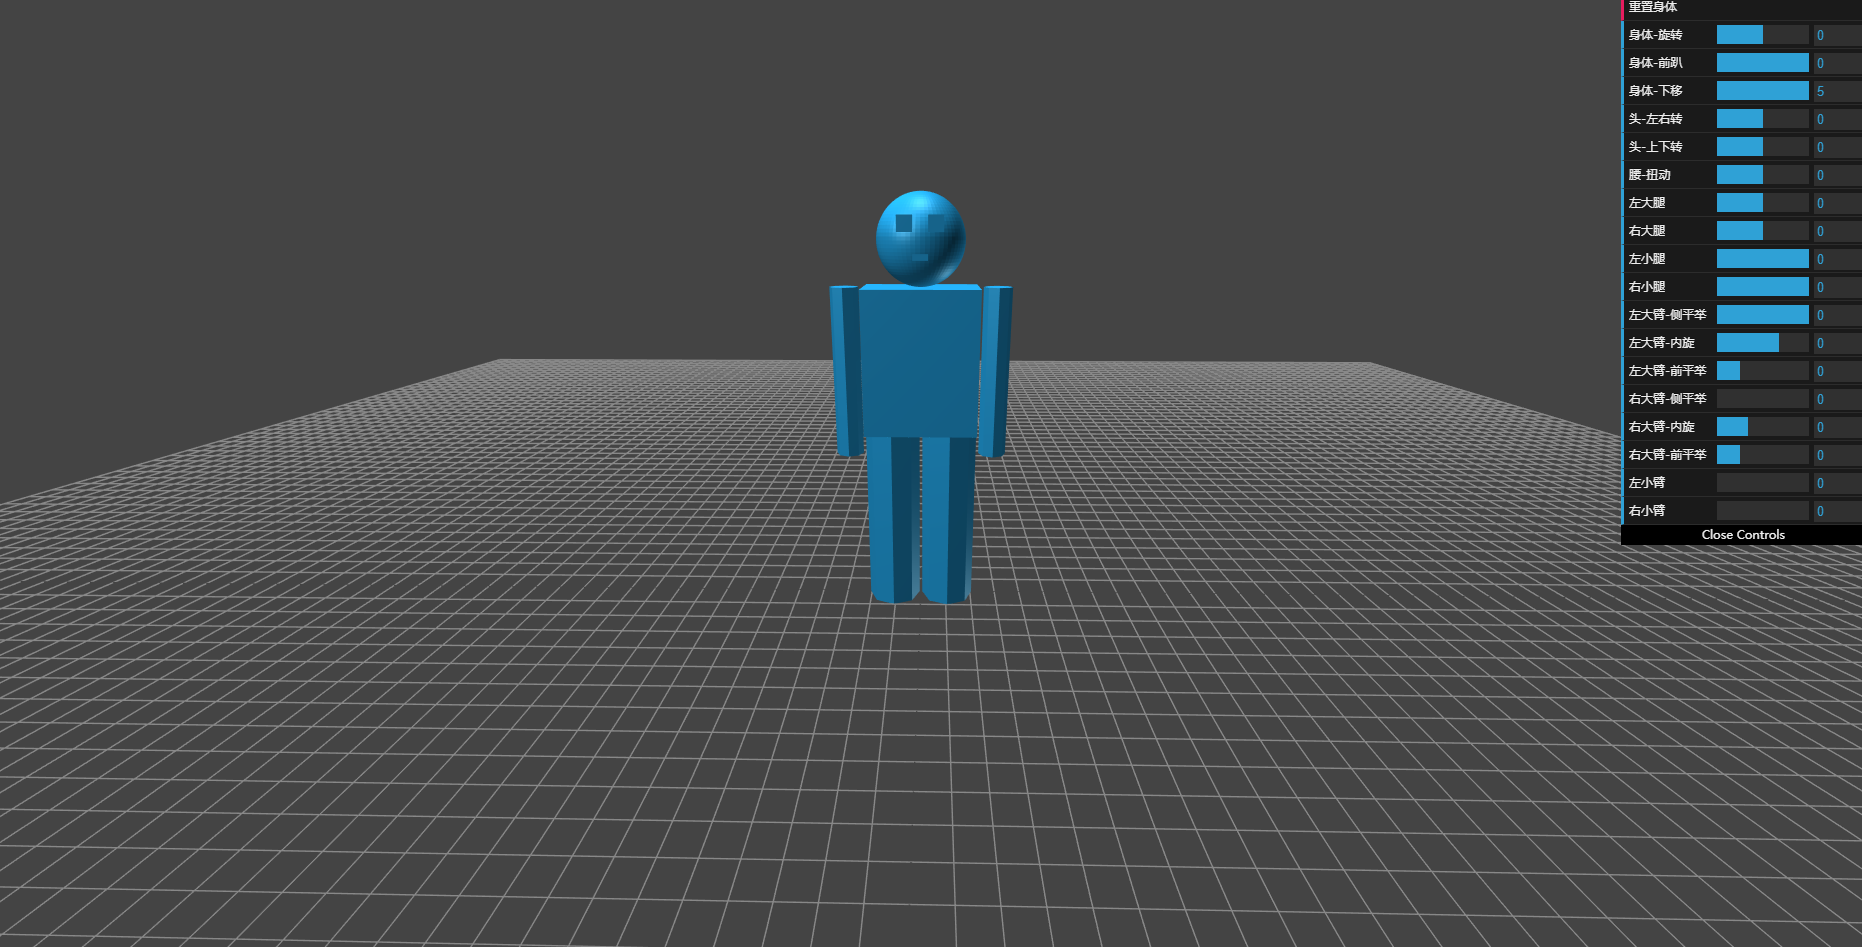
上一篇郭先生解析了一下官方的骨骼动画案例,这篇郭先生就要做一个稍微复杂一点的骨骼动画了,就拿一个小人下手吧。在线案例请点击博客原文。话不多说先上大图
骨骼动画在GUI上面都有体现。制作骨骼动画的步骤在官方案例中已经看到了,这里在回忆一下。骨骼动画的基本步骤
- 创建一个BufferGeometry,并添加skinIndex和skinWeight两个属性。
- 创建骨骼Bone
- 建蒙皮材质Material
- 根据BufferGeometry和Material创建蒙皮网格SkinnedMesh
- 根据Bone创建骨架Skeleton
- SkinnedMesh添加骨骼根节点
- innedMesh绑定骨架
总结起来差不多就这7步,接下来我们一步一步从零创建一个这样的小人
1. 创建一个BufferGeometry,并添加skinIndex和skinWeight两个属性。
我们有几种方案创建这样的复杂几何体。
- 使用threeBSP创建这样的几何体,优点是二元操作更加的强大,能做出复杂几何体,缺点是性能开销大。
- 使用BufferGeometry的merge方法,将几何体合并,优点是性能好,缺点是只能将几何体合并。
- 直接引用模型
我们采用第二种方法。
let head = new THREE.SphereGeometry(3, 60, 40);
let eye_l = new THREE.BoxGeometry(2, 1, 1);
let eye_r = new THREE.BoxGeometry(2, 1, 1);
let mouth = new THREE.BoxGeometry(2, 0.4, 1);
head.merge(eye_l, new THREE.Matrix4().makeTranslation(2, 1, 1))
head.merge(eye_r, new THREE.Matrix4().makeTranslation(2, 1, -1))
head.merge(mouth, new THREE.Matrix4().makeTranslation(2, -1, 0))

let body = new THREE.BoxGeometry(5, 10, 8, 1, 20, 1);
let leg_l = new THREE.CylinderGeometry(2, 2, 14, 8, 14);
let leg_r = new THREE.CylinderGeometry(2, 2, 14, 8, 14);
let arm_l = new THREE.CylinderGeometry(1, 1, 12, 8, 11);
let arm_r = new THREE.CylinderGeometry(1, 1, 12, 8, 11);
let human = body.clone();

human.merge(head, new THREE.Matrix4().makeTranslation(0, 8, 0));
human.merge(leg_l, new THREE.Matrix4().makeTranslation(0, -12, 2.1));
human.merge(leg_r, new THREE.Matrix4().makeTranslation(0, -12, -2.1));
human.merge(arm_l, new THREE.Matrix4().makeTranslation(0, -1, 5.3));
human.merge(arm_r, new THREE.Matrix4().makeTranslation(0, -1, -5.3));

human = new THREE.BufferGeometry().fromGeometry(human);
这里创建小人几何体完毕。接下来是并添加skinIndex和skinWeight两个属性。
var skinIndices = [];
var skinWeights = [];
let position = human.attributes.position;
var vertex = new THREE.Vector3();

for(let i=0; i<position.count; i++) {
    vertex.fromBufferAttribute(position, i);
    if(vertex.z > 4.3 && vertex.y >= 0) {
        skinIndices.push(9,0,0,0);
        skinWeights.push(1,0,0,0);
    } else if (vertex.z < -4.3 && vertex.y >= 0) {
        skinIndices.push(10,0,0,0);
        skinWeights.push(1,0,0,0);
    } else if (vertex.z > 4.3 && vertex.y < 0) {
        skinIndices.push(11,0,0,0);
        skinWeights.push(1,0,0,0);
    } else if (vertex.z < -4.3 && vertex.y < 0) {
        skinIndices.push(12,0,0,0);
        skinWeights.push(1,0,0,0);
    } else if (vertex.y <= 5 && vertex.y >= -5) {
        let w = (vertex.y + 5) / 10;
        skinIndices.push(0,2,0,0);
        skinWeights.push(Math.sqrt(w),1-Math.sqrt(w),0,0);
    } else if (vertex.y > 5) {
        skinIndices.push(1,0,0,0);
        skinWeights.push(1,0,0,0);
    } else if(vertex.y < -5 && vertex.y >= -12 && vertex.z > 0) {
        skinIndices.push(3,0,0,0);
        skinWeights.push(1,0,0,0);
    } else if (vertex.y < -12 && vertex.z > 0) {
        skinIndices.push(5,0,0,0);
        skinWeights.push(1,0,0,0);
    } else if (vertex.y < -5 && vertex.y >= -12 && vertex.z < 0) {
        skinIndices.push(4,0,0,0);
        skinWeights.push(1,0,0,0);
    } else {
        skinIndices.push(6,0,0,0);
        skinWeights.push(1,0,0,0);
    }
}

human.setAttribute('skinIndex', new THREE.Uint16BufferAttribute(skinIndices, 4));
human.setAttribute('skinWeight', new THREE.Float32BufferAttribute(skinWeights, 4));
这里根据几何体顶点的x,y,z值来添加索引和权重,
2. 创建骨骼Bone
骨骼的节点如下图
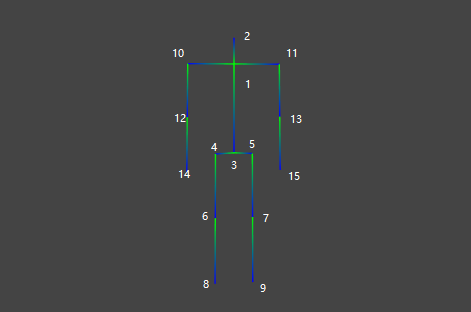
其中bone1为根节点。
let bones = [];
let bone1 = new THREE.Bone(); //胸
bone1.position.y = 5;
let bone2 = new THREE.Bone(); //头
bone2.position.y = 3;
let bone3 = new THREE.Bone(); //尾椎
bone3.position.y = -10;


let bone4 = new THREE.Bone(); //左腿上
bone4.position.y = -0.1;
bone4.position.z = 2.1;
let bone5 = new THREE.Bone(); //右腿上
bone5.position.y = -0.1;
bone5.position.z = -2.1;
let bone6 = new THREE.Bone(); //左腿中
bone6.position.y = -7;
let bone7 = new THREE.Bone(); //右腿中
bone7.position.y = -7;
let bone8 = new THREE.Bone(); //左腿下
bone8.position.y = -7;
let bone9 = new THREE.Bone(); //右腿下
bone9.position.y = -7;

let bone10 = new THREE.Bone(); //左臂上
bone10.position.z = 5.3;
let bone11 = new THREE.Bone(); //右臂上
bone11.position.z = -5.3;
let bone12 = new THREE.Bone(); //左臂中
bone12.position.y = -6;
let bone13 = new THREE.Bone(); //右臂中
bone13.position.y = -6;
let bone14 = new THREE.Bone(); //左臂下
bone14.position.y = -6;
let bone15 = new THREE.Bone(); //右臂下
bone15.position.y = -6;

bone1.add(bone2);
bone1.add(bone3);
bone1.add(bone10)
bone1.add(bone11)

bone3.add(bone4);
bone3.add(bone5);

bone4.add(bone6);
bone5.add(bone7);
bone6.add(bone8);
bone7.add(bone9);
bone10.add(bone12)
bone11.add(bone13)
bone12.add(bone14)
bone13.add(bone15)

bones.push(bone1);
bones.push(bone2);
bones.push(bone3);
bones.push(bone4);
bones.push(bone5);
bones.push(bone6);
bones.push(bone7);
bones.push(bone8);
bones.push(bone9);
bones.push(bone10);
bones.push(bone11);
bones.push(bone12);
bones.push(bone13);
bones.push(bone14);
bones.push(bone15);
3. 创建蒙皮材质Material
这个比较简单,就是打开材质的蒙皮属性skinning: true。
let material = new THREE.MeshPhongMaterial({
    skinning: true,
    color: 0x156289,
    emissive: 0x072534,
    side: THREE.DoubleSide,
    flatShading: true,
    // wireframe: true,
})
4. 根据BufferGeometry和Material创建蒙皮网格SkinnedMesh
mesh = new THREE.SkinnedMesh(human, material);
5. 根据Bone创建骨架Skeleton
let skeleton = new THREE.Skeleton(bones);
6. SkinnedMesh添加骨骼根节点
mesh.add(bones[0]);
7. SkinnedMesh绑定骨架
mesh.bind(skeleton);
8. 添加界面交互GUI
var bones = mesh.skeleton.bones;

gui.add( mesh, "pose" );

gui.add(bones[0].rotation, 'y', bones[0].rotation.y - Math.PI/4, bones[0].rotation.y + Math.PI/4);
gui.add(bones[0].rotation, 'z', bones[0].rotation.z - Math.PI/2, bones[0].rotation.z);
gui.add(bones[0].position, 'y', bones[0].position.y - 21.5, bones[0].position.y);

gui.add(bones[1].rotation, 'y', bones[1].rotation.y - Math.PI/4, bones[1].rotation.y + Math.PI/4);
gui.add(bones[1].rotation, 'z', bones[1].rotation.z - Math.PI/6, bones[1].rotation.z + Math.PI/6);

gui.add(bones[2].rotation, 'y', bones[2].rotation.y - Math.PI/6,  bones[2].rotation.y + Math.PI/6);

gui.add(bones[3].rotation, 'z', bones[3].rotation.z - Math.PI/3, bones[3].rotation.z + Math.PI/3);
gui.add(bones[4].rotation, 'z', bones[4].rotation.z - Math.PI/3, bones[4].rotation.z + Math.PI/3);
gui.add(bones[5].rotation, 'z', bones[5].rotation.z - Math.PI/3,  bones[5].rotation.z);
gui.add(bones[6].rotation, 'z', bones[6].rotation.z - Math.PI/3,  bones[6].rotation.z);

gui.add(bones[9].rotation, 'x', bones[9].rotation.x - Math.PI, bones[9].rotation.x);
gui.add(bones[9].rotation, 'y', bones[9].rotation.y - Math.PI/2, bones[9].rotation.y + Math.PI/4);
gui.add(bones[9].rotation, 'z', bones[9].rotation.z - Math.PI/3, bones[9].rotation.z + Math.PI);

gui.add(bones[10].rotation, 'x', bones[10].rotation.x, bones[10].rotation.x + Math.PI);
gui.add(bones[10].rotation, 'y', bones[10].rotation.y - Math.PI/4, bones[10].rotation.y + Math.PI/2);
gui.add(bones[10].rotation, 'z', bones[10].rotation.z - Math.PI/3, bones[10].rotation.z + Math.PI);

gui.add(bones[11].rotation, 'z', bones[11].rotation.z,  bones[11].rotation.z + Math.PI/4*3);
gui.add(bones[12].rotation, 'z', bones[12].rotation.z,  bones[12].rotation.z + Math.PI/4*3);

gui.__controllers[0].name("重置身体");
gui.__controllers[1].name("身体-旋转");
gui.__controllers[2].name("身体-前趴");
gui.__controllers[3].name("身体-下移");

gui.__controllers[4].name("头-左右转");
gui.__controllers[5].name("头-上下转");

gui.__controllers[6].name("腰-扭动");

gui.__controllers[7].name("左大腿");
gui.__controllers[8].name("右大腿");
gui.__controllers[9].name("左小腿");
gui.__controllers[10].name("右小腿");

gui.__controllers[11].name("左大臂-侧平举");
gui.__controllers[12].name("左大臂-内旋");
gui.__controllers[13].name("左大臂-前平举");

gui.__controllers[14].name("右大臂-侧平举");
gui.__controllers[15].name("右大臂-内旋");
gui.__controllers[16].name("右大臂-前平举");

gui.__controllers[17].name("左小臂");
gui.__controllers[18].name("右小臂");
这样就完成了一个骨骼动画的模型,是不是很简单呢。下篇我们继续完善它,添加帧动画让他动起来。
转载请注明地址:郭先生的博客

 浙公网安备 33010602011771号