Framework 4.6.2下的SignalR使用,以及WPF下同步使用
先介绍一下我的代码环境:
Microsoft Visual Studio Community 2019
第一部分先参考微软官方教程使用创建SignalR网站项目 教程:使用 SignalR 2 进行实时聊天 | Microsoft Learn
这里说几个注意事项:参照本部分微软教程过程中我遇到几项问题,
在创建ChatHub类的时候,VS会自动安装几个类库,在我的系统环境下,有几个报错,具体报错没有截图,主要原因是第三方引用程序包版本不对应,下面是我的packages.config文件对应版本
 1 <?xml version="1.0" encoding="utf-8"?>
 2 <packages>
 3   <package id="jQuery" version="3.7.1" targetFramework="net462" />
 4   <package id="Microsoft.AspNet.SignalR" version="2.2.2" targetFramework="net462" />
 5   <package id="Microsoft.AspNet.SignalR.Core" version="2.2.2" targetFramework="net462" />
 6   <package id="Microsoft.AspNet.SignalR.Core.zh-Hans" version="2.2.2" targetFramework="net462" />
 7   <package id="Microsoft.AspNet.SignalR.JS" version="2.2.2" targetFramework="net462" />
 8   <package id="Microsoft.AspNet.SignalR.SystemWeb" version="2.2.2" targetFramework="net462" />
 9   <package id="Microsoft.AspNet.SignalR.SystemWeb.zh-Hans" version="2.2.2" targetFramework="net462" />
10   <package id="Microsoft.AspNet.SignalR.zh-Hans" version="2.2.2" targetFramework="net462" />
11   <package id="Microsoft.Owin" version="4.2.0" targetFramework="net462" />
12   <package id="Microsoft.Owin.Host.SystemWeb" version="4.2.0" targetFramework="net462" />
13   <package id="Microsoft.Owin.Host.SystemWeb.zh-Hans" version="4.2.0" targetFramework="net462" />
14   <package id="Microsoft.Owin.Security" version="4.2.0" targetFramework="net462" />
15   <package id="Microsoft.Owin.Security.zh-Hans" version="4.2.0" targetFramework="net462" />
16   <package id="Microsoft.Owin.zh-Hans" version="4.2.0" targetFramework="net462" />
17   <package id="Microsoft.Web.Infrastructure" version="2.0.1" targetFramework="net462" />
18   <package id="Newtonsoft.Json" version="13.0.3" targetFramework="net462" />
19   <package id="Owin" version="1.0" targetFramework="net462" />
20 </packages>
- 在 Visual Studio 中,创建 ASP.NET Web 应用程序。

- 在 “新建 ASP.NET 项目 - SignalRChat ”窗口中,选择“ 空 ”并选择“ 确定”。
- 在“解决方案资源管理器”中,右键单击项目并选择“添加新>项”。
- 在 “添加新项 - SignalRChat”中,选择“ 已安装>的 Visual C#>Web>SignalR ”,然后选择“ SignalR Hub 类 (v2) ”。
- 将类命名为 ChatHub 并将其添加到项目中。
此步骤创建 ChatHub.cs 类文件,并向项目添加一组支持 SignalR 的脚本文件和程序集引用。 - 将新的 ChatHub.cs 类文件中的代码替换为以下代码:
using System;
using System.Web;
using Microsoft.AspNet.SignalR;
namespace SignalRChat
{
    public class ChatHub : Hub
    {
        public void Send(string name, string message)
        {
            // Call the broadcastMessage method to update clients.
            Clients.All.broadcastMessage(name, message);
        }
public void Hello(string name,string message)
{
Clients.All.broadcastMessage("Hello:"+name, message);
}}
}这个是另一类,MyHub.cs类,为下面第二部分代码运行提供
    public class MyHub : Hub
    {
        public void Send(string name, string message)
        {
            Clients.All.broadcastMessage("my:"+name, message);
        }
    }
- 在“解决方案资源管理器”中,右键单击项目并选择“添加新>项”。
- 在 “添加新项 - SignalRChat ”中,选择 “已安装>的 Visual C#>Web ”,然后选择“ OWIN 启动类”。
- 将类命名为 Startup 并将其添加到项目中。
- 将 Startup 类中的默认代码替换为以下代码:
 1 using Microsoft.Owin;
 2 using Owin;
 3 [assembly: OwinStartup(typeof(SignalRChat.Startup))]
 4 namespace SignalRChat
 5 {
 6     public class Startup
 7     {
 8         public void Configuration(IAppBuilder app)
 9         {
10             // Any connection or hub wire up and configuration should go here
11             app.MapSignalR();
12         }
13     }
14 }
- 在“解决方案资源管理器”中,右键单击项目并选择“添加>HTML 页面”。
- 将新页 索引 命名为 ,然后选择“ 确定”。
- 在“解决方案资源管理器”中,右键单击创建的 HTML 页面,然后选择“设置为起始页”。
- 将 HTML 页中的默认代码替换为以下代码:
1 <!DOCTYPE html> 2 <html> 3 <head> 4 <title>SignalR Simple Chat</title> 5 <style type="text/css"> 6 .container { 7 background-color: #99CCFF; 8 border: thick solid #808080; 9 padding: 20px; 10 margin: 20px; 11 } 12 </style> 13 </head> 14 <body> 15 <div class="container"> 16 <input type="text" id="message" /> 17 <input type="button" id="sendmessage" value="Send" /> 18 <input type="hidden" id="displayname" /> 19 <ul id="discussion"> 20 </ul> 21 </div> 22 <!--Script references. --> 23 <!--Reference the jQuery library. --> 24 <script src="Scripts/jquery-3.1.1.min.js" ></script> 25 <!--Reference the SignalR library. --> 26 <script src="Scripts/jquery.signalR-2.2.1.min.js"></script> 27 <!--Reference the autogenerated SignalR hub script. --> 28 <script src="signalr/hubs"></script> 29 <!--Add script to update the page and send messages.--> 30 <script type="text/javascript"> 31 $(function () { 32 // Declare a proxy to reference the hub. 33 var chat = $.connection.chatHub; 34 // Create a function that the hub can call to broadcast messages. 35 chat.client.broadcastMessage = function (name, message) { 36 // Html encode display name and message. 37 var encodedName = $('<div />').text(name).html(); 38 var encodedMsg = $('<div />').text(message).html(); 39 // Add the message to the page. 40 $('#discussion').append('<li><strong>' + encodedName 41 + '</strong>: ' + encodedMsg + '</li>'); 42 }; 43 // Get the user name and store it to prepend to messages. 44 $('#displayname').val(prompt('Enter your name:', '')); 45 // Set initial focus to message input box. 46 $('#message').focus(); 47 // Start the connection. 48 $.connection.hub.start().done(function () { 49 $('#sendmessage').click(function () { 50 // Call the Send method on the hub. 51 chat.server.send($('#displayname').val(), $('#message').val()); 52 // Clear text box and reset focus for next comment. 53 $('#message').val('').focus(); 54 }); 55 }); 56 }); 57 </script> 58 </body> 59 </html>
-
检查代码块中的脚本引用是否与项目中的脚本文件版本相对应。
原始代码块中的脚本引用:
1 <!--Script references. -->
2 <!--Reference the jQuery library. -->
3 <script src="Scripts/jquery-3.1.1.min.js" ></script>
4 <!--Reference the SignalR library. -->
5 <script src="Scripts/jquery.signalR-2.2.1.min.js"></script>
- 如果不匹配,请更新 .html 文件。
- 在菜单栏中,选择“全部保存文件>”。
运行示例
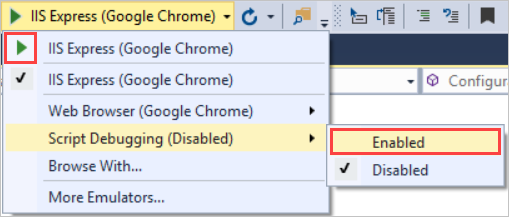
-
在工具栏中,打开 “脚本调试 ”,然后选择“播放”按钮以在调试模式下运行示例。
-
浏览器打开时,输入聊天标识的名称。
-
从浏览器复制 URL,打开其他两个浏览器,然后将 URL 粘贴到地址栏中。
-
在每个浏览器中,输入唯一的名称。
-
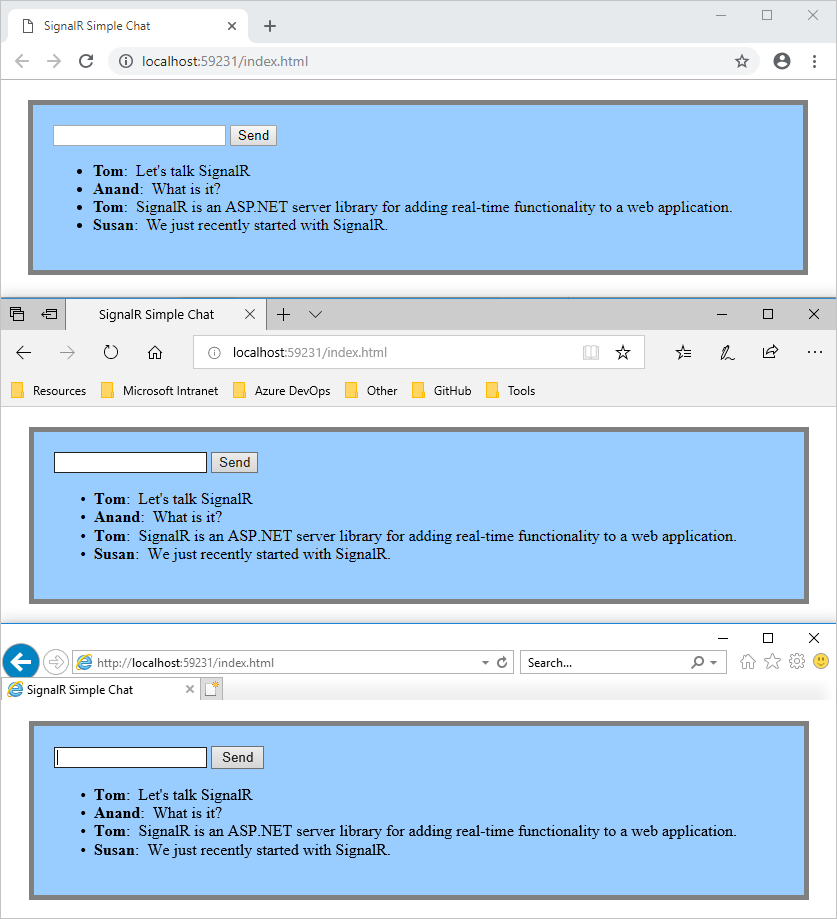
现在,添加批注并选择“ 发送”。 在其他浏览器中重复此操作。 批注实时显示。
备注
此简单的聊天应用程序不维护服务器上的讨论上下文。 中心向所有当前用户广播注释。 稍后加入聊天的用户将看到从加入时添加的消息。
了解聊天应用程序如何在三种不同浏览器中运行。 当 Tom、Anand 和 Susan 发送消息时,所有浏览器都会实时更新:
以上是SignalR在web环境下实现简单的聊天,代码基本上都是微软直接实现的,没有什么改动
第二部分WPF通过SignalR通讯
基于上面第一部分项目,我的项目运行地址是:http://localhost:11733
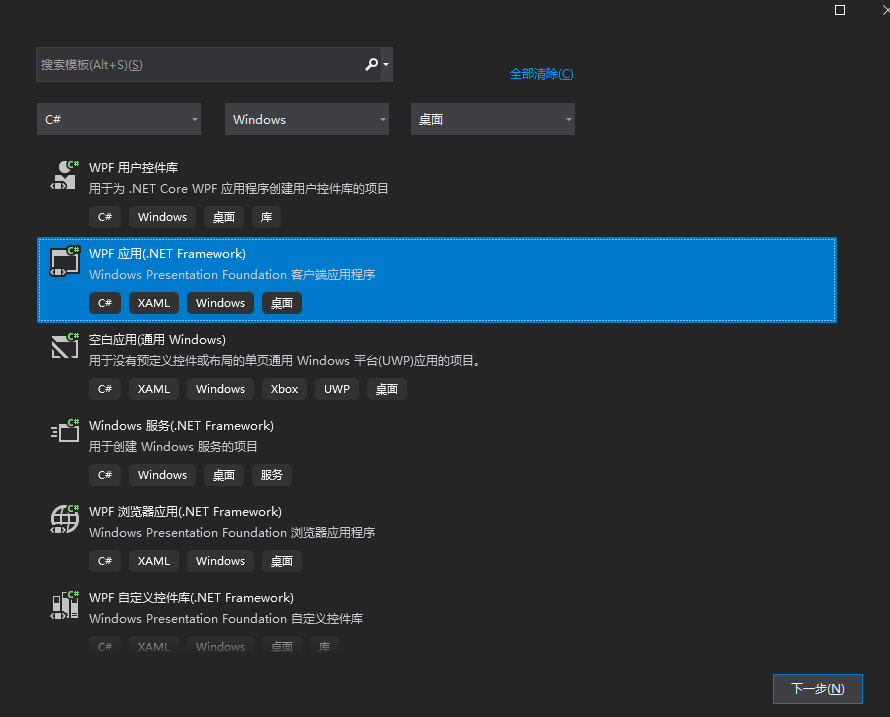
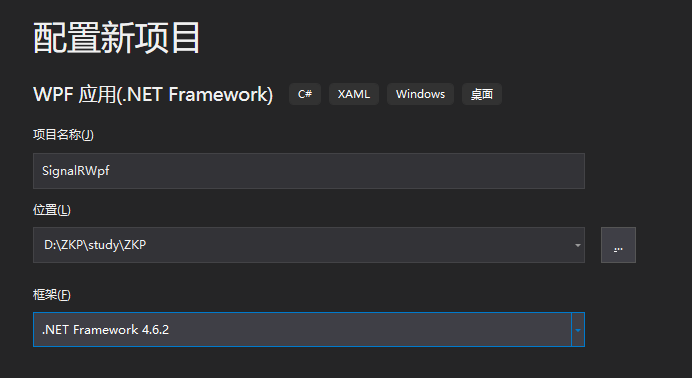
在VS中创建WPF应用(.NET Framework)
我的创建名称:
修改MainWindow.xaml文件代码如下:
<Window x:Class="SignalRWpf.MainWindow"
        xmlns="http://schemas.microsoft.com/winfx/2006/xaml/presentation"
        xmlns:x="http://schemas.microsoft.com/winfx/2006/xaml"
        xmlns:d="http://schemas.microsoft.com/expression/blend/2008"
        xmlns:mc="http://schemas.openxmlformats.org/markup-compatibility/2006"
        xmlns:local="clr-namespace:SignalRWpf"
        mc:Ignorable="d"
        Title="同步聊天" Height="450" Width="800">
    <Grid>
        <TextBox Name="name1" HorizontalAlignment="Left" Height="23" Margin="105,17,0,0" TextWrapping="Wrap" Text="请修改这里为聊天名" VerticalAlignment="Top" Width="120"/>
        <TextBox Name="textbox1" HorizontalAlignment="Left" Height="23" Margin="105,53,0,0" TextWrapping="Wrap" Text="发送输入内容" VerticalAlignment="Top" Width="120"/>
        <Button Content="Send" HorizontalAlignment="Left" Margin="245,53,0,0" VerticalAlignment="Top" Width="75" Click="Button_Click"/>
        <Button Content="Hello" HorizontalAlignment="Left" Margin="341,53,0,0" VerticalAlignment="Top" Width="75" Click="Button1_Click"/>
        <Button Content="MySend" HorizontalAlignment="Left" Margin="441,53,0,0" VerticalAlignment="Top" Width="75" Click="My_Click"/>
        <Label Name="label1" Content="" HorizontalAlignment="Left" Margin="22,103,0,0" VerticalAlignment="Top"/>

    </Grid>
</Window>
修改MainWindow.xaml.cs文件代码如下
 1 using Microsoft.AspNet.SignalR.Client;
 2 using System.Windows;
 3
 4 namespace SignalRWpf
 5 {
 6     /// <summary>
 7     /// MainWindow.xaml 的交互逻辑
 8     /// </summary>
 9     public partial class MainWindow : Window
10     {
11         HubConnection connection;
12         IHubProxy hub;
13         IHubProxy myhub;
14         string url = "http://localhost:11733";
15         public MainWindow()
16         {
17             InitializeComponent();
18             connection = new HubConnection(url);
19             //类名必须与服务端一致
20             hub = connection.CreateHubProxy("ChatHub");
21             hub.On<string, string>("broadcastMessage", Send);
22
23             myhub = connection.CreateHubProxy("MyHub");
24             myhub.On<string, string>("broadcastMessage", Send);
25
26             connection.Start().Wait();
27         }
28
29         private void Button_Click(object sender, RoutedEventArgs e)
30         {
31             hub.Invoke("Send", name1.Text, textbox1.Text);
32             textbox1.Text = "";
33         }
34         private void Send(string name,string message)
35         {
36
37             // 将结果赋值给UI
38             Dispatcher.Invoke(() =>
39             {
40                 this.label1.Content += "\n"+name + " " + message;
41             });
42         }
43         private void My_Click(object sender, RoutedEventArgs e)
44         {
45             myhub.Invoke("Send", name1.Text, textbox1.Text);
46             textbox1.Text = "";
47         }
48         private void Button1_Click(object sender, RoutedEventArgs e)
49         {
50             hub.Invoke("Hello", name1.Text, textbox1.Text);
51             textbox1.Text = "";
52         }
53     }
54 }
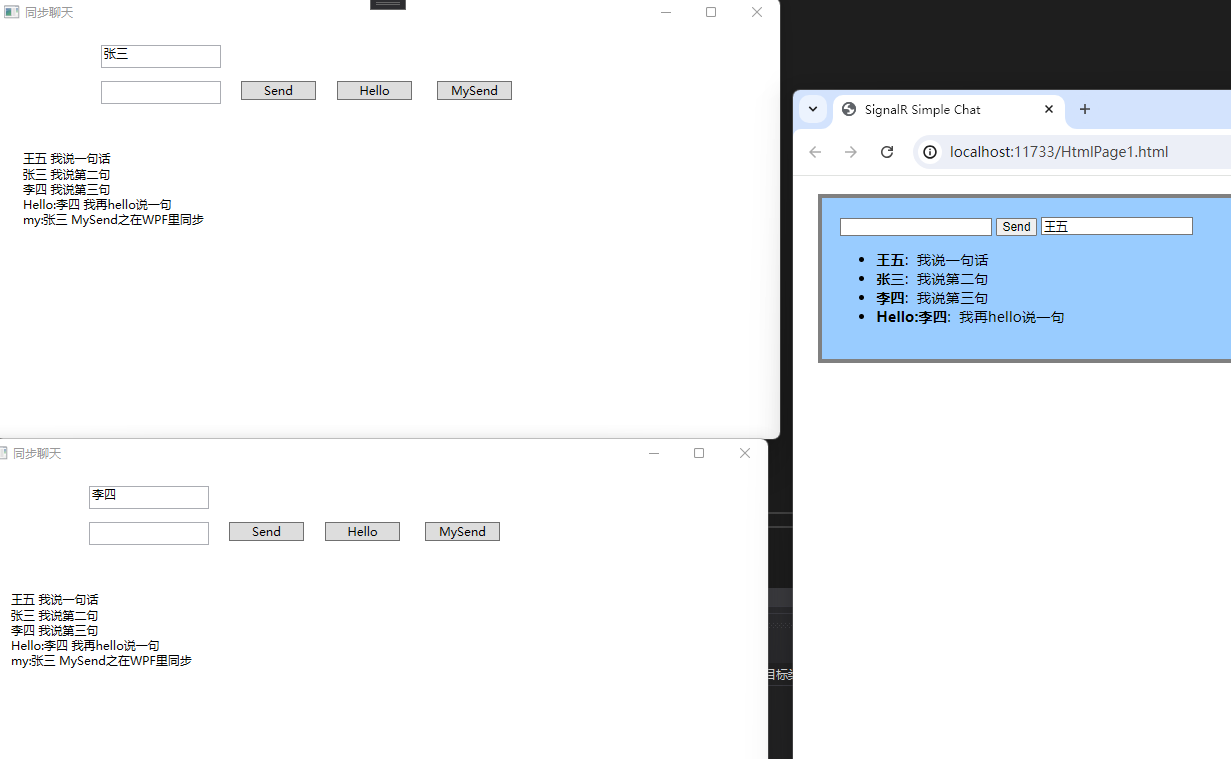
下面是最终效果展示

 浙公网安备 33010602011771号