
【自动化进阶】pytest详解及进阶使用
pytest介绍及基本使用
【自动化测试框架】pytest和unitttest你知道多少?区别在哪?该用哪个?
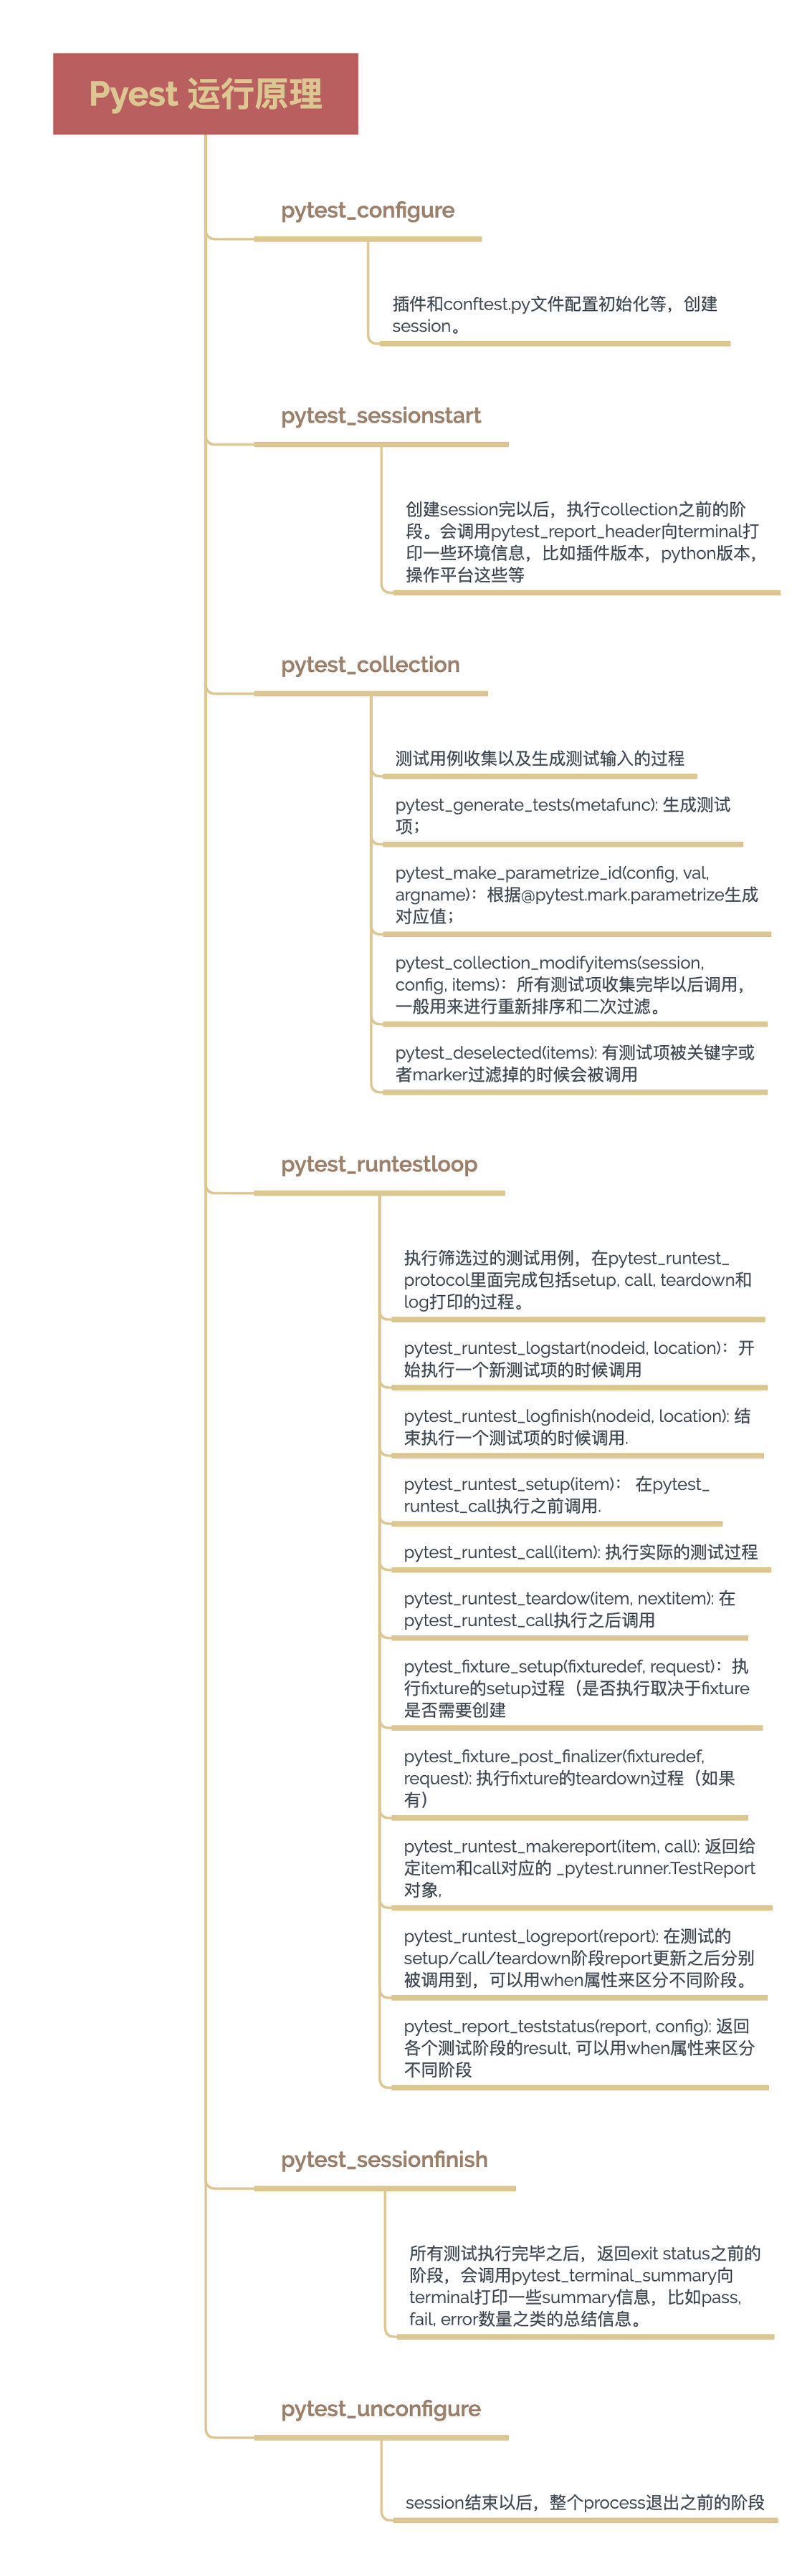
pytest原理
参数化
@pytest.mark.parametrize(argnames, argvalues, indirect=False, ids=None, scope=None))
| 参数 | 说明 |
|---|---|
| argnames | 必传,参数名, 以逗号分隔的字符串,表示一个或多个参数名称(key),或参数字符串的列表/元组 |
| argvalues | 必传,参数值,若argnames有一个则单值列表传入,若argnames有多个,以套用元组的列表展示,元组内与参数名一一对应 |
| indirect | 为true时,那argnames一定是一个fixture函数名称,argvalues值将传入对应的fixture内,相当于@pytest.fixture(params=)的用法,默认False |
| ids | 标记子用例执行名称,与argvalues数量一致,未指定自动生成,默认None |
| scope | 如果指定,则表示参数的范围。范围用于按参数实例对测试进行分组。它还将覆盖任何fixture函数定义的范围,允许使用测试上下文或配置设置动态范围 |
案例
# 参数名 a,b,c,对应传入进去的参数a,b,c,需要一一对应。
@pytest.mark.parametrize("a,b,c",[(1,2,3),(7,8,15),(2,2,3),(9,6,15)])
def test_add(a,b,c):
    sum = a+b
    assert sum==c

# 组合参数化 :多组参数,依次组合,笛卡尔积
@pytest.mark.parametrize("x",[2,4,6])
@pytest.mark.parametrize("y",[1,3,5])
def test_add(x,y):
    print(f"x:{x},y:{y}")
pytest.ini
pytest配置文件可以改变pytest的运行方式,它是一个固定的文件pytest.ini文件,读取配置信息,按指定的方式去运行。
- 位置:一般放在项目的根目录(即当前项目的顶级文件夹下)
- 命名:pytest.ini,不能使用任何中文符号,包括汉字、空格、引号、冒号等等
- 运行的规则:不管是主函数模式运行,命令行模式运行,都会自动读取这个全局配置文件。
- 文件内容不支持中文(注释需要去掉)
[pytest]
# 指定pytest的命令行参数
addopts = -s # 输出print信息
          -v	# 输出详细信息
          -q    # 简化输出
          -k "TestClass and not test_2"  # 执行TestClass测试类下的方法,除了test_2
          -x    # 失败则退出执行
          -m xxx    # 只执行xxx标签的用例
          --clean-alluredir
          -reruns 3  # 失败重跑次数

# 注册标签
markers = xxx

# 测试用例文件搜索的目录
testpaths =
    ./test_case
# 测试用例文件/类/函数的命名规则
python_files = test_*.py
python_classes = Test*
python_functions = test_*

# --base-url插件,定义环境信息
base_url = http://www.baidu.com/

# 报告生成地址
alluredir = ./report/result

# 值为0时,显示所有用例的执行时间,统计后由大到小排序;(非0时,统计执行速度最慢的n条用例)
durations = 0

# 指定执行失败最大次数,超过则停止执行
maxfail=10
pytest.main使用
pytest.main([
        "-s", "-v",
        test_case,
        # mark_case,        # 执行标签用例
        # "-n", "auto",       # 分布式执行,以CPU核数为进程数执行
        # "-d", "--tx", "socket=127.0.0.1:8888", "--rsyncdir ./"  # 远程服务器分布式执行
        "--alluredir", "./report/result",   # allure报告数据生成地址
        # "--junit-xml", "./report/result.xml",
        "--clean-alluredir",
        "--durations=0",    # 值为0时,显示所有用例的执行时间,统计后由大到小排序;(非0时,统计执行速度最慢的n条用例)
        "--instafail",           # 实时打印错误信息,不使用则会最后才抛出所有错误信息
        "--reruns", "2",      # 失败重跑次数(用例方法也可指定重试次数,如:@pytest.mark.flaky(reruns=n))
        # " --reruns-delay", "2",      # 失败重跑后,下次测试重新开始之前等待的秒数。
        "--base-url", "http://123123",   # --base-url插件,定义环境信息(用例可以直接使用,如:def test_case(base_url))
        "--metadata", "author", "value1"   # --metadata参数添加键值对 (key, value) 的元数据
    ])
addopts配置
| 参数 | 作用 |
|---|---|
| -s | 表示输出调试信息,用于显示测试函数中print()打印的信息 |
| -v | 未加前只打印模块名,加v后打印类名、模块名、方法名,显示更详细的信息 |
| -q | 表示只显示整体测试结果 |
| -vs | 这两个参数可以一起使用 |
| -n | 支持多线程或者分布式运行测试用例(前提需安装:pytest-xdist插件) |
| –html | 生成html的测试报告(前提需安装:pytest-html插件) 如:pytest -vs --html ./reports/result.html |
| -x | 表示只要有一个测试用例报错,则执行停止 |
| -k | 模糊匹配,测试用例的部分字符串,指定执行测试用例。 |
| -m | mark标记 |
Fixture
fixture 相比setup和teardown的优势
- 命名方式灵活,不局限于setup和teardown这几个命名
- conftest 可以配置数据共享,
- scope支持四个级别参数 "function" (默认), "class", "module" or "session"
- 可通过 yield语句为测试函数区分前置条件和后置清理
Fixture参数详解及使用
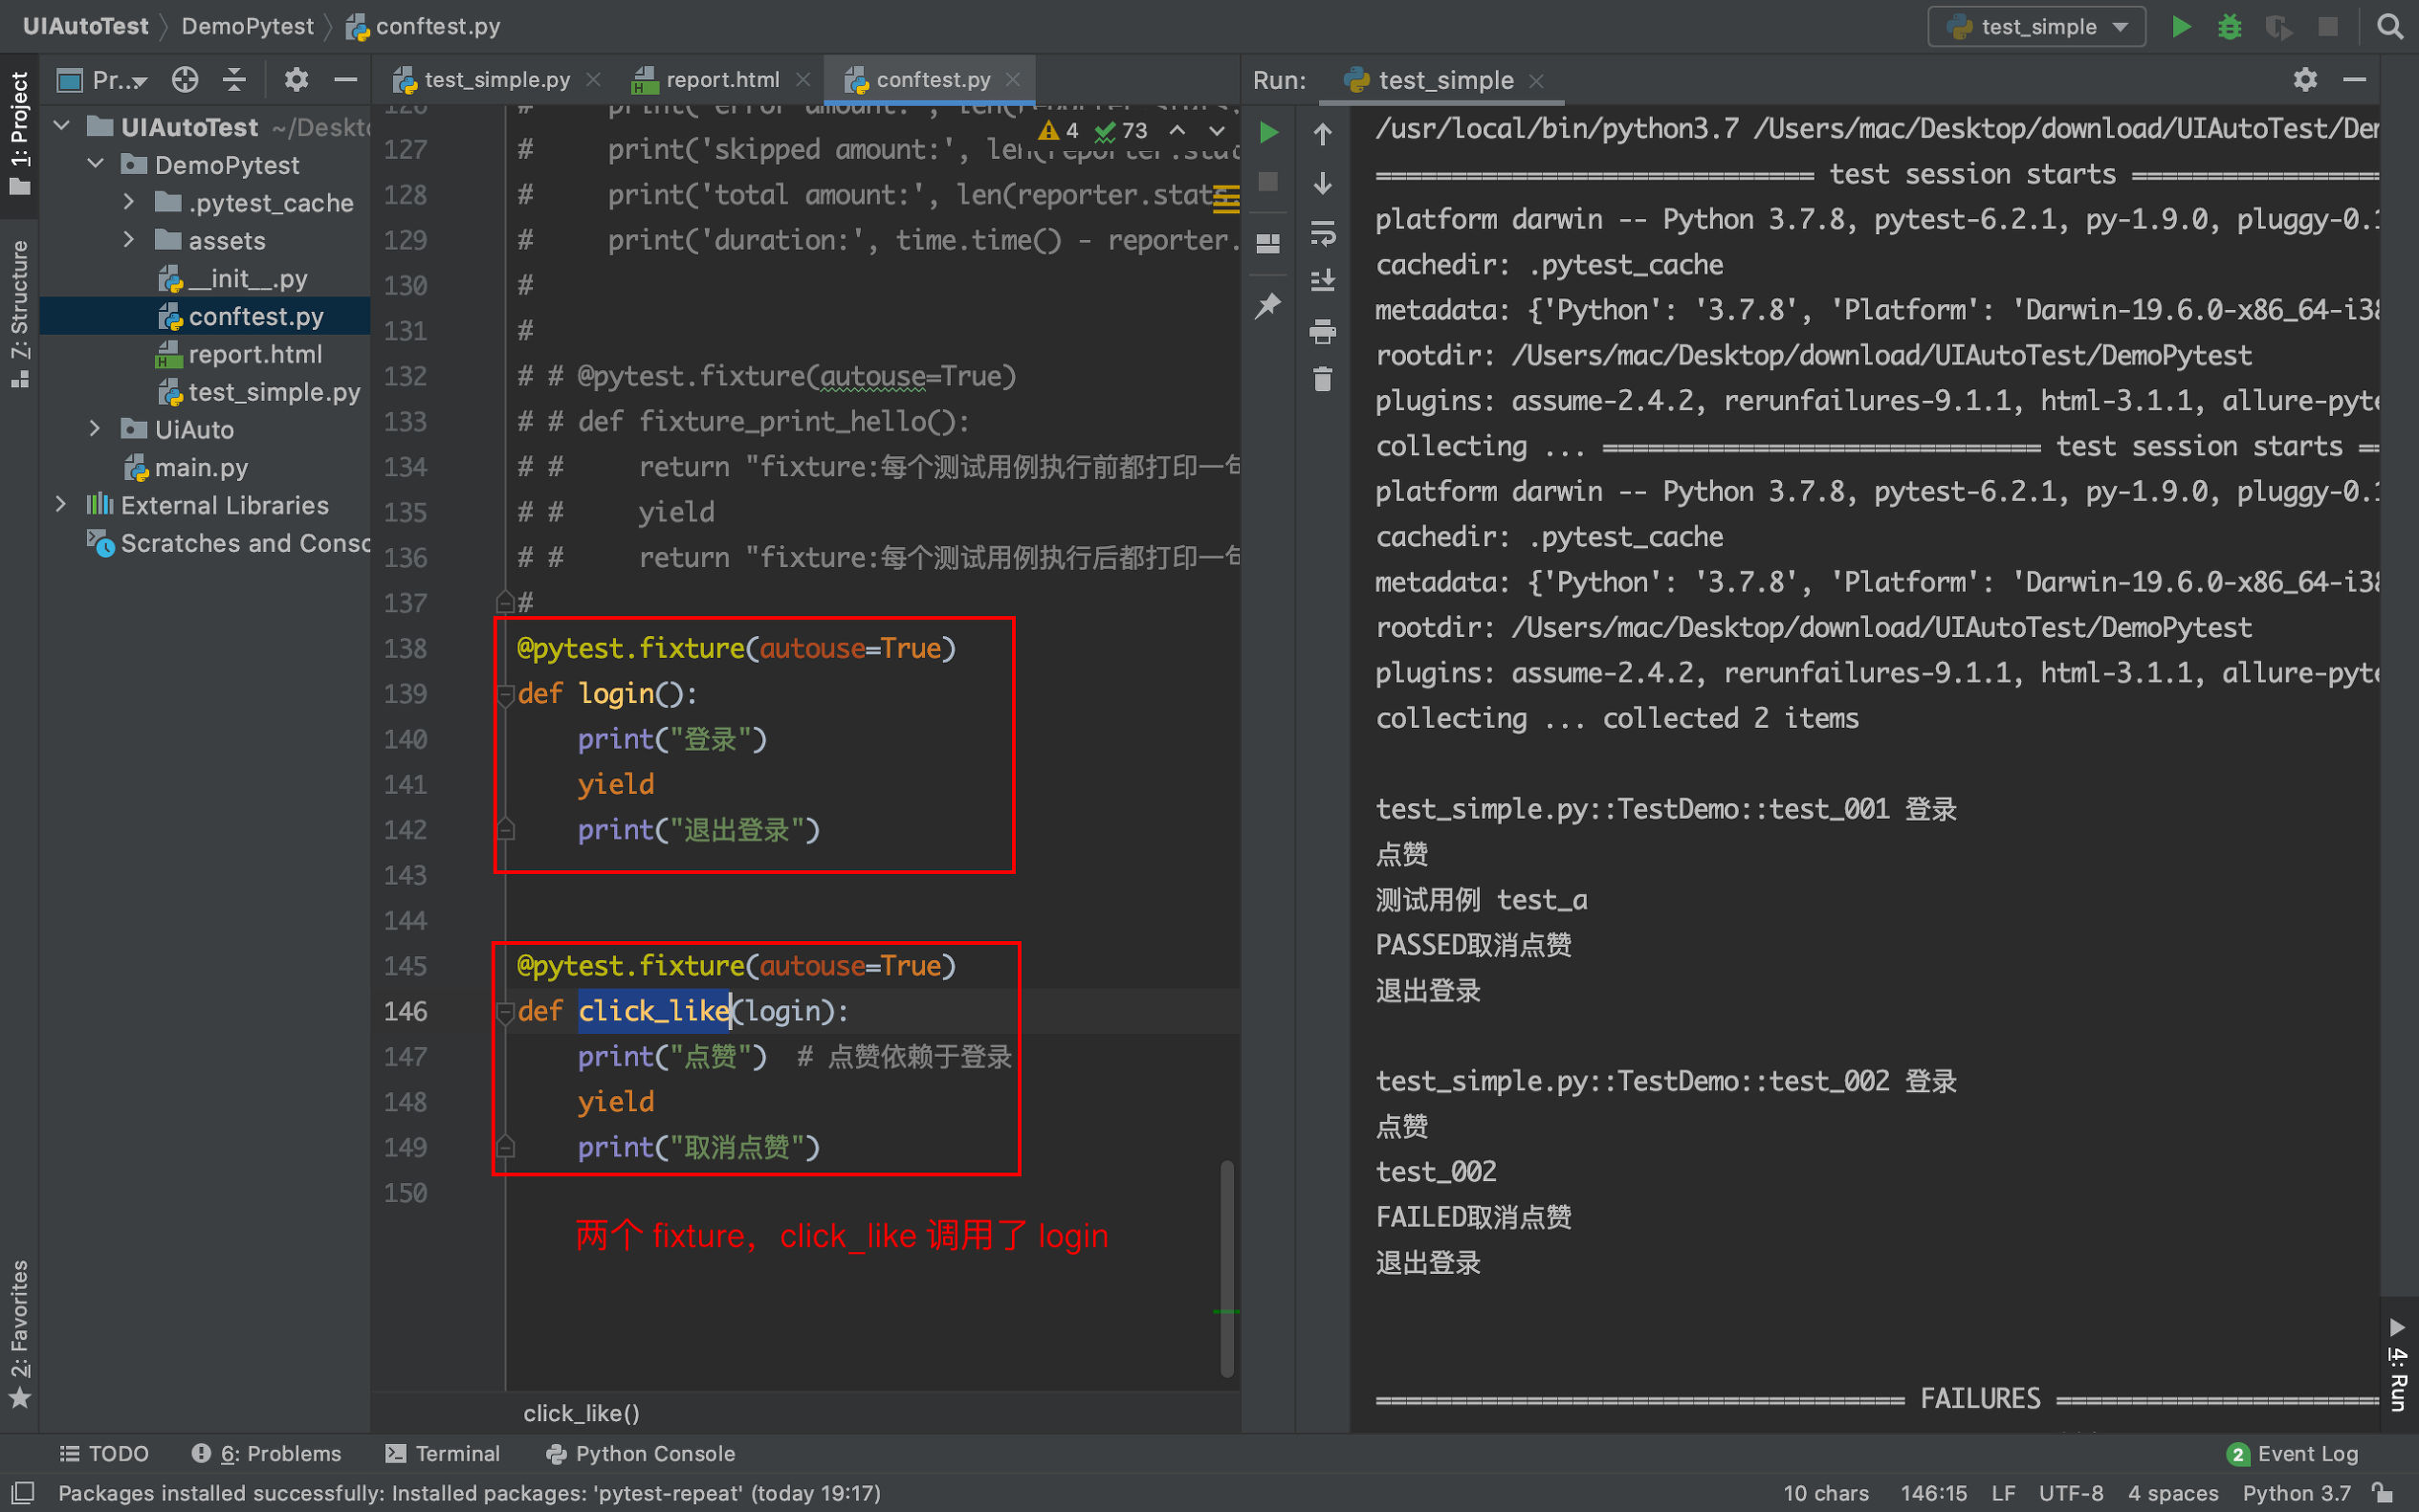
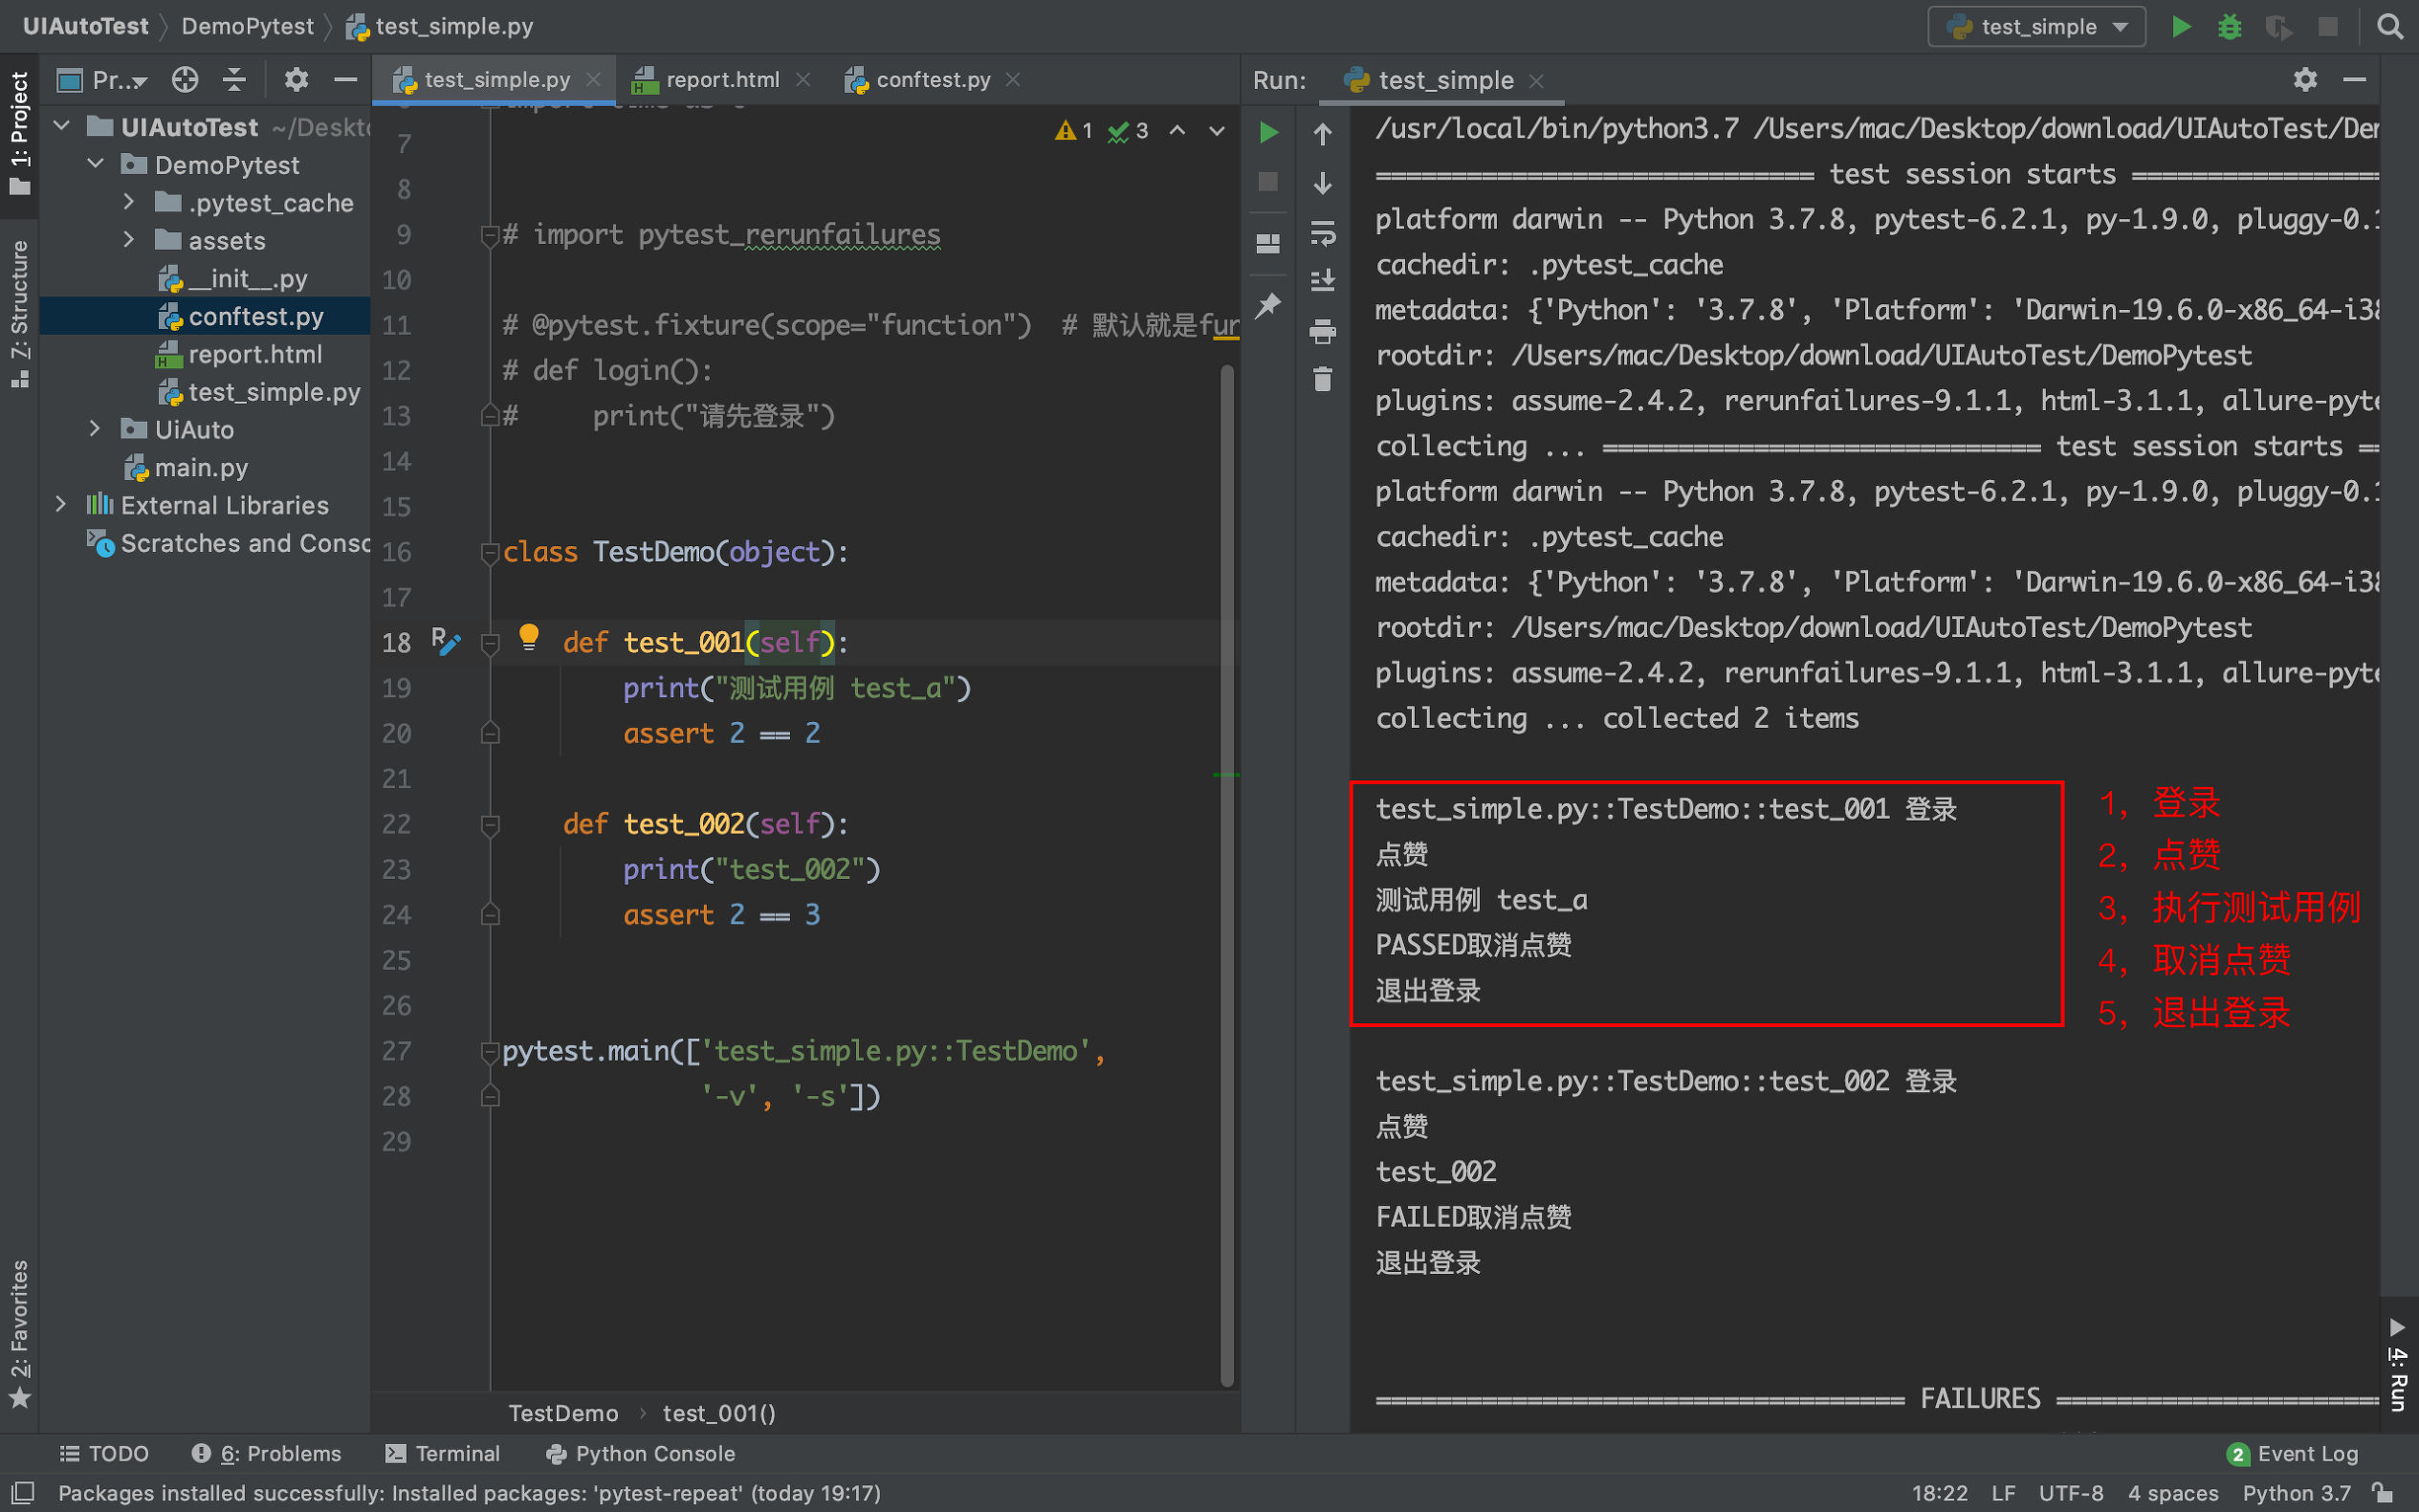
多个fixture之间的相互调用
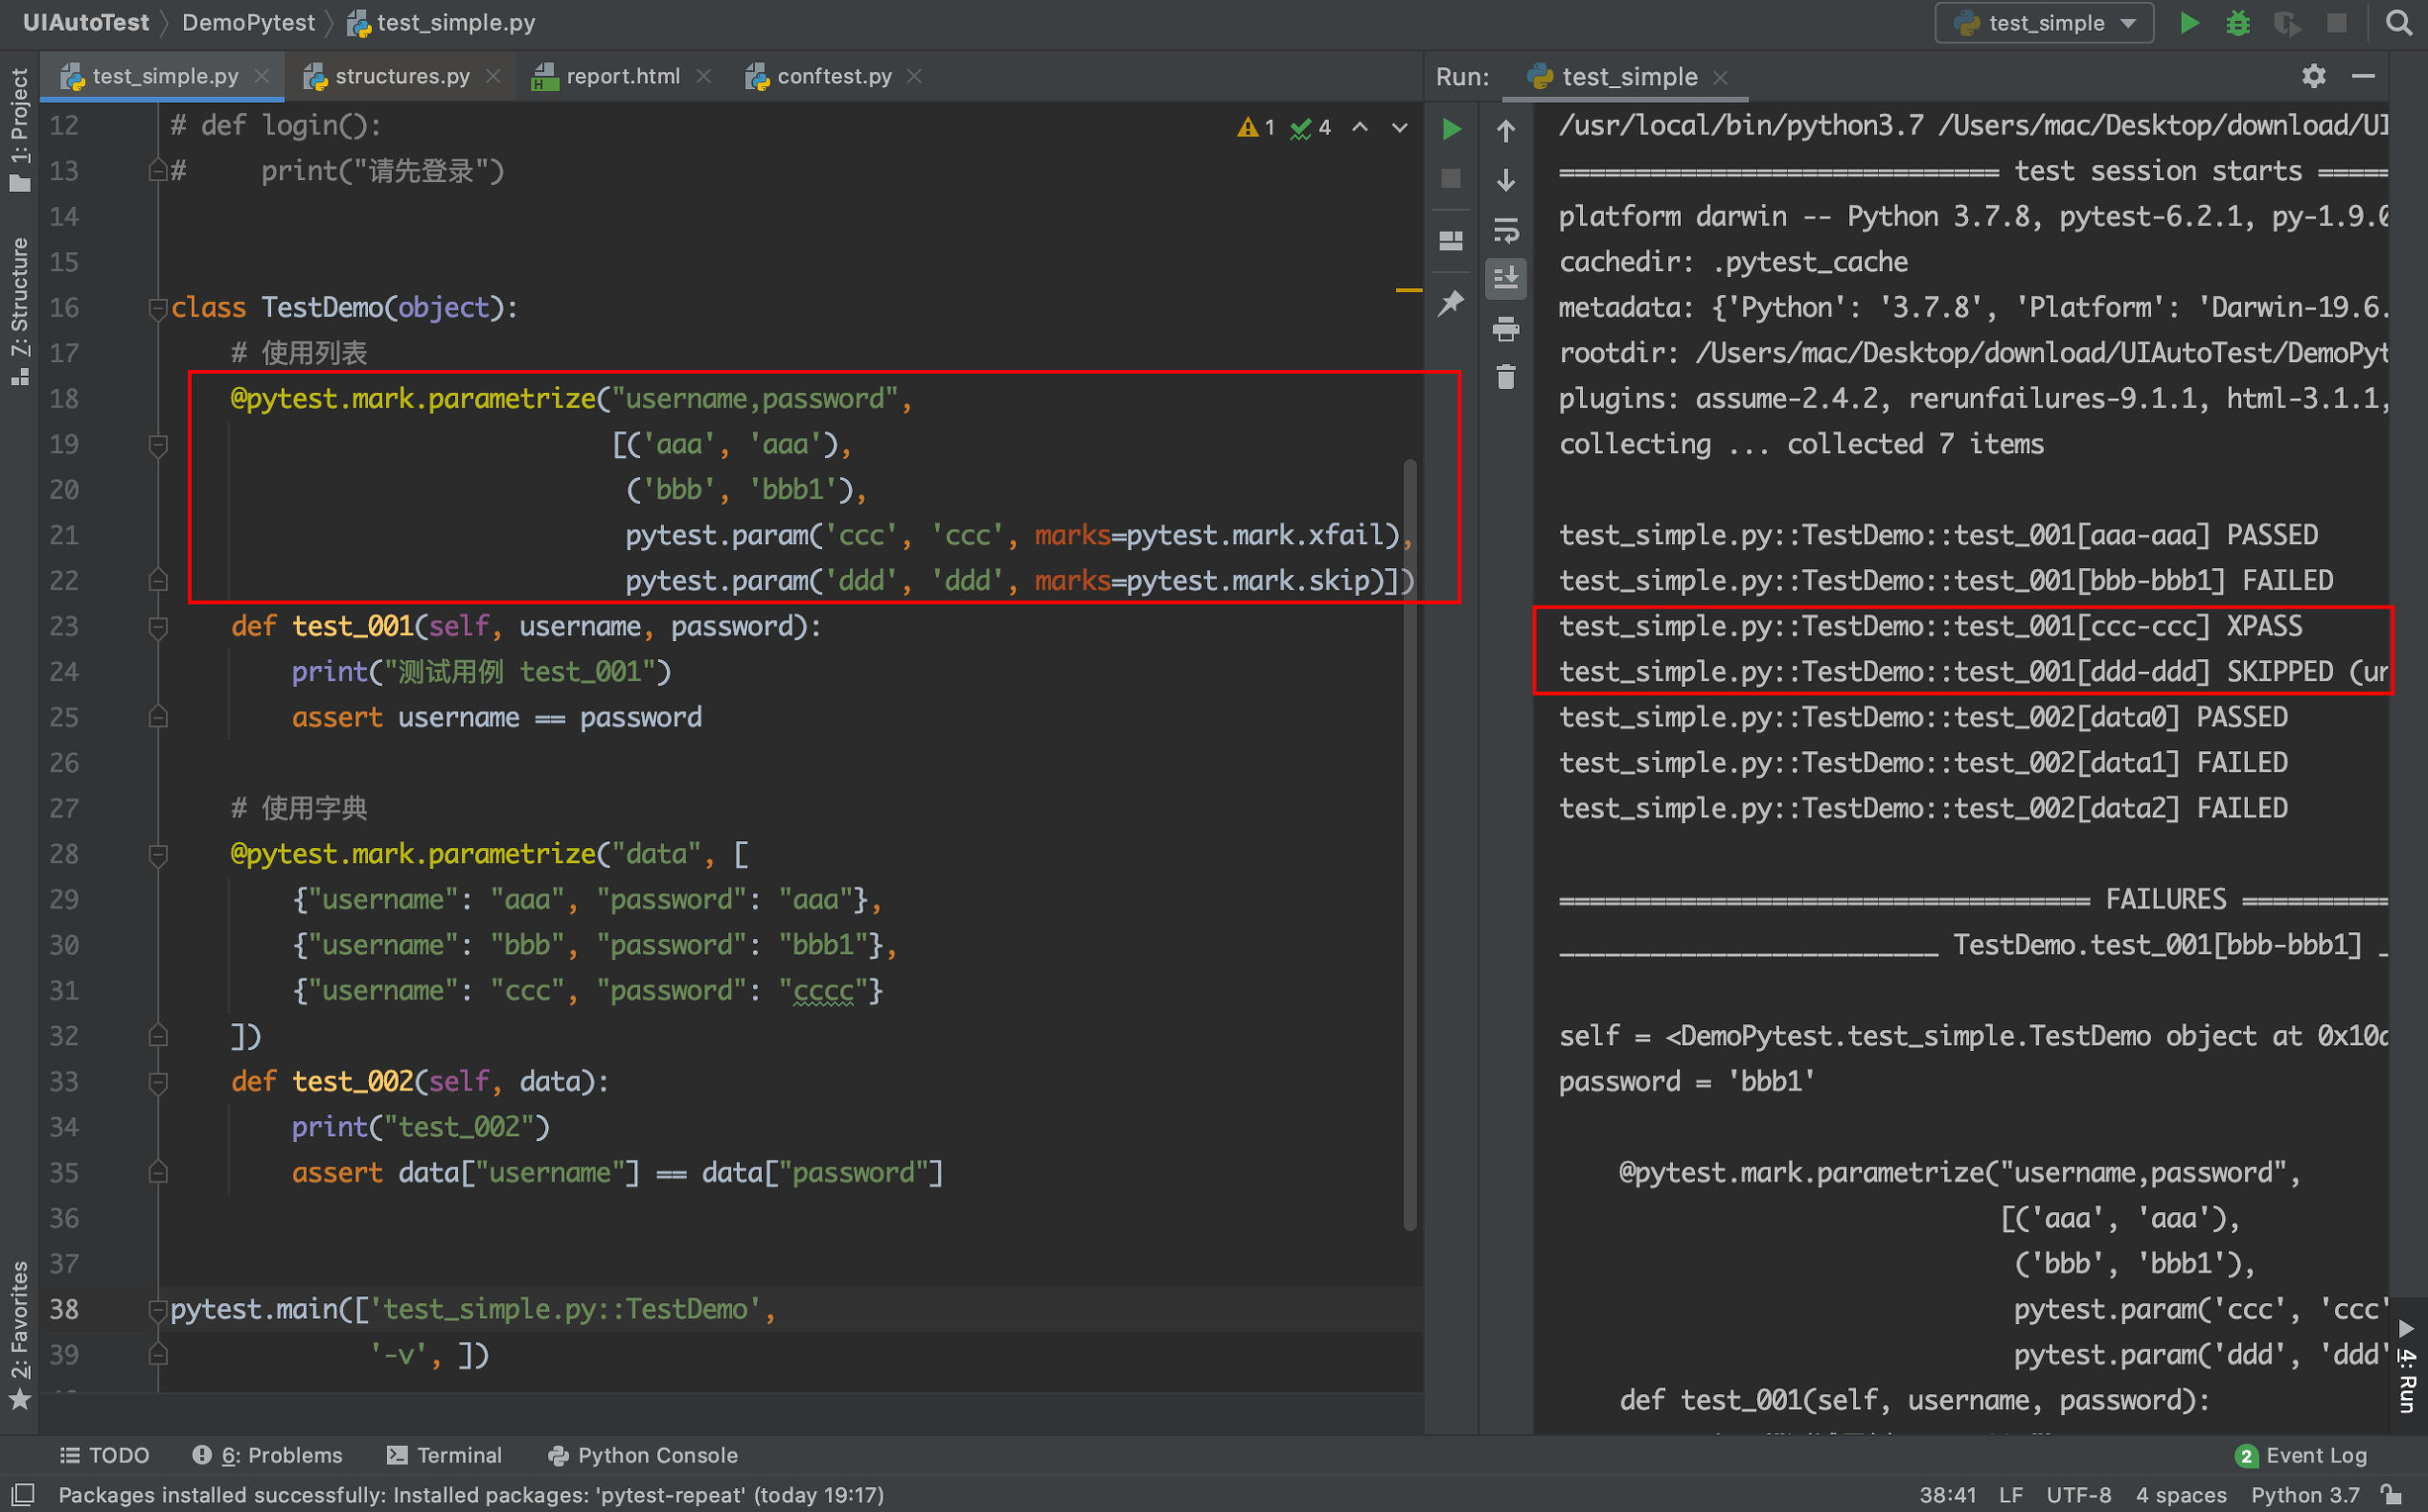
参数化的过程中也可以使用标记,比如标记为fail或者skip
使用fixture进行参数化
示例
# 参数化之 JSON 文件,Excel文件,Yaml文件,读到的数据是一个列表,列表里面嵌套列表,字典,元祖都可以,但是要和参数名称一一对应起来
# 创建一个 json 文件
{
"login_param":
[
{
"username": "aaa",
"password": "aaa"
},
{
"username": "bbb",
"password": "bbb"
},
{
"username": "ccc",
"password": "ccc"
},
{
"username": "ddd",
"password": "ddd1"
}
]
}
# conftest 文件代码
def read_login_json():
with open("login.json", 'r', encoding="UTF-8") as f:
data = json.load(f)['login_param']
return data
# json参数化
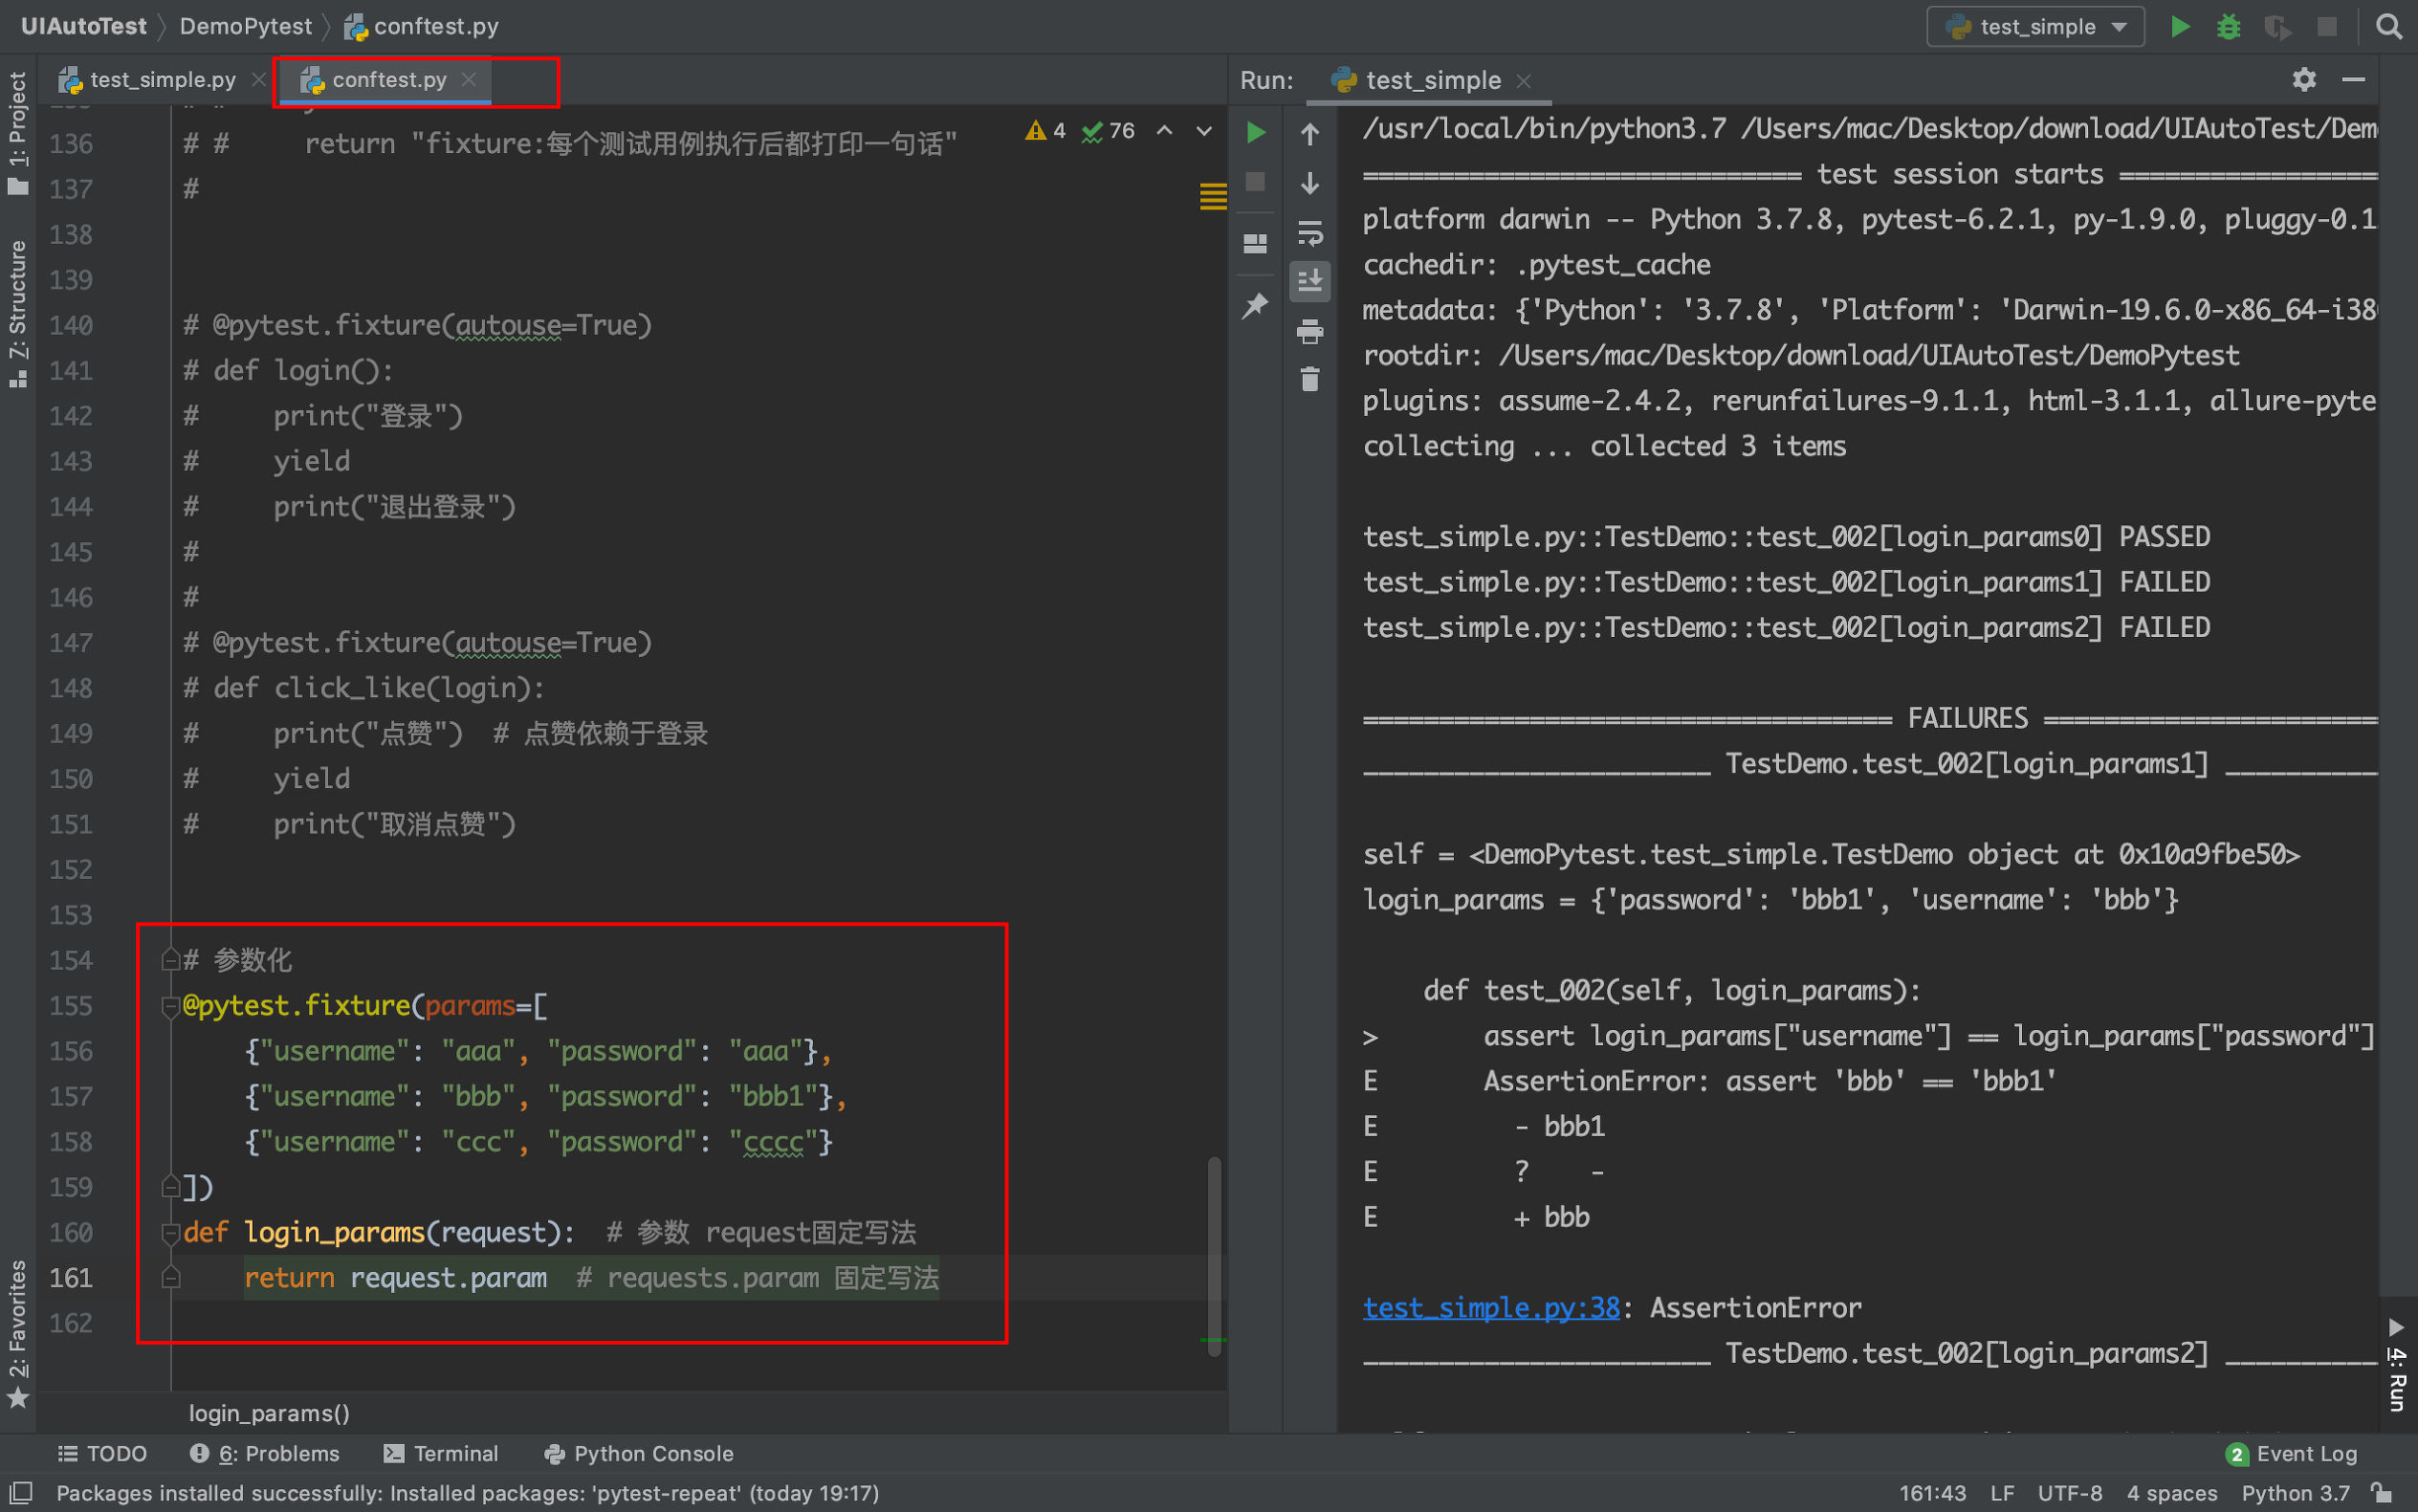
@pytest.fixture(params=read_login_json())
def login_params(request): # 参数 request固定写法
return request.param # requests.param 固定写法
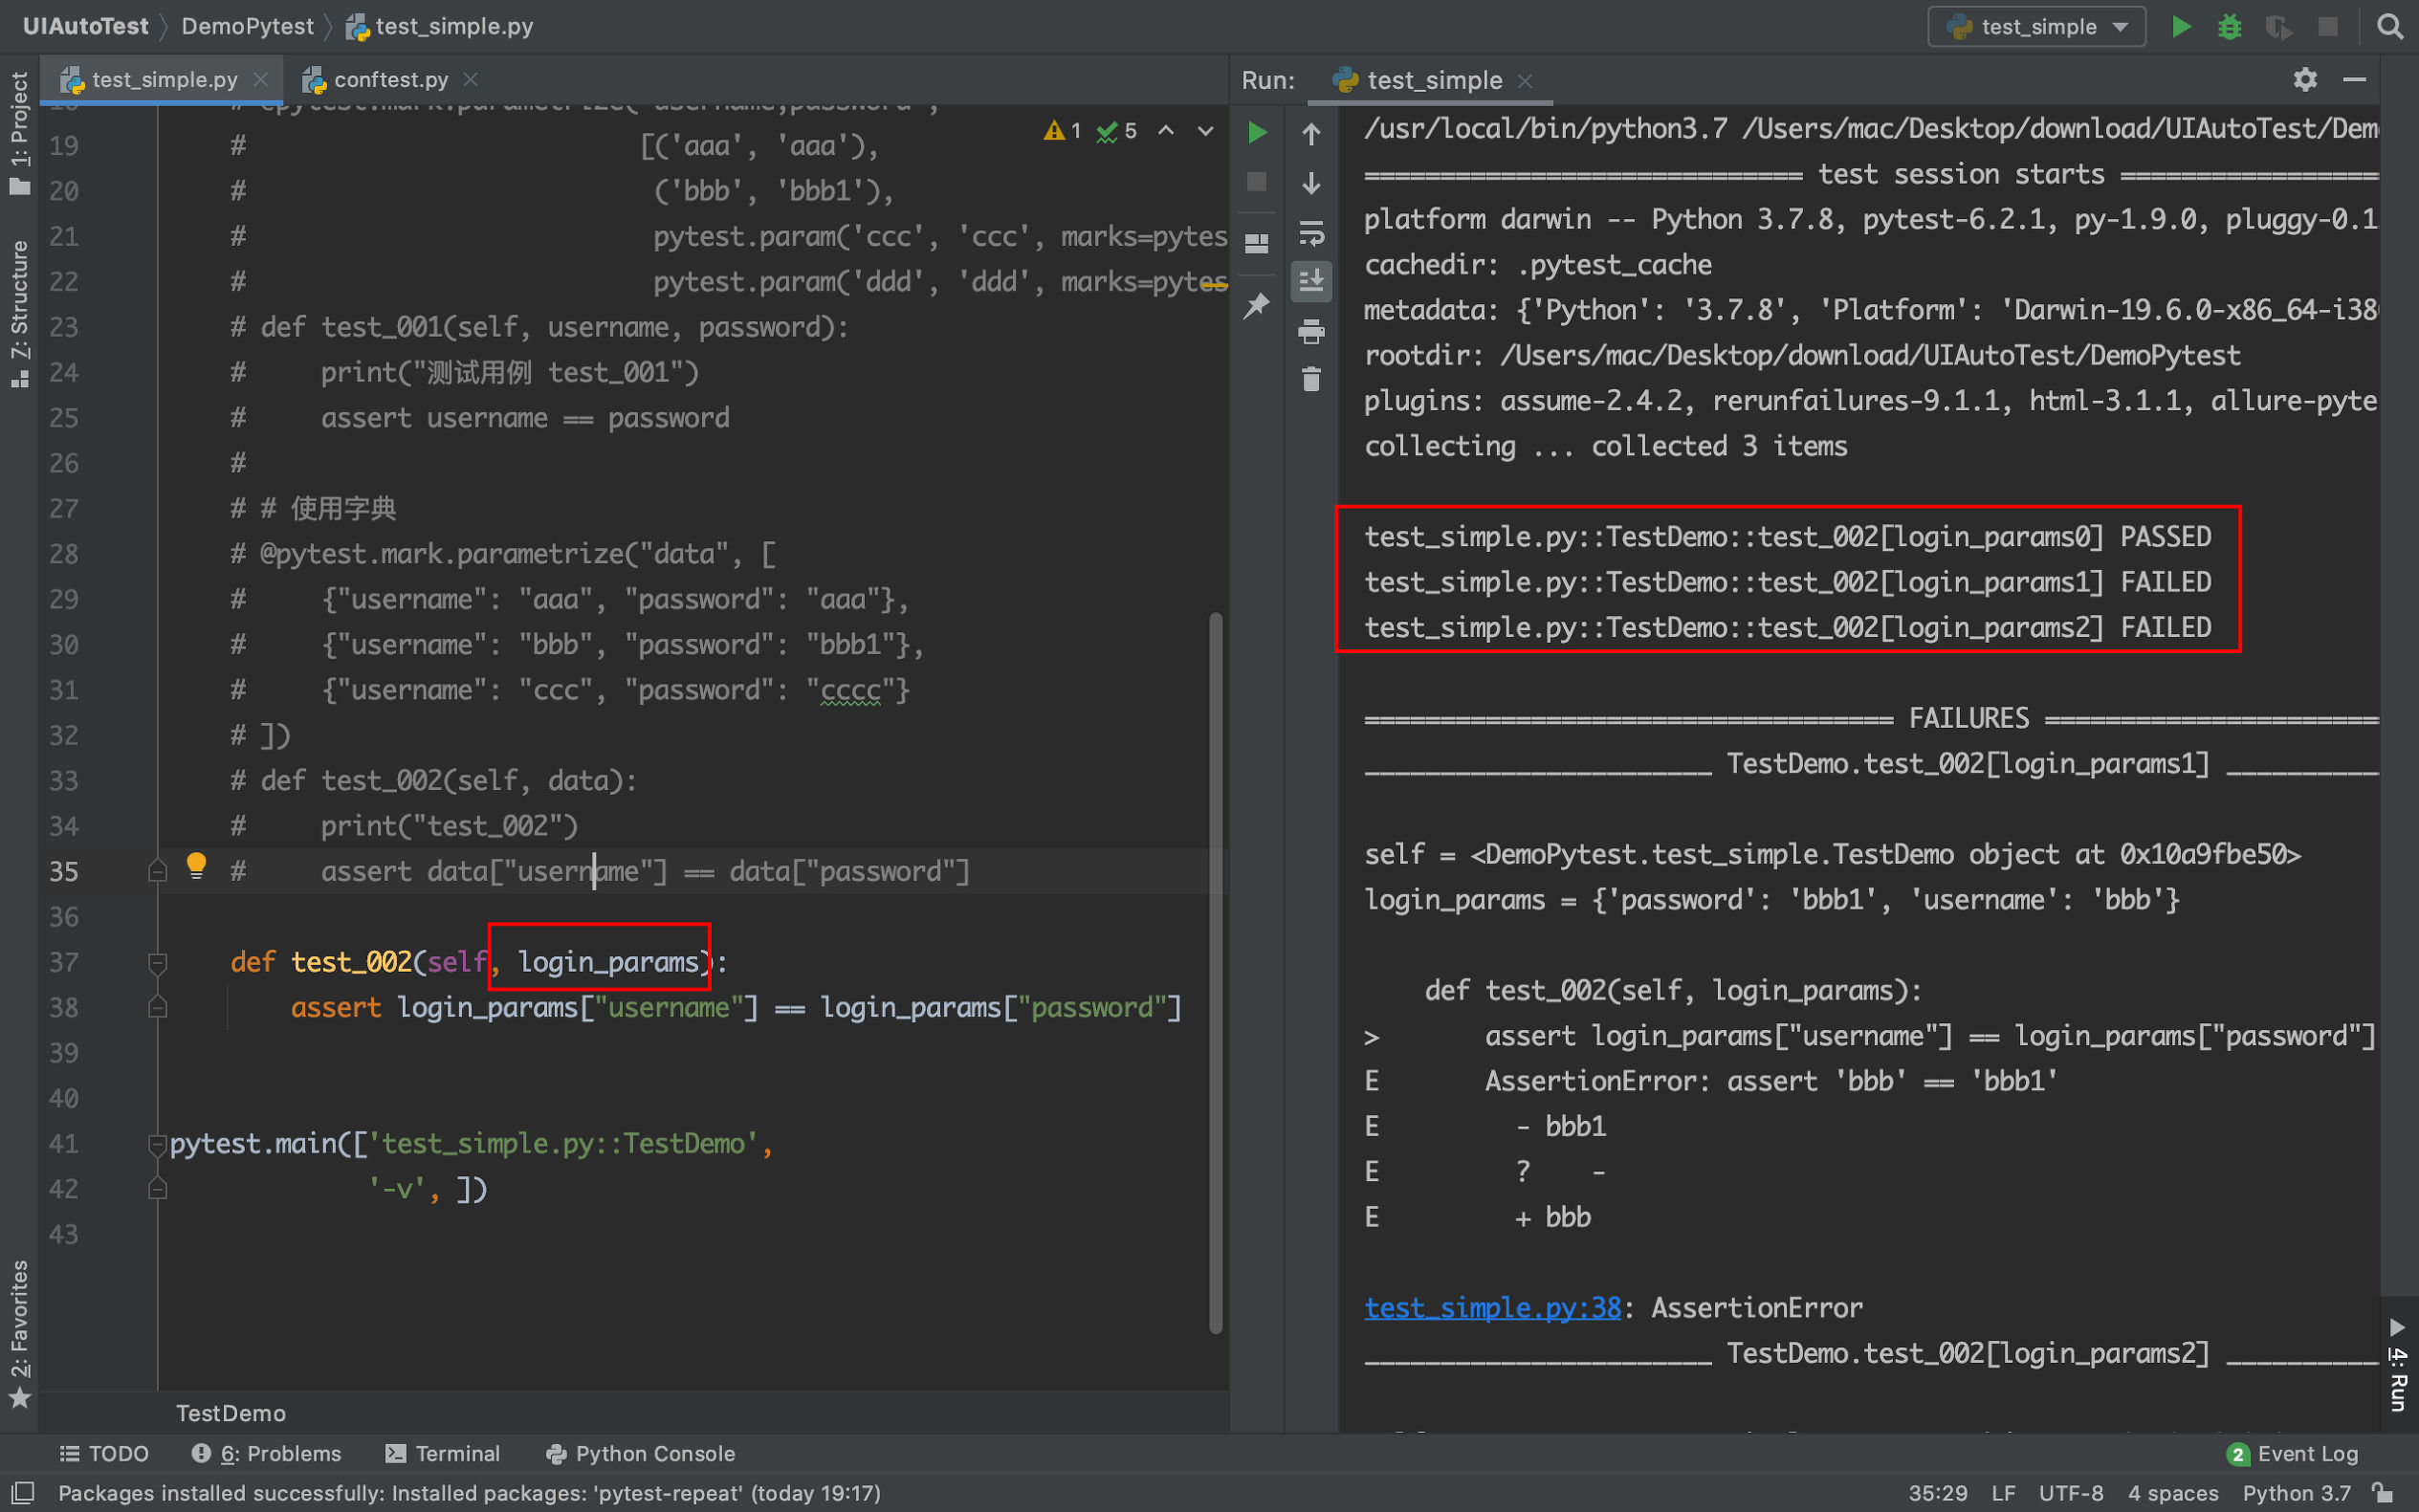
# test_simple.py 文件
class TestDemo(object):
def test_002(self, login_params):
assert login_params["username"] == login_params["password"]
pytest.main(['test_simple.py::TestDemo',
'-v', ])
pytest.mark.相关
给测试用例/测试类打标签
@pytest.mark.标签名
运行时设置只运行标签的用例
pytest -m 标签名
@pytest.mark.skip
跳过该用例
@pytest.mark.skipif
根据特定的条件,不执行标识的测试函数.
@pytest.mark.skipif(condition, reason=None)
- condition:跳过的条件,必传参数
- reason:标注原因,必传参数
使用方法:
@pytest.mark.skipif(1==1, reason="跳过说明")
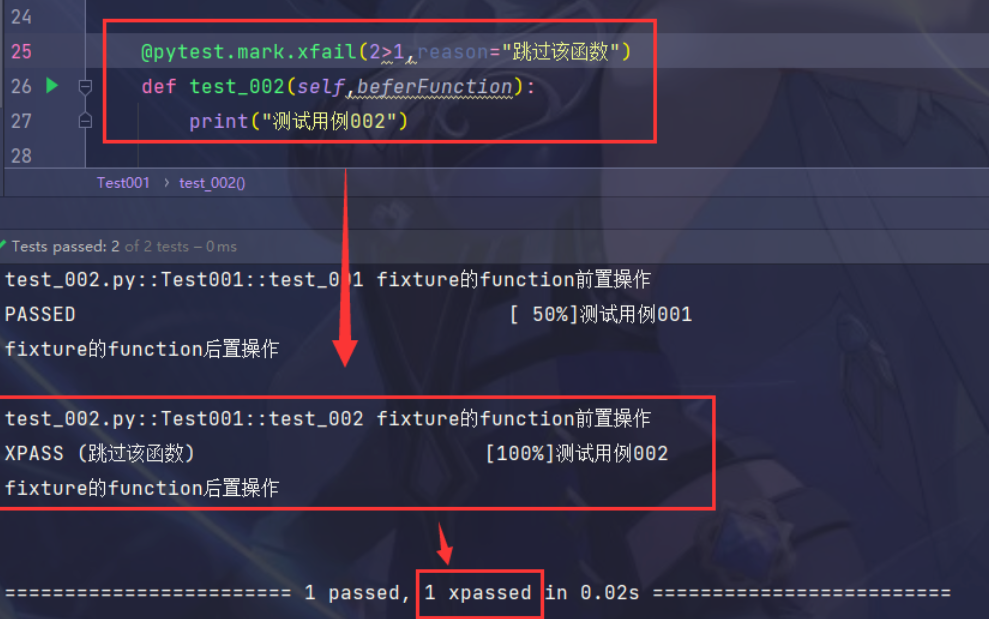
@pytest.mark.xfail
标记测试函数预期为失败函数
xfail(condition=None, reason=None, raises=None, run=True, strict=False)
- condition:预期失败的条件,必传参数
- reason:失败的原因,必传参数
@pytest.mark.repeat(重复测试)
@pytest.mark.repeat(3) # 这个测试用例会运行三次。
@pytest.mark.dependency(用例依赖)
标记测试用例之间的依赖关系,以确保在需要的测试用例之前运行先决条件
@pytest.mark.dependency()
def test_login():
    assert True
@pytest.mark.dependency(depends=["test_login"])
def test_access_profile():
    assert True
@pytest.mark.dependency(depends=["test_login"])
def test_access_settings():
    assert True
失败重运行
用例失败的情况下,可以重运行用例。
需要安装插件rerunfailures
pip install pytest-rerunfailures
使用方法
pytest --reruns 3 --rerun-dalay 2
pytest --reruns {运行失败的用例可以重新运行次数} --rerun-dalay {每次重试之间的延时设置(单位:秒)}
指定用例的运行顺序
pytest有自己的用例执行顺序,但有时候我们就是想指定它按照我的方式去执行,需要使用pytest-ordering插件
安装插件pytest-ordering
pip install pytest-ordering
使用方法
# 方式一:
第一个执行:  @ pytest.mark.run('first')
第二个执行:  @ pytest.mark.run('second')
倒数第二个执行: @ pytest.mark.run('second_to_last')
最后一个执行:  @ pytest.mark.run('last')

# 方式二:
第一个执行:  @ pytest.mark.first
第二个执行:  @ pytest.mark.second
倒数第二个执行:   @ pytest.mark.second_to_last
最后一个执行:    @pytest.mark.last

# 方式三:
第一个执行:  @ pytest.mark.run(order=1)
第二个执行:  @ pytest.mark.run(order=2)
倒数第二个执行:   @ pytest.mark.run(order=-2)
最后一个执行:     @ pytest.mark.run(order=-1)
执行优先级:0>较小的正数>较大的正数>无标记>较小的负数>较大的负数
pytest的hook函数
pytest项目实战
pytest自定义参数
项目主目录创建conftest.py文件
import pytest
from base.driver import Driver
from tools.unit import logger


def pytest_addoption(parser):
    parser.addoption(
        "--devices", action="store", default="", help="devices:表示设备信息,默认取配置文件"
    )
    logger.info('添加pytest自定义参数:--devices')


@pytest.fixture(autouse=True, scope='session')  # pytest.fixture标签进行获取自定义参数
def drivers(request):
    return request.config.getoption("--devices")


@pytest.fixture(scope='session')  # pytest.fixture标签进行获取自定义参数
def get_device(drivers):
    if drivers:
        dv = eval(drivers)
        logger.info("开始与设备 {} 进行会话,并执行测试用例 !!".format(dv["deviceName"]))
        driver = Driver(dv)
        yield driver.get_driver()
        driver.close()
    else:
        logger.info("取配置文件设置的driver")
        driver = Driver()
        yield driver.get_driver()      # 返回内容
        driver.close()                 # 后置处理
用例中引用
class TestLogin(SetupTeardown):

    @pytest.mark.run(order=1)
    @pytest.mark.smock
    @pytest.mark.dependency()
    def test_login_001(self, get_device):    # get_device为自定义参数返回内容
        self.driver = get_device
        logging.info('==========test_login_001========')
        LoginPage(self.driver).login("user123", "password123")
使用方法
pytest --devices {参数内容}
用例使用自定义装饰器
============================= 提升自己 ==========================
进群交流、获取更多干货, 请关注微信公众号:

> > > 咨询交流、进群,请加微信,备注来意:sanshu1318 (←点击获取二维码)
> > > 学习路线+测试实用干货精选汇总:
https://www.cnblogs.com/upstudy/p/15859768.html
> > > 【自动化测试实战】python+requests+Pytest+Excel+Allure,测试都在学的热门技术:
https://www.cnblogs.com/upstudy/p/15921045.html
> > > 【热门测试技术,建议收藏备用】项目实战、简历、笔试题、面试题、职业规划:
https://www.cnblogs.com/upstudy/p/15901367.html
> > > 声明:如有侵权,请联系删除。
============================= 升职加薪 ==========================
更多干货,正在挤时间不断更新中,敬请关注+期待。
进群交流、获取更多干货, 请关注微信公众号:
> > > 咨询交流、进群,请加微信,备注来意:sanshu1318 (←点击获取二维码)
> > > 学习路线+测试实用干货精选汇总:
https://www.cnblogs.com/upstudy/p/15859768.html
> > > 【自动化测试实战】python+requests+Pytest+Excel+Allure,测试都在学的热门技术:
https://www.cnblogs.com/upstudy/p/15921045.html
> > > 【热门测试技术,建议收藏备用】项目实战、简历、笔试题、面试题、职业规划:
https://www.cnblogs.com/upstudy/p/15901367.html
> > > 声明:如有侵权,请联系删除。
============================= 升职加薪 ==========================
更多干货,正在挤时间不断更新中,敬请关注+期待。

 浙公网安备 33010602011771号