
jenkins+testNg+maven+git+selenium自动化集成
准备环境,提前安装好Jenkins及git,maven插件
1、首先我们新建一个maven的工程,并且在pom.xml中配置好我们依赖的一些jar包
<?xml version="1.0" encoding="UTF-8"?>
<project xmlns="http://maven.apache.org/POM/4.0.0"
         xmlns:xsi="http://www.w3.org/2001/XMLSchema-instance"
         xsi:schemaLocation="http://maven.apache.org/POM/4.0.0 http://maven.apache.org/xsd/maven-4.0.0.xsd">
    <modelVersion>4.0.0</modelVersion>

    <groupId>test</groupId>
    <artifactId>com.test</artifactId>
    <version>1.0-SNAPSHOT</version>
    <dependencies>
        <dependency>
            <groupId>org.seleniumhq.selenium</groupId>
            <artifactId>selenium-java</artifactId>
            <version>3.4.0</version>
        </dependency>
        <dependency>
            <groupId>org.testng</groupId>
            <artifactId>testng</artifactId>
            <version>6.9.6</version>
        </dependency>
        <dependency>
            <groupId>org.seleniumhq.selenium</groupId>
            <artifactId>selenium-api</artifactId>
            <version>3.4.0</version>
        </dependency>
    </dependencies>

    <build>
        <finalName>Test</finalName>
        <plugins>
            <plugin>
                <groupId>org.apache.maven.plugins</groupId>
                <artifactId>maven-surefire-plugin</artifactId>
                <version>2.18.1</version>
                <configuration>
                    <forkMode>once</forkMode>
                    <argLine>-Dfile.encoding=UTF-8</argLine>
                </configuration>
            </plugin>
        </plugins>
    </build>
</project>
2、编写我们selenium脚本
import org.openqa.selenium.By;
import org.openqa.selenium.TimeoutException;
import org.openqa.selenium.WebDriver;
import org.openqa.selenium.WebElement;
import org.openqa.selenium.chrome.ChromeDriver;
import org.openqa.selenium.chrome.ChromeOptions;
import org.openqa.selenium.remote.DesiredCapabilities;
import org.openqa.selenium.support.ui.ExpectedCondition;
import org.openqa.selenium.support.ui.WebDriverWait;
import org.testng.Assert;
import org.testng.annotations.AfterTest;
import org.testng.annotations.BeforeTest;
import org.testng.annotations.Test;

public class NewTest {

    private WebDriver driver;
    protected DesiredCapabilities capabilities;
    @BeforeTest
    public void beforeTest() throws Exception {
        capabilities = DesiredCapabilities.chrome();
        capabilities.setBrowserName("chrome");
        System.setProperty("webdriver.chrome.driver", getClass().getResource("/chromedriver.exe").getPath());
        ChromeOptions options = new ChromeOptions();
        options.addArguments("--start-maximized");
        capabilities.setCapability(ChromeOptions.CAPABILITY, options);
        driver = new ChromeDriver(capabilities);
        driver.manage().window().maximize();

    }

    @AfterTest
    public void afterTest(){
        try {
            //等待5秒查看执行效果
            Thread.sleep(5000);
        } catch (InterruptedException e) {
            e.printStackTrace();
        }
        driver.quit();
    }

    @Test
    public void testClass() {
        driver.get("http://www.baidu.com");
        System.out.println("heloo");
        By inputBox = By.id("kw");
        By searchButton = By.id("su");
        //智能等待元素加载出来
        intelligentWait(driver, 10, inputBox);
        //智能等待元素加载出来
        intelligentWait(driver, 10, searchButton);
        driver.findElement(inputBox).sendKeys("中国地图");
        driver.findElement(searchButton).click();
    }

    /**这是智能等待元素加载的方法*/
    public void intelligentWait(WebDriver driver,int timeOut, final By by) {
        try {
            (new WebDriverWait(driver, timeOut)).until(new ExpectedCondition<Boolean>(){
                public Boolean apply(WebDriver driver) {
                    WebElement element = driver.findElement(by);
                    return element.isDisplayed();
                }
            });
        } catch (TimeoutException e) {
            Assert.fail("超时L !! " + timeOut + " 秒之后还没找到元素 [" + by + "]", e);
        }
    }
}
3、配置testng.xml文件
<?xml version="1.0" encoding="UTF-8"?>
<suite name="Suite" parallel="false">
    <test name="Test">
        <classes>
            <class name="NewTest">
            </class>
        </classes>
    </test>
</suite>
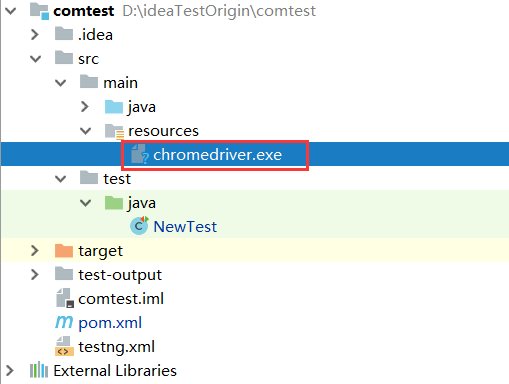
chromedriver.exe驱动放在resources目录下
工程配置已经结束了,我们来进行jenkins的一些配置吧。进入jenkins的系统配置
4、Jenkins中环境的配置
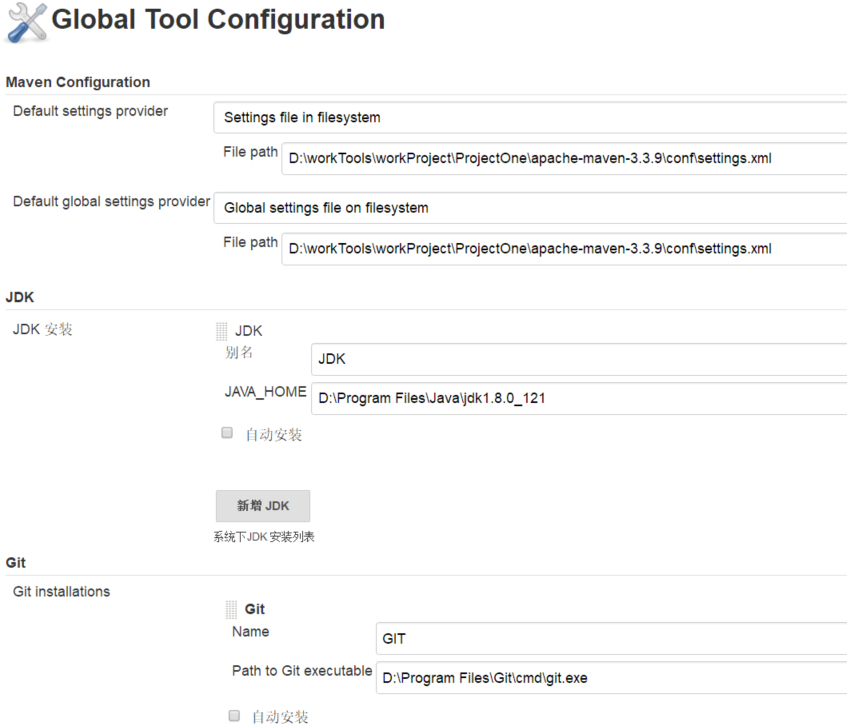
4.1 系统管理-->系统设置-->配置全局属性,及maven项目配置
这个地方一定要配置,因为如果不配置成utf-8的话,jenkins从git上拉下来的文件编码格式不是utf-8的格式,这样子就会导致文件中的一些中文直接变成了乱码,到时候直接影响到脚本的运行
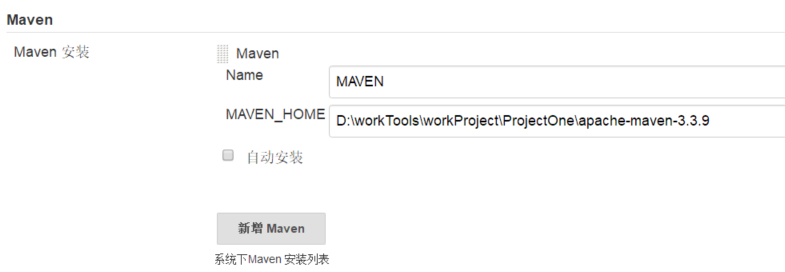
进行maven的项目配置
这里是配置maven的编码以及防止oom,还有是maven的本地仓库以及maven的安装地址
4.2 全局工具配置maven,git,jdk ,进入系统管理-->Global Tool Configuration 里面
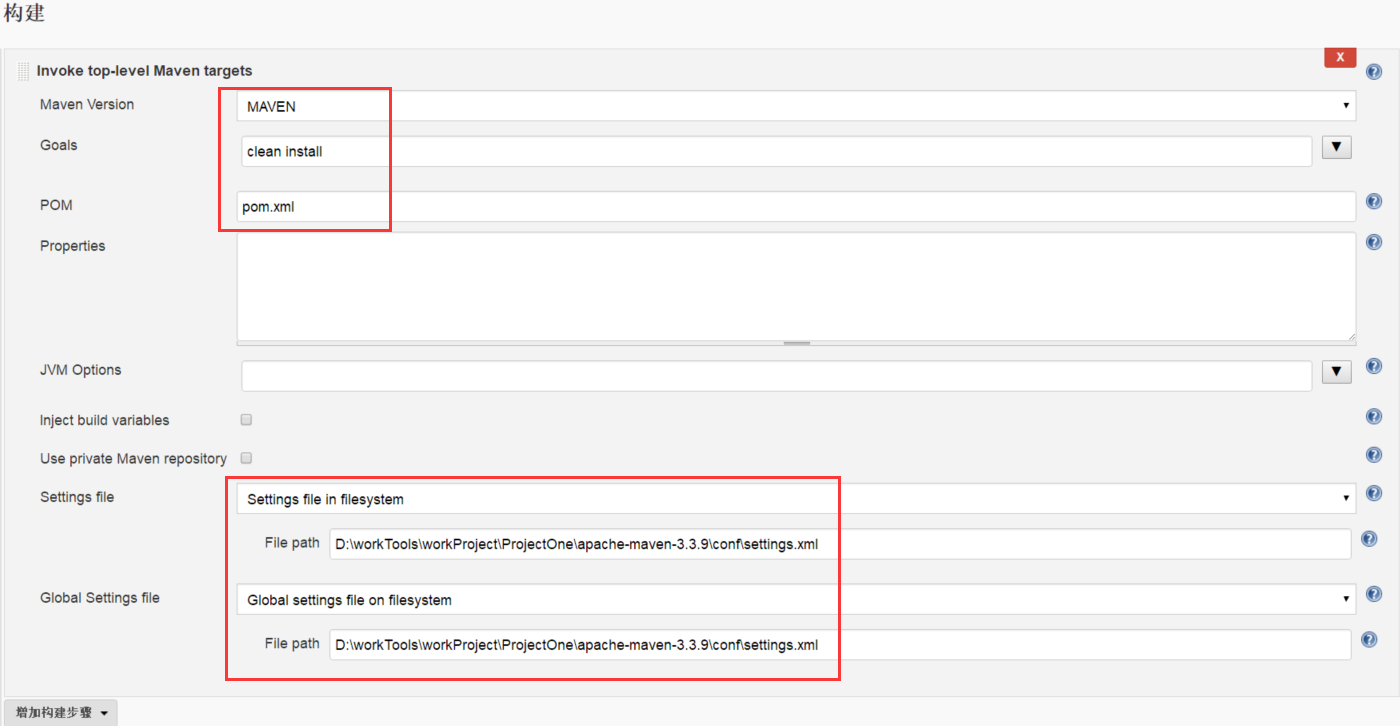
4.3 新建一个projce后,在构建中新建一个构建步骤 invoke-top-level Maven targets
这里只需要配置正确pom就可以了
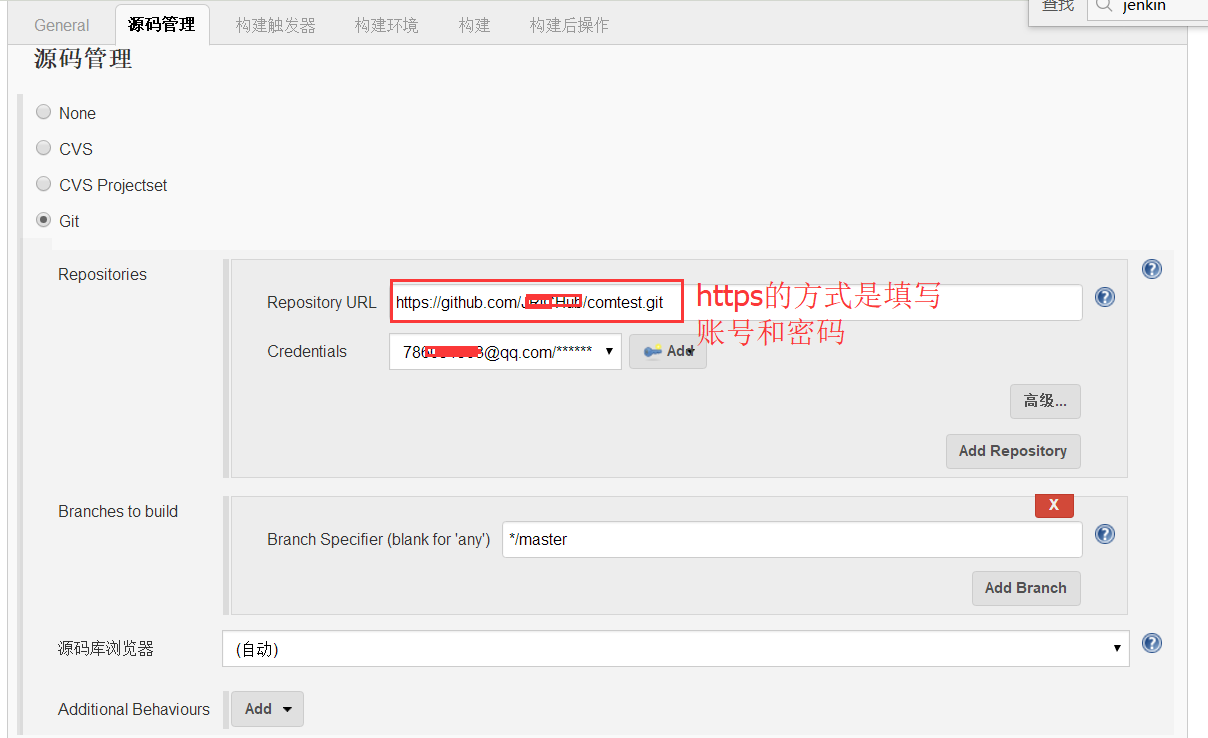
4.4 配置git源码管理路径,这里使用的是https的方式
4.5 在构建中进行配置
源码管理这里我以Git为例子,Repository URL填写项目的地址,可以使https地址,也可以是SHH地址。
注意,如果使用https地址,步骤需要点击Add->填写网站的用户名和密码,要使用SHH地址,在这之前我们必须在本机上生成了ssh密钥,并且在平台上设定过公钥才可以使用。
这里我使用的是码云平台上的项目,参考文章 本地电脑和 Git @ OSC 之间SHH连接教程
只是项目的SHH地址:git@git.oschina.net:higher/webtest.git
如有需要的朋友可以自行下载,https地址为: https://git.oschina.net/higher/webtest.git
**a.SHH方式 **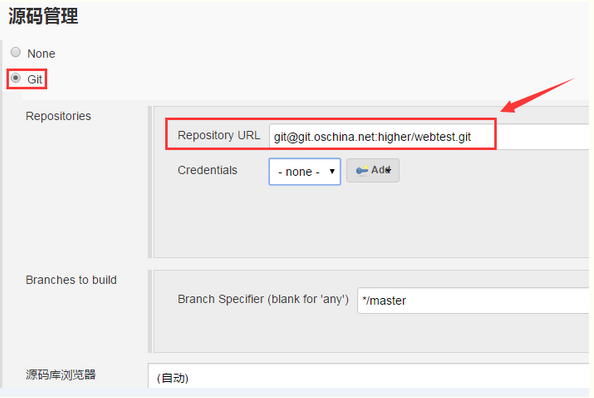
如果出现如下的错误,请检查公钥配置

如果不能解决可以参考我的另外的文章Jenkins 与 git 的配置及解决方式 点击查看
**b.https方式 **
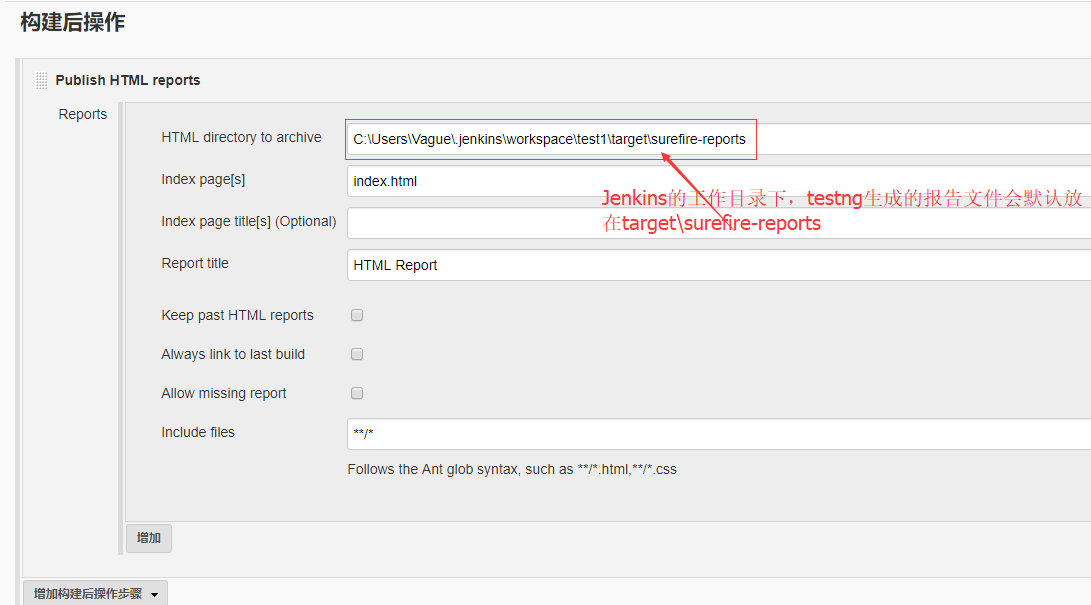
4.6 构建后操作设置
需要显示一下测试报告,采用publish html report方式,实际上就是读取一个html文件,显示在jenkins里面的Html Report中 ;【HTML directory to archive】是生成的报告地址,转换到这个地址中【
C:\Users\Vague\.jenkins\jobs\test1\htmlreports\HTML_Report】
添加publish html reports后,会在项目主页生成一个html reports 的报告入口,如下
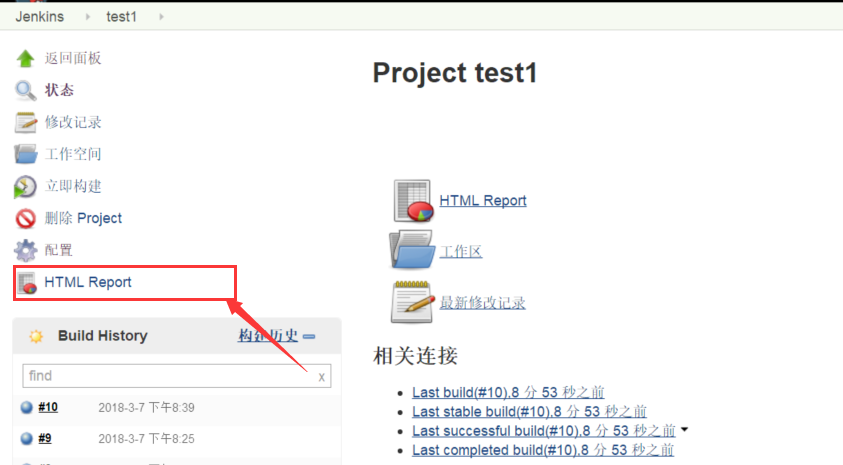
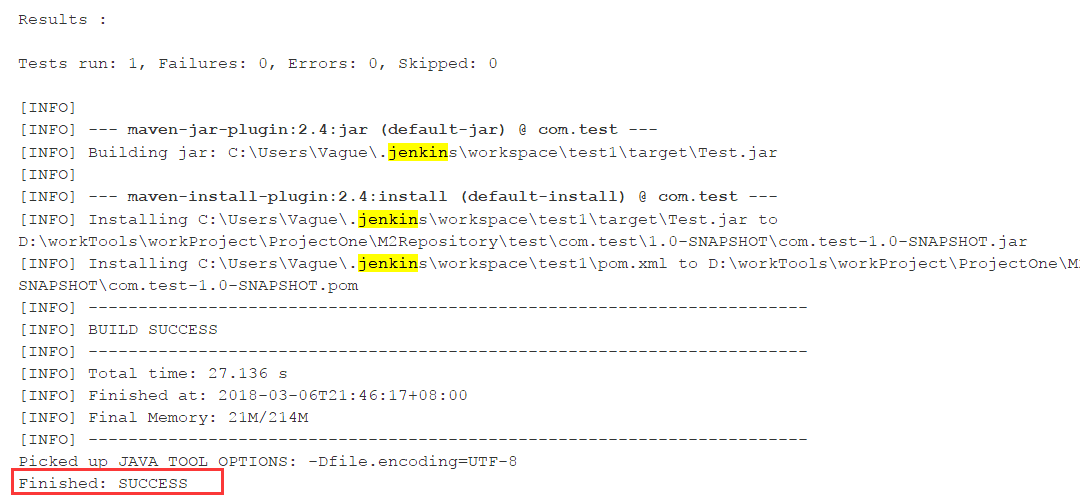
5、运行结果
ps:这次搭建自动化测试环境也有不少踩坑的地方,总结避免再次掉坑啊
1、Jenkins maven 构建乱码,修改file.encoding系统变量编码为UTF-8,参考我的这篇文章
2、构建成功却没有运行测试用例:一是测试用例没有放到src/test/java目录下,二是测试类没有按规则命名,三是因为testng.xml没有放到项目根目录下面

 浙公网安备 33010602011771号