SpringBoot配置文件详解
简介
SpringBoot全局配置文件默认为src/main/resources下的application.properties,后缀可以改为yml,
如果application.yml和application.properties两个配置文件都存在,那么,properties优先级更高
官网(Spring Boot 全部配置项):https://docs.spring.io/spring-boot/docs/current/reference/html/application-properties.html#appendix.application-properties
注意:配置文件改了要重启
修改默认配置
修改端口
application.properties
server.port=9080
application.yml
server:
  port: 9080
自定义属性配置
在SpringBoot配置文件中自定义属性配置,等号左侧的key可以随便写,但是要和其它配置区分开,要且见名知意
application.properties
com.qzcsbj.student.name=jack
com.qzcsbj.student.age=18
com.qzcsbj.student.desc=boy
实体类:注意,下面没有setter方法
package com.qzcsbj.demo.bean;

import org.springframework.beans.factory.annotation.Value;
import org.springframework.stereotype.Component;

/**
 * @公众号 : 全栈测试笔记
 * @博客 : www.cnblogs.com/uncleyong
 * @微信 : ren168632201
 * @描述 : <>
 */
@Component
public class Student {
    @Value("${com.qzcsbj.student.name}")
    private String name;
    @Value("${com.qzcsbj.student.age}")
    private Integer age;
    @Value("${com.qzcsbj.student.desc}")
    private String desc;

    public Student() {
        System.out.println("=========调用实体类无参构造");
    }

    public String getName() {
        return name;
    }

    public Integer getAge() {
        return age;
    }

    public String getDesc() {
        return desc;
    }


    @Override
    public String toString() {
        return "Student{" +
                "name='" + name + '\'' +
                ", age=" + age +
                ", desc='" + desc + '\'' +
                '}';
    }
}
控制器
package com.qzcsbj.demo.controller;

import com.qzcsbj.demo.bean.Student;
import org.springframework.beans.factory.annotation.Autowired;
import org.springframework.beans.factory.annotation.Value;
import org.springframework.web.bind.annotation.RequestMapping;
import org.springframework.web.bind.annotation.RestController;

/**
 * @公众号 : 全栈测试笔记
 * @博客 : www.cnblogs.com/uncleyong
 * @微信 : ren168632201
 * @描述 : <>
 */
@RestController
public class StudentController {

    public StudentController() {
        System.out.println("=========控制器构造方法");
        System.out.println("=========控制器中@Autowired注入的student:" + student);
    }

    @Autowired
    Student student;

    @RequestMapping("getInfo2")
    public Student getInfo2(){
        System.out.println("=====控制器的方法中student:" + student);
        return student;
    }
}
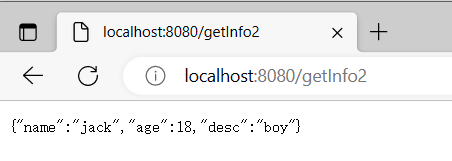
启动项目后,请求:localhost:8080/getInfo2
日志

如果是用非全局配置文件:student.properties
com.qzcsbj.student.name=lucy
com.qzcsbj.student.age=${random.int(1,100)}
com.qzcsbj.student.desc=girl
需要指定配置文件:
@PropertySource("classpath:student.properties")
package com.qzcsbj.demo.bean;

import org.springframework.beans.factory.annotation.Value;
import org.springframework.context.annotation.PropertySource;
import org.springframework.stereotype.Component;

/**
 * @公众号 : 全栈测试笔记
 * @博客 : www.cnblogs.com/uncleyong
 * @微信 : ren168632201
 * @描述 : <>
 */
@Component
@PropertySource("classpath:student.properties")
public class Student {
    @Value("${com.qzcsbj.student.name}")
    private String name;
    @Value("${com.qzcsbj.student.age}")
    private Integer age;
    @Value("${com.qzcsbj.student.desc}")
    private String desc;

    public Student() {
        System.out.println("=========调用实体类无参构造");
    }

    public String getName() {
        return name;
    }

    public Integer getAge() {
        return age;
    }

    public String getDesc() {
        return desc;
    }

    @Override
    public String toString() {
        return "Student{" +
                "name='" + name + '\'' +
                ", age=" + age +
                ", desc='" + desc + '\'' +
                '}';
    }
}

将属性配置赋值给实体类
当我们属性配置很多的时候,使用@Value注解一个一个的注入将会变得很繁琐,这时SpringBoot提供了将属性配置与实体类结合的方式
resources下:application.properties
com.qzcsbj.student.name=jack
com.qzcsbj.student.age=18
com.qzcsbj.student.desc=boy
创建一个配置类,必须要有set方法,因为底层通过set方法注入的
以com.qzcsbj.student开头的属性,下面和配置文件中名字一样的,会自动装配
package com.qzcsbj.config;

import lombok.AllArgsConstructor;
import lombok.Data;
import lombok.NoArgsConstructor;
import org.springframework.boot.context.properties.ConfigurationProperties;
import org.springframework.stereotype.Component;

/**
 * @公众号 : 全栈测试笔记
 * @博客 : www.cnblogs.com/uncleyong
 * @微信 : ren168632201
 * @描述 : <>
 */
@Data
@NoArgsConstructor
@AllArgsConstructor
@Component  // 先生成对象
@ConfigurationProperties(prefix = "com.qzcsbj.student")
public class StudentProperties {
    private String name;
    private Integer age;
    private String desc;
}
控制器
package com.qzcsbj.demo.controller;

import com.qzcsbj.demo.bean.Student;
import com.qzcsbj.demo.config.StudentProperties;
import org.springframework.beans.factory.annotation.Autowired;
import org.springframework.beans.factory.annotation.Value;
import org.springframework.web.bind.annotation.RequestMapping;
import org.springframework.web.bind.annotation.RestController;

/**
 * @公众号 : 全栈测试笔记
 * @博客 : www.cnblogs.com/uncleyong
 * @微信 : ren168632201
 * @描述 : <>
 */
@RestController
public class StudentController {
    public StudentController() {
        System.out.println("=========控制器构造方法");
        System.out.println("=========控制器中@Autowired注入的student:" + student);
    }

    @Autowired  // 注入对象
    StudentProperties studentProperties;

    @RequestMapping("getInfo3")
    public StudentProperties getInfo3(){
        return studentProperties;
    }
}
自定义配置文件
有时我们需要自定义配置文件,将上文关于student的属性配置提取到student.properties文件中
com.qzcsbj.student.name=lucy
com.qzcsbj.student.age=${random.int(1,100)}
com.qzcsbj.student.desc=girl
配置类:需要@PropertySource指定配置文件
package com.qzcsbj.demo.config;

import lombok.AllArgsConstructor;
import lombok.Data;
import lombok.NoArgsConstructor;
import org.springframework.boot.context.properties.ConfigurationProperties;
import org.springframework.context.annotation.PropertySource;
import org.springframework.stereotype.Component;

/**
 * @公众号 : 全栈测试笔记
 * @博客 : www.cnblogs.com/uncleyong
 * @微信 : ren168632201
 * @描述 : <>
 */
@Data
@NoArgsConstructor
@AllArgsConstructor
@Component  // 先生成对象
@PropertySource("classpath:student.properties")
@ConfigurationProperties(prefix = "com.qzcsbj.student")
public class StudentProperties {
    private String name;
    private Integer age;
    private String desc;
}
控制器
package com.qzcsbj.demo.controller;

import com.qzcsbj.demo.bean.Student;
import com.qzcsbj.demo.config.StudentProperties;
import org.springframework.beans.factory.annotation.Autowired;
import org.springframework.beans.factory.annotation.Value;
import org.springframework.web.bind.annotation.RequestMapping;
import org.springframework.web.bind.annotation.RestController;

/**
 * @公众号 : 全栈测试笔记
 * @博客 : www.cnblogs.com/uncleyong
 * @微信 : ren168632201
 * @描述 : <>
 */
@RestController
public class StudentController {

    public StudentController() {
        System.out.println("=========控制器构造方法");
        System.out.println("=========控制器中@Autowired注入的student:" + student);
    }

    @Autowired  // 注入对象
    StudentProperties studentProperties;

    @RequestMapping("getInfo3")
    public StudentProperties getInfo3(){
        return studentProperties;
    }
}
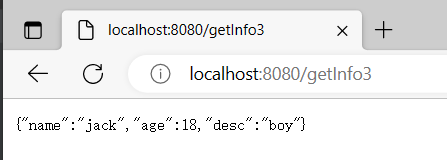
请求:http://localhost:8080/getInfo3

多环境配置
实际开发中可能会有不同的环境,他们配置也不一样,如果每次切换不同环境都需要修改application.properties,那么操作是十分繁琐的。
在Spring Boot中多环境配置文件名需要满足application-{profile}.properties或者application-{profile}.yml的格式,其中{profile}对应你的环境标识,
比如:
application-dev.yml:开发环境
server:
  port: 8081
application-test.yml:测试环境
server:
  port: 8082
application-prod.yml:生产环境
server:
  port: 8083
激活profile,在application.yml文件中通过spring.profiles.active属性来设置,其值对应{profile}值,如:
spring:
  profiles:
    active: dev
启动项目,可以看到端口是dev的端口
![]()
也可以用:application.properties
spring.profiles.active=test
重新启动项目,可以看到端口是test的端口

原文会持续更新,原文地址:https://www.cnblogs.com/uncleyong/p/17064508.html
__EOF__

关于博主:擅长性能、全链路、自动化、企业级自动化持续集成(DevTestOps)、测开等
面试必备:项目实战(性能、自动化)、简历笔试,https://www.cnblogs.com/uncleyong/p/15777706.html
测试提升:从测试小白到高级测试修炼之路,https://www.cnblogs.com/uncleyong/p/10530261.html
欢迎分享:如果您觉得文章对您有帮助,欢迎转载、分享,也可以点击文章右下角【推荐】一下!

 浙公网安备 33010602011771号