Linux内核驱动学习(八)GPIO驱动模拟输出PWM
前言
上一篇的学习中介绍了如何在用户空间直接操作GPIO,并写了一个脚本可以产生PWM。本篇的学习会将写一个驱动操作GPIO,同样的也可以发生PWM,因此这里还需要部分的硬件配合,需要一块开发板,当然可能还需要一台示波器。
原理图
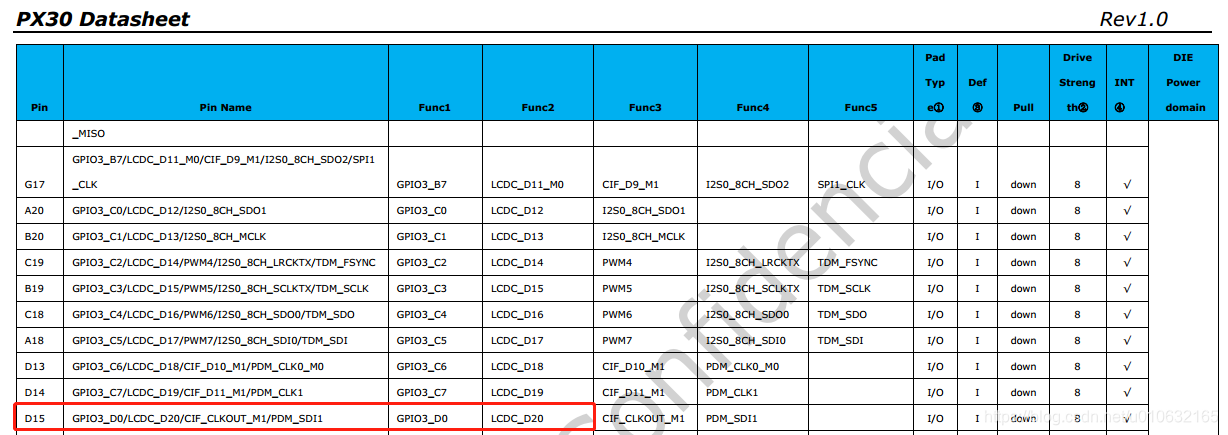
和上一篇相同,引脚依然是GPIO3_D0,具体硬件肯定会不同,注意参考soc的datasheet和硬件原理图,先定位正确需要操作的GPIO。
IO模拟输出PWM
这里驱动实现的方式是先创建一个内核线程,如何创建内核线程可以参考Linux内核驱动学习(五)KThread学习总结,然后在线程函数一直循环反转IO口的输出。这里的目的单纯是为了学习操作GPIO,不建议项目中通过这种IO口模拟的方式去实现PWM的输出,而应该直接使用自带PWM功能的引脚。
设备树
	gpio-demo {
		compatible = "gpio-demo";
		gpios = <&gpio3 0 GPIO_ACTIVE_LOW>;
	};
驱动源码中通过of_get_gpio接口去解析gpio。
驱动端
驱动源码中of_device_id结构体变量中的成员.compatible的值必须和设备树的设备节点兼容属性compatible的值相同;
static struct of_device_id gpio_demo_of_match[] = {
	{ .compatible = "gpio-demo"},
	{},
}

MODULE_DEVICE_TABLE(of,gpio_demo_of_match);

static struct platform_driver gpio_demo_driver = {
	.probe = gpio_demo_probe,
	.driver = {
		.name = "gpio-demo-device",
		.owner = THIS_MODULE,
		.of_match_table = of_match_ptr(gpio_demo_of_match),
	}
};
在probe函数实现对设备树节点的解析,of_get_gpio对应gpio-demo节点下的gpios属性;
然后ret = devm_gpio_request_one(dev, gpio, GPIOF_DIR_OUT, pdev->name)语句初始化GPIO为输出引脚;
static int gpio_demo_probe(struct platform_device *pdev){

	int ret,i;
	struct device *dev = &pdev->dev;
	struct device_node *node = dev->of_node;

	if (!node)
		return -EINVAL;
	ret = of_gpio_count(node);
	if (ret == 0){
		return -EINVAL;
	}
	priv = devm_kzalloc(dev, sizeof(*priv) + sizeof(int) * ret, GFP_KERNEL);
	if (!priv){
		return -ENOMEM;
	}
	priv->count = ret;
	mutex_init(&priv->mtx);
	for (i = 0; i < priv->count; i++) {
		unsigned int gpio;
		gpio = of_get_gpio(node, i);
		if (gpio < 0) {
			dev_warn(dev, "Unable to get gpio #%d\n", i);
			continue;
		}
		ret = devm_gpio_request_one(dev, gpio, GPIOF_DIR_OUT, pdev->name);
		priv->gpio[i] = gpio;
		if (ret < 0) {

			dev_warn(dev, "Unable to re quest GPIO %d: %d\n",
                      gpio, ret);
			continue;
		}
		printk(KERN_INFO "success request gpio %d\n",gpio);

		gpio_direction_output(gpio, 1); //设置输出的电平

	}
	return 0;
}
线程执行函数中通过gpio_set_value设置GPIO的输出值,然后休眠50毫秒,最终PWM的周期应该是100毫秒左右。
static int thread_func(void *data) {

	int i, count;
	while (1){
		count++;
		mutex_lock(&priv->mtx);
		for ( i = 0; i < priv->count; i++){
			gpio_set_value(priv->gpio[i], count%2);
		}
		mutex_unlock(&priv->mtx);
		msleep(50);
		printk(KERN_INFO "thread count %d\n", count);
	}
	return 0;
}
gpio_set_value和gpio_direction_output的区别
如果使用该GPIO时,不会动态地切换输入输出,建议在开始时就设置好GPIO 输出方向,后面拉高拉低时使用gpio_set_value()接口,而不建议使用gpio_direction_output(), 因为gpio_direction_output接口里面有mutex锁,对中断上下文调用会有错误异常,且相比gpio_set_value,gpio_direction_output所做事情更多,浪费。
调试信息
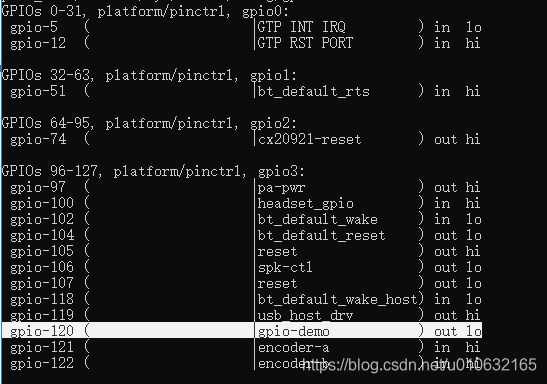
先通过debugfs查看相应的GPIO已经成功加载到内核了;但是我们目前没有留用户层调用的接口,这个有悖于我们的初衷,但是目前为止已经实现了自己想要的效果。
实验结果

附录
#include <linux/module.h>
#include <linux/init.h>

#include <linux/platform_device.h>
//API for libgpio
#include <linux/gpio.h>
//API for malloc
#include <linux/slab.h>
//API for device tree
#include <linux/of_platform.h>
#include <linux/of_gpio.h>
#include <linux/of_device.h>
//API for thread
#include <linux/kthread.h>
#include <linux/delay.h>
#include <linux/mutex.h>

static struct task_struct *thread_body;
struct gpio_demo_priv{
	int count;
	int gpio[0];
	struct mutex mtx;
	int mode;
};

struct gpio_demo_priv *priv;

static int thread_func(void *data) {

	int i, count;
	while (1){
		count++;
		mutex_lock(&priv->mtx);
		for ( i = 0; i < priv->count; i++){
			gpio_set_value(priv->gpio[i], count%2);
		}
		mutex_unlock(&priv->mtx);
		msleep(50);
		printk(KERN_INFO "thread count %d\n", count);
	}
	return 0;
}

static int gpio_demo_probe(struct platform_device *pdev){

	int ret,i;
	struct device *dev = &pdev->dev;
	struct device_node *node = dev->of_node;

	if (!node)
		return -EINVAL;

	ret = of_gpio_count(node);
	if (ret == 0){
		return -EINVAL;
	}

	priv = devm_kzalloc(dev, sizeof(*priv) + sizeof(int) * ret, GFP_KERNEL);

	if (!priv){
		return -ENOMEM;
	}

	priv->count = ret;
	mutex_init(&priv->mtx);
	for (i = 0; i < priv->count; i++) {
		unsigned int gpio;
		gpio = of_get_gpio(node, i);
		if (gpio < 0) {
			dev_warn(dev, "Unable to get gpio #%d\n", i);
			continue;
		}
		ret = devm_gpio_request_one(dev, gpio, GPIOF_DIR_OUT, pdev->name);
		priv->gpio[i] = gpio;
		if (ret < 0) {

			dev_warn(dev, "Unable to re quest GPIO %d: %d\n",
                      gpio, ret);
			continue;
		}
		printk(KERN_INFO "success request gpio %d\n",gpio);

		gpio_direction_output(gpio, 1); //设置输出的电平

	}
	platform_set_drvdata(pdev,priv);

	thread_body = kthread_create(thread_func, NULL, "thread_pwm");
    if((thread_body))
    {
        wake_up_process(thread_body);
    }

	return 0;
}

static struct of_device_id gpio_demo_of_match[] = {
	{ .compatible = "gpio-demo"},
	{},
}

MODULE_DEVICE_TABLE(of,gpio_demo_of_match);

static struct platform_driver gpio_demo_driver = {
	.probe = gpio_demo_probe,
	.driver = {
		.name = "gpio-demo-device",
		.owner = THIS_MODULE,
		.of_match_table = of_match_ptr(gpio_demo_of_match),
	}
};

static int __init gpio_demo_init(void){
	return  platform_driver_register(&gpio_demo_driver);
}

static void __exit gpio_demo_exit(void){
	platform_driver_unregister(&gpio_demo_driver);
}

late_initcall(gpio_demo_init);
module_exit(gpio_demo_exit);

MODULE_LICENSE("GPL");
MODULE_DESCRIPTION("Gpio demo Driver");
MODULE_ALIAS("platform:gpio-demo");

 浙公网安备 33010602011771号