使用SpringBoot发送邮件
最后发送成功后,感觉SpringBoot真的很强大.
↑待加入email输入的重载(可以不上传文件或可以不填写主内容)
↑待加入邮箱RegExp,title长度判定.(等琐碎工作)
首先创建SpringBoot项目
>>使用eclipse构建Spring项目 https://blog.csdn.net/fantasic_van/article/details/79309665 (eclipse未测试)
>>IDEA构建SpringBoot项目 https://blog.csdn.net/lom9357bye/article/details/69677120
之后设置pom.xml文件 (红色是SpringBoot的邮件服务依赖)
<?xml version="1.0" encoding="UTF-8"?>
<project xmlns="http://maven.apache.org/POM/4.0.0" xmlns:xsi="http://www.w3.org/2001/XMLSchema-instance"
         xsi:schemaLocation="http://maven.apache.org/POM/4.0.0 http://maven.apache.org/xsd/maven-4.0.0.xsd">
    <modelVersion>4.0.0</modelVersion>

    <groupId>com.ykmimi</groupId>
    <artifactId>springbootdemo</artifactId>
    <version>0.0.1-SNAPSHOT</version>
    <packaging>jar</packaging>

    <name>springbootdemo</name>
    <description>Demo project for Spring Boot</description>

    <parent>
        <groupId>org.springframework.boot</groupId>
        <artifactId>spring-boot-starter-parent</artifactId>
        <version>2.0.4.RELEASE</version>
        <relativePath/> <!-- lookup parent from repository -->
    </parent>

    <properties>
        <project.build.sourceEncoding>UTF-8</project.build.sourceEncoding>
        <project.reporting.outputEncoding>UTF-8</project.reporting.outputEncoding>
        <java.version>1.8</java.version>
    </properties>

    <dependencies>
        <dependency>
            <groupId>org.springframework.boot</groupId>
            <artifactId>spring-boot-starter-web</artifactId>
        </dependency>

        <dependency>
            <groupId>org.springframework.boot</groupId>
            <artifactId>spring-boot-starter-test</artifactId>
            <scope>test</scope>
        </dependency>

        <dependency>
            <groupId>org.springframework.boot</groupId>
            <artifactId>spring-boot-starter-mail</artifactId>
        </dependency>

        <dependency>
            <groupId>org.springframework.boot</groupId>
            <artifactId>spring-boot-starter</artifactId>
        </dependency>

    </dependencies>

    <build>
        <plugins>
            <plugin>
                <groupId>org.springframework.boot</groupId>
                <artifactId>spring-boot-maven-plugin</artifactId>
            </plugin>
        </plugins>
    </build>


</project>
这里我用的IDEA,等待它自动加载依赖完成.
在resource下的application.properties加入:
spring.mail.host=smtp.126.com
spring.mail.username=发送邮箱@126.com
spring.mail.password=客户端授权码
spring.mail.default-encoding=UTF-8
#spring.mail.port=25
#spring.mail.protocol=smtp
#server.port=8080
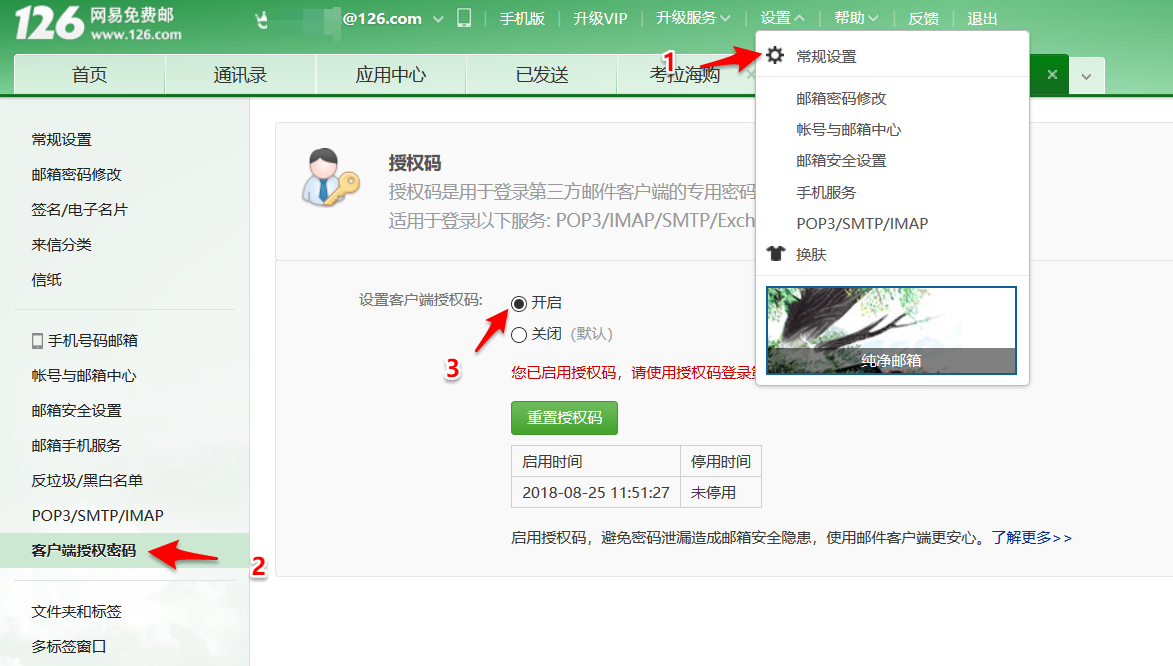
126邮箱的授权密码开启方式:
创建一个Contoller
package com.ykmimi;

import org.springframework.beans.factory.annotation.Autowired;
import org.springframework.mail.javamail.JavaMailSender;
import org.springframework.mail.javamail.MimeMessageHelper;
import org.springframework.web.bind.annotation.RequestMapping;
import org.springframework.web.bind.annotation.RestController;

import javax.mail.MessagingException;
import javax.mail.internet.MimeMessage;

@RestController
@RequestMapping("mail")
public class MailController {
    @Autowired
    JavaMailSender mailSender;

    @RequestMapping("sendmail")
    public Object sendEmail(){

        try {
            final MimeMessage mimeMessage = this.mailSender.createMimeMessage();
            final MimeMessageHelper message = new MimeMessageHelper(mimeMessage);
            message.setFrom("发送邮箱@126.com");
            message.setTo("接收邮箱@qq.com");
            message.setSubject("测试邮件主题");
            message.setText("测试邮件内容");
            this.mailSender.send(mimeMessage);
        } catch (MessagingException e) {
            e.printStackTrace();
        } finally {
            return "sendEmail!";
        }

    }
}
之后执行测试类 SpringbootdemoApplication
浏览器执行 http://localhost:8080/mail/sendmail
---------------------------------------------------------------
一般很多网站上都是手机注册或邮箱注册,邮箱是获取一个随机的激活码,或激活链接(点开即激活账号使用)
本文来自博客园,作者:ace--碳水化合物,转载请注明原文链接:https://www.cnblogs.com/ukzq/p/9533611.html

 浙公网安备 33010602011771号