
Linux下C语言多线程编程
一、多线程基本概念
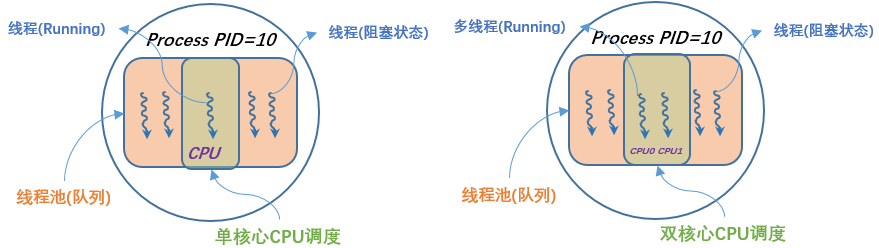
多线程(multithreading),是指从软件或者硬件上实现多个线程并发执行的技术。具有多线程能力的计算机因有硬件支持而能够在同一时间执行多于一个线程,进而提升整体处理性能。具有这种能力的系统包括对称多处理机、多核心处理器以及芯片级多处理或同时多线程处理器。在一个程序中,这些独立运行的程序片段叫作“线程”(Thread),利用它编程的概念就叫作“多线程处理” .(百度) 在单核CPU单线程的处理器上,对于多线程的处理方式,只能分时切换线程,每一个线程运行一个时间片然后被换出,在这种情况下,无须担心公共临界区的变量的竞争问题,相反在对核心CPU中就需要非常严格的关注临界区的数据竞争情况。如下图所示分别为单核心多核心的线程调度情况:
二、多线程基本API介绍
1. 在Linux环境下多线程编程头文件
1 #include <errno.h> // Error code head file(EBUSY,ETIMEDOUT)
2 #include <pthread.h> // Pthread head file
2. 基本线程相关函数
1. pthread_mutex_t g_mutex; // 临界区锁定义
2. pthread_mutex_init(g_mutex,NULL); // 锁初始化函数
3. pthread_cond_t g_cond; // 触发条件定义
4. pthread_cond_init(g_cond,NULL); // 初始化条件变量
5. int ret = pthread_mutex_lock(&g_mutex); // 获取锁,获取失败则阻塞在此函数直至获取到锁,失败返回错误代码EBUSY
6. pthread_mutex_unlock(&g_mutex); // 进行解锁,释放锁
7. ret = pthread_mutex_trylock(&g_mutex); // 尝试获取锁,若获取失败,则不阻塞直接跳过,返回值为锁繁忙EBUSY
8. ret = pthread_mutex_timedlock(&g_mutex ,&outtime); // 尝试在outtime时间段之内获取锁,若超时未获取则不阻塞,并返回ETIMEDOUT
10. pthread_cond_wait(g_cond,g_mutex); // 先对锁进行解锁,并且阻塞等待cond信号触发直至触发完成
11. ret = pthread_cond_timedwait(g_cond,g_mutex,&outtime); // 先对锁进行解锁,并且等待cond信号触发,若在截止时间之前未触发,则跳出函数,并返回ETIMEDOUT
12. pthread_cond_signal(g_cond); // 单一发出触发信号,触发等待队列中的第一个线程,假设您只对队列添加了一个工作作业。那么只需要唤醒一个工作程序线程(再唤醒其它线程是不礼貌的!)
13. pthread_cond_broadcast(g_cond); // 发出广播触发信号,通知唤醒等待队列中的所有线程
14. pthread_cond_destroy(g_cond); // 销毁条件变量,归还条件变量资源
15. pthread_t th1; // 定义线程对象,类似于进程的PID号
16. pthread_create(&th1,NULL,thread_func,NULL); // Create the Thread1 & Start the thread func.
17. pthread_join(th1,NULL); // Wait the Thread1 end.
18. 待补充!
如上所示为基本的多线程编程API,上述锁的API的实现包括了多种方式,基本都能够满足常见的锁需求,对应的每一个函数调用基本上都有int类型的返回值,一般返回的内容都包括在了error.h头文件中。
其中函数pthread_cond_wait、pthread_mutex_lock会阻塞线程直至获取到对应条件,而其他锁相关函数不会一直阻塞线程,从而能够满足其他的场景。
3. 阻塞时间outtime参数设置:
\* 如下是timespec结构体的具体类型,其中都是long型 *\
struct timespec
{
  __time_t tv_sec;    /* Seconds.  */
  __syscall_slong_t tv_nsec;    /* Nanoseconds.  */
};
timespec结构体可以精确到纳秒级别,包括了两个成员变量,分别为秒tv_sec以及纳秒tv_nsec;
具体在延迟阻塞中应用是,可以先获取系统当前时间,然后在当前时间的基础上增加线程阻塞延迟增量,然后通过指针形参传递给对应的线程阻塞函数即可,详参见下:
 1 #include <time.h> // 需要包含时间头文件
 2 long wt_ms; // 需要延迟阻塞的时间
 3 struct timespec outtime; // Defination定义
 4 clock_gettime(CLOCK_REALTIME, &outtime); // Get the current time.(获取当前系统时间,注意一定要用CLOCK_REALTIME来获取系统时间)
 5
 6 /****************************************
 7 *** 开始设置阻塞延迟时间点,在下个时间点触发 ***
 8 ****************************************/
 9
10 outtime.tv_sec += wt_ms / 1000; // 毫秒换算秒
11 time_ns = outtime.tv_nsec + (wt_ms % 1000) * 1000000; // 多出的换算成纳秒
12 if(time_ns >= 1000000000){ // 溢出当前时间则需要判断是否进位
13     outtime.tv_sec++; // 进位
14     outtime.tv_nsec = time_ns - 1000000000; // 计算进位后余
15 }else{
16     outtime.tv_nsec = time_ns; // 无需进位直接赋值即可
17 }
18 ret = pthread_mutex_timedlock(&g_mutex ,&outtime); // 阻塞延迟一段时间,然后返回相关代码给ret.
上述代码将outtime参数阻塞延迟时间传递给了pthread_mutex_timedlock函数:
(a) 若在outtime时间节点之前获取到锁,则停止阻塞,返回ret=0;
(b) 若时间节点之后还未获取锁,则停止阻塞,返回ret=ETIMEDOUT超时。
4. 自旋锁
自旋锁与互斥锁功能一样,唯一一点不同的就是互斥量阻塞后休眠让出cpu,而自旋锁阻塞后不会让出cpu,会一直忙等待,直到得到锁!
自旋锁在用户态使用的比较少,在内核使用的比较多!自旋锁的使用场景:锁的持有时间比较短,或者说小于2次上下文切换的时间。
自旋锁在用户态的函数接口和互斥量一样,把pthread_mutex_xxx()中mutex换成spin,如:pthread_spin_init()。
5. 读写锁(非常适合于读写线程的变量共享情况)
假如现在一个线程a只是想读一个共享变量i,因为不确定是否会有线程去写他,所以我们还是要对它进行加锁。
但是这时候又一个线程b试图读共享变量i ,于是发现被锁住,那么b不得不等到a释放了锁后才能获得锁并读取 i 的值,但是两个读取操作即使是几乎同时发生也并不会像写操作那样造成竞争,因为他们不修改变量的值。
所以我们期望如果是多个线程试图读取共享变量值的话,那么他们应该可以立刻获取而不需要等待前一个线程释放因为读而加的锁。
读写锁可以很好的解决上面的问题。他提供了比互斥量跟好的并行性。因为以读模式加锁后当又有多个线程仅仅是试图再以读模式加锁时,并不会造成这些线程阻塞在等待锁的释放上。
相关读写锁的API具体如下:
1 int pthread_rwlock_init(pthread_rwlock_t *rwlock, const pthread_rwlockattr_t *attr); // 初始化读写锁
2 int pthread_rwlockattr_destory(pthread_rwlockattr_t *attr); // 销毁回收读写锁
3 int pthread_rwlock_rdlock(pthread_rwlock_t *rwlock); // 阻塞方式获取读锁
4 int pthread_rwlock_wrlock(pthread_rwlock_t *rwlock); // 阻塞方式获取写锁
5 int pthread_rwlock_tryrdlock(pthread_rwlock_t *rwlock); // 非阻塞方式获取读锁
6 int pthread_rwlock_trywrlock(pthread_rwlock_t *rwlock); // 非阻塞方式获取写锁
7 int pthread_rwlock_unlock(pthread_rwlock_t *rwlock); // 释放读写锁
具体使用实例代码如下:


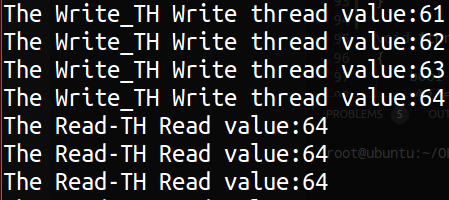
 1 #include <stdio.h>
 2 #include <errno.h> // Error code head file(EBUSY)
 3 #include <stdlib.h>
 4 #include <unistd.h>
 5 #include <pthread.h> // Pthread head file
 6
 7 pthread_rwlock_t rw_lock = PTHREAD_RWLOCK_INITIALIZER;
 8 int global = 0;
 9
10 void *thread_read_func(void *arg);
11 void *thread_write_func(void *arg);
12
13 int main(void)
14 {
15     pthread_t th1,th2;
16     printf("Mutil_Thread_Sys Starting...\n"); // Show the Starting point.
17     pthread_mutex_unlock(GMemory->g_mutex);
18     pthread_create(&th2,NULL,thread_read_func,"Read-TH"); // Create the Thread2 & Start the thread func2.
19     pthread_create(&th1,NULL,thread_write_func,"Write_TH"); // Create the Thread1 & Start the thread func1.
20
21     while(1){ // Main Processing thread.
22         ;
23     }
24
25     pthread_join(th2,NULL); // wait the Thread2 end.
26     pthread_join(th1,NULL); // Wait the Thread1 end.
27
28     printf("System Exit.\n"); // Show the Ending point.
29     return 0;
30 }
31
32 void *thread_read_func(void *arg)
33 {
34     bool ret;
35     char *pthr_name = (char *)arg;
36     while(1){
37         ret = pthread_rwlock_rdlock(&rw_lock);
38         printf("The %s Read value:%d\n",pthr_name,global);
39         usleep(5000);
40         pthread_rwlock_unlock(&rw_lock);
41     }
42 }
43
44 void *thread_write_func(void *arg)
45 {
46     bool ret;
47     char *pthr_name = (char *)arg;
48     while(1){
49         ret = pthread_rwlock_wrlock(&rw_lock);
50         global++;
51         usleep(5000);
52         printf("The %s Write thread value:%d\n",pthr_name,global);
53         pthread_rwlock_unlock(&rw_lock);
54     }
55 }
运行结果如下:
三、线程间通讯方式
1. 全局变量通信
由于线程使用的栈空间和堆空间都是进程的,而多线程都属于进程,故而全局变量能够被多个线程同时访问(为了防止使用混乱,采用锁机制来对全局变量进行访问即可);
1 typedef struct Global_Memory{ // #define new struct type var with mutex lock and data also using-time.
2     pthread_mutex_t *g_mutex; // The mutex lock variable define
3     unsigned int Memory[10]; // The truly Data you will deal with.
4 }GMem;
设计如上所示的结构体变量,并在全局定义,此时即可将Memory空间和g_mutex锁变量进行了绑定,只有获取锁的状态下才可以修改Memory当中的内容,从而能够有序的完成线程间同信。
具体实现代码如下:
 1 #include <stdio.h>
 2 #include <errno.h> // Error code head file(EBUSY)
 3 #include <stdlib.h>
 4 #include <unistd.h>
 5 #include <pthread.h> // Pthread head file
 6
 7 typedef struct Global_Memory{ // #define new struct type var with mutex lock and data also using-time.
 8     pthread_mutex_t *g_mutex; // The mutex lock variable define
 9     unsigned int Memory[10]; // The truly Data you will deal with.
10     int using_time; // Using time setup.
11 }GMem;
12
13 GMem *GMemory = NULL; // #define the mutex-lock & Memory variable
14
15 void *thread_func1(void *arg); // #define the thread functions
16 void *thread_func2(void *arg);
17
18 int main(void)
19 {
20     pthread_t th1,th2;
21     GMemory = (GMem *)malloc(sizeof(GMem)); // Allocal the storage spcae for Memory Data and time_using.
22     GMemory->g_mutex = (pthread_mutex_t *)malloc(sizeof(pthread_mutex_t)); // Allocal the memory space for the mutex variable.
23
24     printf("Mutil_Thread_Sys Starting...\n"); // Show the Starting point.
25     pthread_mutex_init(GMemory->g_mutex,NULL); // Initialize the mutex.
26     pthread_create(&th1,NULL,thread_func1,NULL); // Create the Thread1 & Start the thread func1.
27     pthread_create(&th2,NULL,thread_func2,NULL); // Create the Thread2 & Start the thread func2.
28
29     while(1){ // Main Processing thread.
30         printf("This is the Main Processing...\n");
31         sleep(1); // Delay time cost 1second.
32     }
33
34     pthread_join(th1,NULL); // Wait the Thread1 end.
35     pthread_join(th2,NULL); // wait the Thread2 end.
36     printf("System Exit.\n"); // Show the Ending point.
37     return 0;
38 }
39
40 void *thread_func1(void *arg) // Func1 Point address Define.(void *)
41 {
42     time_t t_s; // Define a time_t var for storage the thread ending timestamp.
43     while(1){
44         pthread_mutex_lock(GMemory->g_mutex); // try to get the mutex lock var, if success, the thread is going to run and deal with the Memory Data.
45         printf("********************************************************************************Func1 Locked.\n"); // Print the mutex lock var's state.
46         t_s = time(NULL) + 1; // setup the ending time of the thread.
47         while(time(NULL) <= t_s){ // Control the ending time.
48             GMemory->Memory[1]++; // Deal with the Memory Data.
49             printf("This is thread_func1 Running:Memory[1]=%d  Memory[2]=%d\n",GMemory->Memory[1],GMemory->Memory[2]); // show the result the thread just did.
50             usleep(1000); // us delay for testing the thread time control.
51         }
52         pthread_mutex_unlock(GMemory->g_mutex); // Unlock the mutex variable so that other thread could use the mutex lock variable.
53         printf("********************************************************************************Func1 Unlocked.\n"); // Print the mutex lock var's state.
54     }
55 }
56
57 void *thread_func2(void *arg)
58 {
59     time_t t_s;
60     while(1){
61         // int ret = pthread_mutex_trylock(GMemory->g_mutex); // Use the Trylock function will make the func2 to be sleeped, Use lock to make sure the Func2 thread could be called.
62         // if(EBUSY == ret) continue;
63         pthread_mutex_lock(GMemory->g_mutex);
64         printf("********************************************************************************Func2 Locked.\n");
65         t_s = time(NULL) + 1;
66         while(time(NULL) <= t_s){
67             GMemory->Memory[2]++;
68             printf("This is thread_func2 Running:Memory[1]=%d  Memory[2]=%d\n",GMemory->Memory[1],GMemory->Memory[2]);
69             usleep(1000);
70         }
71         pthread_mutex_unlock(GMemory->g_mutex);
72         printf("********************************************************************************Func2 Unlocked.\n");
73     }
74 }
2. 消息队列
3. 信号量唤醒
信号量作为基本的通信方式,在线程阻塞睡眠唤醒的过程当中,充当着非常重要的角色,如下所示为条件信号量的定义及使用:
1 pthread_cond_t *g_cond; // condition semaphore define
2 ret = pthread_cond_timedwait(g_cond,GMemory->g_mutex,&outtime); // Waitting for the trigger signal and active the threads in queue while the outtime.
3 ret = pthread_cond_wait(g_cond, GMemory->g_mutex); // unlock the g_mutex lock and wait for the condition trigger.
4 pthread_cond_broadcast(g_cond); // broadcast trigger all threads in the queue.
5 pthread_cond_signal(g_cond); // Only wake up the first thread in the front of wait-queue.
2,3行在线程中用来等待其他线程使用4,5行来进行cond信号量唤醒。
四、生产者消费者模型
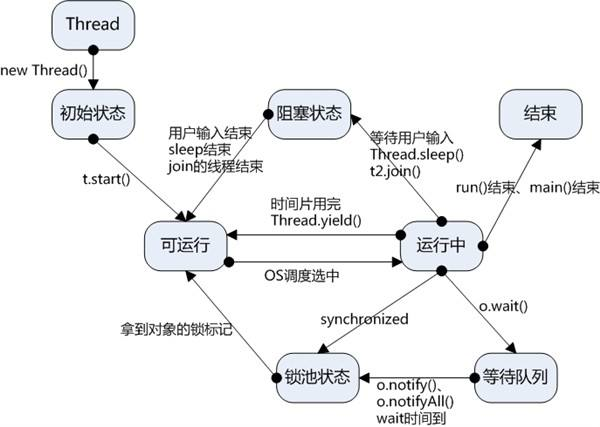
1. 如下图所示为基本的线程状态切换流程:
2. 基本相关多线程框架案例
(a) 延迟阻塞多线程框架:
框架介绍:多个线程在不同时间节点启动,获取同一公共资源,每个线程都能设置自身独立的阻塞等待的时间,若获取资源等待超时,则放弃等待。
 1 bool th_queue_run(long wt_ms, long choke_ms,int th)
 2 {
 3     int ret;
 4     long time_ns=0;
 5     struct timespec outtime;
 6     clock_gettime(CLOCK_REALTIME, &outtime); // Get the current time.
 7     outtime.tv_sec += wt_ms / 1000;
 8     time_ns = outtime.tv_nsec + (wt_ms % 1000) * 1000000;
 9     if(time_ns >= 1000000000){
10         outtime.tv_sec++;
11         outtime.tv_nsec = time_ns - 1000000000;
12     }else{
13         outtime.tv_nsec = time_ns;
14     }
15     ret = pthread_mutex_timedlock(GMemory->g_mutex ,&outtime);
16     if(ret != 0){
17         if(ret == ETIMEDOUT){
18             printf("%d Timeout | Compete, Running Failed!\n",th);
19             return false;
20         }
21     }
22     printf("%d Running successfully.\n",th);
23     GMemory->Memory[th]++;
24     printf("Memory[3] Memory[4] **** %d %d\n",GMemory->Memory[3],GMemory->Memory[4]);
25     sleep(choke_ms);
26     pthread_mutex_unlock(GMemory->g_mutex);
27     return true;
28 }
(b) 未完待续
五、关于线程调度
1. Linux下的sleep()和sched_yield()
sched_yield()的man手册描述如下:
DESCRIPTIONsched_yield() causes the calling thread to relinquish the CPU. The thread is moved to the end of the queue for its static priority and a new thread gets to run.RETURN VALUEOn success, sched_yield() returns 0. On error, -1 is returned, and errno is set appropriately.ERRORSIn the Linux implementation, sched_yield() always succeeds.
翻译一下,sched_yield()会让出当前线程的CPU占有权,然后把线程放到静态优先队列的尾端,然后一个新的线程会占用CPU,那这个和sleep()有啥区别呢?
- sched_yield()这个函数可以使用另一个级别等于或高于当前线程的线程先运行。如果没有符合条件的线程,那么这个函数将会立刻返回然后继续执行当前线程的程序。
- 而sleep则是等待一定时间后等待CPU的调度,然后去获得CPU资源(这也是usleep()为什么不准的原因)。
那么什么时候使用sched_yield()呢?
Strategic calls to sched_yield() can improve performance by giving other threads or processes a chance to run when (heavily) contended resources (e.g., mutexes) have been released by the caller.
翻译一下,有策略的调用sched_yield()能在资源竞争情况很严重时,通过给其他的线程或进程运行机会的方式来提升程序的性能。也就是说,调用sched_yield()能让你的当前线程让出资源,通过一定的策略调用sched_yield()满足你的业务要求可以保证各个线程或进程都有机会运行。
2. Linux下杀死指定的线程
I. 线程终止的 4 种方式:
- 线程的执行函数返回了,这和 main() 函数结束类似。
- 线程调用了 pthread_exit() 函数,这和调用 exit() 返回类似。
- 线程被另一个线程通过 pthread_cancel() 函数取消,这和通过kill() 发送 SIGKILL 信号类似。
- 进程终止了,则进程中的所有线程也会终止。
II. 取消某个线程的常规步骤:
a) 被取消的线程操作:
- 允许取消,pthread_setcancelstate(),参数可选值:
- PTHREAD_CANCEL_ENABLE,这是默认值;
- PTHREAD_CANCEL_DISABLE;
- 设置取消类型,pthread_setcanceltype(),参数可选值:
- PTHREAD_CANCEL_ASYNCHRONOUS,异步方式,当发出取消请求后,线程可能会在任何点被杀死。
- PTHREAD_CANCEL_DEFERRED,延迟方式,线程只会在特定的取消点(cancellation points,调用某个函数前)被杀死,这是默认值。
b) 发起取消的线程:
- 发送取消要求,pthread_cancel(),发出取消请求后,pthread_cancel() 当即返回,不会等待目标线程的退出。
- 等待取消完成,pthread_join()。
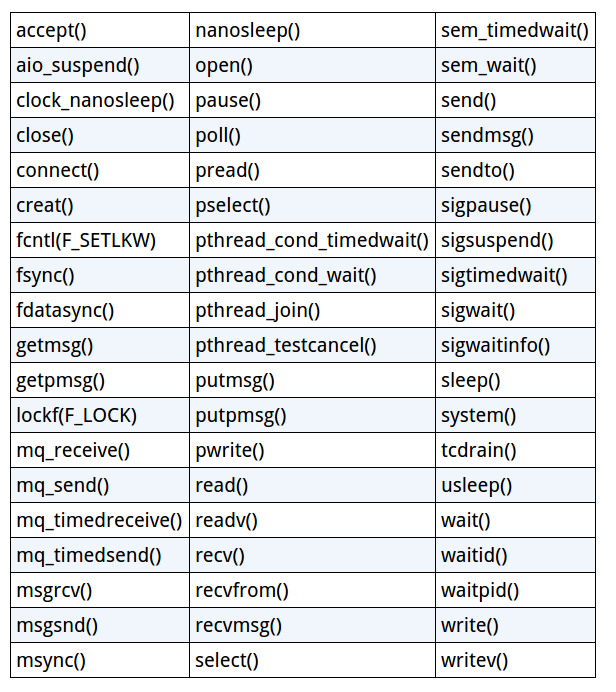
c) 哪些函数是取消点?
III. 实验代码:
1. 不使用特定的取消点,任意可能位置销毁线程:
 1 #include <stdio.h>
 2 #include <unistd.h>
 3 #include <string.h>
 4 #include <stdlib.h>
 5 #include <time.h>
 6 #include <pthread.h>
 7 #include <sys/time.h>
 8
 9 void *thread_func(void *arg);
10
11 int main(void)
12 {
13     pthread_t th1;
14     void *pth_state; // 用来记录线程回收的状态情况
15
16     pthread_create(&th1, NULL, thread_func, NULL); // 创建线程
17     sleep(5);
18     pthread_cancel(th1); // 取消销毁线程, 对于自动退出的线程, 无需取消线程
19     pthread_join(th1, &pth_state); // 阻塞等待回收线程资源
20     if(PTHREAD_CANCELED == pth_state){
21       printf("thread1 was terminate by cancel\n");
22     }else{
23       printf("thread1 was not terminate by cancel\n");
24     }
25     exit(EXIT_SUCCESS);
26     return 0;
27 }
28
29 void *thread_func(void *arg)
30 {
31   int i = 2;
32   printf("Welcome Thread test...\n");
33   pthread_setcancelstate(PTHREAD_CANCEL_ENABLE, NULL);   // 设置取消功能使能, 否则线程将无法被注销, 默认为 PTHREAD_CANCEL_ENABLE
34   pthread_setcanceltype(PTHREAD_CANCEL_ASYNCHRONOUS, NULL);  // 设置异步杀死功能, 线程可能在任何位置处被杀死:PTHREAD_CANCEL_ASYNCHRONOUS 特定的取消点:PTHREAD_CANCEL_DEFERRED
35   for(;i>0;){
36     printf("Thread is running...\n");
37     sleep(1); // sleep为默认的取消点位置, 因此此线程函数的取消位置一般为sleep函数调用之前 pthread_testcancel(); //主动设置取消点, 主动设置的取消点优先级低于系统默认函数的优先级
38   }
39   return NULL; // pthread_exit((void*)0); // 直接使用函数终止结束当前线程
40 }
1 pthread_mutex_t mut; // 定义mutex锁变量
2 pthread_cleanup_push(pthread_mutex_unlock, (void *)&mut); // 线程取消退出前的处理程序记录在栈中,函数执行顺序与注册顺序相反
3 pthread_mutex_lock(&mut); // 使用资源前对其加锁
4 /* do some work */
5 pthread_mutex_unlock(&mut); // 使用完资源释放锁
6 pthread_cleanup_pop(0); // 线程取消退出前执行栈中函数
函数接口介绍:
线程可以安排他退出时需要调用的函数,这与进程可以用atexit函数安排进程退出时需要调用的函数是类似的。这样的函数称为线程清理处理程序,线程可以建立多个清理处理程序。处理程序记录在栈中,也就是说他们的执行顺序与他们注册的顺序相反,接口如下:
- 头文件:#include <pthread.h>
- 入栈注册函数原型:
- void pthread_cleanup_push(void (*rtn)(void *), void *arg);
- void(*rtn)(void *):线程清理函数;
- void *arg:清理函数参数;
- 出栈注册函数原型:
- void pthread_clean_pop(int execute);
- int execute:清理函数出栈执行编号;
1 {
2     pthread_mutex_t mut; // 定义mutex锁变量
3     int oldtype; // 用于暂存当前的pthread_setcanceltype状态
4
5     pthread_setcanceltype(PTHREAD_CANCEL_DEFERRED, &mut, oldtype); //设置为同步取消,这样保证push和其他操作不能被打断
6     pthread_cleanup_push(routine, arg); // 入栈线程取消前函数routine+参数arg
7     pthread_cleanup_pop(execute); // 出栈执行函数
8     pthread_setcanceltype(oldtype, NULL); // 恢复之前的pthread_setcanceltype状态
9 }
测试代码:
 1 #include<stdlib.h>
 2 #include<stdio.h>
 3 #include<unistd.h>
 4 #include<pthread.h>
 5 void clean_fun1(void * arg)
 6 {
 7     printf("this is clean fun1\n");
 8 }
 9 void clean_fun2(void * arg)
10 {
11     printf("this is clean fun2\n");
12 }
13 void * thread_fun(void * arg)
14 {
15     pthread_cleanup_push(clean_fun1,NULL);
16     pthread_cleanup_push(clean_fun2,NULL);
17     sleep(100);
18     //这里要注意,如果将sleep(100);换成while(1);的话,程序会一直暂停.push和pop要成对出现.
19     //因为while(1);运行的太快,线程不接受cancel信号
20     //while(1);
21     pthread_cleanup_pop(0);
22     pthread_cleanup_pop(0);
23     return NULL;
24 }
25 int main()
26 {
27     pthread_t tid1;
28     int err;
29     err=pthread_create(&tid1,NULL,thread_fun,NULL);
30     if(err!=0)
31     {
32         perror("pthread_create");
33         exit(0);
34     }
35     sleep(3);
36     //printf("test\n");
37     err=pthread_cancel(tid1);
38     if(err!=0)
39     {
40         perror("cancel error:");
41         exit(0);
42     }
43     err=pthread_join(tid1,NULL);
44     if(err!=0)
45     {
46         perror("pthread_join  error:");
47         exit(0);
48     }
49
50     return 0;
51 }
https://blog.csdn.net/wuweidonggmail/article/details/111056048
https://blog.csdn.net/qixiang2013/article/details/126126112 多线程私有数据pthread_key_create
https://pubs.opengroup.org/onlinepubs/7908799/xsh/pthread_condattr_init.html int pthread_condattr_init(pthread_condattr_t *attr);
https://blog.csdn.net/ericbar/article/details/79879850 Linux下pthread_once()函数
Reference:
树莓派多线程点灯:https://github.com/embedded-learning-group/Linux_Learning/tree/master/20190818_Lesson7
相关thread API函数接口介绍:https://pubs.opengroup.org/onlinepubs/9699919799/functions/pthread_mutex_timedlock.html
POSIX线程详解(第三部分):https://www.ibm.com/developerworks/cn/linux/thread/posix_thread3/index.html
线程同步及消息队列:https://www.cnblogs.com/noticeable/p/8549788.html
消息队列通信详解:https://blog.csdn.net/anonymalias/article/details/9799645
杀死某一个线程:https://blog.csdn.net/wuweidonggmail/article/details/111056048

 浙公网安备 33010602011771号