使用fir.im分发IOS App的步骤
There are four methods to release your iOS app:
-
Enterprise:
- Situation: internal testing within a company
- Required: an enterprise developer account
- Advantage: when publishing within an enterprise, the device UDID is not restricted
- PS: if the app is installed by a person outside the company, your account will be banned.
-
iOS AppStore:
- Situation:uploading to the App Store (several-week official review by Apple is required)
- Required:packaged with a release certificate
- PS: cannot debug
-
Development:
- Situation:internal testing. Or for debugging on a real device. In general, you install the app on your device with a data cable.
- available device is pre-set (up to 100), you should add their UDIDs
- Required:packaged with a development certificate
-
Ad Hoc:
- Situation:internal testing and debugging on a real device. And you can distribute the app on TestFlight / 蒲公英 / fir
- available device is pre-set (up to 100), you should add their UDIDs
- Required:packaged with a distribution certificate
Now we are going to introduce the method (the 4th) to distribute your app on fir.im.
What is required:
- a MacOS computer
- a Windows computer
- an APPLE developer account
- a fir account (real-name authentication required)
1. Generate your certificates
You should process the following steps of this chapter on your Windows computer (or virtual machine). It is also practicable to generate them on Apple Developer,But it will be quite troublesome
Steps:
-
Download AppUploader
The software called AppUploader is required. I have shared it on BaiduYun. Please download it.- Link for Downloading appuploader
- password is g4ak
- PS: this is an old version which is unavailable on its website
-
Login AppUploader
Enter the software, then you should log in with your APPLE develop account (may require SMS verification)
![]()
-
Add Certificate
Choose 证书 and create a certificate for distribution, we called it P12 certificate. And then click the **ADD **Bottom in the right corner
![]()
-
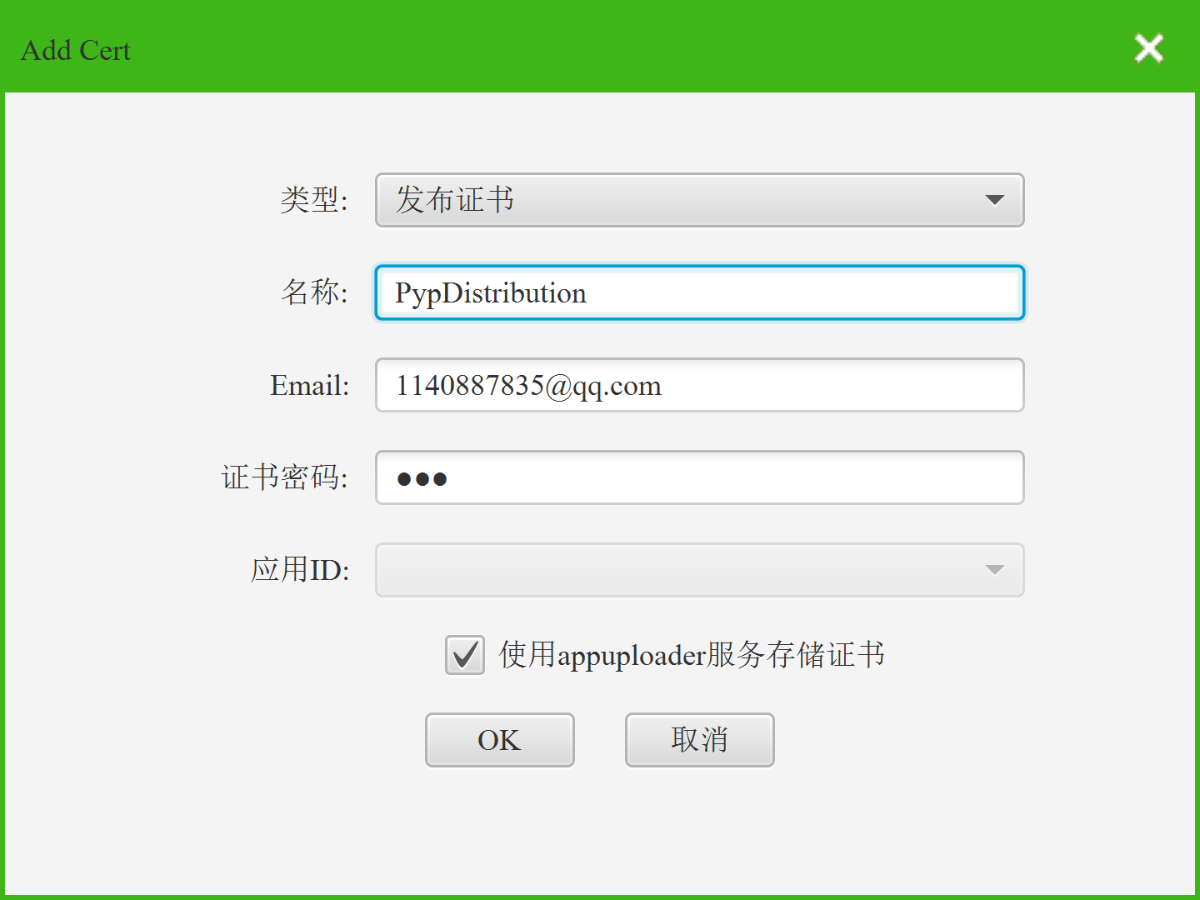
Create Your Certificate
- 类型:Choose 发布证书
- 名称:name it casually
- Email:enter your work email
- 证书密码:enter a simple password and remember it, you should enter it later
![]()
-
Download Certificate
Click OK and you can see the new certificate you created in the list.
Then click the p12文件 to download it
![]()
-
Add ID
![]()
Click BACK and then click 描述文件
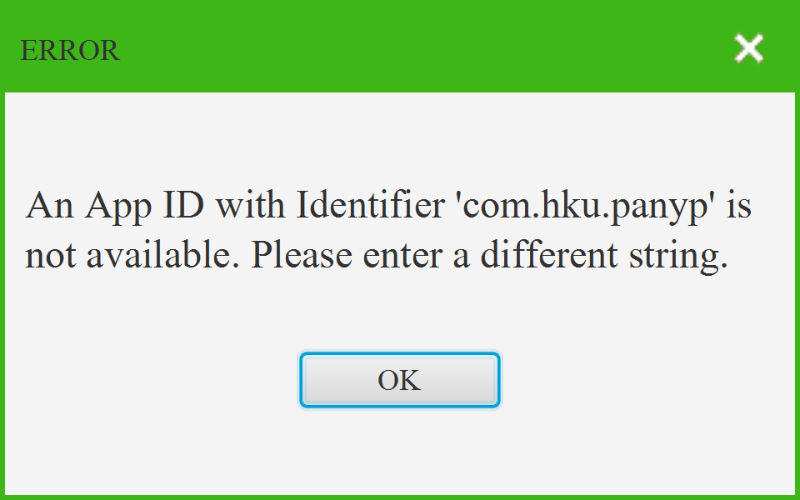
Click ADD then click "添加应用ID"- 应用ID:
- 名称:name it casually, but do not use ID name which has been used. If the following warning pops up, please change a name.
![]()
-
Create An AdHoc Profile
- Type:choose Ad Hoc
- 应用ID:choose the ID you created just now
- 证书:选中全部
- Devices:选中全部设备
![]()
-
Download Profile
Click OK,and you can see the profile you created just now in the list.
Click 下载 to download it
![]()


2. install your certificate
The rest of these steps should be done on your MacOS computer
And now you have got two files
- One is your distribute certificate, whose suffix is p12
- The other one is your profile, whose suffix is mobileprovision
Steps:
-
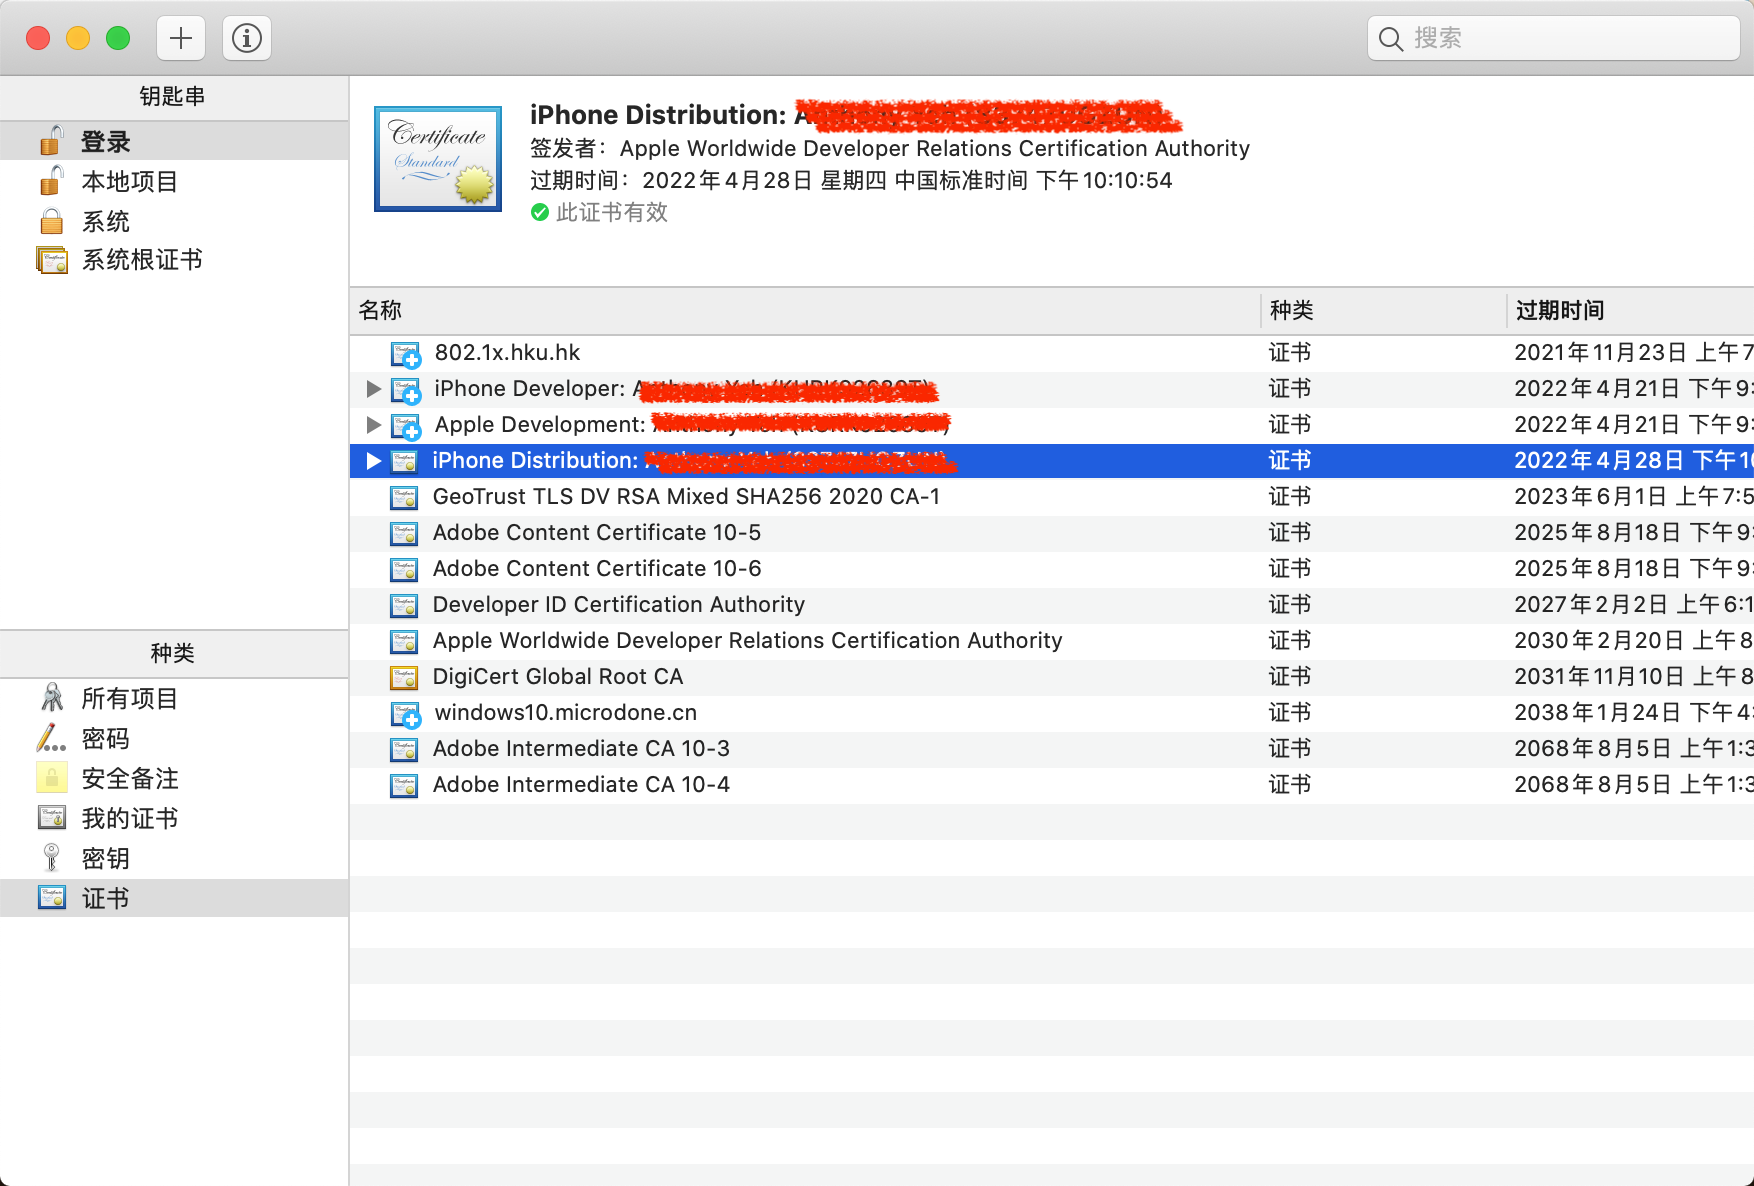
Install Certificate
Click the p12 to install, it will be add in your keychain
![]()
Check in your keychain, you may find a new iPhone Distribution Certificate in your keychain
PS: 信任 item of this certificate is 使用系统默认, please donot change it -
Add Profile
Click the mobileprovision file to add it to your XCode
3. Generate the ipa
Before this, you should make sure that your app developed on XCode can generate in debug/release method because this document does not include the content to fix your program bug
Steps:
-
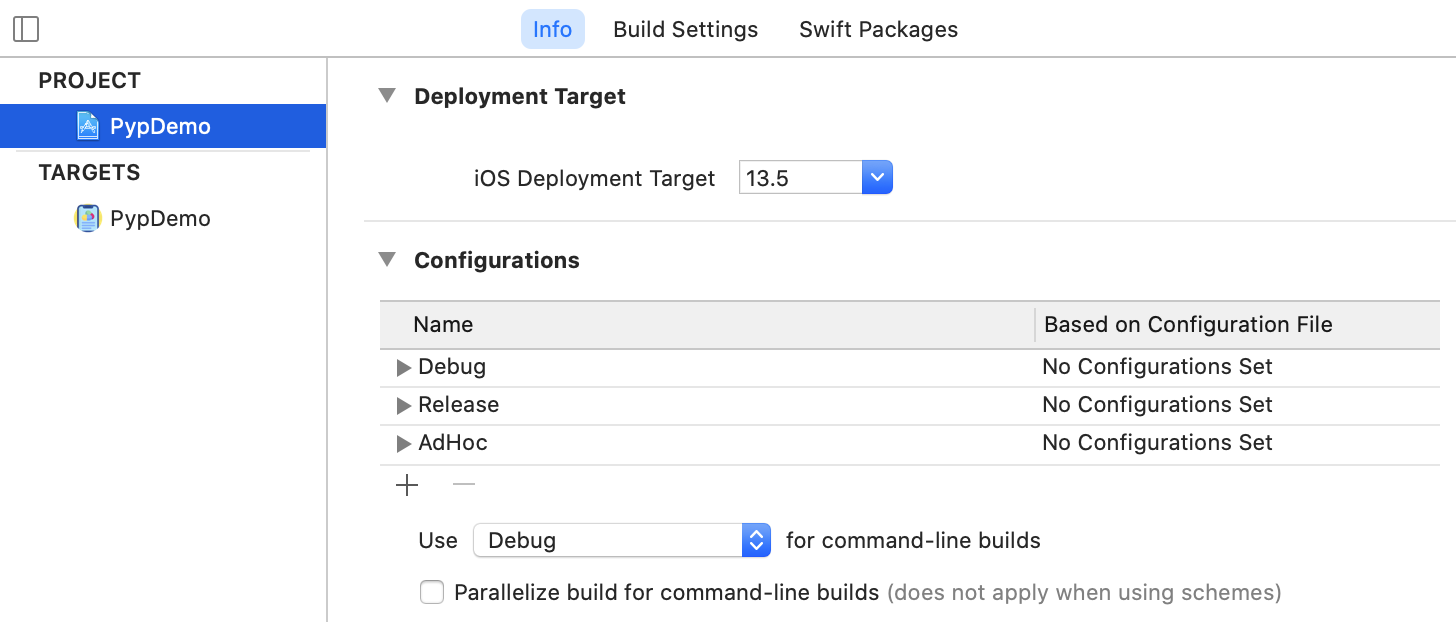
Add a new Ad Hoc configuration for generating ipa
- Open your Xcode and your project
- Choose: PROJECT → Info → Configuration → ”+“Button
- Choose: duplicate ”release“ configuration
- replace the new configuration's name with AdHoc
![]()
-
Change your Signing
- Choose: TARGETS → Signing&Capabilities → AdHoc → Signing
- Bundle Identifier: enter the ID you created before
- Provisioning Profile: choose the mobileprovision (Ad Hoc) file you added
- There should not be a warning **Status: Invalid trust settings **below. If so, please recheck your steps.
![]()
-
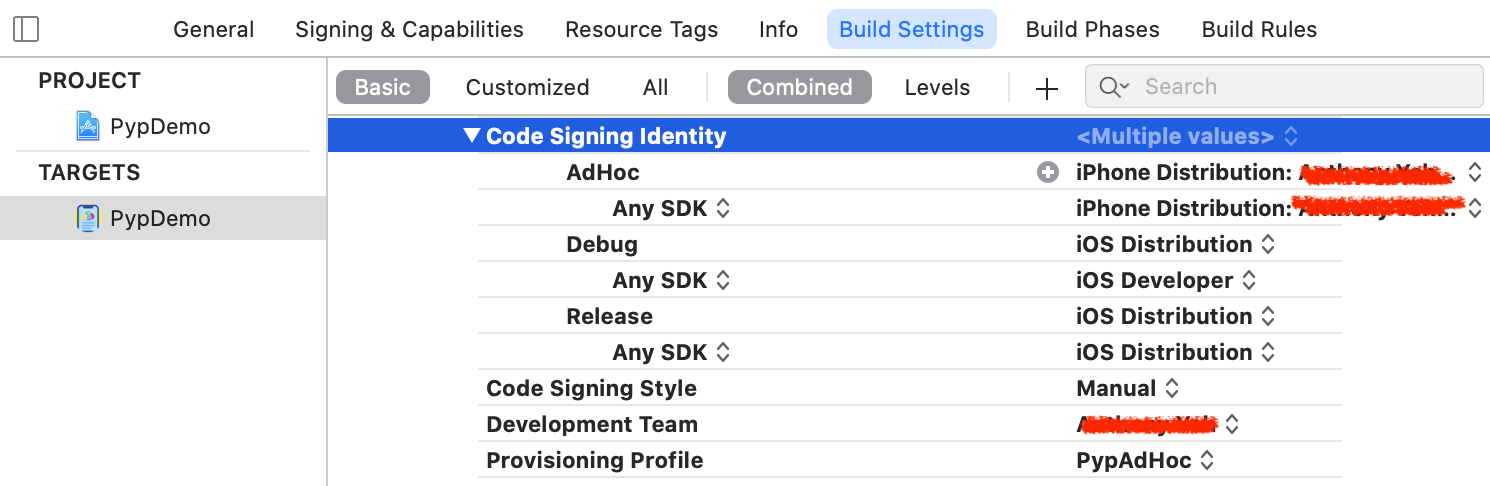
Change the project signing
- Choose: PROJECT → Build Settings → Signing (Basic+Combined)
- In AdHoc item, press the ”+“button, a Any SDK item will be added
- in these two item behind, please all choose the iPhone Distribution certificate you added to your keychain (the p12 file)
![]()
-
Change the target signing
- Choose: TARGET → Build Settings → Signing (Basic+Combined)
- In AdHoc and SDK these two items behind, please all choose the iPhone Distribution certificate as same as shown in step4
![]()
-
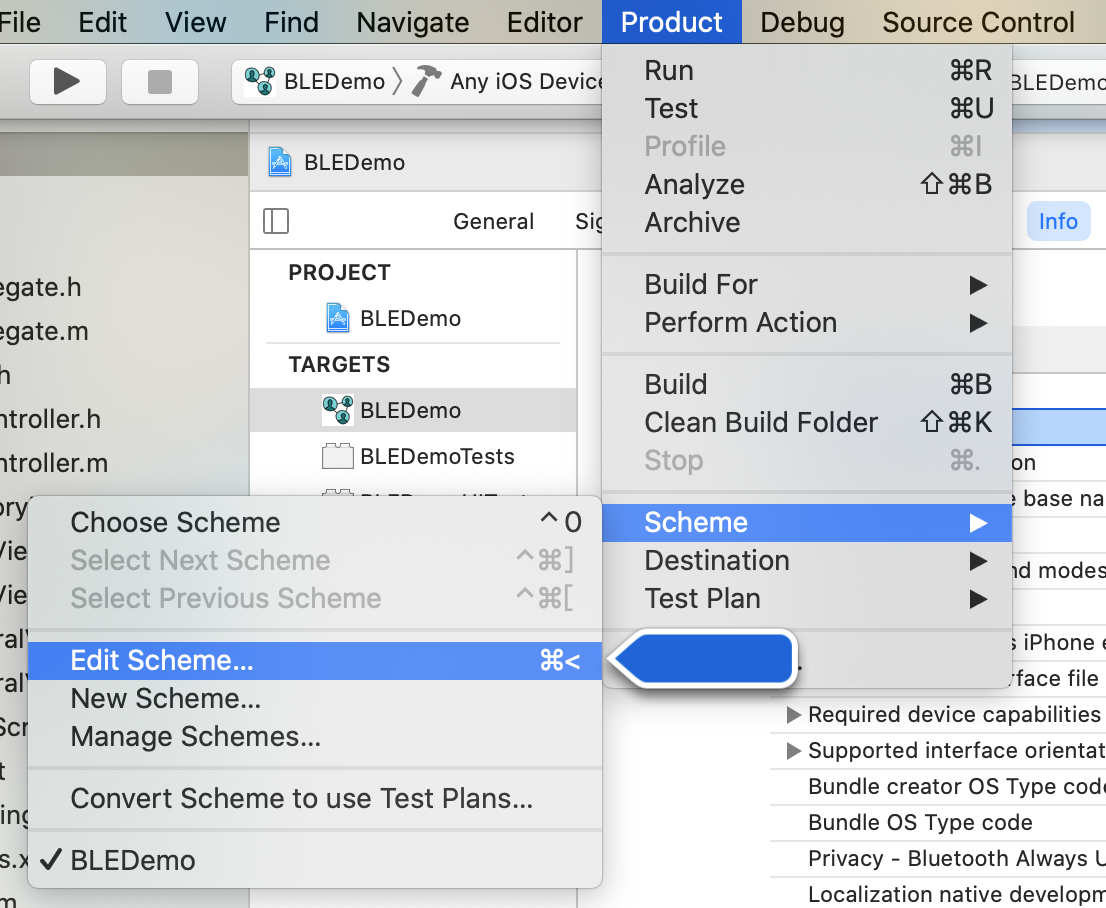
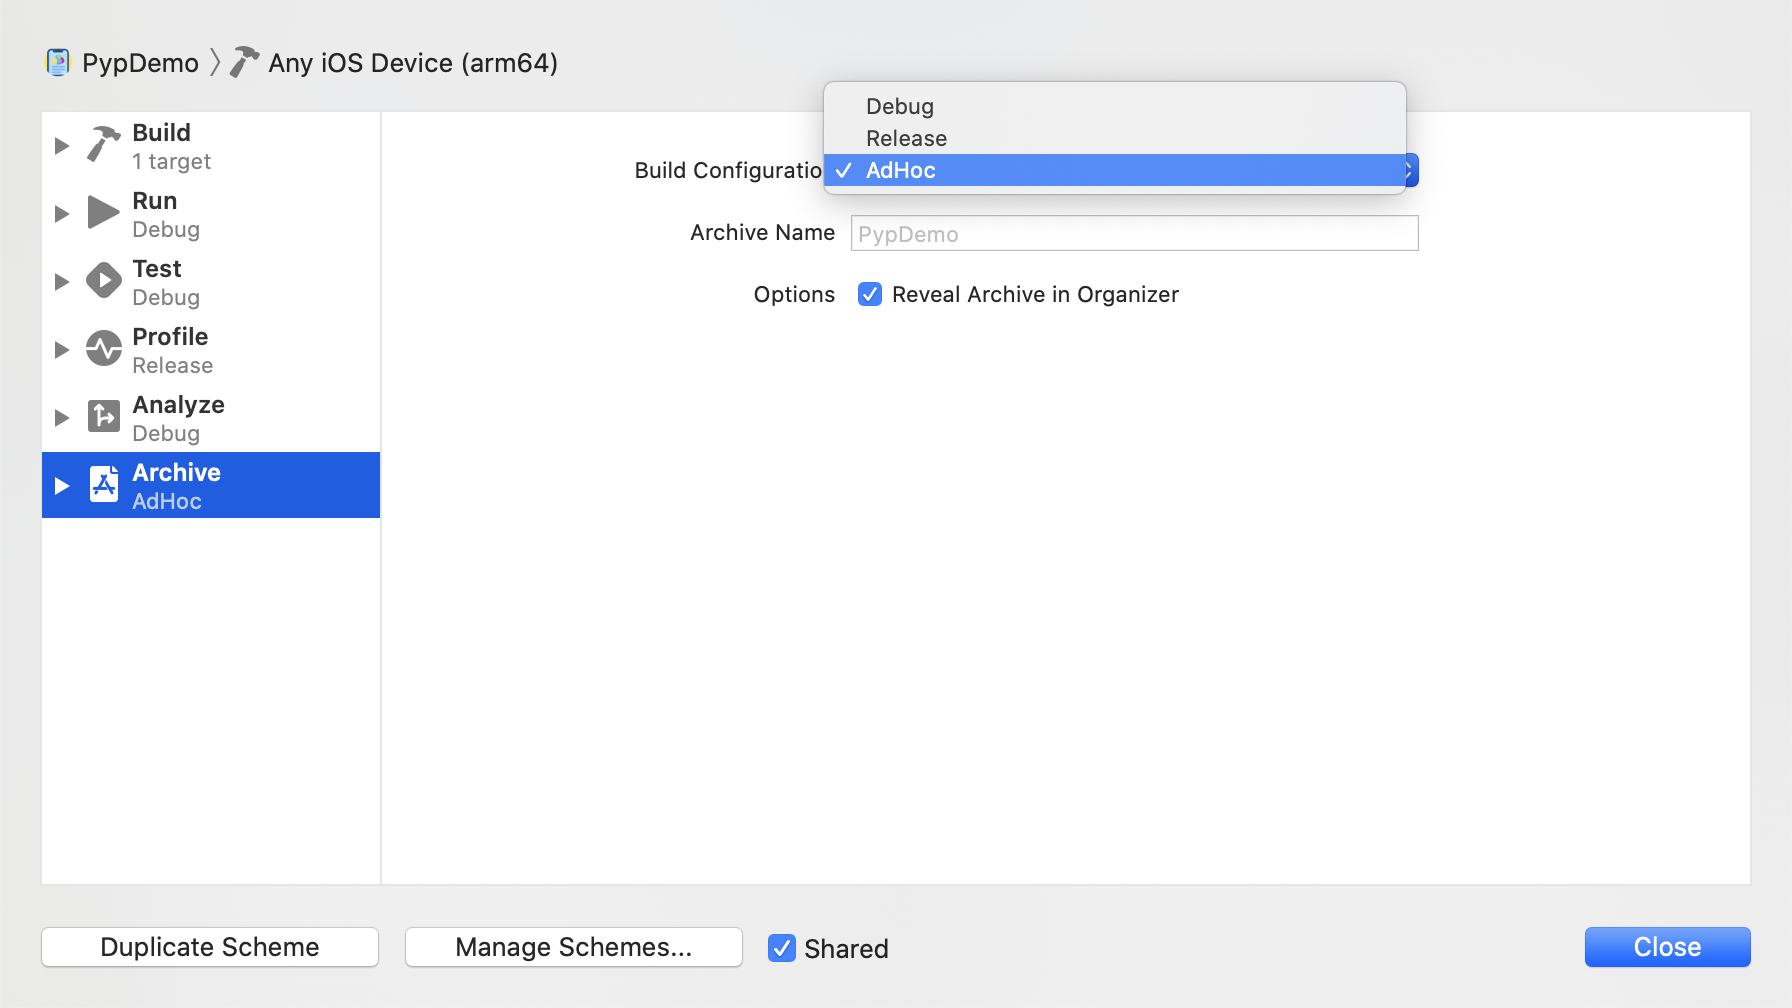
Edit Scheme
-
Choose: Product → Scheme → Edit Scheme
-
In the new window, choose: Archive → Build Configuration
-
Choose the AdHoc item
![]()
![]()
-
-
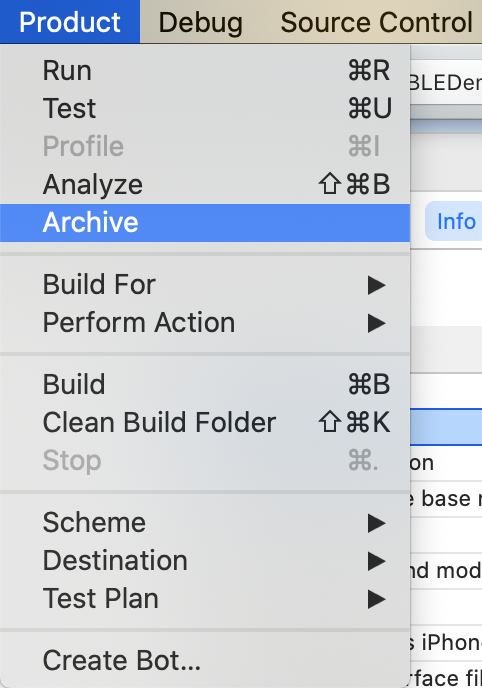
Start to achive
-
In build option, choose Any IOS Device(arm64)
![]()
-
Choose: Product → Achive
![]()
-
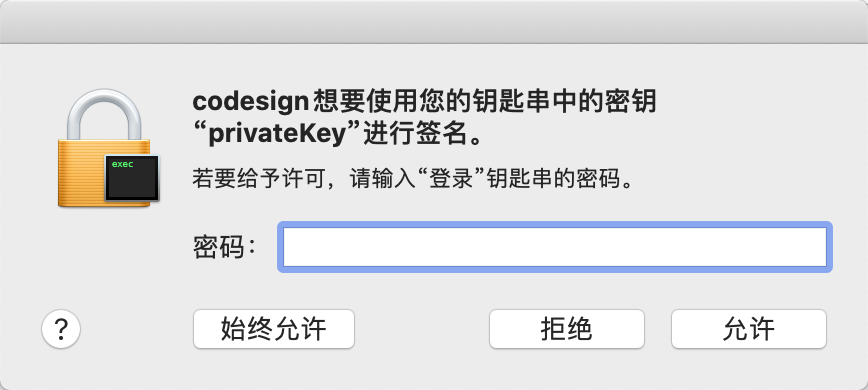
Please enter the password of your keychain(your MacOS computer password)
![]()
-
-
Generate the ipa
-
In the Organizer window, you can see the app is under generating
![]()
-
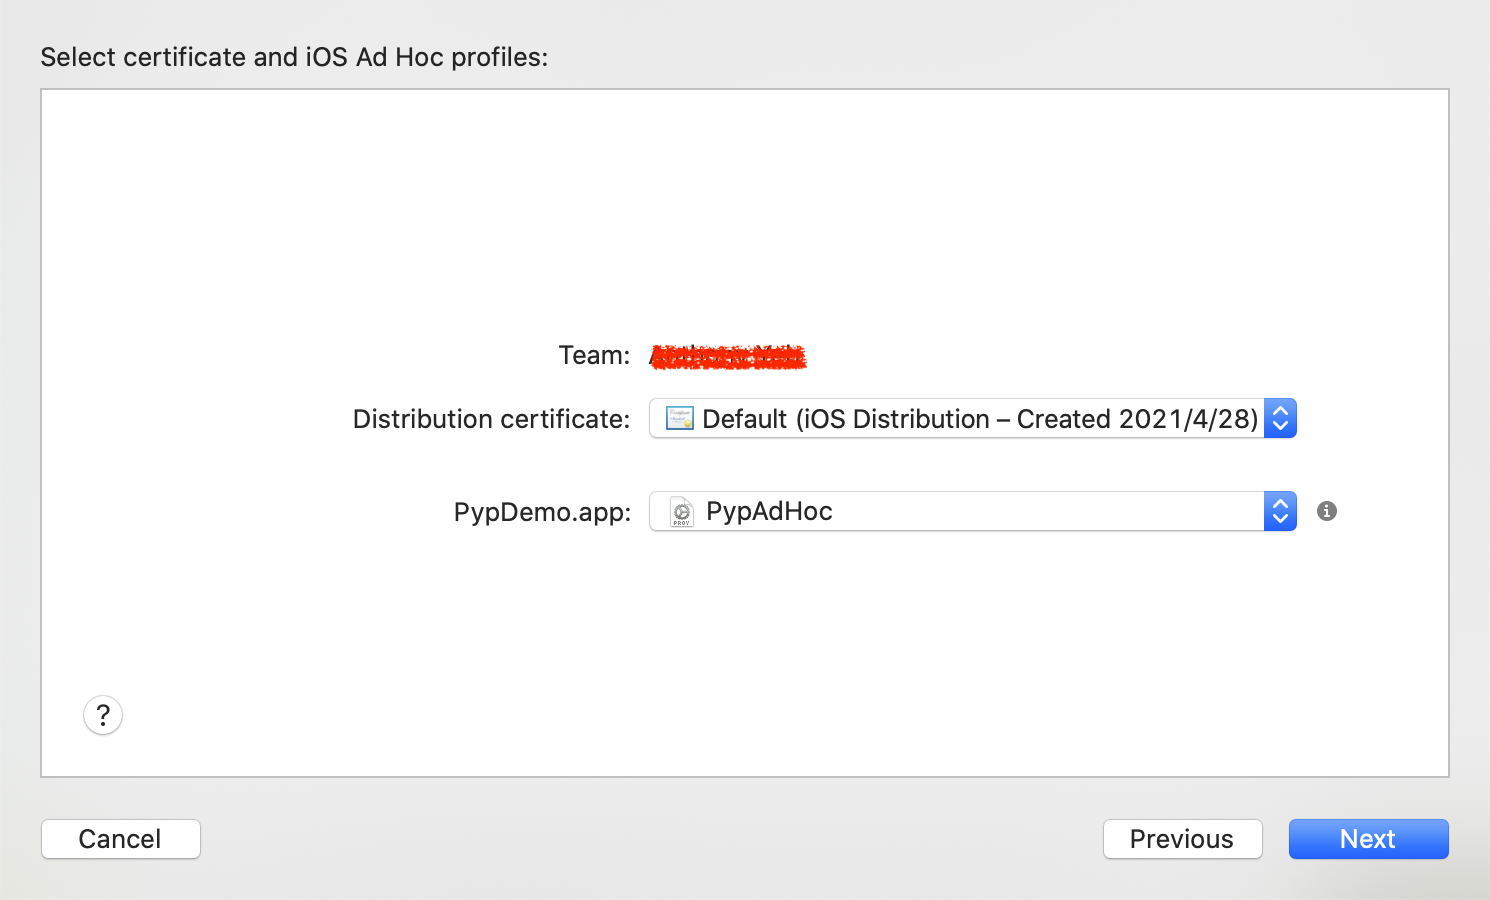
Click the Distribute App button, then choose Ad Hoc
-
Then press Next, in the next window, do not change the item and press Next
-
Then you see the default Distribution certificate is usable, you should choose the right mobileprovision file. There should not be a warning below (Profile doesn't include the selected signing certificate). If so, please recheck your steps.
![]()
-
Then press the Next button, in the new window that popped up you can export the ipa file. After Click the Export button, you should choose a path on your computer, then you press the Export button, you can find a file folder in this path, and the ipa file is in this folder.
![]()
-


4. Distribute your ipa through fir
You can distribute your ipa through the website of fir.im
Steps:
-
Login
Sign up an account of fir.im website. In addition, real-name authentication is required -
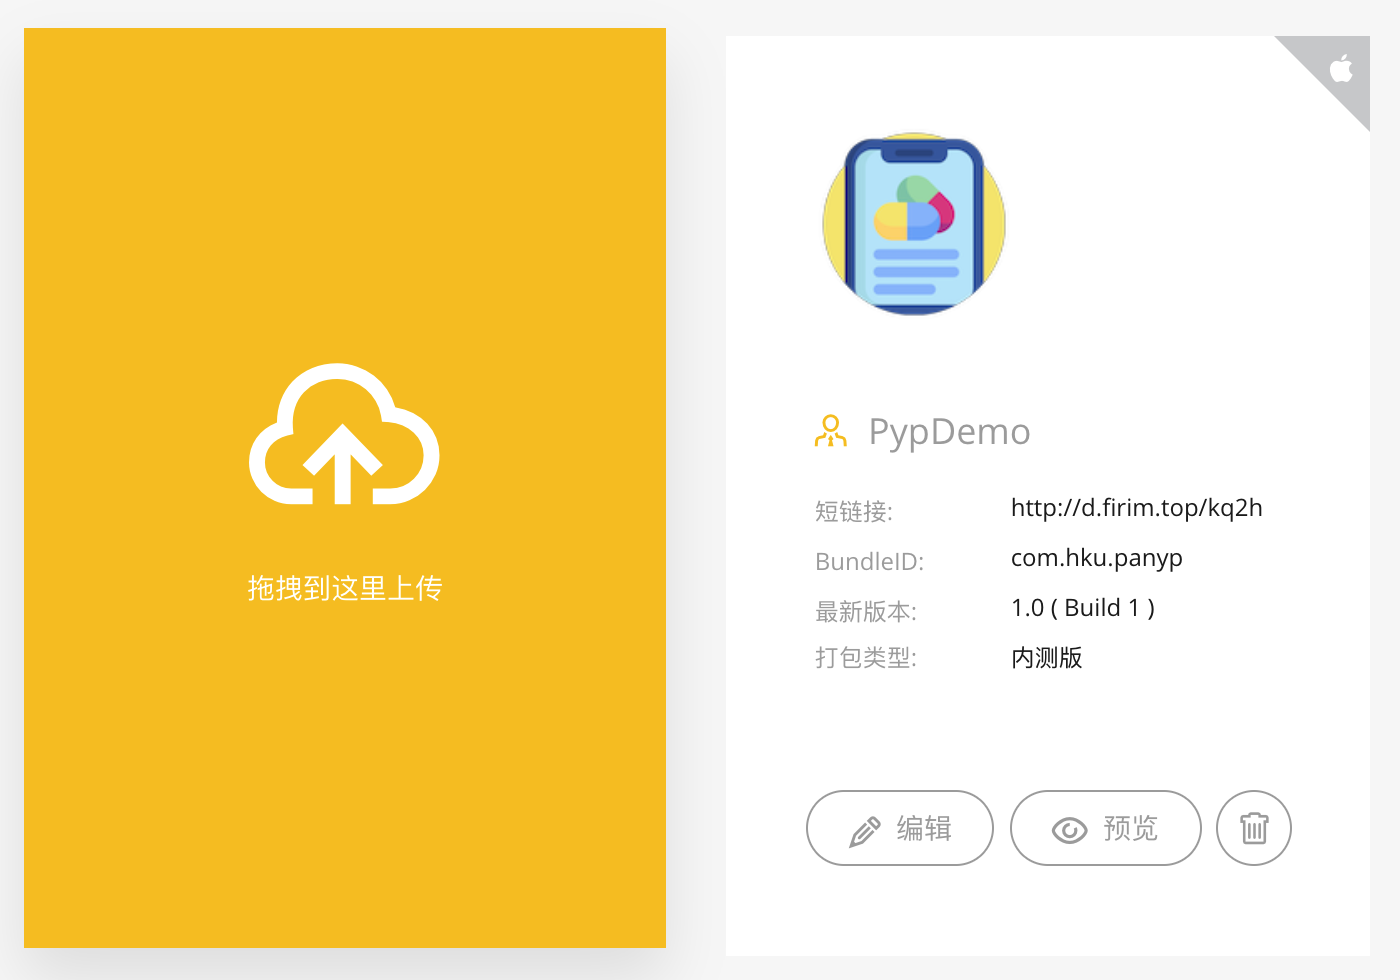
Upload
Login with your account and then just drag your ipa file into the page to upload it.
![]()
-
Generate the Link
The 短链接 can be used for distribution and downloading.

 浙公网安备 33010602011771号