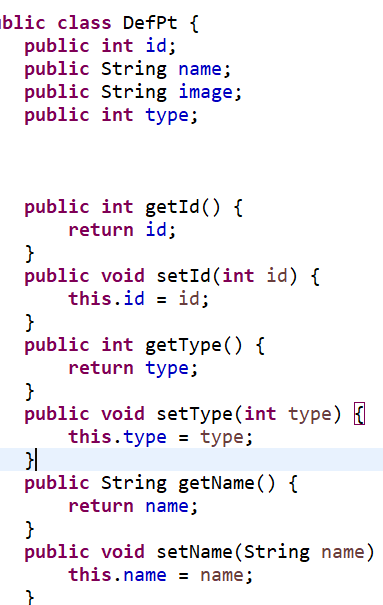
计划配置文件(除战役征服地图外)主要使用xml格式来保存,然后通过java的映射机制,作为类保存
xml配置示例:
<?xml version="1.0" encoding="UTF-8" standalone="yes"?>
<!--type -1固定 1海洋 0底图通用  2沙漠 3雪地 4草地 5泥地 6外星 7热带草地-->
<pts>
    <pt id="1" name="海洋" image="pt0.png" type="1"/>
    <pt id="2" name="底图" image="pt1.png" type="0"/>
    <pt id="3" name="浅草" image="pt2.png" type="4"/>
    <pt id="4" name="浅沙" image="pt3.png" type="2"/>
    <pt id="5" name="雪地" image="pt4.png" type="3"/>
    <pt id="6" name="月球" image="pt5.png" type="6"/>
    <pt id="7" name="浅泥" image="pt6.png" type="5"/>
    <pt id="8" name="深沙" image="pt7.png" type="2"/>
    <pt id="9" name="深泥" image="pt8.png" type="5"/>
    <pt id="10" name="深草" image="pt9.png" type="7"/>
    <pt id="11" name="砂石" image="pt10.png" type="5"/>
</pts>
类配置示例:

然后添加如下方法:
//泛型方法 根据传入的类型,返回list类型
    public static <T> List<T> getDaoListByClass(T item,String path) throws Exception{
        List<T> ts=new ArrayList<T>();
        Class clazz=item.getClass();
        XmlReader reader = new XmlReader();
        Element root = reader.parse(Gdx.files.internal(path));
        Array<Element> elements = root.getChildrenByNameRecursively(root.getChild(0).getName());
        //获得条目属性的数量,然后通过反射,把值给了类
        for (Element element : elements) {
            Field[] fieldName = clazz.getDeclaredFields();
            item = (T) clazz.newInstance();
            Class clazs=item.getClass();
            for(int i=0;i<fieldName.length;i++) {
                // 创建实例
                Field f  = clazs.getDeclaredField(fieldName[i].getName());
                    f.setAccessible(true);
                if (f.getType().getName().equals(String.class.getName())) {
                    String str=element.get(fieldName[i].getName());
                    f.set(item, str);
                }else if (f.getType().getName().equals(int.class.getName())) {
                    int str=element.getInt(fieldName[i].getName());
                    f.set(item, str);
                }else if (f.getType().getName().equals(float.class.getName())) {
                    float str=element.getFloat(fieldName[i].getName());
                    f.set(item, str);
                }else if (f.getType().getName().equals(boolean.class.getName())) {
                    boolean str=element.getBoolean(fieldName[i].getName());
                    f.set(item, str);
                }
            }
            ts.add(item);
            //ts.add(tempItem);
        }
        return ts;
    }
调用示例:
  //此示例功能为:用某种图案填充该pixmap到满
  // 使用前必须初始化 pixmap
    // ptId-->type -1固定 1海洋 0底图通用 2沙漠 3雪地 4草地 5泥地 6外星 7热带草地
    public static Pixmap coverImgByPtimgId(Pixmap pixmap, int ptId) {
        // 通过配置文件获取读取的pt
        DefPt defPt = new DefPt();
        List<DefPt> defPts = new ArrayList<DefPt>();
        try {
            defPts = GameUtils.getDaoListByClass(defPt, "config/def_pt.xml");
        } catch (Exception e) {
            e.printStackTrace();
        }
        String imgPtStr = null;
        for (int i = 0; i < defPts.size(); i++) {
            if (defPts.get(i).getId() == ptId) {
                imgPtStr = defPts.get(i).getImage();
                break;
            }
        }
        if (imgPtStr != null && pixmap != null) {
            // 获取图片资源
            Pixmap imgPt = new Pixmap(Gdx.files.internal("pixmap/pts/" + imgPtStr));
            // 获取目标长宽,并循环绘制
            int w = (int) ((pixmap.getWidth() / imgPt.getWidth()) + 1);
            int h = (int) ((pixmap.getHeight() / imgPt.getHeight()) + 1);
            int x = 0;
            int y = 0;
            int x_px;
            int y_px;
            int coverCount = w * h;
            // Gdx.app.log("地图底图开始构建", "w:" + w + " h:" + h );
            for (int i = 0; i < coverCount; i++) {
                x = i % w;
                y = (int) (i / w);
                x_px = x * imgPt.getWidth();
                y_px = y * imgPt.getHeight();
                // Gdx.app.log("地图底图开始构建", " id:" + i + " x:" + x + " y:" + y+ "
                // x_px:" + x_px + " y_px:" + y_px);
                pixmap.drawPixmap(imgPt, x_px, y_px, 0, 0, imgPt.getWidth(), imgPt.getHeight());
            }
            // 清除资源
            imgPt.dispose();
        }
        return pixmap;
    }
所有的配置文件都可以用该泛型方法处理为配置类,到游戏中使用


 浙公网安备 33010602011771号