【转】如何离线安装python的库及依赖库
文章来源:https://zhuanlan.zhihu.com/p/351494670
在线安装python的第三方库实在是简单的不能在简单了,在anaconda Prompt直接输入
pip install package这里我们先简单介绍下pip——— 一个python包安装与管理的软件
pip的基本功能
既然是一个包安装与管理软件,那么pip提供的功能基本就是:
#安装
pip install pandas
#卸载
pip uninstall pandas

#导出 freeze
pip freeze > requirement.txt

#显示 show/list
pip show pandas  ##列出包的具体信息
Name: pandas
Version: 1.0.5
#Summary: Powerful data structures for data analysis, time series, and statistics
#Home-page: https://pandas.pydata.org
#Author: None
#Author-email: None
#License: BSD
#Location: c:\users\zhangyang\anaconda3\lib\site-packages
#Requires: python-dateutil, numpy, pytz
#Required-by: statsmodels, seaborn

pip list         ##列出所有的包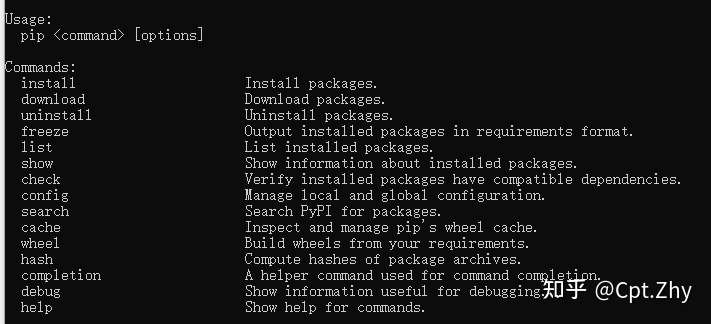
由上图可见,pip提供的功能还是蛮丰富的,只不过对于我们来讲,最常用的就是install,show,freeze。
除了这些基本的功能外,还有一些扩展的选项需要我们掌握,比如使用镜像源,通过txt文件批量安装等等:
pip install package -i https://pypi.mirrors.ustc.edu.cn/simple/   ##使用中科大镜像源
pip install -r requirement.txt  ##安装脚本里列出的库
更具体的一些细节大家可以百度也可以通过pip --help,pip install --help查看帮助。
离线安装python的库及依赖库
本篇文章的重点是解决在终端没办法联网的情况下怎么安装想安装的库呢?我们以pyinstaller这个库举例子。

如果仅安装pyinstaller的安装包,那么就会报错,大家注意到上图列出了pyinstaller的依赖库:future,macholib,setuptools,pefile,而且macholib也有个依赖库altgraph,结构如下。
- -pyinstaller
- ---future
- ---macholib
- ---altgraph
- ---setuptools
- ---pefile
我们的目标就是:一次性能够下载所需的全部的安装包!
其实解决的方式也很简单,就是运用pip的基本功能download,具体格式如下
pip download -d ./path pyinstaller -i https://pypi.mirrors.ustc.edu.cn/simple/<-d ./path>的意思是将下载的文件存放到当前目录下的path文件夹里面,<-i url>的意思是从中科大镜像源下载文件。完成后如下图:
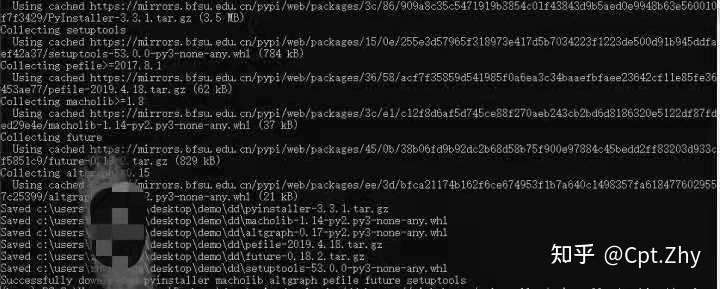
我们发现一共下载了五个安装包
正好是之前我们需要的库及所有依赖库以及依赖库的依赖库………………
那么当解决完下载后,最后一步就剩下安装了。
一个一个安装的话……也不是不可以,但我们有更好的方法:
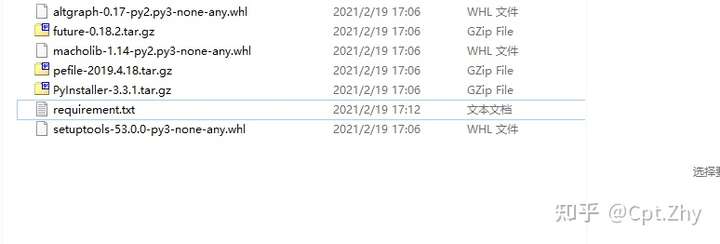
方法一:生成requirement.txt
pip install -r requirement.txt我们在这个文件夹下建一个requirement.txt,打开后将命令行上的
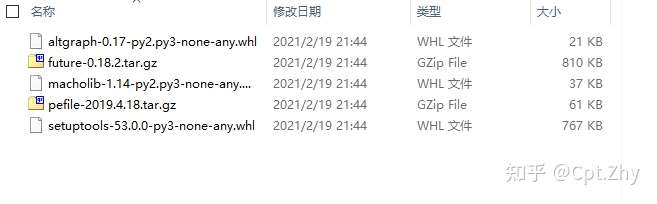
Saved c:\users\admin\desktop\demo\dd\pyinstaller-3.3.1.tar.gz
Saved c:\users\admin\desktop\demo\dd\macholib-1.14-py2.py3-none-any.whl
Saved c:\users\admin\desktop\demo\dd\altgraph-0.17-py2.py3-none-any.whl
Saved c:\users\admin\desktop\demo\dd\pefile-2019.4.18.tar.gz
Saved c:\users\admin\desktop\demo\dd\future-0.18.2.tar.gz
Saved c:\users\admin\desktop\demo\dd\setuptools-53.0.0-py3-none-any.whl
后面包文件名按照倒序的方式复制到文件夹内:
setuptools-53.0.0-py3-none-any.whl
future-0.18.2.tar.gz
pefile-2019.4.18.tar.gz
altgraph-0.17-py2.py3-none-any.whl
macholib-1.14-py2.py3-none-any.whl
pyinstaller-3.3.1.tar.gz
这个时候我们这个文件夹内就是这样的:
把这个文件夹考到离线的电脑上,在prompt里执行命令:
cd .\Desktop\path     ##先进入这个文件夹内
pip install -r requirement.txt    ##按照脚本内安装包的顺序安装库
方法二:使用本地索引依赖包(推荐)
pip提供了可以在本地目录搜索依赖包的选项,这样安装的好处是以前安装过的依赖包不会更新,避免出现升级带来的bug。
pip install --no-index --find-links=C:\Users\path\ pyinstaller大功告成!
补充:
关于pipdeptree和pipreqs。
pipdeptree可以列出一个库所需要的所有依赖库以及版本号,也可以列出哪些库依赖这个库。
首先是安装pipdeptree
pip install pipdeptree然后就是:
pipdeptree -p pyinstaller ##列出依赖库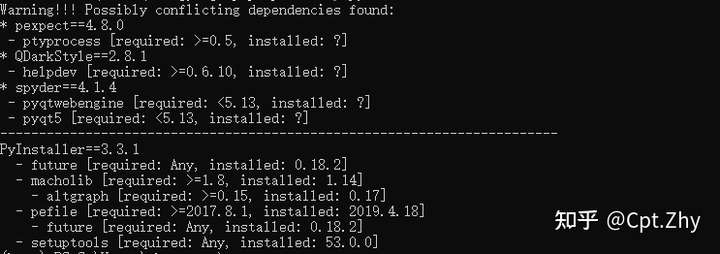
列出那些库依赖这些库
pipdeptree -p pyinstaller -rpipreqs主要是用来导出项目所需要的库
首先还是安装
pip install pipreqs之后:
# 使用步骤
1.在项目根目录下执行命令
pipreqs ./ # 报错就执行下面这条
pipreqs ./ --encoding=utf-8
2.可以看到生成了requirements.txt文件
3.执行下面代码就会把项目用到的所有组件装上
pip3 install -r requirements.txt

 浙公网安备 33010602011771号